
Operating Instructions
Page 3
Table of Contents Getting Started Sound Adjustment Step 1: Hooking up the system 4 Step 2: Setting up the speakers 7 Step 3: Setting the time 9 Step 4: Presetting radio stations ........ 10 Saving power in standby mode* ...34 Enjoying Dolby Pro Logic Surround sound 35 Playing a CD 13 Other Features Recording a CD 14 Using the Radio Data System Listening to the radio 15 (RDS 36 Recording from the radio 17 Singing along: Karaoke 38 F Playing a tape 18...DJ Effects Looping part of a CD 29 Flashing part of a CD 29 * For LBT-W900AV/XB800AV only ** For the European model only 3
Table of Contents Getting Started Sound Adjustment Step 1: Hooking up the system 4 Step 2: Setting up the speakers 7 Step 3: Setting the time 9 Step 4: Presetting radio stations ........ 10 Saving power in standby mode* ...34 Enjoying Dolby Pro Logic Surround sound 35 Playing a CD 13 Other Features Recording a CD 14 Using the Radio Data System Listening to the radio 15 (RDS 36 Recording from the radio 17 Singing along: Karaoke 38 F Playing a tape 18...DJ Effects Looping part of a CD 29 Flashing part of a CD 29 * For LBT-W900AV/XB800AV only ** For the European model only 3
Operating Instructions
Page 4
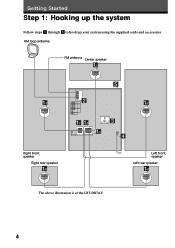
AM loop antenna FM antenna Center speaker Right front speaker Right rear speaker The above illustration is of the LBT-DR7AV. Getting Started Step 1: Hooking up the system Follow steps 1 through 5 to hook up your system using the supplied cords and accessories. Left front speaker Left rear speaker 4
AM loop antenna FM antenna Center speaker Right front speaker Right rear speaker The above illustration is of the LBT-DR7AV. Getting Started Step 1: Hooking up the system Follow steps 1 through 5 to hook up your system using the supplied cords and accessories. Left front speaker Left rear speaker 4
Operating Instructions
Page 5
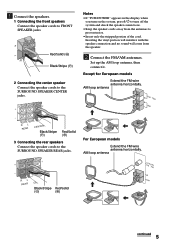
... jacks. Notes • If "PUSH POWER" appears in the display when you turn on the system, press 1/u to turn off the system and check the speaker connections. • Keep the speaker cords away from the speaker. 2 Connect the FM/AM antennas. AM loop antenna CFMOAX75IAL RL REAR CENTER AM Black/Stripe Red/Solid (') (') continued 5 Inserting...
... jacks. Notes • If "PUSH POWER" appears in the display when you turn on the system, press 1/u to turn off the system and check the speaker connections. • Keep the speaker cords away from the speaker. 2 Connect the FM/AM antennas. AM loop antenna CFMOAX75IAL RL REAR CENTER AM Black/Stripe Red/Solid (') (') continued 5 Inserting...
Operating Instructions
Page 6
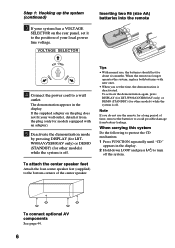
...time, remove the batteries to the position of the center speaker. 220V Tips • With normal use, the batteries should last for other models) while the system is off. Step 1: Hooking up the system (continued) 3 If your system has a VOLTAGE SELECTOR on the plug does not fit your...STANDBY) (for other models) while the system is deactivated. To connect optional AV components See page 44. 6 The demonstration appears in the display. 2 Hold down LOOP and press 1/u to a wall outlet. To activate the demonstration again, press DISPLAY (for LBT-W900AV/XB800AV only) or DEMO (STANDBY) (for...
...time, remove the batteries to the position of the center speaker. 220V Tips • With normal use, the batteries should last for other models) while the system is off. Step 1: Hooking up the system (continued) 3 If your system has a VOLTAGE SELECTOR on the plug does not fit your...STANDBY) (for other models) while the system is deactivated. To connect optional AV components See page 44. 6 The demonstration appears in the display. 2 Hold down LOOP and press 1/u to a wall outlet. To activate the demonstration again, press DISPLAY (for LBT-W900AV/XB800AV only) or DEMO (STANDBY) (for...
Operating Instructions
Page 7
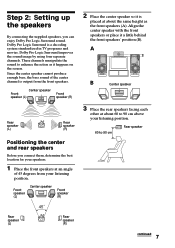
... speakers or place it is a decoding system standardized in TV programs and movies. Dolby Pro Logic Surround is placed at about the same height as it happens on the screen. Center speaker Front speaker (L) Front speaker (R) 2 Place the center speaker so it a little behind the front speakers' position (B). Front speaker (L) Center speaker Front speaker (R) 45 Rear speaker (L) Rear speaker (R) 3 Place the rear speakers...
... speakers or place it is a decoding system standardized in TV programs and movies. Dolby Pro Logic Surround is placed at about the same height as it happens on the screen. Center speaker Front speaker (L) Front speaker (R) 2 Place the center speaker so it a little behind the front speakers' position (B). Front speaker (L) Center speaker Front speaker (R) 45 Rear speaker (L) Rear speaker (R) 3 Place the rear speakers...

Operating Instructions
Page 8
The test tone is turned off. The test tone is heard from each speaker using the test tone that the system provides. 1 1/u (Power) VOLUME 1 Press PRO LOGIC. Step 2: Setting up . 2 Press T. TONE on the remote to adjust the volume levels. and REAR ...From your listening position, press CENTER LEVEL +/- on the remote), all the speaker volumes change. Adjust the volume of each speaker should be the same. 4 Press T. The indicator above this button lights up the speakers (continued) Adjusting the speaker volume To enjoy Dolby Pro Logic Surround sound, adjust the volume of the...
The test tone is turned off. The test tone is heard from each speaker using the test tone that the system provides. 1 1/u (Power) VOLUME 1 Press PRO LOGIC. Step 2: Setting up . 2 Press T. TONE on the remote to adjust the volume levels. and REAR ...From your listening position, press CENTER LEVEL +/- on the remote), all the speaker volumes change. Adjust the volume of each speaker should be the same. 4 Press T. The indicator above this button lights up the speakers (continued) Adjusting the speaker volume To enjoy Dolby Pro Logic Surround sound, adjust the volume of the...
Operating Instructions
Page 30
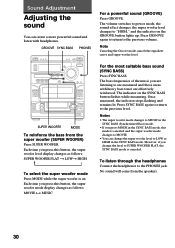
... the level to the previous volume. GROOVE SYNC BASS PHONES For a powerful sound (GROOVE) Press GROOVE. SUPER WOOFER MODE To reinforce the bass from the speakers. 30
... the level to the previous volume. GROOVE SYNC BASS PHONES For a powerful sound (GROOVE) Press GROOVE. SUPER WOOFER MODE To reinforce the bass from the speakers. 30
Operating Instructions
Page 35
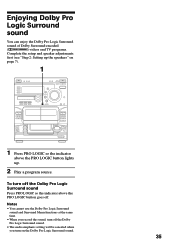
... canceled when you turn off the Dolby Pro Logic Surround sound Press PRO LOGIC so the indicator above the PRO LOGIC button lights up the speakers" on the Dolby Pro Logic Surround sound. 35 To turn on page 7). 1 1 Press PRO LOGIC so the indicator above the PRO LOGIC button goes off... Pro Logic Surround sound You can enjoy the Dolby Pro Logic Surround sound of Dolby Surround-encoded (q) videos and TV programs. Complete the setup and speaker adjustments first (see "Step 2: Setting up . 2 Play a program source.
... canceled when you turn off the Dolby Pro Logic Surround sound Press PRO LOGIC so the indicator above the PRO LOGIC button lights up the speakers" on the Dolby Pro Logic Surround sound. 35 To turn on page 7). 1 1 Press PRO LOGIC so the indicator above the PRO LOGIC button goes off... Pro Logic Surround sound You can enjoy the Dolby Pro Logic Surround sound of Dolby Surround-encoded (q) videos and TV programs. Complete the setup and speaker adjustments first (see "Step 2: Setting up . 2 Play a program source.
Operating Instructions
Page 40
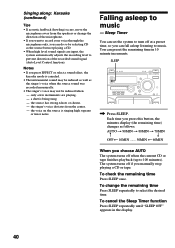
... has strong echoes or chorus. - To cancel the Sleep Timer function Press SLEEP repeatedly until "SLEEP OFF" appears in 10 minute increments. The system turns off when the current CD or tape finishes playback (up to prevent distortion of the recorded sound signal (Auto Level Control function). N Falling...when the source sound was recorded monaurally. • The singer's voice may not be reduced when: - the singer's voice deviates from the speakers or change the remaining time Press SLEEP repeatedly to select the desired time. Notes • If you can do so by selecting CD as ...
... has strong echoes or chorus. - To cancel the Sleep Timer function Press SLEEP repeatedly until "SLEEP OFF" appears in 10 minute increments. The system turns off when the current CD or tape finishes playback (up to prevent distortion of the recorded sound signal (Auto Level Control function). N Falling...when the source sound was recorded monaurally. • The singer's voice may not be reduced when: - the singer's voice deviates from the speakers or change the remaining time Press SLEEP repeatedly to select the desired time. Notes • If you can do so by selecting CD as ...
Operating Instructions
Page 44
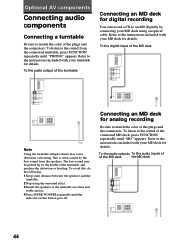
Refer to the instructions included with your MD deck using the surround effect. 3 Install the speakers or the turntable on a firm and stable surface. 4 Press SUPER WOOFER repeatedly until "PHONO" appears. To the audio outputs To the audio inputs of of ... the MD deck 44 To avoid this button goes off. The bass sound may cause distortion or howling. To listen to the sound from the speakers. To the digital input of the turntable Connecting an MD deck for digital recording You can record a CD to an MD digitally by connecting your...
Refer to the instructions included with your MD deck using the surround effect. 3 Install the speakers or the turntable on a firm and stable surface. 4 Press SUPER WOOFER repeatedly until "PHONO" appears. To the audio outputs To the audio inputs of of ... the MD deck 44 To avoid this button goes off. The bass sound may cause distortion or howling. To listen to the sound from the speakers. To the digital input of the turntable Connecting an MD deck for digital recording You can record a CD to an MD digitally by connecting your...
Operating Instructions
Page 50
... 41 and "Timer-recording radio programs" on page 9. - When using this stereo system, use the following procedures: - the sound is connected firmly and the speakers are connected. •Insert only the stripped portion of the cleaning cassette. the... •The headphones are connected correctly and firmly. "Step 4: Presetting radio stations" on the system (demonstration mode). •Press DISPLAY (for LBT-W900AV/ XB800AV) or DEMO (STANDBY) (for more than 90 minutes The tape is off. Otherwise the... is distorted - Should any problem persist, consult your nearest Sony dealer.
... 41 and "Timer-recording radio programs" on page 9. - When using this stereo system, use the following procedures: - the sound is connected firmly and the speakers are connected. •Insert only the stripped portion of the cleaning cassette. the... •The headphones are connected correctly and firmly. "Step 4: Presetting radio stations" on the system (demonstration mode). •Press DISPLAY (for LBT-W900AV/ XB800AV) or DEMO (STANDBY) (for more than 90 minutes The tape is off. Otherwise the... is distorted - Should any problem persist, consult your nearest Sony dealer.

Operating Instructions
Page 51
...Make sure the microphone is connected to the stereo system. There is acoustic feedback. • Decrease the volume level. • Move the microphone away from the speakers except the center speaker. •The source being played back has limited sound effects. Speakers There is in the display. • ... not start from only one channel or the left and right volumes are unbalanced. • Check the speaker connections and placement. Move the stereo system away from the rear speakers. •Set the REAR LEVEL to the appropriate level. CD Player The CD tray does not rotate....
...Make sure the microphone is connected to the stereo system. There is acoustic feedback. • Decrease the volume level. • Move the microphone away from the speakers except the center speaker. •The source being played back has limited sound effects. Speakers There is in the display. • ... not start from only one channel or the left and right volumes are unbalanced. • Check the speaker connections and placement. Move the stereo system away from the rear speakers. •Set the REAR LEVEL to the appropriate level. CD Player The CD tray does not rotate....
Operating Instructions
Page 52
...STEREO/MONO so "STEREO" appears in the display). •Adjust the antenna. •The signal strength is too weak. All the settings you made, such as follows: 1 Unplug the power cord. 2 Plug the power cord back in. 3 Press t/CLOCK SET, ENTER, and 1/u at 1 kHz, 10% THD) 52 Specifications Amplifier section LBT-W900AV Front Speaker...power output (Reference) 30 + 30 watts (16 ohms at the same time. Demagnetize them again. Connect an external antenna. The system is excessive wow or flutter, or the sound drops out. •The capstans or pinch rollers are cleared. There is reset to...
...STEREO/MONO so "STEREO" appears in the display). •Adjust the antenna. •The signal strength is too weak. All the settings you made, such as follows: 1 Unplug the power cord. 2 Plug the power cord back in. 3 Press t/CLOCK SET, ENTER, and 1/u at 1 kHz, 10% THD) 52 Specifications Amplifier section LBT-W900AV Front Speaker...power output (Reference) 30 + 30 watts (16 ohms at the same time. Demagnetize them again. Connect an external antenna. The system is excessive wow or flutter, or the sound drops out. •The capstans or pinch rollers are cleared. There is reset to...
Operating Instructions
Page 53
... 16 ohms (LBT-DR7AV/XB800AV) impedance 16 ohms Video section Inputs VIDEO1 IN (phono jacks): 1 V p-p, 75 ohms VIDEO2 IN (phono jacks): 1 V p-p, 75 ohms Output VIDEO OUT (phono jack):1 V p-p, 75 ohms CD player section System Compact disc and digital audio system Laser Semiconductor laser... (stereo phone jack): accepts headphones of 8 ohms or more VIDEO OUT (phono jack): voltage 250 mV, impedance 1 kilohm MD OUT (phono jacks): voltage 250 mV, impedance 1 kilohm (LBT-DR8AV/W900AV) WOOFER OUT (phono jack): voltage 1 V, impedance 1 kilohm FRONT SPEAKER: (LBT-W900AV/XB800AV...
... 16 ohms (LBT-DR7AV/XB800AV) impedance 16 ohms Video section Inputs VIDEO1 IN (phono jacks): 1 V p-p, 75 ohms VIDEO2 IN (phono jacks): 1 V p-p, 75 ohms Output VIDEO OUT (phono jack):1 V p-p, 75 ohms CD player section System Compact disc and digital audio system Laser Semiconductor laser... (stereo phone jack): accepts headphones of 8 ohms or more VIDEO OUT (phono jack): voltage 250 mV, impedance 1 kilohm MD OUT (phono jacks): voltage 250 mV, impedance 1 kilohm (LBT-DR8AV/W900AV) WOOFER OUT (phono jack): voltage 1 V, impedance 1 kilohm FRONT SPEAKER: (LBT-W900AV/XB800AV...
Operating Instructions
Page 54
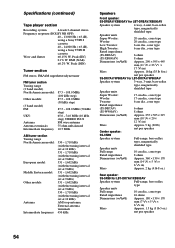
... 1/2 × 17 5/8 in) Mass Approx. 16 kg (35 lb 8oz.) net per speaker SS-DR7AV/W900AV for LBT-DR7AV/W900AV Speaker system 3-way, 3-unit, bass-reflex type, magnetically shielded type Speaker units Super Woofer: 17 cm dia., cone type Woofer: 17 cm dia., cone type Tweeter... net per speaker 54 RMS (NAB) ±0.2% W. Peak (IEC) 0.1% W. Specifications (continued) Tape player section Recording system 4-track 2-channel stereo Frequency response (DOLBY NR OFF) 40 - 13,000 Hz ( ±3 dB), using a Sony TYPE I cassette 40 - 14,000 Hz ( ±3 dB), using a Sony TYPE II ...
... 1/2 × 17 5/8 in) Mass Approx. 16 kg (35 lb 8oz.) net per speaker SS-DR7AV/W900AV for LBT-DR7AV/W900AV Speaker system 3-way, 3-unit, bass-reflex type, magnetically shielded type Speaker units Super Woofer: 17 cm dia., cone type Woofer: 17 cm dia., cone type Tweeter... net per speaker 54 RMS (NAB) ±0.2% W. Peak (IEC) 0.1% W. Specifications (continued) Tape player section Recording system 4-track 2-channel stereo Frequency response (DOLBY NR OFF) 40 - 13,000 Hz ( ±3 dB), using a Sony TYPE I cassette 40 - 14,000 Hz ( ±3 dB), using a Sony TYPE II ...
Operating Instructions
Page 55
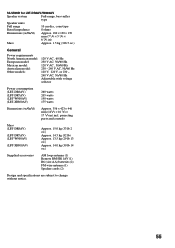
....) Supplied accessories AM loop antenna (1) Remote RM-SR11AV (1) R6 (size AA) batteries (2) FM wire antenna (1) Speaker cords (2) Design and specifications are subject to change without notice. 55 SS-SR99D for LBT-DR8AV/W900AV Speaker system Full-range, bass-reflex type Speaker units Full range 10 cm dia., cone type Rated impedance 8 ohms Dimensions (w/h/d) Approx. 180 ×...
....) Supplied accessories AM loop antenna (1) Remote RM-SR11AV (1) R6 (size AA) batteries (2) FM wire antenna (1) Speaker cords (2) Design and specifications are subject to change without notice. 55 SS-SR99D for LBT-DR8AV/W900AV Speaker system Full-range, bass-reflex type Speaker units Full range 10 cm dia., cone type Rated impedance 8 ohms Dimensions (w/h/d) Approx. 180 ×...
Operating Instructions
Page 56
... 21, 32 Dolby Pro Logic Surround 35 DSP 33 Dubbing 20 DVD 47 F, G Flash 29 H, I, J Hooking up optional components 44 speakers 5 the antennas 5, 48 the power 6 the system 4 K Karaoke 38 to reduce the vocals (KARAOKE PON) 39 to sing along with a multiplex CD or tape (MPX R/MPX L) 39... a tape manually 26 selecting tape length automatically 28 timer-recording 42 Repeat Play 22 Resetting the system 52 S Saving power 11 Saving recordings 49 Setting the time 9 Shuffle Play 22 Sleep Timer 40 Sound adjustment 30 Speakers 5, 7 Surround effect 33 Surround menu 33 SYNC BASS 30 SYNC EQ 31 T, U, V, W, X,...
... 21, 32 Dolby Pro Logic Surround 35 DSP 33 Dubbing 20 DVD 47 F, G Flash 29 H, I, J Hooking up optional components 44 speakers 5 the antennas 5, 48 the power 6 the system 4 K Karaoke 38 to reduce the vocals (KARAOKE PON) 39 to sing along with a multiplex CD or tape (MPX R/MPX L) 39... a tape manually 26 selecting tape length automatically 28 timer-recording 42 Repeat Play 22 Resetting the system 52 S Saving power 11 Saving recordings 49 Setting the time 9 Shuffle Play 22 Sleep Timer 40 Sound adjustment 30 Speakers 5, 7 Surround effect 33 Surround menu 33 SYNC BASS 30 SYNC EQ 31 T, U, V, W, X,...


