Operating Instructions
Page 4
... limits are cautioned that this product. For more of correctly, you purchased the product. This equipment generates, uses and can be determined by turning the equipment off and on, the user is connected. Consult the dealer or an experienced radio/TV technician for the environment and human health, which the receiver is encouraged to try to correct...
... limits are cautioned that this product. For more of correctly, you purchased the product. This equipment generates, uses and can be determined by turning the equipment off and on, the user is connected. Consult the dealer or an experienced radio/TV technician for the environment and human health, which the receiver is encouraged to try to correct...
Operating Instructions
Page 5
... remove the battery from the actual display. DivX video files can only be played back on MHC-GZR33Di. MPEG4 video files can view any video files (including MPEG4 video files) on LBT-LCD7Di, when files are for models MHC-GZR33Di and LBTLCD7Di. On certain batteries this battery should be replaced by inappropriate waste handling of the following components. To ensure that the battery will help...
... remove the battery from the actual display. DivX video files can only be played back on MHC-GZR33Di. MPEG4 video files can view any video files (including MPEG4 video files) on LBT-LCD7Di, when files are for models MHC-GZR33Di and LBTLCD7Di. On certain batteries this battery should be replaced by inappropriate waste handling of the following components. To ensure that the battery will help...
Operating Instructions
Page 6
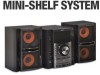
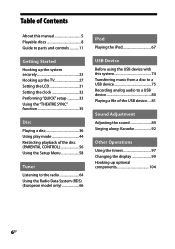
... Disc Playing a disc 36 Using play mode 44 Restricting playback of the disc (PARENTAL CONTROL 56 Using the Setup Menu 58 Tuner Listening to the radio 64 Using the Radio Data System (RDS) (European model only 66 iPod Playing the iPod 67 USB Device Before using the USB device with this system 74 Transferring music from a disc to a USB device 75 Recording analog audio to a USB device 80 Playing a file of the USB device.....81 Sound Adjustment Adjusting the sound 89 Singing along: Karaoke 92 Other Operations Using the timers 97 Changing the display 99 Hooking...
... Disc Playing a disc 36 Using play mode 44 Restricting playback of the disc (PARENTAL CONTROL 56 Using the Setup Menu 58 Tuner Listening to the radio 64 Using the Radio Data System (RDS) (European model only 66 iPod Playing the iPod 67 USB Device Before using the USB device with this system 74 Transferring music from a disc to a USB device 75 Recording analog audio to a USB device 80 Playing a file of the USB device.....81 Sound Adjustment Adjusting the sound 89 Singing along: Karaoke 92 Other Operations Using the timers 97 Changing the display 99 Hooking...
Operating Instructions
Page 12
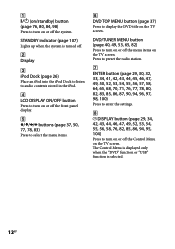
... an iPod into the iPod Dock to listen to audio contents stored in the iPod. LCD DISPLAY ON/OFF button Press to turn on or off the front panel display. buttons (page 37, 50, 77, 78, 83) Press to select the menu items. DVD TOP MENU button (page 37) Press to display the DVD title on or off the system. Press to preset the radio station. ENTER button...
... an iPod into the iPod Dock to listen to audio contents stored in the iPod. LCD DISPLAY ON/OFF button Press to turn on or off the front panel display. buttons (page 37, 50, 77, 78, 83) Press to select the menu items. DVD TOP MENU button (page 37) Press to display the DVD title on or off the system. Press to preset the radio station. ENTER button...

Operating Instructions
Page 17
... or video file. The Control Menu is displayed only when the "DVD" function or "USB" function is selected. PRESET + button (page 65) Press to select the preset station. (go forward) button (page 35, 37, 42, 51, 68, 71, 84, 100) Press to select the playback source or transferring destination on a Sony Ericsson mobile phone. Guide to parts and controls SUBTITLE button (page 38) Press to turn...
... or video file. The Control Menu is displayed only when the "DVD" function or "USB" function is selected. PRESET + button (page 65) Press to select the preset station. (go forward) button (page 35, 37, 42, 51, 68, 71, 84, 100) Press to select the playback source or transferring destination on a Sony Ericsson mobile phone. Guide to parts and controls SUBTITLE button (page 38) Press to turn...
Operating Instructions
Page 20
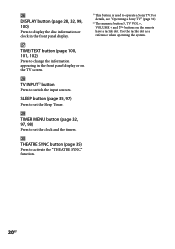
... front panel display or on the remote have a tactile dot. SLEEP button (page 35, 97) Press to set the Sleep Timer. TIMER MENU button (page 32, 97, 98) Press to set the clock and the timers. THEATRE SYNC button (page 35) Press to activate the "THEATRE SYNC" function. 1) This button is used to switch the input sources. For details, see "Operating a Sony TV" (page 31). 2) The numeric button 5, TV VOL +, VOLUME + and buttons...
... front panel display or on the remote have a tactile dot. SLEEP button (page 35, 97) Press to set the Sleep Timer. TIMER MENU button (page 32, 97, 98) Press to set the clock and the timers. THEATRE SYNC button (page 35) Press to activate the "THEATRE SYNC" function. 1) This button is used to switch the input sources. For details, see "Operating a Sony TV" (page 31). 2) The numeric button 5, TV VOL +, VOLUME + and buttons...
Operating Instructions
Page 39
... open the disc tray. you change the function. you change the settings in the Setup Menu. you changed the "PARENTAL CONTROL" level. You cannot search for a still picture on a DVD-R/-RW in VR mode. You may not be able to use the Instant Replay or Instant Advance function in Repeat Play mode or with some scenes. Depending on the DVD VIDEO...
... open the disc tray. you change the function. you change the settings in the Setup Menu. you changed the "PARENTAL CONTROL" level. You cannot search for a still picture on a DVD-R/-RW in VR mode. You may not be able to use the Instant Replay or Instant Advance function in Repeat Play mode or with some scenes. Depending on the DVD VIDEO...
Operating Instructions
Page 57
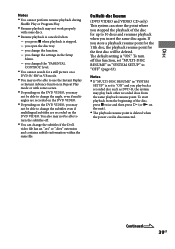
... a new 4-digit password using the numeric buttons, then press ENTER. 4 To confirm your 4-digit password using the numeric buttons, then press ENTER. The lower the value, the stricter the limitation. To turn off the "PARENTAL CONTROL" function Set "LEVEL" to select "LEVEL," then press ENTER. When you select "OTHERS ," enter the area code for "LEVEL" appear on the TV screen. 7 Press ...
... a new 4-digit password using the numeric buttons, then press ENTER. 4 To confirm your 4-digit password using the numeric buttons, then press ENTER. The lower the value, the stricter the limitation. To turn off the "PARENTAL CONTROL" function Set "LEVEL" to select "LEVEL," then press ENTER. When you select "OTHERS ," enter the area code for "LEVEL" appear on the TV screen. 7 Press ...
Operating Instructions
Page 63
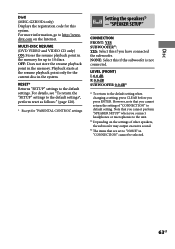
... starts at the resume playback point only for "PARENTAL CONTROL" settings Setting the speakers1) "SPEAKER SETUP" CONNECTION FRONT: YES SUBWOOFER2): YES: Select this if you cannot return the setting of other speakers, the subwoofer may output excessive sound. 3) The items that you have connected the subwoofer. LEVEL (FRONT) L 0.0 dB R 0.0 dB SUBWOOFER 0.0 dB3) 1) To return to http://www. NONE: Select this system. MULTI-DISC RESUME (DVD VIDEO and VIDEO CD only...
... starts at the resume playback point only for "PARENTAL CONTROL" settings Setting the speakers1) "SPEAKER SETUP" CONNECTION FRONT: YES SUBWOOFER2): YES: Select this if you cannot return the setting of other speakers, the subwoofer may output excessive sound. 3) The items that you have connected the subwoofer. LEVEL (FRONT) L 0.0 dB R 0.0 dB SUBWOOFER 0.0 dB3) 1) To return to http://www. NONE: Select this system. MULTI-DISC RESUME (DVD VIDEO and VIDEO CD only...
Operating Instructions
Page 67
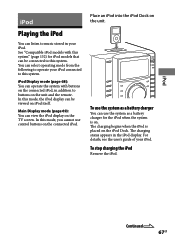
... use the system as a battery charger You can use control buttons on the unit and the remote. To stop charging the iPod Remove the iPod. Continued 67GB You can select operating mode from the following to operate your iPod connected to buttons on the connected iPod. In this mode, you cannot use the system as a battery charger for iPod models that can be viewed on the iPod Dock. iPod Display mode (page 68): You can operate the system with this system...
... use the system as a battery charger You can use control buttons on the unit and the remote. To stop charging the iPod Remove the iPod. Continued 67GB You can select operating mode from the following to operate your iPod connected to buttons on the connected iPod. In this mode, you cannot use the system as a battery charger for iPod models that can be viewed on the iPod Dock. iPod Display mode (page 68): You can operate the system with this system...
Operating Instructions
Page 69
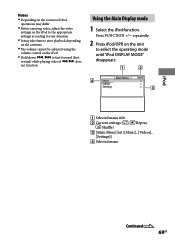
.... The volume cannot be adjusted using the volume control on the unit to fast-forward (fastrewind) while playing video if / does not function. Press FUNCTION +/ repeatedly. 2 Press iPod/OPR on the iPod. Hold down / to select the operating mode until "iPod DISPLAY MODE" disappears. Selected menu title Current settings ( , Repeat, Shuffle) [Main Menu] list ([Music], [Videos], [Settings]) Selected menu Continued...
.... The volume cannot be adjusted using the volume control on the unit to fast-forward (fastrewind) while playing video if / does not function. Press FUNCTION +/ repeatedly. 2 Press iPod/OPR on the iPod. Hold down / to select the operating mode until "iPod DISPLAY MODE" disappears. Selected menu title Current settings ( , Repeat, Shuffle) [Main Menu] list ([Music], [Videos], [Settings]) Selected menu Continued...
Operating Instructions
Page 97
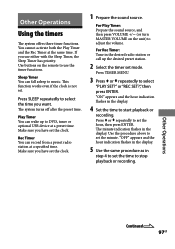
... preset station. 2 Select the timer set mode. Make sure you want. Other Operations Continued 97GB Rec Timer You can record from a preset radio station at a preset time. "OFF" appears and the hour indication flashes in the display. 5 Use the same procedure as in the display. 4 Set the time to music. Other Operations Using the timers The system offers three timer functions. Use buttons on the unit) to DVD, tuner or optional USB device at a specified time. This function works even if the clock...
... preset station. 2 Select the timer set mode. Make sure you want. Other Operations Continued 97GB Rec Timer You can record from a preset radio station at a preset time. "OFF" appears and the hour indication flashes in the display. 5 Use the same procedure as in the display. 4 Set the time to music. Other Operations Using the timers The system offers three timer functions. Use buttons on the unit) to DVD, tuner or optional USB device at a specified time. This function works even if the clock...
Operating Instructions
Page 105
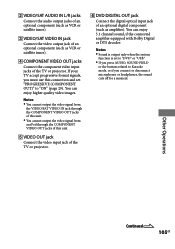
... an iPod through the COMPONENT VIDEO OUT jacks of this connection and set to "DVD" or "USB." If you press AUDIO, SOUND FIELD or the buttons related to "ON" (page 29). Notes Sound is output only when the system function is set "PROGRESSIVE (COMPONENT OUT)" to Karaoke mode, or if you must use this unit. VIDEO OUT jack Connect the video input jack of the TV or projector. DVD DIGITAL OUT jack Connect the digital optical input jack...
... an iPod through the COMPONENT VIDEO OUT jacks of this connection and set to "DVD" or "USB." If you press AUDIO, SOUND FIELD or the buttons related to "ON" (page 29). Notes Sound is output only when the system function is set "PROGRESSIVE (COMPONENT OUT)" to Karaoke mode, or if you must use this unit. VIDEO OUT jack Connect the video input jack of the TV or projector. DVD DIGITAL OUT jack Connect the digital optical input jack...
Operating Instructions
Page 112
... MODE: OFF" appears in Dolby Digital or MPEG audio format. If not, update the iPod before using with the latest software. The sound is playing music. Adjust the volume. It may take time to MPEG4 Simple Profile. The disc title, CD-TEXT and DVD-TEXT characters do not appear properly. The disc is connected properly. Check the speaker connection (page 23). iPod There is no sound. Make sure...
... MODE: OFF" appears in Dolby Digital or MPEG audio format. If not, update the iPod before using with the latest software. The sound is playing music. Adjust the volume. It may take time to MPEG4 Simple Profile. The disc title, CD-TEXT and DVD-TEXT characters do not appear properly. The disc is connected properly. Check the speaker connection (page 23). iPod There is no sound. Make sure...
Operating Instructions
Page 113
If the USB device has a power switch, turn the USB device off the system and remove the USB device. USB device You cannot start transferring or recording to a USB device. The following problems may have occurred. The USB device is not formatted correctly. Refer to the operating instructions supplied with this system" (page 130) for the supported device types. The USB device is full. The number of your iPod.) Check that the operating mode is finished. ...
If the USB device has a power switch, turn the USB device off the system and remove the USB device. USB device You cannot start transferring or recording to a USB device. The following problems may have occurred. The USB device is not formatted correctly. Refer to the operating instructions supplied with this system" (page 130) for the supported device types. The USB device is full. The number of your iPod.) Check that the operating mode is finished. ...
Operating Instructions
Page 119
... from the speaker cords and the power cord as far away from the display. A stereo FM program cannot be changed. Multi-angles are firmly inserted all the way. Turn on the DVD VIDEO being played back. The DVD VIDEO prohibits changing the angles. Tuner The radio presetting is canceled. The power cord is no sound." (page 107) and check the condition of the system. Connect the component properly (page...
... from the speaker cords and the power cord as far away from the display. A stereo FM program cannot be changed. Multi-angles are firmly inserted all the way. Turn on the DVD VIDEO being played back. The DVD VIDEO prohibits changing the angles. Tuner The radio presetting is canceled. The power cord is no sound." (page 107) and check the condition of the system. Connect the component properly (page...

Operating Instructions
Page 120
... operate properly after performing the above measures or other troubles not described above occur, reset the system as follows: Use buttons on the unit to reset the system to its factory default settings. 1 Unplug the power cord. 2 Plug the power cord back in. 3 Press to the default settings*, perform reset as the preset stations, clock and timer. Do not press when resetting the system. * Except for the "SETUP" settings...
... operate properly after performing the above measures or other troubles not described above occur, reset the system as follows: Use buttons on the unit to reset the system to its factory default settings. 1 Unplug the power cord. 2 Plug the power cord back in. 3 Press to the default settings*, perform reset as the preset stations, clock and timer. Do not press when resetting the system. * Except for the "SETUP" settings...
Operating Instructions
Page 125
... disconnect the power cord (mains lead) from a cold to a warm location or is placed in a very damp room, moisture may not be used for an extended period of the copyright holders. In this limit requires permission of time. Please be aware that the operating voltage of the music beyond this situation, remove the disc, and leave the system turned on for...
... disconnect the power cord (mains lead) from a cold to a warm location or is placed in a very damp room, moisture may not be used for an extended period of the copyright holders. In this limit requires permission of time. Please be aware that the operating voltage of the music beyond this situation, remove the disc, and leave the system turned on for...
Operating Instructions
Page 126
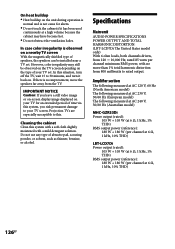
... on-screen display image displayed on your TV for alarm. Do not touch the cabinet if it back on. Specifications Main unit AUDIO POWER SPECIFICATIONS POWER OUTPUT AND TOTAL HARMONIC DISTORTION: (LBT-LCD7Di The United States model only) With 6 ohm loads, both channels driven, from the TV. If there is no more than 1% total harmonic distortion from 800 milliwatts to 30 minutes, and turn...
... on-screen display image displayed on your TV for alarm. Do not touch the cabinet if it back on. Specifications Main unit AUDIO POWER SPECIFICATIONS POWER OUTPUT AND TOTAL HARMONIC DISTORTION: (LBT-LCD7Di The United States model only) With 6 ohm loads, both channels driven, from the TV. If there is no more than 1% total harmonic distortion from 800 milliwatts to 30 minutes, and turn...
Operating Instructions
Page 127
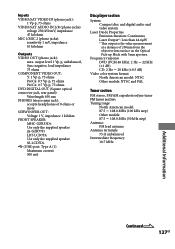
.../Cr: 0.7 Vp-p, 75 ohms DVD DIGITAL OUT (Square optical connector jack, rear panel): Wavelength 650 nm PHONES (stereo mini jack): accepts headphones of 200mm from the objective lens surface on the Optical Pick-up Block with 7mm aperture. LBT-LCD7Di: Use only the supplied speaker SS‑LCD7Di. (USB) port: Type A (1) Maximum current: 500 mA Disc player section System: Compact disc and digital audio and video system Laser Diode Properties Emission duration: Continuous Laser Output*: Less than 44.6µW * This...
.../Cr: 0.7 Vp-p, 75 ohms DVD DIGITAL OUT (Square optical connector jack, rear panel): Wavelength 650 nm PHONES (stereo mini jack): accepts headphones of 200mm from the objective lens surface on the Optical Pick-up Block with 7mm aperture. LBT-LCD7Di: Use only the supplied speaker SS‑LCD7Di. (USB) port: Type A (1) Maximum current: 500 mA Disc player section System: Compact disc and digital audio and video system Laser Diode Properties Emission duration: Continuous Laser Output*: Less than 44.6µW * This...


