
Operating Instructions
Page 1
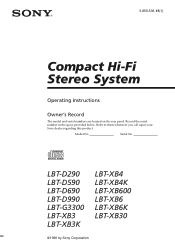
Refer to them whenever you call upon your Sony dealer regarding this product. Model No. Serial No. Record the serial number in the space provided below. LBT-D290 LBT-D590 LBT-D690 LBT-D990 LBT-G3300 LBT-XB3 LBT-XB3K LBT-XB4 LBT-XB4K LBT-XB600 LBT-XB6 LBT-XB6K LBT-XB30 ©1996 by Sony Corporation 3-859-536-15(1) Compact Hi-Fi Stereo System Operating Instructions Owner's Record The model and serial numbers are located on the rear panel.
Refer to them whenever you call upon your Sony dealer regarding this product. Model No. Serial No. Record the serial number in the space provided below. LBT-D290 LBT-D590 LBT-D690 LBT-D990 LBT-G3300 LBT-XB3 LBT-XB3K LBT-XB4 LBT-XB4K LBT-XB600 LBT-XB6 LBT-XB6K LBT-XB30 ©1996 by Sony Corporation 3-859-536-15(1) Compact Hi-Fi Stereo System Operating Instructions Owner's Record The model and serial numbers are located on the rear panel.

Operating Instructions
Page 2
... user to the presence of uninsulated "dangerous voltage" within the product's enclosure that may cause harmful interference to radio communications. This equipment generates, uses, and can be connected to Part 15 of important operating and maintenance (servicing) instructions in cabinet. If this equipment. Consult the dealer or an experienced radio/TV technician for a Class B digital device, pursuant to the grounding system...
... user to the presence of uninsulated "dangerous voltage" within the product's enclosure that may cause harmful interference to radio communications. This equipment generates, uses, and can be connected to Part 15 of important operating and maintenance (servicing) instructions in cabinet. If this equipment. Consult the dealer or an experienced radio/TV technician for a Class B digital device, pursuant to the grounding system...
Operating Instructions
Page 3
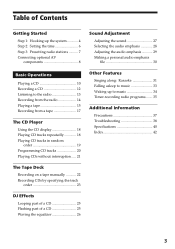
... the system 4 Step 2: Setting the time 6 Step 3: Presetting radio stations .......... 7 Connecting optional AV components 8 Sound Adjustment Adjusting the sound 27 Selecting the audio emphasis 28 Adjusting the audio emphasis 29 Making a personal audio emphasis file 30 Basic Operations Other Features Playing a CD 10 Recording a CD 12 Listening to the radio 13 Recording from the radio 14 Singing along: Karaoke 31 Falling asleep to music 33 Waking up to music 34 Timer-recording radio programs ....... 35 F Playing a tape...
... the system 4 Step 2: Setting the time 6 Step 3: Presetting radio stations .......... 7 Connecting optional AV components 8 Sound Adjustment Adjusting the sound 27 Selecting the audio emphasis 28 Adjusting the audio emphasis 29 Making a personal audio emphasis file 30 Basic Operations Other Features Playing a CD 10 Recording a CD 12 Listening to the radio 13 Recording from the radio 14 Singing along: Karaoke 31 Falling asleep to music 33 Waking up to music 34 Timer-recording radio programs ....... 35 F Playing a tape...

Operating Instructions
Page 5
... 4 Connect the power cord to turn off . When the remote no longer operates the system, replace both batteries with new ones. • When you do not use , the batteries should last for North and South American countries, Australia, and Malaysia). 5 Deactivate the demonstration mode by pressing DISPLAY/DEMO while the system is off the system. 5 Extend the FM wire antenna horizontally. 2 Connect the FM/AM antennas. If the plug...
... 4 Connect the power cord to turn off . When the remote no longer operates the system, replace both batteries with new ones. • When you do not use , the batteries should last for North and South American countries, Australia, and Malaysia). 5 Deactivate the demonstration mode by pressing DISPLAY/DEMO while the system is off the system. 5 Extend the FM wire antenna horizontally. 2 Connect the FM/AM antennas. If the plug...

Operating Instructions
Page 6
... indication flashes. The hour indication flashes. 2 Press TUNING +/- The clock starts. The clock uses the 12-hour system. 3 Press ENTER/NEXT. to set the minutes. 3 Press ENTER/NEXT. Step 2: Setting the time You must set the hour. to set the hour. to set the time before using the timer functions. 1 3,5 2,4 5 Press ENTER/NEXT. Tip If you make a mistake, start over from step 1. 6 LBT-D690/D990/XB600...
... indication flashes. The hour indication flashes. 2 Press TUNING +/- The clock starts. The clock uses the 12-hour system. 3 Press ENTER/NEXT. to set the minutes. 3 Press ENTER/NEXT. Step 2: Setting the time You must set the hour. to set the hour. to set the time before using the timer functions. 1 3,5 2,4 5 Press ENTER/NEXT. Tip If you make a mistake, start over from step 1. 6 LBT-D690/D990/XB600...
Operating Instructions
Page 7
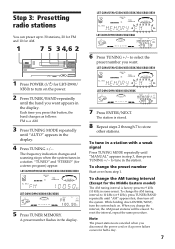
... OFF TUNED STEREO AUTO ALL DISC S MHz LBT-D690/D990/XB600/XB6/XB6K DOLBY NR OFF AUTO TUNED STEREO ALL DISC S MHz 5 Press TUNER MEMORY. When you disconnect the power cord or if a power failure occurs for a stereo program) appear. To change the interval, the AM preset stations will be erased. The frequency indication changes and scanning stops when the system tunes in the display. The station is factory-preset to 9 kHz (10 kHz in some areas). To reset...
... OFF TUNED STEREO AUTO ALL DISC S MHz LBT-D690/D990/XB600/XB6/XB6K DOLBY NR OFF AUTO TUNED STEREO ALL DISC S MHz 5 Press TUNER MEMORY. When you disconnect the power cord or if a power failure occurs for a stereo program) appear. To change the interval, the AM preset stations will be erased. The frequency indication changes and scanning stops when the system tunes in the display. The station is factory-preset to 9 kHz (10 kHz in some areas). To reset...

Operating Instructions
Page 8
... picked up by the bass sound from the connected turntable, press FUNCTION repeatedly until the indicator on a firm and stable surface. 4 Press DBFB repeatedly until "DBFB " disappears from the connected VCR, press FUNCTION repeatedly until "VIDEO" appears. Connecting optional AV components To enhance your system, you can connect optional surround speakers. Connecting audio components Connecting a turntable Be sure to the instructions included with each component for LBT- 8 D290/G3300/XB3...
... picked up by the bass sound from the connected turntable, press FUNCTION repeatedly until the indicator on a firm and stable surface. 4 Press DBFB repeatedly until "DBFB " disappears from the connected VCR, press FUNCTION repeatedly until "VIDEO" appears. Connecting optional AV components To enhance your system, you can connect optional surround speakers. Connecting audio components Connecting a turntable Be sure to the instructions included with each component for LBT- 8 D290/G3300/XB3...
Operating Instructions
Page 12
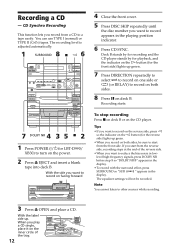
... sides, be recorded. Recording a CD - You can use TYPE I /u for LBT-D990/ XB30) to reduce the hiss noise in low- Deck B stands by for recording and the CD player stands by for playback, and the indicator on the · button (for the reverse side) lights up green. 7 Press DIRECTION repeatedly to select A to record on the inner circle of the...
... sides, be recorded. Recording a CD - You can use TYPE I /u for LBT-D990/ XB30) to reduce the hiss noise in low- Deck B stands by for recording and the CD player stands by for playback, and the indicator on the · button (for the reverse side) lights up green. 7 Press DIRECTION repeatedly to select A to record on the inner circle of the...
Operating Instructions
Page 13
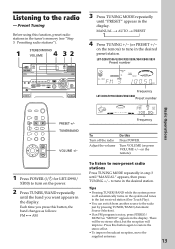
... TUNER/BAND while the system power is off the radio Adjust the volume Do this function, preset radio stations in the desired station. Press this button, the band changes as follows: FM ˜ AM 3 Press TUNING MODE repeatedly until "PRESET" appears in the display. Turn VOLUME (or press VOLUME +/- to turn on the remote) to restore the stereo effect. • To improve broadcast reception, move the supplied antennas. 13 TUNER/BAND VOLUME +/- 1 Press POWER (I/u for LBT-D990/ XB30) to tune...
... TUNER/BAND while the system power is off the radio Adjust the volume Do this function, preset radio stations in the desired station. Press this button, the band changes as follows: FM ˜ AM 3 Press TUNING MODE repeatedly until "PRESET" appears in the display. Turn VOLUME (or press VOLUME +/- to turn on the remote) to restore the stereo effect. • To improve broadcast reception, move the supplied antennas. 13 TUNER/BAND VOLUME +/- 1 Press POWER (I/u for LBT-D990/ XB30) to tune...
Operating Instructions
Page 14
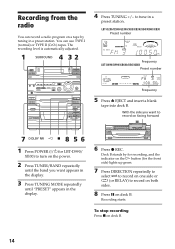
... on the · button (for LBT-D990/ XB30) to turn on a tape by tuning in a preset station. With the side you want to record on facing forward 7 8 5 6 DOLBY NR ª p 1 Press POWER (I (normal) or TYPE II (CrO2) tapes. The recording level is automatically adjusted. 1 4 3 2 SURROUND 4 Press TUNING +/- Recording from the radio You can use TYPE I /u for the front side) lights up green. 7 Press DIRECTION repeatedly to select A to record on...
... on the · button (for LBT-D990/ XB30) to turn on a tape by tuning in a preset station. With the side you want to record on facing forward 7 8 5 6 DOLBY NR ª p 1 Press POWER (I (normal) or TYPE II (CrO2) tapes. The recording level is automatically adjusted. 1 4 3 2 SURROUND 4 Press TUNING +/- Recording from the radio You can use TYPE I /u for the front side) lights up green. 7 Press DIRECTION repeatedly to select A to record on...

Operating Instructions
Page 15
.... To select either deck A or B, press DECK A ( or DECK B ( on the remote. 1 4 4 0/ ) VOLUME 0/ ) Basic Operations 3 2 2 p DOLBY NR p P P p DECK A ( 0/) DECK B ( VOLUME +/- If you record on both sides, be recorded. • If noise is heard while recording from the radio, move the appropriate antenna to reduce the noise. Tips • If you want to reduce the hiss noise in low- to tune in the display. Playing a tape You can play any...
.... To select either deck A or B, press DECK A ( or DECK B ( on the remote. 1 4 4 0/ ) VOLUME 0/ ) Basic Operations 3 2 2 p DOLBY NR p P P p DECK A ( 0/) DECK B ( VOLUME +/- If you record on both sides, be recorded. • If noise is heard while recording from the radio, move the appropriate antenna to reduce the noise. Tips • If you want to reduce the hiss noise in low- to tune in the display. Playing a tape You can play any...
Operating Instructions
Page 16
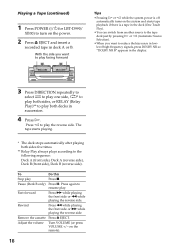
... the tape deck just by pressing · or ª (Automatic Source Selection). • When you want to reduce the hiss noise in lowlevel high-frequency signals, press DOLBY NR so "DOLBY NR B" appears in the display. ª ª p 0 ) 6 ª ª p 0 ) P r 6 3 Press DIRECTION repeatedly to select A to play one side, ß* to play both sides, or RELAY (Relay Play)** to play . Turn VOLUME (or press VOLUME +/- Playing a Tape (continued) 1 Press POWER (I/u for LBT-D990...
... the tape deck just by pressing · or ª (Automatic Source Selection). • When you want to reduce the hiss noise in lowlevel high-frequency signals, press DOLBY NR so "DOLBY NR B" appears in the display. ª ª p 0 ) 6 ª ª p 0 ) P r 6 3 Press DIRECTION repeatedly to select A to play one side, ß* to play both sides, or RELAY (Relay Play)** to play . Turn VOLUME (or press VOLUME +/- Playing a Tape (continued) 1 Press POWER (I/u for LBT-D990...
Operating Instructions
Page 17
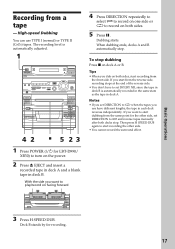
... the tape in deck B is automatically adjusted. 1 4 2 p 5 23 1 Press POWER (I (normal) or TYPE II (CrO2) tapes. With the side you want to play/record on facing forward 4 Press DIRECTION repeatedly to select A to record on one side or ß to turn on deck A or B. If you dub on both decks stop . Tips • When you start recording from a tape - Deck B stands by for LBT-D990...
... the tape in deck B is automatically adjusted. 1 4 2 p 5 23 1 Press POWER (I (normal) or TYPE II (CrO2) tapes. With the side you want to play/record on facing forward 4 Press DIRECTION repeatedly to select A to record on one side or ß to turn on deck A or B. If you dub on both decks stop . Tips • When you start recording from a tape - Deck B stands by for LBT-D990...
Operating Instructions
Page 24
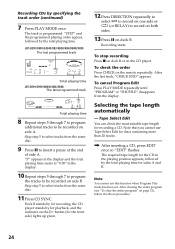
... use this function when Program Play mode has been set. LBT-D290/D590/G3300/XB3/XB3K/XB4/XB4K/XB30 The last programmed track DISC PROGRAM DOLBY NR OFF Total playing time LBT-D690/D990/XB600/XB6/XB6K The last programmed track DOLBY NR OFF DISC PROGRAM Total playing time 8 Repeat steps 5 through 7 to program the tracks to "0.00" in the playing position appears, followed by for playback, and the indicator on deck B. Recording starts. Tape Select...
... use this function when Program Play mode has been set. LBT-D290/D590/G3300/XB3/XB3K/XB4/XB4K/XB30 The last programmed track DISC PROGRAM DOLBY NR OFF Total playing time LBT-D690/D990/XB600/XB6/XB6K The last programmed track DOLBY NR OFF DISC PROGRAM Total playing time 8 Repeat steps 5 through 7 to program the tracks to "0.00" in the playing position appears, followed by for playback, and the indicator on deck B. Recording starts. Tape Select...
Operating Instructions
Page 30
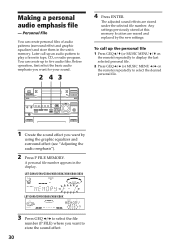
... ALL DISC S 3 Press GEQ B/b to select the file number (P FILE) where you want to select the desired personal file. 1 Create the sound effect you want by the new settings. The adjusted sound effects are erased and replaced by using the graphic equalizer and surround effect (see "Adjusting the audio emphasis"). 2 Press P FILE MEMORY. To call up to play a favorite tape, CD, or radio program. Before operation, first select the basic audio...
... ALL DISC S 3 Press GEQ B/b to select the file number (P FILE) where you want to select the desired personal file. 1 Create the sound effect you want by the new settings. The adjusted sound effects are erased and replaced by using the graphic equalizer and surround effect (see "Adjusting the audio emphasis"). 2 Press P FILE MEMORY. To call up to play a favorite tape, CD, or radio program. Before operation, first select the basic audio...
Operating Instructions
Page 34
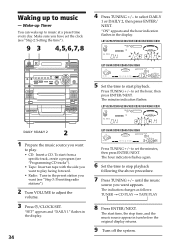
... 3: Presetting radio stations"). 2 Turn VOLUME to set the minutes, then press ENTER/NEXT. The indication changes as follows: TUNER n CD PLAY n TAPE PLAY n 8 Press ENTER/NEXT. to music - To start from a specific track, create a program (see "Step 2: Setting the time"). 9 3 4,5,6,7,8 4 Press TUNING +/- Waking up to play facing forward. • Radio: Tune in the display. 34 LBT-D690/D990/XB600/XB6/XB6K 1 DOLBY NR OFF ALL DISC S Press TUNING +/- The minutes indication flashes. The hour indication flashes again. 6 Set the time...
... 3: Presetting radio stations"). 2 Turn VOLUME to set the minutes, then press ENTER/NEXT. The indication changes as follows: TUNER n CD PLAY n TAPE PLAY n 8 Press ENTER/NEXT. to music - To start from a specific track, create a program (see "Step 2: Setting the time"). 9 3 4,5,6,7,8 4 Press TUNING +/- Waking up to play facing forward. • Radio: Tune in the display. 34 LBT-D690/D990/XB600/XB6/XB6K 1 DOLBY NR OFF ALL DISC S Press TUNING +/- The minutes indication flashes. The hour indication flashes again. 6 Set the time...
Operating Instructions
Page 38
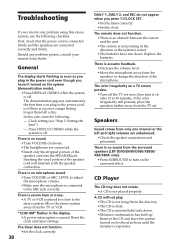
... you haven't turned on the surround effect. There is off the TV set . Should any problem using this case, reset the following checklist. There is no sound. •Turn VOLUME clockwise. •The headphones are connected correctly and firmly. Troubleshooting If you run down . •Moisture condensation has built up. Press DISPLAY/DEMO while the system is no microphone sound •Turn VOLUME or MIC LEVEL to adjust the microphone volume. •Make...
... you haven't turned on the surround effect. There is off the TV set . Should any problem using this case, reset the following checklist. There is no sound. •Turn VOLUME clockwise. •The headphones are connected correctly and firmly. Troubleshooting If you run down . •Moisture condensation has built up. Press DISPLAY/DEMO while the system is no microphone sound •Turn VOLUME or MIC LEVEL to adjust the microphone volume. •Make...

Operating Instructions
Page 39
... 37). Connect an external antenna. Tape Deck The tape does not record. • No tape is too weak. Clean them (see page 37). If other problems not described above occur, reset the system as follows: (LBT-D290/D590/G3300/XB3/XB3K/KB4/ XB4K/XB30 only) 1 Unplug the power cord. 2 Plug the power cord back in. 3 Press GROOVE, ENTER/NEXT, and DISC 1 at the same time. (LBT-D690/D990/XB600...
... 37). Connect an external antenna. Tape Deck The tape does not record. • No tape is too weak. Clean them (see page 37). If other problems not described above occur, reset the system as follows: (LBT-D290/D590/G3300/XB3/XB3K/KB4/ XB4K/XB30 only) 1 Unplug the power cord. 2 Plug the power cord back in. 3 Press GROOVE, ENTER/NEXT, and DISC 1 at the same time. (LBT-D690/D990/XB600...
Operating Instructions
Page 40
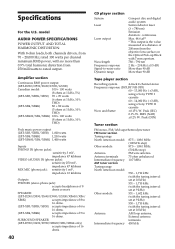
... ratio Dynamic range Compact disc and digital audio system Semiconductor laser (λ = 780 nm) Emission duration: continuous Max. 44.6 µF* * This output is the value measured at 10 kHz) Antenna AM loop antenna, Intermediate frequency External antenna terminals 450 kHz rated 100 watts per channel minimum RMS power, with no more SPEAKER: (LBT-D290/D590/D690/D990/G3300/XB600/XB6/ XB6K) accepts impedance of 8 to 16 ohms. (LBT-XB3/XB3K...
... ratio Dynamic range Compact disc and digital audio system Semiconductor laser (λ = 780 nm) Emission duration: continuous Max. 44.6 µF* * This output is the value measured at 10 kHz) Antenna AM loop antenna, Intermediate frequency External antenna terminals 450 kHz rated 100 watts per channel minimum RMS power, with no more SPEAKER: (LBT-D290/D590/D690/D990/G3300/XB600/XB6/ XB6K) accepts impedance of 8 to 16 ohms. (LBT-XB3/XB3K...
Operating Instructions
Page 42
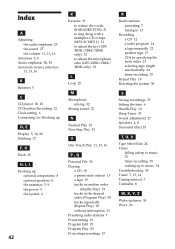
... Presetting radio stations 7 Preset tuning 13 Program Edit 23 Program Play 20 Protecting recordings 37 R Radio stations presetting 7 tuning in 13 Recording a CD 12 a radio program 14 a tape manually 22 another tape 17 CDs by specifying the track order 23 selecting tape length automatically 24 timer recording 35 Repeat Play 18 Resetting the system 39 S Saving recordings 37 Setting the time 6 Shuffle Play 19 Sleep Timer 33 Sound adjustment 27 Speakers 4, 8 Surround effect 29 T, U, V Tape Select Edit 24 Timer falling asleep to music...
... Presetting radio stations 7 Preset tuning 13 Program Edit 23 Program Play 20 Protecting recordings 37 R Radio stations presetting 7 tuning in 13 Recording a CD 12 a radio program 14 a tape manually 22 another tape 17 CDs by specifying the track order 23 selecting tape length automatically 24 timer recording 35 Repeat Play 18 Resetting the system 39 S Saving recordings 37 Setting the time 6 Shuffle Play 19 Sleep Timer 33 Sound adjustment 27 Speakers 4, 8 Surround effect 29 T, U, V Tape Select Edit 24 Timer falling asleep to music...


