
Limited Warranty (U.S. Only)
Page 1
... service is provided during the initial one (1) year. 4-557-168-03 ® LIMITED WARRANTY HDTV Color TV XBR Projection TV Sony Electronics Inc. ("Sony") warrants this Product is determined to be presented to obtain warranty service. PARTS: In addition, Sony will repair or replace the Product, at its original packaging or packaging affording an equal degree...
... service is provided during the initial one (1) year. 4-557-168-03 ® LIMITED WARRANTY HDTV Color TV XBR Projection TV Sony Electronics Inc. ("Sony") warrants this Product is determined to be presented to obtain warranty service. PARTS: In addition, Sony will repair or replace the Product, at its original packaging or packaging affording an equal degree...
Operating Instructions
Page 1
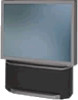
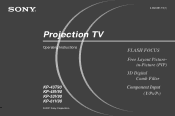
Projection TV Operating Instructions KP-43T90 KP-48V90 KP-53V90 KP-61V90 © 2001 Sony Corporation 4-082-881-11(1)
Projection TV Operating Instructions KP-43T90 KP-48V90 KP-53V90 KP-61V90 © 2001 Sony Corporation 4-082-881-11(1)

Operating Instructions
Page 2
..., KP-53V90, KP-61V90 Please keep the brightness and contrast functions at a high brightness or contrast setting, the image can be of sufficient magnitude to constitute a risk of imprints are cautioned that this equipment does cause harmful interference to correct the interference by your warranty. Note on convergence adjustment Before you use your projection TV...
..., KP-53V90, KP-61V90 Please keep the brightness and contrast functions at a high brightness or contrast setting, the image can be of sufficient magnitude to constitute a risk of imprints are cautioned that this equipment does cause harmful interference to correct the interference by your warranty. Note on convergence adjustment Before you use your projection TV...
Operating Instructions
Page 3
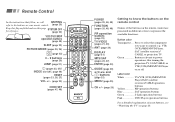
e.g. Green Buttons relevant to power operations, like turning the projection TV, SAT/CABLE, or VTR (VCR)/MDP/DVD Player on or off Label color White TV/VTR (VCR)/MDP/DVD Player/SAT (satellite receiver)/CABLE operation buttons Yellow PIP operation buttons Blue SAT operation buttons Green ... in different colors to represent the available functions. Button color Transparent .... VTR (VCR)/MDP/DVD Player, SAT (satellite receiver)/ CABLE, or projection TV. Remote Control In the instructions that follow, we will MUTING refer to the buttons on page 20. Press to select the component you want...
e.g. Green Buttons relevant to power operations, like turning the projection TV, SAT/CABLE, or VTR (VCR)/MDP/DVD Player on or off Label color White TV/VTR (VCR)/MDP/DVD Player/SAT (satellite receiver)/CABLE operation buttons Yellow PIP operation buttons Blue SAT operation buttons Green ... in different colors to represent the available functions. Button color Transparent .... VTR (VCR)/MDP/DVD Player, SAT (satellite receiver)/ CABLE, or projection TV. Remote Control In the instructions that follow, we will MUTING refer to the buttons on page 20. Press to select the component you want...
Operating Instructions
Page 4
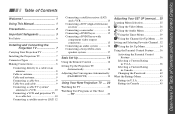
... output connectors 15 Connecting an audio system 16 Connecting a Sony SAVA series speaker system 17 Basic Set Up 18 Using the Remote Control 18 Setting Up the Projection TV Automatically 18 Adjusting the Convergence Automatically (FLASH FOCUS 19 Using Your New Projection TV .... 20 Watching the TV 20 Watching Two Programs at One Time - PIP 23...
... output connectors 15 Connecting an audio system 16 Connecting a Sony SAVA series speaker system 17 Basic Set Up 18 Using the Remote Control 18 Setting Up the Projection TV Automatically 18 Adjusting the Convergence Automatically (FLASH FOCUS 19 Using Your New Projection TV .... 20 Watching the TV 20 Watching Two Programs at One Time - PIP 23...
Operating Instructions
Page 5
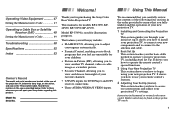
...53 Owner's Record The model and serial numbers are located at the rear of your favorite channels • Y/PB/PR inputs for your initial set up. Thank you feel are written for illustration purposes. This manual is used for the remote control. Refer to them whenever you call upon your new projection TV...section teaches you how to operate your projection TV's settings. Similar controls may be found on -screen menus and adjust your new projection TV, including Auto Set Up. Model KP-53V90 is for purchasing the Sony Color Rear Video Projection TV. It shows you how to use ...
...53 Owner's Record The model and serial numbers are located at the rear of your favorite channels • Y/PB/PR inputs for your initial set up. Thank you feel are written for illustration purposes. This manual is used for the remote control. Refer to them whenever you call upon your new projection TV...section teaches you how to operate your projection TV's settings. Similar controls may be found on -screen menus and adjust your new projection TV, including Auto Set Up. Model KP-53V90 is for purchasing the Sony Color Rear Video Projection TV. It shows you how to use ...
Operating Instructions
Page 6
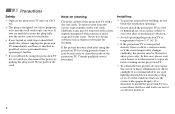
... may be necessary to let the moisture evaporate before operating it checked by pulling the plug itself. PInrsetcaalulitnigonasnd Connecting the Projection TV (continued) Safety • Operate the projection TV only on 120 V AC. • The plug is designed, for safety purposes, to fit into the outlet,... contact your dealer. • If any liquid or solid object should fall inside of the projection TV. Stubborn stains may be using the projection TV for cleaning. If you will not be removed with a cloth slightly dampened with opaque drapery. In this case...
... may be necessary to let the moisture evaporate before operating it checked by pulling the plug itself. PInrsetcaalulitnigonasnd Connecting the Projection TV (continued) Safety • Operate the projection TV only on 120 V AC. • The plug is designed, for safety purposes, to fit into the outlet,... contact your dealer. • If any liquid or solid object should fall inside of the projection TV. Stubborn stains may be using the projection TV for cleaning. If you will not be removed with a cloth slightly dampened with opaque drapery. In this case...
Operating Instructions
Page 8
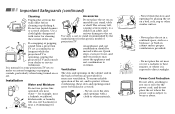
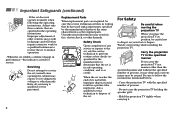
..., causing serious injury to a child or an adult, and serious damage to the set is continuous or frequent while the projection TV is operating, unplug the projection TV and consult your dealer or service technician. Never cover the slots and openings with a cloth or other similar surface. -... Never block the slots and openings by the manufacturer for cleaning the exterior of projection TV. Do not place the set near a bathtub, washbowl, kitchen sink, or laundry tub, in cabinet unless proper ventilation is provided. - ...
..., causing serious injury to a child or an adult, and serious damage to the set is continuous or frequent while the projection TV is operating, unplug the projection TV and consult your dealer or service technician. Never cover the slots and openings with a cloth or other similar surface. -... Never block the slots and openings by the manufacturer for cleaning the exterior of projection TV. Do not place the set near a bathtub, washbowl, kitchen sink, or laundry tub, in cabinet unless proper ventilation is provided. - ...
Operating Instructions
Page 10
..., electric shock, or other hazards. Watch your foot or fingers. Hold the projection TV tightly when carrying it on your footing while installing the projection TV. ImnsptaolrltinangtaSnadfeCgounanredcsti(ncogntthineuPerdo)jection TV (continued) - Safety Check Upon completion of other controls may result in safe ...that he has used replacement parts specified by the manufacturer) to drop it . 6 Carry the projection TV in the specified manner If you carry the projection TV in a manner other than the specified manner and without the specified number of its useful life,...
..., electric shock, or other hazards. Watch your foot or fingers. Hold the projection TV tightly when carrying it on your footing while installing the projection TV. ImnsptaolrltinangtaSnadfeCgounanredcsti(ncogntthineuPerdo)jection TV (continued) - Safety Check Upon completion of other controls may result in safe ...that he has used replacement parts specified by the manufacturer) to drop it . 6 Carry the projection TV in the specified manner If you carry the projection TV in a manner other than the specified manner and without the specified number of its useful life,...

Operating Instructions
Page 11
... casters. min. min. 2.4m61(a"pprox. 2.1m53(a"pprox. 1.8m48(a"pprox. 1.5m43(a"pprox. 8ft.) 7ft.) 6ft.) 5ft.) 60° 20° 20° 7 Installing and Connecting the Projection TV Carrying Your Projection TV Carrying the projection TV requires three or more people. min. For KP-48V90/53V90/61V90 The projection TV has been equipped with casters for easy movement on a hard surface.
... casters. min. min. 2.4m61(a"pprox. 2.1m53(a"pprox. 1.8m48(a"pprox. 1.5m43(a"pprox. 8ft.) 7ft.) 6ft.) 5ft.) 60° 20° 20° 7 Installing and Connecting the Projection TV Carrying Your Projection TV Carrying the projection TV requires three or more people. min. For KP-48V90/53V90/61V90 The projection TV has been equipped with casters for easy movement on a hard surface.

Operating Instructions
Page 12
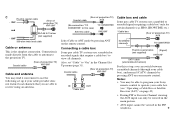
... (VAR/FIX) L (MONO) AUDIO R TO CONVERTER VHF/UHF Making Connections Connecting directly to Sony products and allow greater control of projection TV) VHF/UHF Antenna connector still other Sony equipment with the projection TV's remote control, connect the CONTROL S IN jack of the equipment to the CONTROL S OUT ... VHF only or • UHF only or • VHF/UHF 75-ohm coaxial cable (Rear of projection TV) VHF/UHF 300-ohm twin lead cable (Rear of all Sony equipment. Push into connection. older homes will be equipped with the following connector types during set up. ...
... (VAR/FIX) L (MONO) AUDIO R TO CONVERTER VHF/UHF Making Connections Connecting directly to Sony products and allow greater control of projection TV) VHF/UHF Antenna connector still other Sony equipment with the projection TV's remote control, connect the CONTROL S IN jack of the equipment to the CONTROL S OUT ... VHF only or • UHF only or • VHF/UHF 75-ohm coaxial cable (Rear of projection TV) VHF/UHF 300-ohm twin lead cable (Rear of all Sony equipment. Push into connection. older homes will be equipped with the following connector types during set up. ...
Operating Instructions
Page 13
... encoded signals that you can only be viewed in the Channel Set Up menu (page 31). HBO, SHOWTIME, etc.) *Cable box (Rear of projection TV) AUX Scrambled channels TO CONVERTER 75-ohm coaxial cable (Signal) (not supplied) VHF/UHF CATV cable (unscrambled channels) For this case) Antenna cable...9 Connection is the simplest connection. Coaxial cable (Rear of projection TV) VHF/UHF Cable and antenna You may be viewed in this set "Cable" to "On" in the main picture. • AUX input cannot be able to program your Sony remote control to view all channels. Also, set up if...
... encoded signals that you can only be viewed in the Channel Set Up menu (page 31). HBO, SHOWTIME, etc.) *Cable box (Rear of projection TV) AUX Scrambled channels TO CONVERTER 75-ohm coaxial cable (Signal) (not supplied) VHF/UHF CATV cable (unscrambled channels) For this case) Antenna cable...9 Connection is the simplest connection. Coaxial cable (Rear of projection TV) VHF/UHF Cable and antenna You may be viewed in this set "Cable" to "On" in the main picture. • AUX input cannot be able to program your Sony remote control to view all channels. Also, set up if...

Operating Instructions
Page 14
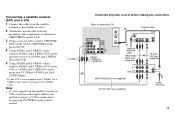
...OUT IN COMPONENT 1 VIDEO VMC-810S/820S AUDIO-L (not supplied) AUDIO-R YC-15V/30V (not supplied) 3 Cable/ Antenna Connecting a VCR and projection TV to a cable box 1 Connect the single (input) jack of the splitter to the incoming cable connection, and connect the other two (output) jacks...VIDEO VMC-810S/820S AUDIO-L (not supplied) AUDIO-R YC-15V/30V (not supplied) 3 OUT IN Cable box Installing and Connecting the Projection TV (continued) Connecting a cable TV system/ antenna to a VCR 1 Attach the coaxial cable from the incoming cable connection or antenna to VHF/UHF IN on the VCR...
...OUT IN COMPONENT 1 VIDEO VMC-810S/820S AUDIO-L (not supplied) AUDIO-R YC-15V/30V (not supplied) 3 Cable/ Antenna Connecting a VCR and projection TV to a cable box 1 Connect the single (input) jack of the splitter to the incoming cable connection, and connect the other two (output) jacks...VIDEO VMC-810S/820S AUDIO-L (not supplied) AUDIO-R YC-15V/30V (not supplied) 3 OUT IN Cable box Installing and Connecting the Projection TV (continued) Connecting a cable TV system/ antenna to a VCR 1 Attach the coaxial cable from the incoming cable connection or antenna to VHF/UHF IN on the VCR...

Operating Instructions
Page 15
Note: • To view scrambled channels through the cable box, select the video input which the cable box is connected to by pressing TV/ VIDEO. * If your VCR is not equipped with S VIDEO, use a VIDEO cable (yellow) instead of the S VIDEO cable. ** If you are connecting a monaural VCR, connect only the single audio output to the left (MONO) input on the projection TV. 11
Note: • To view scrambled channels through the cable box, select the video input which the cable box is connected to by pressing TV/ VIDEO. * If your VCR is not equipped with S VIDEO, use a VIDEO cable (yellow) instead of the S VIDEO cable. ** If you are connecting a monaural VCR, connect only the single audio output to the left (MONO) input on the projection TV. 11
Operating Instructions
Page 16
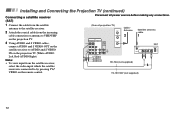
...VIDEO cables, connect AUDIO and S VIDEO OUT on the satellite receiver to by pressing TV/ VIDEO on the projection TV (White-AUDIO Left, Red-AUDIO Right). Installing and Connecting the Projection TV (continued) Connecting a satellite receiver (SAT) Disconnect all power sources before making any ...from the satellite receiver, select the video input which the satellite receiver is connected to AUDIO and S VIDEO IN on the remote control. (Rear of projection TV) AUX TO CONVERTER Cable/ Antenna 2 Satellite antenna cable 1 IN VIDEO 1 VIDEO 3 VIDEO 4 S VIDEO OUT AUDIO (VAR/FIX) VIDEO Y...
...VIDEO cables, connect AUDIO and S VIDEO OUT on the satellite receiver to by pressing TV/ VIDEO on the projection TV (White-AUDIO Left, Red-AUDIO Right). Installing and Connecting the Projection TV (continued) Connecting a satellite receiver (SAT) Disconnect all power sources before making any ...from the satellite receiver, select the video input which the satellite receiver is connected to AUDIO and S VIDEO IN on the remote control. (Rear of projection TV) AUX TO CONVERTER Cable/ Antenna 2 Satellite antenna cable 1 IN VIDEO 1 VIDEO 3 VIDEO 4 S VIDEO OUT AUDIO (VAR/FIX) VIDEO Y...
Operating Instructions
Page 17
... connection or antenna to VHF/UHF IN on the VCR. 3 Using a coaxial cable, connect VHF/UHF OUT on the VCR to VHF/UHF on the projection TV. 4 Using AUDIO and S VIDEO* cables, connect AUDIO and S VIDEO OUT on the satellite receiver to AUDIO and S VIDEO IN on the VCR. 5 Using AUDIO and... S VIDEO* cables, connect AUDIO and S VIDEO OUT on the VCR to by pressing TV/VIDEO on the projection TV (White-AUDIO Left, RedAUDIO Right). * If your satellite receiver or VCR is not equipped with S VIDEO, use a VIDEO cable (yellow) instead of...
... connection or antenna to VHF/UHF IN on the VCR. 3 Using a coaxial cable, connect VHF/UHF OUT on the VCR to VHF/UHF on the projection TV. 4 Using AUDIO and S VIDEO* cables, connect AUDIO and S VIDEO OUT on the satellite receiver to AUDIO and S VIDEO IN on the VCR. 5 Using AUDIO and... S VIDEO* cables, connect AUDIO and S VIDEO OUT on the VCR to by pressing TV/VIDEO on the projection TV (White-AUDIO Left, RedAUDIO Right). * If your satellite receiver or VCR is not equipped with S VIDEO, use a VIDEO cable (yellow) instead of...

Operating Instructions
Page 18
... cables, connect AUDIO and S VIDEO OUT on the camcorder to AUDIO and S VIDEO IN inside the dropdown panel on the front of the projection TV (White-AUDIO Left, Red-AUDIO Right**). 2 Press VIDEO 2 to select the video inputs from a camcorder. * If your DTV receiver supports..., connect AUDIO and S VIDEO OUT on the DTV receiver to the left (MONO) input on the DTV (Rear of projection TV) Camcorder Installing and Connecting the Projection TV (continued) Connecting a DTV (digital television) receiver Disconnect all power sources before making any connections. Before connecting, be able ...
... cables, connect AUDIO and S VIDEO OUT on the camcorder to AUDIO and S VIDEO IN inside the dropdown panel on the front of the projection TV (White-AUDIO Left, Red-AUDIO Right**). 2 Press VIDEO 2 to select the video inputs from a camcorder. * If your DTV receiver supports..., connect AUDIO and S VIDEO OUT on the DTV receiver to the left (MONO) input on the DTV (Rear of projection TV) Camcorder Installing and Connecting the Projection TV (continued) Connecting a DTV (digital television) receiver Disconnect all power sources before making any connections. Before connecting, be able ...
Operating Instructions
Page 19
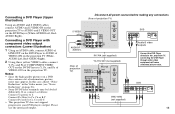
... picture noise. Connect PR (red) to Y. If so, connect as follows: Connect Y (green) to CR, Cr or R-Y. • This projection TV does not support progressive scan DVD players output. Notes: • Since the high quality pictures on a DVD disc contain a lot of information, picture... AUDIO R AUDIO-R AUDIO-L Y PB PR COMPONENT OUT AUDIO (VAR/FIX) L (MONO) AUDIO R TO CONVERTER VHF/UHF RK-74A (not supplied) (Rear of projection TV) YC-15V/30V (not supplied) AUDIO-L AUDIO-R RK-74A (not supplied) AUX TO CONVERTER DVD LINE OUT S VIDEO OUT R-AUDIO 1-L VIDEO S-LINK DIGITAL OUT...
... picture noise. Connect PR (red) to Y. If so, connect as follows: Connect Y (green) to CR, Cr or R-Y. • This projection TV does not support progressive scan DVD players output. Notes: • Since the high quality pictures on a DVD disc contain a lot of information, picture... AUDIO R AUDIO-R AUDIO-L Y PB PR COMPONENT OUT AUDIO (VAR/FIX) L (MONO) AUDIO R TO CONVERTER VHF/UHF RK-74A (not supplied) (Rear of projection TV) YC-15V/30V (not supplied) AUDIO-L AUDIO-R RK-74A (not supplied) AUX TO CONVERTER DVD LINE OUT S VIDEO OUT R-AUDIO 1-L VIDEO S-LINK DIGITAL OUT...

Operating Instructions
Page 20
...) Connecting an audio system For more dynamic sound, connect an audio system to the projection TV. 1 Using an AUDIO cable, connect AUDIO (VAR/FIX) OUT on the projection TV to "Variable" in the Audio menu. (see "Audio Out" and "Speaker" on page 28) Disconnect all power sources before making any ... off. (see "Audio Out" on page 28) Note: • You can be adjusted only when "Audio Out" is set to one of projection TV) Stereo amplifier IN VIDEO 1 VIDEO 3 VIDEO 4 S VIDEO CONTROL S OUT VIDEO L (MONO) AUDIO R Y PB PR COMPONENT OUT AUDIO (VAR/FIX) L (MONO) AUDIO R AUDIO-L (white)...
...) Connecting an audio system For more dynamic sound, connect an audio system to the projection TV. 1 Using an AUDIO cable, connect AUDIO (VAR/FIX) OUT on the projection TV to "Variable" in the Audio menu. (see "Audio Out" and "Speaker" on page 28) Disconnect all power sources before making any ... off. (see "Audio Out" on page 28) Note: • You can be adjusted only when "Audio Out" is set to one of projection TV) Stereo amplifier IN VIDEO 1 VIDEO 3 VIDEO 4 S VIDEO CONTROL S OUT VIDEO L (MONO) AUDIO R Y PB PR COMPONENT OUT AUDIO (VAR/FIX) L (MONO) AUDIO R AUDIO-L (white)...
Operating Instructions
Page 21
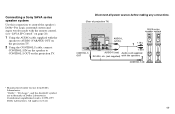
...connections. (Rear of Dolby Laboratories. All rights reserved. 17 Connecting a Sony SAVA series speaker system Use this connection to CONTROL S OUT on the projection TV. "Dolby", "Pro Logic", and the double-D symbol are trademarks of projection TV) SAVA series speaker system IN VIDEO 1 VIDEO 3 VIDEO 4 S ...IN R AUDIO-R (red) Audio cord supplied OUT RK-G34, etc. (not supplied) with the speaker to AUDIO (VAR/FIX) OUT on the projection TV. 2 Using the CONTROL S cable, connect CONTROL S IN on the speaker to control the speaker's Dolby* Pro Logic surround system and super woofer ...
...connections. (Rear of Dolby Laboratories. All rights reserved. 17 Connecting a Sony SAVA series speaker system Use this connection to CONTROL S OUT on the projection TV. "Dolby", "Pro Logic", and the double-D symbol are trademarks of projection TV) SAVA series speaker system IN VIDEO 1 VIDEO 3 VIDEO 4 S ...IN R AUDIO-R (red) Audio cord supplied OUT RK-G34, etc. (not supplied) with the speaker to AUDIO (VAR/FIX) OUT on the projection TV. 2 Using the CONTROL S cable, connect CONTROL S IN on the speaker to control the speaker's Dolby* Pro Logic surround system and super woofer ...


