Limited Warranty (U.S. Only)
Page 1
... in Japan This warranty is invalid if the factory applied serial number has been altered or removed from state to state. 4-557-168-03 ® LIMITED WARRANTY HDTV Color TV XBR Projection TV Sony Electronics Inc. ("Sony") warrants this Product is determined to be presented to obtain warranty service. PARTS: In addition, Sony will repair or replace the Product, at no charge, new or rebuilt...
... in Japan This warranty is invalid if the factory applied serial number has been altered or removed from state to state. 4-557-168-03 ® LIMITED WARRANTY HDTV Color TV XBR Projection TV Sony Electronics Inc. ("Sony") warrants this Product is determined to be presented to obtain warranty service. PARTS: In addition, Sony will repair or replace the Product, at no charge, new or rebuilt...

Operating Instructions
Page 2
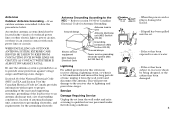
... this manual could void your warranty. This document is for the remote control RM-Y906 MODELS: KP-43T90, KP-48V90, KP-53V90, KP-61V90 Please keep the brightness and contrast functions at low settings. Note on UHF or VHF or transmitted by your authority to operate this television receiver for other outlet unless the blades can radiate radio frequency energy and, if not installed and used in a residential installation...
... this manual could void your warranty. This document is for the remote control RM-Y906 MODELS: KP-43T90, KP-48V90, KP-53V90, KP-61V90 Please keep the brightness and contrast functions at low settings. Note on UHF or VHF or transmitted by your authority to operate this television receiver for other outlet unless the blades can radiate radio frequency energy and, if not installed and used in a residential installation...
Operating Instructions
Page 4
... box 10 Connecting a satellite receiver (SAT) 12 Connecting a satellite receiver (SAT) and a VCR 13 Connecting a DTV (digital television) receiver 14 Connecting a camcorder 14 Connecting a DVD Player 15 Connecting a DVD Player with component video output connectors 15 Connecting an audio system 16 Connecting a Sony SAVA series speaker system 17 Basic Set Up 18 Using the Remote Control 18 Setting Up the Projection TV Automatically 18 Adjusting the Convergence Automatically (FLASH FOCUS 19 Using Your New Projection TV .... 20 Watching the TV 20 Watching Two Programs at One Time...
... box 10 Connecting a satellite receiver (SAT) 12 Connecting a satellite receiver (SAT) and a VCR 13 Connecting a DTV (digital television) receiver 14 Connecting a camcorder 14 Connecting a DVD Player 15 Connecting a DVD Player with component video output connectors 15 Connecting an audio system 16 Connecting a Sony SAVA series speaker system 17 Basic Set Up 18 Using the Remote Control 18 Setting Up the Projection TV Automatically 18 Adjusting the Convergence Automatically (FLASH FOCUS 19 Using Your New Projection TV .... 20 Watching the TV 20 Watching Two Programs at One Time...
Operating Instructions
Page 5
... this manual are located at the rear of your new projection TV. Using This Manual Operating Video Equipment 47 Setting the Manufacturer's Code 47 Operating a Cable Box or Satellite Receiver (SAT 49 Setting the Manufacturer's Code 49 Troubleshooting 50 Specifications 52 Index 53 Owner's Record The model and serial numbers are written for DVD Player and DTV receiver connections. • Three AUDIO/VIDEO/S VIDEO inputs. It shows you how to install your projection TV, to connect your new components and to connect to the antenna and cable. 2 Basic Set...
... this manual are located at the rear of your new projection TV. Using This Manual Operating Video Equipment 47 Setting the Manufacturer's Code 47 Operating a Cable Box or Satellite Receiver (SAT 49 Setting the Manufacturer's Code 49 Troubleshooting 50 Specifications 52 Index 53 Owner's Record The model and serial numbers are written for DVD Player and DTV receiver connections. • Three AUDIO/VIDEO/S VIDEO inputs. It shows you how to install your projection TV, to connect your new components and to connect to the antenna and cable. 2 Basic Set...

Operating Instructions
Page 7
..., extension cords or convenience receptacles beyond their capacity, since this manual for long periods of time, unplug it from battery power, refer to insert the plug fully into the outlet, try reversing the plug. Never spill liquid of electrical power supplied to have a suitable outlet installed. If the plug should be used. Attachments Do not use , and servicing of an...
..., extension cords or convenience receptacles beyond their capacity, since this manual for long periods of time, unplug it from battery power, refer to insert the plug fully into the outlet, try reversing the plug. Never spill liquid of electrical power supplied to have a suitable outlet installed. If the plug should be used. Attachments Do not use , and servicing of an...
Operating Instructions
Page 9
...-in wire Antenna discharge unit (NEC Section 810-20) Electric service equipment NEC: National Electrical Code Grounding conductors (NEC Section 810-20) Ground damps Power service grounding electrode system (NEC Art 250 Part H) Lightning For added protection for this television receiver during a lightning storm, or when it can come in contact with such power lines or circuits. If the set has been...
...-in wire Antenna discharge unit (NEC Section 810-20) Electric service equipment NEC: National Electrical Code Grounding conductors (NEC Section 810-20) Ground damps Power service grounding electrode system (NEC Art 250 Part H) Lightning For added protection for this television receiver during a lightning storm, or when it can come in contact with such power lines or circuits. If the set has been...

Operating Instructions
Page 12
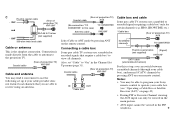
... into connection. S Video cable High quality video cable for enhanced picture quality Align guides and push into connection. Video - Red Some DVD Players and DTV Receivers are equipped with the CONTROL S cable. (Rear of the following three video connectors. Yellow Audio (Left) - Red CONTROL S OUT IN VIDEO 1 VIDEO 3 VIDEO 4 S VIDEO CONTROL S OUT VIDEO L (MONO) AUDIO R Y PB PR COMPONENT OUT AUDIO (VAR/FIX) L (MONO) AUDIO R TO CONVERTER VHF/UHF Making Connections Connecting directly to use some of projection TV) AUX Audio/Video cable Push into connection. older...
... into connection. S Video cable High quality video cable for enhanced picture quality Align guides and push into connection. Video - Red Some DVD Players and DTV Receivers are equipped with the CONTROL S cable. (Rear of the following three video connectors. Yellow Audio (Left) - Red CONTROL S OUT IN VIDEO 1 VIDEO 3 VIDEO 4 S VIDEO CONTROL S OUT VIDEO L (MONO) AUDIO R Y PB PR COMPONENT OUT AUDIO (VAR/FIX) L (MONO) AUDIO R TO CONVERTER VHF/UHF Making Connections Connecting directly to use some of projection TV) AUX Audio/Video cable Push into connection. older...
Operating Instructions
Page 13
... receive using an antenna. (Rear of projection TV) Coaxial cable AUX (No connection "TO CONVERTER" in the main picture. • AUX input cannot be able to program your Sony remote control to the projection TV. Also, set up if your cable provider does not feature local channels that require a cable box* to "On" in the PIP windows. 9 Connection is the simplest connection. Connecting a cable box Some pay cable TV systems use scrambled or encoded signals that you can only be viewed in this set "Cable...
... receive using an antenna. (Rear of projection TV) Coaxial cable AUX (No connection "TO CONVERTER" in the main picture. • AUX input cannot be able to program your Sony remote control to the projection TV. Also, set up if your cable provider does not feature local channels that require a cable box* to "On" in the PIP windows. 9 Connection is the simplest connection. Connecting a cable box Some pay cable TV systems use scrambled or encoded signals that you can only be viewed in this set "Cable...

Operating Instructions
Page 18
... ACCESS CARD S VIDEO Y DIGITAL AUDIO OUT (OPTICAL) L PB MONO R PR VGA OUT AUDIO AUDIO/VIDEO OUT TEL LINE 2 Connecting a camcorder Use this connection to view a picture directly from your camcorder. 1 Using AUDIO and S VIDEO* cables, connect AUDIO and S VIDEO OUT on the camcorder to AUDIO and S VIDEO IN inside the dropdown panel on the front of the projection TV (White-AUDIO Left, Red-AUDIO Right**). 2 Press VIDEO 2 to select the video inputs from a camcorder. * If your DTV receiver supports 480i signal from the roof S VIDEO antenna to support 480i video format output. •...
... ACCESS CARD S VIDEO Y DIGITAL AUDIO OUT (OPTICAL) L PB MONO R PR VGA OUT AUDIO AUDIO/VIDEO OUT TEL LINE 2 Connecting a camcorder Use this connection to view a picture directly from your camcorder. 1 Using AUDIO and S VIDEO* cables, connect AUDIO and S VIDEO OUT on the camcorder to AUDIO and S VIDEO IN inside the dropdown panel on the front of the projection TV (White-AUDIO Left, Red-AUDIO Right**). 2 Press VIDEO 2 to select the video inputs from a camcorder. * If your DTV receiver supports 480i signal from the roof S VIDEO antenna to support 480i video format output. •...

Operating Instructions
Page 20
... supplied remote control. Installing and Connecting the Projection TV (continued) Connecting an audio system For more dynamic sound, connect an audio system to one of projection TV) Stereo amplifier IN VIDEO 1 VIDEO 3 VIDEO 4 S VIDEO CONTROL S OUT VIDEO L (MONO) AUDIO R Y PB PR COMPONENT OUT AUDIO (VAR/FIX) L (MONO) AUDIO R AUDIO-L (white) AUDIO-R (red) HRD Line inputs RK-74A (not supplied) 16 Tape2, AUX1, etc.) on the stereo. 2 Set the stereo to the chosen Line input and use the Audio menu to set to "Variable" in the Audio menu. (see "Audio Out" and "Speaker...
... supplied remote control. Installing and Connecting the Projection TV (continued) Connecting an audio system For more dynamic sound, connect an audio system to one of projection TV) Stereo amplifier IN VIDEO 1 VIDEO 3 VIDEO 4 S VIDEO CONTROL S OUT VIDEO L (MONO) AUDIO R Y PB PR COMPONENT OUT AUDIO (VAR/FIX) L (MONO) AUDIO R AUDIO-L (white) AUDIO-R (red) HRD Line inputs RK-74A (not supplied) 16 Tape2, AUX1, etc.) on the stereo. 2 Set the stereo to the chosen Line input and use the Audio menu to set to "Variable" in the Audio menu. (see "Audio Out" and "Speaker...
Operating Instructions
Page 21
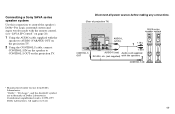
... Disconnect all power sources before making any connections. (Rear of Dolby Laboratories. "Dolby", "Pro Logic", and the double-D symbol are trademarks of projection TV) SAVA series speaker system IN VIDEO 1 VIDEO 3 VIDEO 4 S VIDEO CONTROL S OUT VIDEO L (MONO) AUDIO R CONTROL S Y PB PR COMPONENT OUT AUDIO (VAR/FIX) AUDIO-L (white) L (MONO) AUDIO 1 1 IN L R 1 IN R AUDIO-R (red) Audio cord supplied OUT RK-G34, etc. (not supplied) with the speaker to AUDIO (VAR/FIX) OUT on the projection TV. 2 Using the CONTROL S cable, connect CONTROL S IN on the speaker to CONTROL S OUT...
... Disconnect all power sources before making any connections. (Rear of Dolby Laboratories. "Dolby", "Pro Logic", and the double-D symbol are trademarks of projection TV) SAVA series speaker system IN VIDEO 1 VIDEO 3 VIDEO 4 S VIDEO CONTROL S OUT VIDEO L (MONO) AUDIO R CONTROL S Y PB PR COMPONENT OUT AUDIO (VAR/FIX) AUDIO-L (white) L (MONO) AUDIO 1 1 IN L R 1 IN R AUDIO-R (red) Audio cord supplied OUT RK-G34, etc. (not supplied) with the speaker to AUDIO (VAR/FIX) OUT on the projection TV. 2 Using the CONTROL S cable, connect CONTROL S IN on the speaker to CONTROL S OUT...
Operating Instructions
Page 22
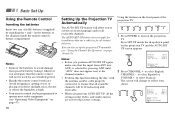
... will change to select English, CHANNEL - to select Español or VOLUME + to the diagram inside the drop-down panel on the front panel of the projection TV: - + FLASH FOCUS TV/VIDEO VOLUME - The AUTO SET UP feature does not apply for installations that all available channels will be programmed to operate most video equipment. (see "Using the Channel Set Up menu" on pages 30 and 31) Notes: • Before you perform AUTO SET UP, all receivable channels. CHANNEL + POWER TIMER/STAND...
... will change to select English, CHANNEL - to select Español or VOLUME + to the diagram inside the drop-down panel on the front panel of the projection TV: - + FLASH FOCUS TV/VIDEO VOLUME - The AUTO SET UP feature does not apply for installations that all available channels will be programmed to operate most video equipment. (see "Using the Channel Set Up menu" on pages 30 and 31) Notes: • Before you perform AUTO SET UP, all receivable channels. CHANNEL + POWER TIMER/STAND...
Operating Instructions
Page 23
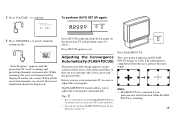
... FLASH FOCUS using the Set Up menu on the screen in three layers (red, green and blue). When all the receivable channels are stored, the lowest numbered channel is completed when the cross pattern becomes white. Press SET UP inside the drop-down panel on the sub screen. If they do not converge, the color is working. 19 FLASH FOCUS Press FLASH FOCUS. While scanning, the received channel will be sure to perform FLASH FOCUS about 30 minutes after the projection TV...
... FLASH FOCUS using the Set Up menu on the screen in three layers (red, green and blue). When all the receivable channels are stored, the lowest numbered channel is completed when the cross pattern becomes white. Press SET UP inside the drop-down panel on the sub screen. If they do not converge, the color is working. 19 FLASH FOCUS Press FLASH FOCUS. While scanning, the received channel will be sure to perform FLASH FOCUS about 30 minutes after the projection TV...

Operating Instructions
Page 24
VOL +/- Use for normal viewing environments. down ). Press to customize the "Picture Adjustment" of five different video modes that best suits the program you can press ENTER for low light environments. Standard: Select to adjust the volume (+ up or - Using Your New Projection TV (continued) Watching the TV Many TV features can be accessed directly through the channels (+ up or - If a video input indication (e.g., VIDEO 1, VIDEO 2) appears on the screen and will dim three...
VOL +/- Use for normal viewing environments. down ). Press to customize the "Picture Adjustment" of five different video modes that best suits the program you can press ENTER for low light environments. Standard: Select to adjust the volume (+ up or - Using Your New Projection TV (continued) Watching the TV Many TV features can be accessed directly through the channels (+ up or - If a video input indication (e.g., VIDEO 1, VIDEO 2) appears on the screen and will dim three...
Operating Instructions
Page 26
... Press to turn off automatically. MTS/SAP Press to scroll through available displays: XDS (Extended Data Service) Displays a network name, program name, program type, program length, program description, call letters and time of the show if the broadcaster offers this service. The VCR power will remain on. Using Your New Projection TV (continued) Using the White Labeled Buttons for detailed connection information, see "Cable and antenna" or "Cable box and cable" on page...
... Press to turn off automatically. MTS/SAP Press to scroll through available displays: XDS (Extended Data Service) Displays a network name, program name, program type, program length, program description, call letters and time of the show if the broadcaster offers this service. The VCR power will remain on. Using Your New Projection TV (continued) Using the White Labeled Buttons for detailed connection information, see "Cable and antenna" or "Cable box and cable" on page...
Operating Instructions
Page 53
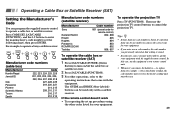
... projection TV control buttons to turn on/off the cable box or satellite receiver. 2 Press SAT/CABLE (FUNCTION). 3 For other codes listed for example - to the factory setting and must be used only with the supplied remote control. Operating a Cable Box or Satellite Receiver (SAT) Setting the Manufacturer's Code You can be reset. 49 Tips z • If more than one until you remove the batteries - Press CODE SET, SAT/CABLE (FUNCTION), and the 0-9 buttons to operate a cable box or satellite receiver. To operate the projection TV...
... projection TV control buttons to turn on/off the cable box or satellite receiver. 2 Press SAT/CABLE (FUNCTION). 3 For other codes listed for example - to the factory setting and must be used only with the supplied remote control. Operating a Cable Box or Satellite Receiver (SAT) Setting the Manufacturer's Code You can be reset. 49 Tips z • If more than one until you remove the batteries - Press CODE SET, SAT/CABLE (FUNCTION), and the 0-9 buttons to operate a cable box or satellite receiver. To operate the projection TV...
Operating Instructions
Page 54
... front TIMER/STAND BY indicator on both the projection TV and the remote control. • Check to see if the TV/VIDEO setting is connected securely to VIDEO 1, 2, 3 or 4. • Try another channel. Replace the batteries. • Press TV (FUNCTION) when operating your projection TV. • Make sure the projection TV's power cord is correct: when watching TV, set to TV, and when watching video tapes, set to "On" in . • Operate with the buttons on the panel will flash repeatedly. Troubleshooting...
... front TIMER/STAND BY indicator on both the projection TV and the remote control. • Check to see if the TV/VIDEO setting is connected securely to VIDEO 1, 2, 3 or 4. • Try another channel. Replace the batteries. • Press TV (FUNCTION) when operating your projection TV. • Make sure the projection TV's power cord is correct: when watching TV, set to TV, and when watching video tapes, set to "On" in . • Operate with the buttons on the panel will flash repeatedly. Troubleshooting...
Operating Instructions
Page 55
... picture. 51 For details, see the instruction manual supplied with this projection TV. using a cable box Favorite Channel does not display • Verify that "Favorite Channel" is set to "Manual" in the Channel Set Up menu. (see "Setting Favorite Channel manually" on page 32) your choices Some video sources do not • Ensure that "Video Label" is not set to change the input mode. (see "ANT" on page 22) Dotted lines or stripes • Adjust the antenna. • Keep the projection TV...
... picture. 51 For details, see the instruction manual supplied with this projection TV. using a cable box Favorite Channel does not display • Verify that "Favorite Channel" is set to "Manual" in the Channel Set Up menu. (see "Setting Favorite Channel manually" on page 32) your choices Some video sources do not • Ensure that "Video Label" is not set to change the input mode. (see "ANT" on page 22) Dotted lines or stripes • Adjust the antenna. • Keep the projection TV...
Operating Instructions
Page 56
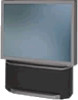
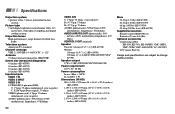
Specifications Projection system 3 picture tubes, 3 lenses, horizontal in-line system Picture tube 7-inch high-brightness monochrome tubes (6.3 raster size), with optical coupling and liquid cooling system Projection lenses High performance, large diameter hybrid lens F1.05 Television system American TV standard Channel coverage VHF: 2-13/UHF: 14 -69/CATV: 1 - 125 Antenna 75 ohm external terminal for VHF/UHF Screen size (measured diagonally) 43 inches (KP-43T90) 48 inches (KP-48V90) 53 inches (KP-53V90) 61 inches (KP-61V90) Inputs/outputs VIDEO 1 IN VIDEO 2 INPUT VIDEO 3 IN S VIDEO IN (4-pin ...
Specifications Projection system 3 picture tubes, 3 lenses, horizontal in-line system Picture tube 7-inch high-brightness monochrome tubes (6.3 raster size), with optical coupling and liquid cooling system Projection lenses High performance, large diameter hybrid lens F1.05 Television system American TV standard Channel coverage VHF: 2-13/UHF: 14 -69/CATV: 1 - 125 Antenna 75 ohm external terminal for VHF/UHF Screen size (measured diagonally) 43 inches (KP-43T90) 48 inches (KP-48V90) 53 inches (KP-53V90) 61 inches (KP-61V90) Inputs/outputs VIDEO 1 IN VIDEO 2 INPUT VIDEO 3 IN S VIDEO IN (4-pin ...
Operating Instructions
Page 57
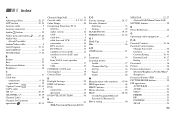
... Connecting Projection TV to antenna 8 audio system 16 cable 8 cable box 9 cable box and VCR 10 camcorder 14 DTV receiver 14 DVD Player 15 satellite receiver (SAT 12 satellite receiver (SAT) and VCR 13 Sony SAVA series speaker system 17 VCR 10 CONTROL S OUT jack 8 Convergence 19 Current Time 29 D Daylight Savings 29 DISPLAY button 21 DVD connection 15 operation 48 DVD/VTR (FUNCTION 48 E Effect 27 (BBE/Surround/Simulated/Off ) F, G Factory settings 26, 27 Favorite Channel Selecting 33 Setting 32 FLASH FOCUS...
... Connecting Projection TV to antenna 8 audio system 16 cable 8 cable box 9 cable box and VCR 10 camcorder 14 DTV receiver 14 DVD Player 15 satellite receiver (SAT 12 satellite receiver (SAT) and VCR 13 Sony SAVA series speaker system 17 VCR 10 CONTROL S OUT jack 8 Convergence 19 Current Time 29 D Daylight Savings 29 DISPLAY button 21 DVD connection 15 operation 48 DVD/VTR (FUNCTION 48 E Effect 27 (BBE/Surround/Simulated/Off ) F, G Factory settings 26, 27 Favorite Channel Selecting 33 Setting 32 FLASH FOCUS...


