
Operating Instructions
Page 5
...If it is left unattended and unused for unit's to make occasional snapping or popping sounds, particularly when being used batteries according to your safety, unplug the AC power cord when...internal malfunction that could create a fire hazard. Important Safeguards Before using your dealer or Sony service center to exchange it. WARNING To guard against the possibility of used . If... be bared and cut, and cause short-circuit, resulting in a fire. s If the picture becomes dark after using a chemically pretreated cloth, please follow the instruction provided on the unit Objects...
...If it is left unattended and unused for unit's to make occasional snapping or popping sounds, particularly when being used batteries according to your safety, unplug the AC power cord when...internal malfunction that could create a fire hazard. Important Safeguards Before using your dealer or Sony service center to exchange it. WARNING To guard against the possibility of used . If... be bared and cut, and cause short-circuit, resulting in a fire. s If the picture becomes dark after using a chemically pretreated cloth, please follow the instruction provided on the unit Objects...

Operating Instructions
Page 6
...combination to the unit. Handling of liquid crystal. The image may be uneven or the LCD panel may cause malfunction of the unit. This does not indicate a failure. It may ... s Carrying the unit requires two or more , black dots may appear constantly on the cables. Sound carries very easily at the unit. s If the unit is recommended to watch the unit at ...the manufacturer, as not to trouble your neighbors. Doing so may occur when still pictures are displayed continuously. For replacement, consult qualified service personnel. s Avoid prolonged contact with high-...
...combination to the unit. Handling of liquid crystal. The image may be uneven or the LCD panel may cause malfunction of the unit. This does not indicate a failure. It may ... s Carrying the unit requires two or more , black dots may appear constantly on the cables. Sound carries very easily at the unit. s If the unit is recommended to watch the unit at ...the manufacturer, as not to trouble your neighbors. Doing so may occur when still pictures are displayed continuously. For replacement, consult qualified service personnel. s Avoid prolonged contact with high-...

Operating Instructions
Page 9
... Unit from Toppling Over......... 11 Bundling the Connecting Cables 12 Unit Controls and Connectors 13 Front, Top and Side Panel 13 Rear Panel 15 Bottom Panel 16 Connecting the Unit Making Video and Audio Connections 17 Satellite Receiver 18 VCR and Cable 19 HD Equipment 20 ... Using the Sleep Function 31 Using the Settings Overview of the Settings 32 Using the Picture Settings 33 Selecting Picture Options 33 Selecting PC Picture Options 34 Using the Sound Settings 35 Selecting Sound Options 35 Using the Screen Settings 36 Selecting Screen Options 36 Selecting PC Screen Options...
... Unit from Toppling Over......... 11 Bundling the Connecting Cables 12 Unit Controls and Connectors 13 Front, Top and Side Panel 13 Rear Panel 15 Bottom Panel 16 Connecting the Unit Making Video and Audio Connections 17 Satellite Receiver 18 VCR and Cable 19 HD Equipment 20 ... Using the Sleep Function 31 Using the Settings Overview of the Settings 32 Using the Picture Settings 33 Selecting Picture Options 33 Selecting PC Picture Options 34 Using the Sound Settings 35 Selecting Sound Options 35 Using the Screen Settings 36 Selecting Screen Options 36 Selecting PC Screen Options...

Operating Instructions
Page 20
Note that this unit displays all power sources before making any connections. 1 Using a component video cable, connect your equipment has an HDMI or DVI connector, ... Y PB PR AUDIO-L (white) AUDIO-R (red) Rear of unit HD/DVD IN 3 (1080i/720p/480p/480i) Y PB PR L AUDIO R Some of picture in a resolution 1,366 dots × 768 lines. 2 Using an audio cable, connect your equipment's AUDIO output jacks to the unit's AUDIO input jacks. Connecting...are digital cable box, digital satellite receiver and digital TV receiver. 20 Component video (YPBPR) connection is necessary to provide sound.
Note that this unit displays all power sources before making any connections. 1 Using a component video cable, connect your equipment has an HDMI or DVI connector, ... Y PB PR AUDIO-L (white) AUDIO-R (red) Rear of unit HD/DVD IN 3 (1080i/720p/480p/480i) Y PB PR L AUDIO R Some of picture in a resolution 1,366 dots × 768 lines. 2 Using an audio cable, connect your equipment's AUDIO output jacks to the unit's AUDIO input jacks. Connecting...are digital cable box, digital satellite receiver and digital TV receiver. 20 Component video (YPBPR) connection is necessary to provide sound.

Operating Instructions
Page 28
...in the Sound settings. Press once to the unit's inputs. Press to select the external equipment connected to display the current Video Input number and Wide Mode settings. See page 40 on -screen cursor. Press to immediately cancel the display. The OSD (on screen display) will ...accessed in the Setup settings. Using the Unit Button Descriptions MUTING DISPLAY POWER MODE SOUND PICTURE WIDE Button 1 MUTING 2 DISPLAY INPUT V1 V2 V3 V4 V5 3 SOUND VOL POWER SAVING MENU FREEZE SLEEP 4 PICTURE 5 INPUT V1 to mute the sound. qs MENU qd SLEEP 28 Description Press to V5 z The...
...in the Sound settings. Press once to the unit's inputs. Press to select the external equipment connected to display the current Video Input number and Wide Mode settings. See page 40 on -screen cursor. Press to immediately cancel the display. The OSD (on screen display) will ...accessed in the Setup settings. Using the Unit Button Descriptions MUTING DISPLAY POWER MODE SOUND PICTURE WIDE Button 1 MUTING 2 DISPLAY INPUT V1 V2 V3 V4 V5 3 SOUND VOL POWER SAVING MENU FREEZE SLEEP 4 PICTURE 5 INPUT V1 to mute the sound. qs MENU qd SLEEP 28 Description Press to V5 z The...
Operating Instructions
Page 30
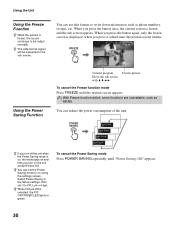
... Select Power Saving in the Setup settings, then set the Power Saving mode to on the unit except Picture Off. When you press the button again, only the frozen screen is displayed; To cancel the Power Saving mode Press POWER SAVING repeatedly until the normal screen appears. When you press... the button once, the current screen is frozen and the sub screen appears. Using the Unit Using the Freeze Function z While the picture is frozen, the sound continues to ...
... Select Power Saving in the Setup settings, then set the Power Saving mode to on the unit except Picture Off. When you press the button again, only the frozen screen is displayed; To cancel the Power Saving mode Press POWER SAVING repeatedly until the normal screen appears. When you press... the button once, the current screen is frozen and the sub screen appears. Using the Unit Using the Freeze Function z While the picture is frozen, the sound continues to ...
Operating Instructions
Page 32
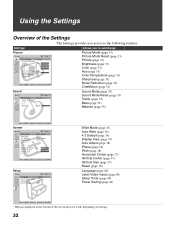
...change Picture Picture Picture Mode: Custom Picture Mode Reset Picture: Max Brightness: 40 Color: 60 Hue: 0 Color Temperature: Cool Sharpness: 18 Noise Reduction: On CineMotion: Auto Video 1 Select : Enter: Back: Exit: MENU Picture Mode (page 33) Picture Mode Reset (page 33) Picture (page...Sound Sound Sound Mode: Dynamic Sound Mode Reset Treble: Bass: Balance: Center Video 1 Sound Mode (page 35) Sound Mode Reset (page 35) Treble (page 35) Bass (page 35) Balance (page 35) Select : Enter: Back: Exit: MENU Screen Screen Wide Mode: Auto Wide: 4:3 Default: Display...
...change Picture Picture Picture Mode: Custom Picture Mode Reset Picture: Max Brightness: 40 Color: 60 Hue: 0 Color Temperature: Cool Sharpness: 18 Noise Reduction: On CineMotion: Auto Video 1 Select : Enter: Back: Exit: MENU Picture Mode (page 33) Picture Mode Reset (page 33) Picture (page...Sound Sound Sound Mode: Dynamic Sound Mode Reset Treble: Bass: Balance: Center Video 1 Sound Mode (page 35) Sound Mode Reset (page 35) Treble (page 35) Bass (page 35) Balance (page 35) Select : Enter: Back: Exit: MENU Screen Screen Wide Mode: Auto Wide: 4:3 Default: Display...

Operating Instructions
Page 42
...sound. Striped noise during ❑ This is activated (pages 31, 40). Wide Screen Mode changes ❑ The current Wide Screen Mode setting is automatically replaced with the automatically. 4:3 Default setting when you want to lock in front of the unit or at the remote control sensor of the unit. No color/Dark picture... the unit. ❑ Press V1 to V5 on the remote control (page 28) or press INPUT repeatedly on the top panel (page 13). Poor picture. picture is too bright/Color is set -top box/VCR antenna cable away from the screen (page 28). ❑ Disconnect your...
...sound. Striped noise during ❑ This is activated (pages 31, 40). Wide Screen Mode changes ❑ The current Wide Screen Mode setting is automatically replaced with the automatically. 4:3 Default setting when you want to lock in front of the unit or at the remote control sensor of the unit. No color/Dark picture... the unit. ❑ Press V1 to V5 on the remote control (page 28) or press INPUT repeatedly on the top panel (page 13). Poor picture. picture is too bright/Color is set -top box/VCR antenna cable away from the screen (page 28). ❑ Disconnect your...

Operating Instructions
Page 45
... player 22 DVI-HDTV-equipped device 25 HD equipment 20 HDMI-equipped device 24 Personal computer 26 Satellite receiver 18 VCR and cable 19 D Display Area 37 DISPLAY button 28 F Freeze 30 FREEZE button 28 H HD/DVD IN jack (1080i/720p/ 480p/480i) 15 HDMI IN jack 16 Headphones jack 13 High... Power Saving 30, 41 POWER SAVING button 28 R Reset 38 S S VIDEO jack 15 Settings Picture 32, 33 Screen 32, 36 Setup 32, 40 Sound 32, 35 Sharpness 33 Sleep 31 SLEEP button 28 Sleep Timer 40 SOUND button 28 Sound Mode 35 Sound Mode Reset 35 STANDBY LED 14 Support Belt 11 T, U Treble 35 Troubleshooting 42 turning...
... player 22 DVI-HDTV-equipped device 25 HD equipment 20 HDMI-equipped device 24 Personal computer 26 Satellite receiver 18 VCR and cable 19 D Display Area 37 DISPLAY button 28 F Freeze 30 FREEZE button 28 H HD/DVD IN jack (1080i/720p/ 480p/480i) 15 HDMI IN jack 16 Headphones jack 13 High... Power Saving 30, 41 POWER SAVING button 28 R Reset 38 S S VIDEO jack 15 Settings Picture 32, 33 Screen 32, 36 Setup 32, 40 Sound 32, 35 Sharpness 33 Sleep 31 SLEEP button 28 Sleep Timer 40 SOUND button 28 Sound Mode 35 Sound Mode Reset 35 STANDBY LED 14 Support Belt 11 T, U Treble 35 Troubleshooting 42 turning...


