Operating Instructions
Page 3
...unplug the LCD Projection TV immediately and have it further. ❑ If you call upon your Sony dealer regarding this product meets the ENERGY STAR® guidelines for energy efficiency. As an ENERGY STAR® Partner, Sony Corporation has determined that face the screen with opaque ... may be using the LCD Projection TV for safety purposes, to excessive dust or mechanical vibration. ❑ Avoid operating the LCD Projection TV at the rear of BBE Sound, Inc. Record these numbers in the spaces provided below 41°F (5°C). ❑ If the LCD Projection TV is a U.S.
...unplug the LCD Projection TV immediately and have it further. ❑ If you call upon your Sony dealer regarding this product meets the ENERGY STAR® guidelines for energy efficiency. As an ENERGY STAR® Partner, Sony Corporation has determined that face the screen with opaque ... may be using the LCD Projection TV for safety purposes, to excessive dust or mechanical vibration. ❑ Avoid operating the LCD Projection TV at the rear of BBE Sound, Inc. Record these numbers in the spaces provided below 41°F (5°C). ❑ If the LCD Projection TV is a U.S.
Operating Instructions
Page 5
... reliable operation of an internal malfunction that could create a fire hazard. Never spill liquid of the LCD Projection TV. If you clean the screen surface in the wrong way, the screen may cause hazards. Object and Liquid Entry Never push objects of time, it from the wall outlet as...mild soap and warm water. Cleaning Clean the cabinet of the LCD Projection TV with solution of LCD Projection TV. Never use power-line operated sets near water - To clean the screen, do as follows: ❑ Clean the screen with a soft cloth, such as they may be necessary to overturn....
... reliable operation of an internal malfunction that could create a fire hazard. Never spill liquid of the LCD Projection TV. If you clean the screen surface in the wrong way, the screen may cause hazards. Object and Liquid Entry Never push objects of time, it from the wall outlet as...mild soap and warm water. Cleaning Clean the cabinet of the LCD Projection TV with solution of LCD Projection TV. Never use power-line operated sets near water - To clean the screen, do as follows: ❑ Clean the screen with a soft cloth, such as they may be necessary to overturn....
Operating Instructions
Page 7
...by the manufacturer) to drop it on the screen, part of its light source. Ask a qualified service technician to dispose of any service or repairs to the set . Carry the LCD Projection TV in the specified manner If you carry the LCD Projection TV in red, replace the lamp with a ...certifies in writing that the set reaches the end of the screen appears white due to you, you may appear constantly on the display. For Safety Be careful when moving the LCD Projection TV When you install the LCD projection TV. 7 Replacement Parts When replacement parts are required, be affected...
...by the manufacturer) to drop it on the screen, part of its light source. Ask a qualified service technician to dispose of any service or repairs to the set . Carry the LCD Projection TV in the specified manner If you carry the LCD Projection TV in red, replace the lamp with a ...certifies in writing that the set reaches the end of the screen appears white due to you, you may appear constantly on the display. For Safety Be careful when moving the LCD Projection TV When you install the LCD projection TV. 7 Replacement Parts When replacement parts are required, be affected...
Operating Instructions
Page 8
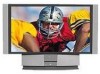
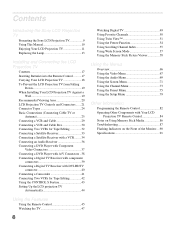
...Sony LCD Projection TV Presenting the Sony LCD Projection TV 9 Using This Manual 10 Enjoying Your LCD Projection TV 11 Replacing the Lamp 13 Installing and Connecting the LCD Projection TV Contents 17 Inserting Batteries into the Remote Control ..........17 Carrying Your LCD Projection TV 18 To Prevent the LCD Projection TV from Falling Down 19 When Installing Your LCD Projection TV...Up the LCD projection TV Automatically 44 Watching Digital TV 49 Using Favorite Channels 50 Using Twin View 51 Using the Freeze Function 54 Using Scrolling Channel Index 55 Using Wide Screen Mode 57 ...
...Sony LCD Projection TV Presenting the Sony LCD Projection TV 9 Using This Manual 10 Enjoying Your LCD Projection TV 11 Replacing the Lamp 13 Installing and Connecting the LCD Projection TV Contents 17 Inserting Batteries into the Remote Control ..........17 Carrying Your LCD Projection TV 18 To Prevent the LCD Projection TV from Falling Down 19 When Installing Your LCD Projection TV...Up the LCD projection TV Automatically 44 Watching Digital TV 49 Using Favorite Channels 50 Using Twin View 51 Using the Freeze Function 54 Using Scrolling Channel Index 55 Using Wide Screen Mode 57 ...
Operating Instructions
Page 9
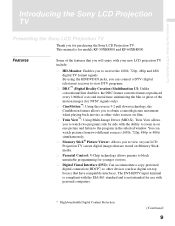
...Projection TV screen digital images that have compatible interfaces. The DVI-HDTV input terminal is compliant with personal computers. * High-bandwidth Digital Content Protection (Continued) 9 This manual is not intended for use with the EIA-861 standard and is for purchasing the Sony LCD Projection TV... you to view on your new LCD projection TV include: ❑ HD-Monitor: Enables you for models KF-50XBR800 and KF-60XBR800. Introducing the Sony LCD Projection TV Introducing the Sony LCD Projection TV Presenting the Sony LCD Projection TV Thank you to receive the 1080i, 720p...
...Projection TV screen digital images that have compatible interfaces. The DVI-HDTV input terminal is compliant with personal computers. * High-bandwidth Digital Content Protection (Continued) 9 This manual is not intended for use with the EIA-861 standard and is for purchasing the Sony LCD Projection TV... you to view on your new LCD projection TV include: ❑ HD-Monitor: Enables you for models KF-50XBR800 and KF-60XBR800. Introducing the Sony LCD Projection TV Introducing the Sony LCD Projection TV Presenting the Sony LCD Projection TV Thank you to receive the 1080i, 720p...
Operating Instructions
Page 10
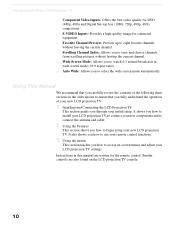
...channel. ❑ Wide Screen Mode: Allows you to watch 4:3 normal broadcasts in the order shown to select the wide screen mode automatically. Using This Manual We recommend that you through your new LCD projection TV. 1 Installing and Connecting the LCD Projection TV This section guides you carefully...review the contents of the following three sections in wide screen mode (16:9 aspect ratio). ❑ Auto Wide: Allows you to ensure that you fully understand the operation of your initial setup. Introducing the Sony LCD Projection TV ❑ Component Video Inputs: Offers the best video...
...channel. ❑ Wide Screen Mode: Allows you to watch 4:3 normal broadcasts in the order shown to select the wide screen mode automatically. Using This Manual We recommend that you through your new LCD projection TV. 1 Installing and Connecting the LCD Projection TV This section guides you carefully...review the contents of the following three sections in wide screen mode (16:9 aspect ratio). ❑ Auto Wide: Allows you to ensure that you fully understand the operation of your initial setup. Introducing the Sony LCD Projection TV ❑ Component Video Inputs: Offers the best video...
Operating Instructions
Page 11
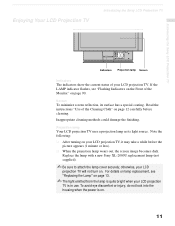
... lamp (not supplied). ✍ Be sure to attach the lamp cover securely; Enjoying Your LCD Projection TV Introducing the Sony LCD Projection TV Introducing the Sony LCD Projection TV Indicators Projection lamp Screen Indicators The indicators show the current status of the Cleaning Cloth" on page 90. Note the following.... ✍ The light emitted from the lamp is quite bright when your LCD projection TV. Read the instructions "Use of your LCD projection TV is on. 11 Screen To minimize screen reflection, its light source. To avoid eye discomfort or injury, do not look ...
... lamp (not supplied). ✍ Be sure to attach the lamp cover securely; Enjoying Your LCD Projection TV Introducing the Sony LCD Projection TV Introducing the Sony LCD Projection TV Indicators Projection lamp Screen Indicators The indicators show the current status of the Cleaning Cloth" on page 90. Note the following.... ✍ The light emitted from the lamp is quite bright when your LCD projection TV. Read the instructions "Use of your LCD projection TV is on. 11 Screen To minimize screen reflection, its light source. To avoid eye discomfort or injury, do not look ...
Operating Instructions
Page 12
... a humid room, or if the room temperature changes suddenly, the picture may result in a damaged screen. ✍ To clean the screen, please use any type of the Cleaning Cloth" below). Introducing the Sony LCD Projection TV Notes on the LCD Projection TV To enjoy clear pictures ❑ Be sure not to allow sunlight or light from a lamp...
... a humid room, or if the room temperature changes suddenly, the picture may result in a damaged screen. ✍ To clean the screen, please use any type of the Cleaning Cloth" below). Introducing the Sony LCD Projection TV Notes on the LCD Projection TV To enjoy clear pictures ❑ Be sure not to allow sunlight or light from a lamp...
Operating Instructions
Page 13
... to burst. ❑ Do not put any purpose other than replacement. If the screen becomes dark, the color looks unusual, or the LAMP indicator on the new lamp. Introducing the Sony LCD Projection TV Introducing the Sony LCD Projection TV Replacing the Lamp The projection lamp has a limited life which illuminates the picture. Failure to replace the lamp...
... to burst. ❑ Do not put any purpose other than replacement. If the screen becomes dark, the color looks unusual, or the LAMP indicator on the new lamp. Introducing the Sony LCD Projection TV Introducing the Sony LCD Projection TV Replacing the Lamp The projection lamp has a limited life which illuminates the picture. Failure to replace the lamp...

Operating Instructions
Page 18
Do not grasp the pedestal or the front panel of the LCD projecttion TV. 18 Installing and Connecting the LCD Projection TV Carrying Your LCD Projection TV Carrying the LCD projection TV requires at least two people. When moving the LCD projection TV, support the screen bottom with one hand while grasping the top part with the other hand, as shown in the illustration below. Do not grasp the pedestal or the front panel of the LCD projection TV, otherwise these parts might break off.
Do not grasp the pedestal or the front panel of the LCD projecttion TV. 18 Installing and Connecting the LCD Projection TV Carrying Your LCD Projection TV Carrying the LCD projection TV requires at least two people. When moving the LCD projection TV, support the screen bottom with one hand while grasping the top part with the other hand, as shown in the illustration below. Do not grasp the pedestal or the front panel of the LCD projection TV, otherwise these parts might break off.

Operating Instructions
Page 21
Installing and Connecting the LCD Projection TV LCD Projection TV Controls and Connectors Front Panel Menu Controls The front panel menu controls allow access to open and close the front panel To open To close OPEN (Continued) 21 The arrow buttons move the on -screen menus without the use of a remote control. Installing and Connecting the LCD Projection TV How to the on -screen cursor in the menus and by pressing the button selects the menu item. Pressing MENU brings up the on-screen menus.
Installing and Connecting the LCD Projection TV LCD Projection TV Controls and Connectors Front Panel Menu Controls The front panel menu controls allow access to open and close the front panel To open To close OPEN (Continued) 21 The arrow buttons move the on -screen menus without the use of a remote control. Installing and Connecting the LCD Projection TV How to the on -screen cursor in the menus and by pressing the button selects the menu item. Pressing MENU brings up the on-screen menus.

Operating Instructions
Page 37
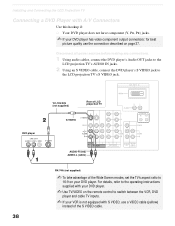
...with Component Video Connectors This is the preferred hookup to use the same row of the Wide Screen modes, set the TV's aspect ratio to the Y, PB and PR jacks on your DVD player. Rear of LCD projection TV Y VMC-10HG (not supplied) PB PR DVD player AUDIO-R (red) AUDIO-L (white)...Disconnect all power sources before making any connections. 1 Using three separate component video cables, connect the DVD player's Y, B-Y and R-Y jacks to 16:9 on the LCD projection TV. Use the HD/DVD IN 5 or 6 connections. ✍ The Y, B-Y and R-Y jacks on your DVD player are sometimes labeled Y, CB and CR, or ...
...with Component Video Connectors This is the preferred hookup to use the same row of the Wide Screen modes, set the TV's aspect ratio to the Y, PB and PR jacks on your DVD player. Rear of LCD projection TV Y VMC-10HG (not supplied) PB PR DVD player AUDIO-R (red) AUDIO-L (white)...Disconnect all power sources before making any connections. 1 Using three separate component video cables, connect the DVD player's Y, B-Y and R-Y jacks to 16:9 on the LCD projection TV. Use the HD/DVD IN 5 or 6 connections. ✍ The Y, B-Y and R-Y jacks on your DVD player are sometimes labeled Y, CB and CR, or ...
Operating Instructions
Page 38
... VIDEO cable (yellow) instead of the Wide Screen modes, set the TV's aspect ratio to 16:9 on your VCR is not equipped with your DVD player. ✍ Use TV/VIDEO on page 37. DVD player 38 YC-15V/30V (not supplied) Rear of LCD projection TV S VIDEO AUDIO-R (red) AUDIO-L (white...) RK-74A (not supplied) ✍ To take advantage of the S VIDEO cable. Disconnect all power sources before making any connections. 1 Using audio cables, connect the DVD player's Audio OUT jacks to the LCD projection TV's AUDIO IN ...
... VIDEO cable (yellow) instead of the Wide Screen modes, set the TV's aspect ratio to 16:9 on your VCR is not equipped with your DVD player. ✍ Use TV/VIDEO on page 37. DVD player 38 YC-15V/30V (not supplied) Rear of LCD projection TV S VIDEO AUDIO-R (red) AUDIO-L (white...) RK-74A (not supplied) ✍ To take advantage of the S VIDEO cable. Disconnect all power sources before making any connections. 1 Using audio cables, connect the DVD player's Audio OUT jacks to the LCD projection TV's AUDIO IN ...

Operating Instructions
Page 44
...use . If you use the channel buttons on for all channel selection. The Auto Setup screen appears when you turn on the LCD projection TV. 2 Press FUNCTION on the remote control until the TV indicator lights up your channels. to run Auto Setup, or press CH- Installing and Connecting... the LCD Projection TV Setting Up the LCD projection TV Automatically After you finish connecting your LCD projection TV, you can run Auto Program by selecting it later by using the Auto Program feature in the Channel...
...use . If you use the channel buttons on for all channel selection. The Auto Setup screen appears when you turn on the LCD projection TV. 2 Press FUNCTION on the remote control until the TV indicator lights up your channels. to run Auto Setup, or press CH- Installing and Connecting... the LCD Projection TV Setting Up the LCD projection TV Automatically After you finish connecting your LCD projection TV, you can run Auto Program by selecting it later by using the Auto Program feature in the Channel...
Operating Instructions
Page 45
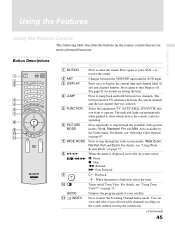
... M: Fast-Forward H: Playback 0 GUIDE qa INDEX : When the menu is operating. Turns on -screen cursor. Also available in the Video menu. The LCD projection TV alternates between the current channel and the last channel that are for details on the screen without leaving the current one. (Continued) 45 For details, see "Selecting Video Options...
... M: Fast-Forward H: Playback 0 GUIDE qa INDEX : When the menu is operating. Turns on -screen cursor. Also available in the Video menu. The LCD projection TV alternates between the current channel and the last channel that are for details on the screen without leaving the current one. (Continued) 45 For details, see "Selecting Video Options...
Operating Instructions
Page 46
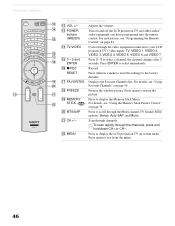
ws MENU Description Adjusts the volume. For instructions, see "Using Favorite Channels" on page 50. Freezes the window picture. For details, see "Programming the Remote Control" on page 58 Press to scroll through the channels, press and hold down...to select a channel, the channel changes after 2 seconds. Press to your LCD projection TV's video inputs: TV, VIDEO 1, VIDEO 2, VIDEO 3, VIDEO 4, VIDEO 5, VIDEO 6 and VIDEO 7. Using the Features RM-Y912 Button qs VOL +/- Turn on -screen menu. qd POWER buttons (GREEN) qf TV/VIDEO qg 0 - 9 and ENTER qh z REC RESET qj FAVORITES qk ...
ws MENU Description Adjusts the volume. For instructions, see "Using Favorite Channels" on page 50. Freezes the window picture. For details, see "Programming the Remote Control" on page 58 Press to scroll through the channels, press and hold down...to select a channel, the channel changes after 2 seconds. Press to your LCD projection TV's video inputs: TV, VIDEO 1, VIDEO 2, VIDEO 3, VIDEO 4, VIDEO 5, VIDEO 6 and VIDEO 7. Using the Features RM-Y912 Button qs VOL +/- Turn on -screen menu. qd POWER buttons (GREEN) qf TV/VIDEO qg 0 - 9 and ENTER qh z REC RESET qj FAVORITES qk ...
Operating Instructions
Page 47
... . The following will jump between the VHF/UHF input and the AUX input. 3 POWER Turns the LCD projection TV on page 54). 0 DISPLAY Press to mute the sound. down information that appears on the LCD projection TV's screen (see "Using the Freeze Function" on and off , press DISPLAY again. (Continued) 47 The channel will appear...
... . The following will jump between the VHF/UHF input and the AUX input. 3 POWER Turns the LCD projection TV on page 54). 0 DISPLAY Press to mute the sound. down information that appears on the LCD projection TV's screen (see "Using the Freeze Function" on and off , press DISPLAY again. (Continued) 47 The channel will appear...

Operating Instructions
Page 50
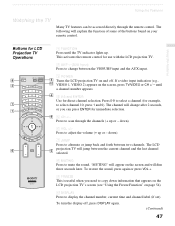
... V or v. Press to select. ✍ When the remote control mode is set to other than TV mode, you want to the Favorite Channel number. z To assign Channel Labels (e.g., ABC, HBO, MTV... as shown at right, use the Channel Label feature in the preview window. The program of the screen. The Favorite Channel options appear. Creating a List of Favorite Channels Displaying a List of Favorite Channels 1...channels that you cannot select the channel by using the Channel Menu, see page 74). 50 A preview of the highlighted channel appears in the upper right of that channel appears in...
... V or v. Press to select. ✍ When the remote control mode is set to other than TV mode, you want to the Favorite Channel number. z To assign Channel Labels (e.g., ABC, HBO, MTV... as shown at right, use the Channel Label feature in the preview window. The program of the screen. The Favorite Channel options appear. Creating a List of Favorite Channels Displaying a List of Favorite Channels 1...channels that you cannot select the channel by using the Channel Menu, see page 74). 50 A preview of the highlighted channel appears in the upper right of that channel appears in...
Operating Instructions
Page 51
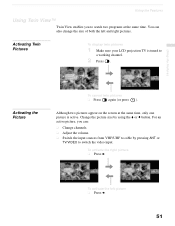
Although two pictures appear on the screen at the same time. To activate the left and right pictures. You can : ❑ Change channels. ❑ Adjust the... (or press ). To activate the right picture ❑ Press b. Activating Twin Pictures To display twin pictures 1 Make sure your LCD projection TV is active. Using the Features Using Twin View™ Twin View enables you can also change the size of both the left picture ❑...only one picture is tuned to switch the video input. Change the picture size by pressing ANT or TV/VIDEO to a working channel. 2 Press .
Although two pictures appear on the screen at the same time. To activate the left and right pictures. You can : ❑ Change channels. ❑ Adjust the... (or press ). To activate the right picture ❑ Press b. Activating Twin Pictures To display twin pictures 1 Make sure your LCD projection TV is active. Using the Features Using Twin View™ Twin View enables you can also change the size of both the left picture ❑...only one picture is tuned to switch the video input. Change the picture size by pressing ANT or TV/VIDEO to a working channel. 2 Press .
Operating Instructions
Page 53
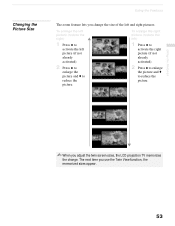
... Features The zoom feature lets you use the Twin View function, the memorized sizes appear. 53 Using the Features ✍ When you adjust the twin screen sizes, the LCD projection TV memorizes the change the size of the left and right pictures.
... Features The zoom feature lets you use the Twin View function, the memorized sizes appear. 53 Using the Features ✍ When you adjust the twin screen sizes, the LCD projection TV memorizes the change the size of the left and right pictures.


