
Operating Instructions
Page 3
... dust or mechanical vibration. ❑ Avoid operating the LCD Projection TV at temperature below 41°F (5°C). ❑ If the LCD Projection TV is transported directly from SRS Labs, Inc. As an ENERGY STAR® Partner, Sony Corporation has determined that face the screen with opaque drapery. registered... and BBE Symbol are trademarks of BBE Sound, Inc. Safety ❑ Operate the LCD Projection TV only on 120 V AC. ❑ The plug is designed, for several days, disconnect the power by pulling the plug itself. If you are unable to direct illumination or direct sunlight....
... dust or mechanical vibration. ❑ Avoid operating the LCD Projection TV at temperature below 41°F (5°C). ❑ If the LCD Projection TV is transported directly from SRS Labs, Inc. As an ENERGY STAR® Partner, Sony Corporation has determined that face the screen with opaque drapery. registered... and BBE Symbol are trademarks of BBE Sound, Inc. Safety ❑ Operate the LCD Projection TV only on 120 V AC. ❑ The plug is designed, for several days, disconnect the power by pulling the plug itself. If you are unable to direct illumination or direct sunlight....
Operating Instructions
Page 4
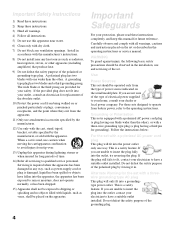
... openings. Alternate Warning for the set or described in the installation, use this apparatus during lightning storms or when unused for replacement of power source indicated on the set with a threewire grounding type AC plug This plug will fit into the apparatus, the apparatus has been exposed...not be exposed to have a suitable outlet installed. If the provided plug does not fit into the outlet, contact your dealer or local power company. Use Power Sources This set with a three-wire grounding type plug (a plug having one way. If the plug still fails to fit, contact your...
... openings. Alternate Warning for the set or described in the installation, use this apparatus during lightning storms or when unused for replacement of power source indicated on the set with a threewire grounding type AC plug This plug will fit into the apparatus, the apparatus has been exposed...not be exposed to have a suitable outlet installed. If the provided plug does not fit into the outlet, contact your dealer or local power company. Use Power Sources This set with a three-wire grounding type plug (a plug having one way. If the plug still fails to fit, contact your...
Operating Instructions
Page 5
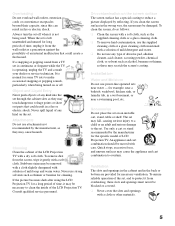
...the screen surface in a wet basement, or near water - Use only a cart or stand recommended by reflecting. To ensure reliable operation of LCD Projection TV. Object and Liquid Entry Never push objects of any kind on or off when it gently with a dry soft cloth. Never spill liquid of ... may be blocked or covered. ❑ Never cover the slots and openings with a solution of mild detergent and water. ❑ Do not use power-line operated sets near a swimming pool, etc. On contamination on an unstable cart, stand, table or shelf. Accessories Do not place the set is...
...the screen surface in a wet basement, or near water - Use only a cart or stand recommended by reflecting. To ensure reliable operation of LCD Projection TV. Object and Liquid Entry Never push objects of any kind on or off when it gently with a dry soft cloth. Never spill liquid of ... may be blocked or covered. ❑ Never cover the slots and openings with a solution of mild detergent and water. ❑ Do not use power-line operated sets near a swimming pool, etc. On contamination on an unstable cart, stand, table or shelf. Accessories Do not place the set is...
Operating Instructions
Page 6
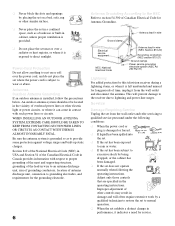
...supporting structure, grounding of the Canadian Electrical Code in the operating instructions. Improper adjustment of other electric light or power circuits, or where it from the wall outlet and refer servicing to qualified service personnel under the following conditions: ❑ When...service equipment NEC: National Electrical Code Antenna lead-in wire (NEC Section 810-20) Grounding conductors (NEC section 810-21) Ground clamps Power service grounding electrode system (NEC Art 250 Part H) Lightning For added protection for this television receiver during a lightning storm, or when...
...supporting structure, grounding of the Canadian Electrical Code in the operating instructions. Improper adjustment of other electric light or power circuits, or where it from the wall outlet and refer servicing to qualified service personnel under the following conditions: ❑ When...service equipment NEC: National Electrical Code Antenna lead-in wire (NEC Section 810-20) Grounding conductors (NEC section 810-21) Ground clamps Power service grounding electrode system (NEC Art 250 Part H) Lightning For added protection for this television receiver during a lightning storm, or when...
Operating Instructions
Page 11
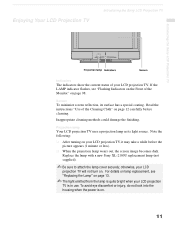
... 11 To avoid eye discomfort or injury, do not look into the housing when the power is on your LCD projection TV is quite bright when your LCD projection TV, it may take a while before cleaning. Inappropriate cleaning methods could damage the finishing. ... appears (1 minute or less). ❑ When the projection lamp wears out, the screen image becomes dark. otherwise, your LCD projection TV. Enjoying Your LCD Projection TV Introducing the Sony LCD Projection TV Introducing the Sony LCD Projection TV Projection lamp Indicators Screen Indicators The indicators show the current status...
... 11 To avoid eye discomfort or injury, do not look into the housing when the power is on your LCD projection TV is quite bright when your LCD projection TV, it may take a while before cleaning. Inappropriate cleaning methods could damage the finishing. ... appears (1 minute or less). ❑ When the projection lamp wears out, the screen image becomes dark. otherwise, your LCD projection TV. Enjoying Your LCD Projection TV Introducing the Sony LCD Projection TV Introducing the Sony LCD Projection TV Projection lamp Indicators Screen Indicators The indicators show the current status...
Operating Instructions
Page 12
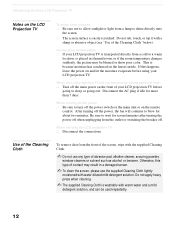
Introducing the Sony LCD Projection TV Notes on the LCD Projection TV To enjoy clear pictures ❑ Be sure not to allow sunlight or light from the outlet or switching the breaker off. When carrying the LCD projection TV ❑ Disconnect the connections. Use of the Cleaning Cloth To ...The supplied Cleaning Cloth is easily scratched. On moisture condensation ❑ If your LCD projection TV. When turning off the power ❑ Be sure to wait for several minutes after turning the power off the power, the fan will not be used for more than 7 days. Otherwise, this ...
Introducing the Sony LCD Projection TV Notes on the LCD Projection TV To enjoy clear pictures ❑ Be sure not to allow sunlight or light from the outlet or switching the breaker off. When carrying the LCD projection TV ❑ Disconnect the connections. Use of the Cleaning Cloth To ...The supplied Cleaning Cloth is easily scratched. On moisture condensation ❑ If your LCD projection TV. When turning off the power ❑ Be sure to wait for several minutes after turning the power off the power, the fan will not be used for more than 7 days. Otherwise, this ...
Operating Instructions
Page 13
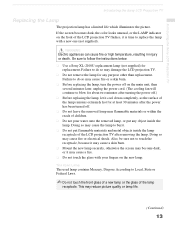
... unit, then several minutes later, unplug the power cord. (The cooling fan will continue to replace the lamp with your fingers on the front of the lamp receptacle. This may cause fire or electrical shock. Introducing the Sony LCD Projection TV Introducing the Sony LCD Projection TV Replacing the Lamp The projection lamp has a limited life which illuminates...
... unit, then several minutes later, unplug the power cord. (The cooling fan will continue to replace the lamp with your fingers on the front of the lamp receptacle. This may cause fire or electrical shock. Introducing the Sony LCD Projection TV Introducing the Sony LCD Projection TV Replacing the Lamp The projection lamp has a limited life which illuminates...
Operating Instructions
Page 14
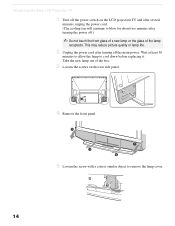
... lamp out of the lamp receptacle. Wait at least 30 minutes to allow the lamp to remove the lamp cover. 14 Introducing the Sony LCD Projection TV 1 Turn off the power switch on the rear side panel. 4 Remove the front panel. 5 Loosen the screw with a coin or similar object to cool down before replacing it...
... lamp out of the lamp receptacle. Wait at least 30 minutes to allow the lamp to remove the lamp cover. 14 Introducing the Sony LCD Projection TV 1 Turn off the power switch on the rear side panel. 4 Remove the front panel. 5 Loosen the screw with a coin or similar object to cool down before replacing it...
Operating Instructions
Page 15
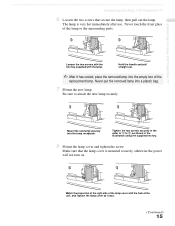
... pull straight out. ✍ After it was. (Continued) 15 Make sure that secure the lamp, then pull out the lamp. Match the projection of the right side of the lamp cover with the lamp. Mount the new lamp securely into the empty box of 1 to attach the new...lamp cover and tighten the screw. The lamp is mounted securely, otherwise the power will not turn on. Never put the removed lamp into a plastic bag. 7 Mount the new lamp. Introducing the Sony LCD Projection TV Introducing the Sony LCD Projection TV 6 Loosen the two screws that the lamp cover is very hot immediately after...
... pull straight out. ✍ After it was. (Continued) 15 Make sure that secure the lamp, then pull out the lamp. Match the projection of the right side of the lamp cover with the lamp. Mount the new lamp securely into the empty box of 1 to attach the new...lamp cover and tighten the screw. The lamp is mounted securely, otherwise the power will not turn on. Never put the removed lamp into a plastic bag. 7 Mount the new lamp. Introducing the Sony LCD Projection TV Introducing the Sony LCD Projection TV 6 Loosen the two screws that the lamp cover is very hot immediately after...
Operating Instructions
Page 16
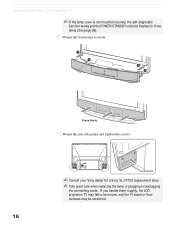
Press firmly. 10 Mount the rear side panel and tighten the screws. ✍ Consult your Sony dealer for three times (See page 98). 9 Mount the front panel securely. Introducing the Sony LCD Projection TV ✍ If the lamp cover is not mounted securely, the self-diagnostic function works and the POWER/STANDBY indicator flashes for a Sony XL-2100U replacement lamp. ✍ Take great care when replacing the lamp or plugging in/unplugging the connecting cords. If you handle them roughly, the LCD projection TV may fall or be moved, and the TV stand or floor surfaces may be scratched. 16
Press firmly. 10 Mount the rear side panel and tighten the screws. ✍ Consult your Sony dealer for three times (See page 98). 9 Mount the front panel securely. Introducing the Sony LCD Projection TV ✍ If the lamp cover is not mounted securely, the self-diagnostic function works and the POWER/STANDBY indicator flashes for a Sony XL-2100U replacement lamp. ✍ Take great care when replacing the lamp or plugging in/unplugging the connecting cords. If you handle them roughly, the LCD projection TV may fall or be moved, and the TV stand or floor surfaces may be scratched. 16
Operating Instructions
Page 29
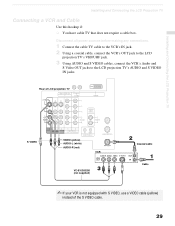
...power sources before making any connections. 1 Connect the cable TV cable to the VCR's IN jack. 2 Using a coaxial cable, connect the VCR's OUT jack to the LCD projection TV's VHF/UHF jack. 3 Using AUDIO and S VIDEO cables, connect the VCR's Audio and S Video OUT jacks to the LCD projection TV...'s AUDIO and S VIDEO IN jacks. Installing and Connecting the LCD Projection TV Installing and Connecting the LCD Projection TV Connecting a VCR and Cable Use this hookup if: ❑ You have cable TV that does not require a cable box. Rear of LCD projection TV S VIDEO VIDEO ...
...power sources before making any connections. 1 Connect the cable TV cable to the VCR's IN jack. 2 Using a coaxial cable, connect the VCR's OUT jack to the LCD projection TV's VHF/UHF jack. 3 Using AUDIO and S VIDEO cables, connect the VCR's Audio and S Video OUT jacks to the LCD projection TV...'s AUDIO and S VIDEO IN jacks. Installing and Connecting the LCD Projection TV Installing and Connecting the LCD Projection TV Connecting a VCR and Cable Use this hookup if: ❑ You have cable TV that does not require a cable box. Rear of LCD projection TV S VIDEO VIDEO ...
Operating Instructions
Page 30
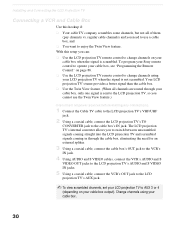
... Sony remote control to operate your cable box, see "Programming the Remote Control" on page 86. ❑ Use the LCD projection TV remote control to change channels on your cable box when the signal is not scrambled. Change channels using your cable box. 30 Your LCD projection TV's... With this hookup if: ❑ Your cable TV company scrambles some channels, but not all power sources before making any connections. 1 Connect the Cable TV cable to the LCD projection TV's VHF/UHF jack. 2 Using a coaxial cable, connect the LCD projection TV's TO CONVERTER jack to the cable box's IN...
... Sony remote control to operate your cable box, see "Programming the Remote Control" on page 86. ❑ Use the LCD projection TV remote control to change channels on your cable box when the signal is not scrambled. Change channels using your cable box. 30 Your LCD projection TV's... With this hookup if: ❑ Your cable TV company scrambles some channels, but not all power sources before making any connections. 1 Connect the Cable TV cable to the LCD projection TV's VHF/UHF jack. 2 Using a coaxial cable, connect the LCD projection TV's TO CONVERTER jack to the cable box's IN...
Operating Instructions
Page 32
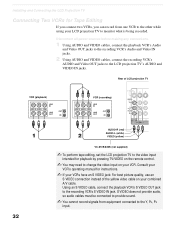
...sound. ✍ You cannot record signals from one VCR to the other while using your combined A/V cable. Installing and Connecting the LCD Projection TV Connecting Two VCRs for Tape Editing If you connect two VCRs, you can record from equipment connected to change the video input on the ...remote control. ✍ You may need to the Y, PB, PR input. 32 Rear of the yellow video cable on your LCD projection TV to monitor what is being recorded. Disconnect all power sources before making any connections. 1 Using AUDIO and VIDEO cables, connect the playback VCR's Audio and...
...sound. ✍ You cannot record signals from one VCR to the other while using your combined A/V cable. Installing and Connecting the LCD Projection TV Connecting Two VCRs for Tape Editing If you connect two VCRs, you can record from equipment connected to change the video input on the ...remote control. ✍ You may need to the Y, PB, PR input. 32 Rear of the yellow video cable on your LCD projection TV to monitor what is being recorded. Disconnect all power sources before making any connections. 1 Using AUDIO and VIDEO cables, connect the playback VCR's Audio and...
Operating Instructions
Page 33
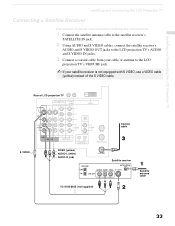
...Projection TV Installing and Connecting the LCD Projection TV Connecting a Satellite Receiver Disconnect all power sources before making any connections. 1 Connect the satellite antenna cable to the satellite receiver's SATELLITE IN jack. 2 Using AUDIO and S VIDEO cables, connect the satellite receiver's AUDIO and S VIDEO OUT jacks to the LCD projection TV... from your cable or antenna to the LCD projection TV's VHF/UHF jack. ✍ If your satellite receiver is not equipped with S VIDEO, use a VIDEO cable (yellow) instead of LCD projection TV S VIDEO Coaxial cable VIDEO (yellow) AUDIO-L...
...Projection TV Installing and Connecting the LCD Projection TV Connecting a Satellite Receiver Disconnect all power sources before making any connections. 1 Connect the satellite antenna cable to the satellite receiver's SATELLITE IN jack. 2 Using AUDIO and S VIDEO cables, connect the satellite receiver's AUDIO and S VIDEO OUT jacks to the LCD projection TV... from your cable or antenna to the LCD projection TV's VHF/UHF jack. ✍ If your satellite receiver is not equipped with S VIDEO, use a VIDEO cable (yellow) instead of LCD projection TV S VIDEO Coaxial cable VIDEO (yellow) AUDIO-L...
Operating Instructions
Page 34
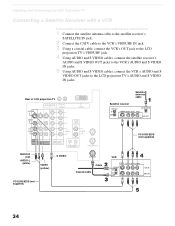
...Projection TV Connecting a Satellite Receiver with a VCR Disconnect all power sources before making any connections. 1 Connect the satellite antenna cable to the satellite receiver's SATELLITE IN jack. 2 Connect the CATV cable to the VCR's VHF/UHF IN jack. 3 Using a coaxial cable, connect the VCR's OUT jack to the LCD projection TV...Using AUDIO and S VIDEO cables, connect the VCR's AUDIO and S VIDEO OUT jacks to the LCD projection TV's AUDIO and S VIDEO IN jacks. Rear of LCD projection TV Satellite receiver Satellite antenna cable AUDIO-R (red) AUDIO-L (white) S VIDEO VIDEO (yellow) VC-...
...Projection TV Connecting a Satellite Receiver with a VCR Disconnect all power sources before making any connections. 1 Connect the satellite antenna cable to the satellite receiver's SATELLITE IN jack. 2 Connect the CATV cable to the VCR's VHF/UHF IN jack. 3 Using a coaxial cable, connect the VCR's OUT jack to the LCD projection TV...Using AUDIO and S VIDEO cables, connect the VCR's AUDIO and S VIDEO OUT jacks to the LCD projection TV's AUDIO and S VIDEO IN jacks. Rear of LCD projection TV Satellite receiver Satellite antenna cable AUDIO-R (red) AUDIO-L (white) S VIDEO VIDEO (yellow) VC-...
Operating Instructions
Page 36
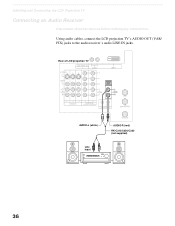
Using audio cables, connect the LCD projection TV's AUDIO OUT (VAR/ FIX) jacks to the audio receiver's audio LINE IN jacks. Installing and Connecting the LCD Projection TV Connecting an Audio Receiver Disconnect all power sources before making any connections. Rear of LCD projection TV AUDIO-L (white) Line input AUDIO-R (red) RK-C310/C320/C330 (not supplied) 36
Using audio cables, connect the LCD projection TV's AUDIO OUT (VAR/ FIX) jacks to the audio receiver's audio LINE IN jacks. Installing and Connecting the LCD Projection TV Connecting an Audio Receiver Disconnect all power sources before making any connections. Rear of LCD projection TV AUDIO-L (white) Line input AUDIO-R (red) RK-C310/C320/C330 (not supplied) 36
Operating Instructions
Page 37
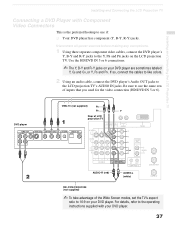
... PB and PR. Use the HD/DVD IN 5 or 6 connections. ✍ The Y, B-Y and R-Y jacks on the LCD projection TV. DVD player VMC-10 (not supplied) PB PR Y Rear of LCD projection TV AUDIO-R (red) AUDIO-L (white) RK-C310/C320/C330 (not supplied) ✍ To take advantage of the Wide Screen modes... cable, connect the DVD player's Audio OUT jacks to the Y, PB and PR jacks on your DVD player. Disconnect all power sources before making any connections. 1 Using three separate component video cables, connect the DVD player's Y, B-Y and R-Y jacks to the LCD projection TV's AUDIO IN jacks.
... PB and PR. Use the HD/DVD IN 5 or 6 connections. ✍ The Y, B-Y and R-Y jacks on the LCD projection TV. DVD player VMC-10 (not supplied) PB PR Y Rear of LCD projection TV AUDIO-R (red) AUDIO-L (white) RK-C310/C320/C330 (not supplied) ✍ To take advantage of the Wide Screen modes... cable, connect the DVD player's Audio OUT jacks to the Y, PB and PR jacks on your DVD player. Disconnect all power sources before making any connections. 1 Using three separate component video cables, connect the DVD player's Y, B-Y and R-Y jacks to the LCD projection TV's AUDIO IN jacks.
Operating Instructions
Page 38
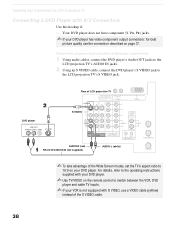
Disconnect all power sources before making any connections. 1 Using audio cables, connect the DVD player's Audio OUT jacks to the LCD projection TV's AUDIO IN jacks. 2 Using an S VIDEO cable, connect the DVD player's S VIDEO jack to 16:9 on your DVD player has video component output ... equipped with A/V Connectors Use this hookup if: ❑ Your DVD player does not have component (Y, PB, PR) jacks. ✍ If your DVD player. Rear of LCD projection TV DVD player S VIDEO AUDIO-R (red) RK-C310/C320/C330 (not supplied) AUDIO-L (white) ✍ To take advantage of the S VIDEO cable. 38 ...
Disconnect all power sources before making any connections. 1 Using audio cables, connect the DVD player's Audio OUT jacks to the LCD projection TV's AUDIO IN jacks. 2 Using an S VIDEO cable, connect the DVD player's S VIDEO jack to 16:9 on your DVD player has video component output ... equipped with A/V Connectors Use this hookup if: ❑ Your DVD player does not have component (Y, PB, PR) jacks. ✍ If your DVD player. Rear of LCD projection TV DVD player S VIDEO AUDIO-R (red) RK-C310/C320/C330 (not supplied) AUDIO-L (white) ✍ To take advantage of the S VIDEO cable. 38 ...
Operating Instructions
Page 39
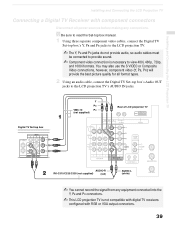
...supplied) Rear of LCD projection TV Digital TV Set-top box AUDIO-R RK-C310/C320/C330 (not supplied) (red) AUDIO-L (white) ✍ You cannot record the signal from any connections. Installing and Connecting the LCD Projection TV Installing and Connecting the LCD Projection TV Connecting a Digital TV Receiver with... video (Y, PB, PR) will provide the best picture quality for all power sources before making any equipment connected into the Y, PB and PR connectors. ✍ This LCD projection TV is necessary to provide sound. ✍ Component video connection is not compatible...
...supplied) Rear of LCD projection TV Digital TV Set-top box AUDIO-R RK-C310/C320/C330 (not supplied) (red) AUDIO-L (white) ✍ You cannot record the signal from any connections. Installing and Connecting the LCD Projection TV Installing and Connecting the LCD Projection TV Connecting a Digital TV Receiver with... video (Y, PB, PR) will provide the best picture quality for all power sources before making any equipment connected into the Y, PB and PR connectors. ✍ This LCD projection TV is necessary to provide sound. ✍ Component video connection is not compatible...
Operating Instructions
Page 40
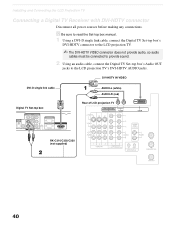
...-L (white) AUDIO-R (red) Rear of LCD projection TV RK-C310/C320/C330 (not supplied) 40 DVI-HDTV IN VIDEO DVI-D single link cable Digital TV Set-top box OPTICAL AUDIO OUT VIDEO OUT (480i) 1 2 L1 L2 OPTICAL S. Installing and Connecting the LCD Projection TV Connecting a Digital TV Receiver with DVI-HDTV connector Disconnect all power sources before making...
...-L (white) AUDIO-R (red) Rear of LCD projection TV RK-C310/C320/C330 (not supplied) 40 DVI-HDTV IN VIDEO DVI-D single link cable Digital TV Set-top box OPTICAL AUDIO OUT VIDEO OUT (480i) 1 2 L1 L2 OPTICAL S. Installing and Connecting the LCD Projection TV Connecting a Digital TV Receiver with DVI-HDTV connector Disconnect all power sources before making...


