
Operating Instructions
Page 3
... safety purposes, to a warm location, or if the room temperature changes suddenly, the picture may be using the LCD Projection TV for several days, disconnect the power by BBE Sound, Inc. under license from SRS Labs, Inc. ENERGY STAR® is recommended to use spot lighting directed... and walls are licensed by pulling the plug itself. As an ENERGY STAR® Partner, Sony Corporation has determined that face the screen with opaque drapery. Safety ❑ Operate the LCD Projection TV only on 120 V AC. ❑ The plug is incorporated under U.S. Never pull on page...
... safety purposes, to a warm location, or if the room temperature changes suddenly, the picture may be using the LCD Projection TV for several days, disconnect the power by BBE Sound, Inc. under license from SRS Labs, Inc. ENERGY STAR® is recommended to use spot lighting directed... and walls are licensed by pulling the plug itself. As an ENERGY STAR® Partner, Sony Corporation has determined that face the screen with opaque drapery. Safety ❑ Operate the LCD Projection TV only on 120 V AC. ❑ The plug is incorporated under U.S. Never pull on page...
Operating Instructions
Page 4
... with the manufacturer's instructions. 8) Do not install near water. 6) Clean only with dry cloth. 7) Do not block any way, such as power-supply cord or plug is equipped with liquids, such as radiators, heat registers, stoves, or other . This is a safety feature. Servicing is ...replacement of the polarized or grounding-type plug. If the plug still fails to dripping or splashing and no objects filled with a polarized AC power cord plug (a plug having a third pin for the set . Important Safety Instructions 1) Read these instructions. 2) Keep these instructions completely, and...
... with the manufacturer's instructions. 8) Do not install near water. 6) Clean only with dry cloth. 7) Do not block any way, such as power-supply cord or plug is equipped with liquids, such as radiators, heat registers, stoves, or other . This is a safety feature. Servicing is ...replacement of the polarized or grounding-type plug. If the plug still fails to dripping or splashing and no objects filled with a polarized AC power cord plug (a plug having a third pin for the set . Important Safety Instructions 1) Read these instructions. 2) Keep these instructions completely, and...
Operating Instructions
Page 5
..., or near water - Cleaning Clean the cabinet of mild soap and warm water. If the picture becomes dark after using the LCD Projection TV for some TV sets to make occasional snapping or popping sounds, particularly when being used. Object and Liquid Entry Never push objects of any type of... mild detergent and water. ❑ Do not use strong solvents such as a precaution against the possibility of LCD Projection TV. Attachments Do not use power-line operated sets near a swimming pool, etc. Stubborn stains may fall, causing serious injury to a child or an adult and ...
..., or near water - Cleaning Clean the cabinet of mild soap and warm water. If the picture becomes dark after using the LCD Projection TV for some TV sets to make occasional snapping or popping sounds, particularly when being used. Object and Liquid Entry Never push objects of any type of... mild detergent and water. ❑ Do not use strong solvents such as a precaution against the possibility of LCD Projection TV. Attachments Do not use power-line operated sets near a swimming pool, etc. Stubborn stains may fall, causing serious injury to a child or an adult and ...
Operating Instructions
Page 6
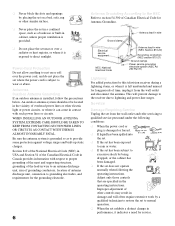
... space, such as to provide some protection against voltage surges and built-up static charges. Improper adjustment of other electric light or power circuits, or where it indicates a need for long periods of Canadian Electrical Code for Antenna Grounding. Antennas Outdoor Antenna Grounding If... equipment NEC: National Electrical Code Antenna lead-in wire (NEC Section 810-20) Grounding conductors (NEC section 810-21) Ground clamps Power service grounding electrode system (NEC Art 250 Part H) Lightning For added protection for this television receiver during a lightning storm, or when...
... space, such as to provide some protection against voltage surges and built-up static charges. Improper adjustment of other electric light or power circuits, or where it indicates a need for long periods of Canadian Electrical Code for Antenna Grounding. Antennas Outdoor Antenna Grounding If... equipment NEC: National Electrical Code Antenna lead-in wire (NEC Section 810-20) Grounding conductors (NEC section 810-21) Ground clamps Power service grounding electrode system (NEC Art 250 Part H) Lightning For added protection for this television receiver during a lightning storm, or when...
Operating Instructions
Page 11
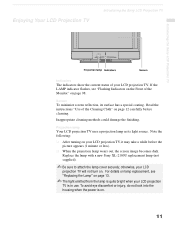
..., do not look into the housing when the power is in use. Screen To minimize screen reflection, its light source. Projection lamp Your LCD projection TV uses a projection lamp as its surface has a special coating. otherwise, your LCD projection TV. Enjoying Your LCD Projection TV Introducing the Sony LCD Projection TV Introducing the Sony LCD Projection TV Projection lamp Indicators Screen Indicators The indicators show the...
..., do not look into the housing when the power is in use. Screen To minimize screen reflection, its light source. Projection lamp Your LCD projection TV uses a projection lamp as its surface has a special coating. otherwise, your LCD projection TV. Enjoying Your LCD Projection TV Introducing the Sony LCD Projection TV Introducing the Sony LCD Projection TV Projection lamp Indicators Screen Indicators The indicators show the...
Operating Instructions
Page 12
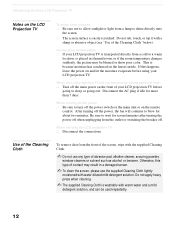
... out. After turning off the power, the fan will not be used repeatedly. 12 If this type of contact may be blurred or show poor color. On moisture condensation ❑ If your LCD projection TV before using your LCD projection TV. When the LCD projection TV will continue to blow for more... or tap it with water diluted mild detergent solution. Disconnect the AC plug if idle for about two minutes. Introducing the Sony LCD Projection TV Notes on the LCD Projection TV To enjoy clear pictures ❑ Be sure not to allow sunlight or light from a lamp to shine directly onto the...
... out. After turning off the power, the fan will not be used repeatedly. 12 If this type of contact may be blurred or show poor color. On moisture condensation ❑ If your LCD projection TV before using your LCD projection TV. When the LCD projection TV will continue to blow for more... or tap it with water diluted mild detergent solution. Disconnect the AC plug if idle for about two minutes. Introducing the Sony LCD Projection TV Notes on the LCD Projection TV To enjoy clear pictures ❑ Be sure not to allow sunlight or light from a lamp to shine directly onto the...
Operating Instructions
Page 13
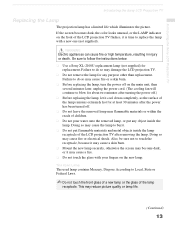
..., otherwise the screen may become dark, or it may damage the LCD projection TV. ❑ Do not remove the lamp for any object inside the lamp receptacle of the LCD projection TV after turning the power off.) ❑ Before replacing the lamp, let it is time to ...any purpose other than replacement. Introducing the Sony LCD Projection TV Introducing the Sony LCD Projection TV Replacing the Lamp The projection lamp has a limited life which illuminates the picture. Doing so may cause fire or a skin burn. ❑ Before replacing the lamp, turn the power off . ❑ Do not leave the...
..., otherwise the screen may become dark, or it may damage the LCD projection TV. ❑ Do not remove the lamp for any object inside the lamp receptacle of the LCD projection TV after turning the power off.) ❑ Before replacing the lamp, let it is time to ...any purpose other than replacement. Introducing the Sony LCD Projection TV Introducing the Sony LCD Projection TV Replacing the Lamp The projection lamp has a limited life which illuminates the picture. Doing so may cause fire or a skin burn. ❑ Before replacing the lamp, turn the power off . ❑ Do not leave the...
Operating Instructions
Page 14
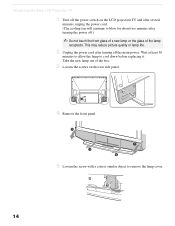
...picture quality or lamp life. 2 Unplug the power cord after turning the power off.) ✍ Do not touch the front glass of a new lamp or the glass of the box. 3 Loosen the screws on the LCD projection TV and after several minutes, unplug the power cord. (The cooling fan will continue to ...blow for about two minutes after turning off the main power. Wait at least 30 minutes to allow the lamp to cool down before replacing it. Introducing the Sony LCD Projection TV 1 Turn off the power switch on the rear side panel. 4 Remove the front panel. 5 Loosen the screw with a ...
...picture quality or lamp life. 2 Unplug the power cord after turning the power off.) ✍ Do not touch the front glass of a new lamp or the glass of the box. 3 Loosen the screws on the LCD projection TV and after several minutes, unplug the power cord. (The cooling fan will continue to ...blow for about two minutes after turning off the main power. Wait at least 30 minutes to allow the lamp to cool down before replacing it. Introducing the Sony LCD Projection TV 1 Turn off the power switch on the rear side panel. 4 Remove the front panel. 5 Loosen the screw with a ...
Operating Instructions
Page 15
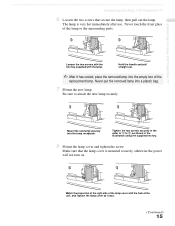
Hold the handle and pull straight out. ✍ After it was. (Continued) 15 Match the projection of the right side of the replacement lamp. The lamp is mounted securely, otherwise the power will not turn on. Never touch the front glass of 1 to attach the new lamp securely. Be sure to 2,.... Tighten the two screws securely in the illustration using the supplied hex key. 8 Mount the lamp cover and tighten the screw. Introducing the Sony LCD Projection TV Introducing the Sony LCD Projection TV 6 Loosen the two screws that the lamp cover is very hot immediately after use.
Hold the handle and pull straight out. ✍ After it was. (Continued) 15 Match the projection of the right side of the replacement lamp. The lamp is mounted securely, otherwise the power will not turn on. Never touch the front glass of 1 to attach the new lamp securely. Be sure to 2,.... Tighten the two screws securely in the illustration using the supplied hex key. 8 Mount the lamp cover and tighten the screw. Introducing the Sony LCD Projection TV Introducing the Sony LCD Projection TV 6 Loosen the two screws that the lamp cover is very hot immediately after use.
Operating Instructions
Page 16
Press firmly. 10 Mount the rear side panel and tighten the screws. ✍ Consult your Sony dealer for three times (See page 98). 9 Mount the front panel securely. If you handle them roughly, the LCD projection TV may fall or be moved, and the TV stand or floor surfaces may be scratched. 16 Introducing the Sony LCD Projection TV ✍ If the lamp cover is not mounted securely, the self-diagnostic function works and the POWER/STANDBY indicator flashes for a Sony XL-2100U replacement lamp. ✍ Take great care when replacing the lamp or plugging in/unplugging the connecting cords.
Press firmly. 10 Mount the rear side panel and tighten the screws. ✍ Consult your Sony dealer for three times (See page 98). 9 Mount the front panel securely. If you handle them roughly, the LCD projection TV may fall or be moved, and the TV stand or floor surfaces may be scratched. 16 Introducing the Sony LCD Projection TV ✍ If the lamp cover is not mounted securely, the self-diagnostic function works and the POWER/STANDBY indicator flashes for a Sony XL-2100U replacement lamp. ✍ Take great care when replacing the lamp or plugging in/unplugging the connecting cords.
Operating Instructions
Page 29
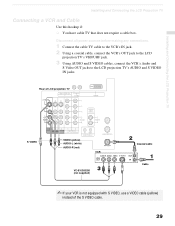
...Rear of LCD projection TV S VIDEO VIDEO (yellow) AUDIO-L (white) AUDIO-R (red) VCR VC-810S/820S (not supplied) Coaxial cable Cable ✍ If your VCR is not equipped with S VIDEO, use a VIDEO cable (yellow) instead of the S VIDEO cable. 29 Installing and Connecting the LCD Projection TV Installing and Connecting the LCD Projection TV... Connecting a VCR and Cable Use this hookup if: ❑ You have cable TV that does not require a cable box. Disconnect all power sources before making any connections. 1 Connect the cable TV ...
...Rear of LCD projection TV S VIDEO VIDEO (yellow) AUDIO-L (white) AUDIO-R (red) VCR VC-810S/820S (not supplied) Coaxial cable Cable ✍ If your VCR is not equipped with S VIDEO, use a VIDEO cable (yellow) instead of the S VIDEO cable. 29 Installing and Connecting the LCD Projection TV Installing and Connecting the LCD Projection TV... Connecting a VCR and Cable Use this hookup if: ❑ You have cable TV that does not require a cable box. Disconnect all power sources before making any connections. 1 Connect the cable TV ...
Operating Instructions
Page 30
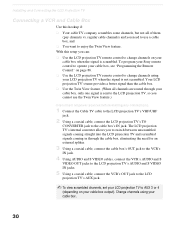
...not all power sources before making any connections. 1 Connect the Cable TV cable to the LCD projection TV's VHF/UHF jack. 2 Using a coaxial cable, connect the LCD projection TV's TO CONVERTER jack to change channels using your LCD projection TV when the signal is not scrambled. Your LCD projection TV's tuner provides... (pay channels vs. To program your Sony remote control to operate your cable box, see "Programming the Remote Control" on page 86. ❑ Use the LCD projection TV remote control to change channels on your LCD projection TV to enjoy the Twin View feature. Installing...
...not all power sources before making any connections. 1 Connect the Cable TV cable to the LCD projection TV's VHF/UHF jack. 2 Using a coaxial cable, connect the LCD projection TV's TO CONVERTER jack to change channels using your LCD projection TV when the signal is not scrambled. Your LCD projection TV's tuner provides... (pay channels vs. To program your Sony remote control to operate your cable box, see "Programming the Remote Control" on page 86. ❑ Use the LCD projection TV remote control to change channels on your LCD projection TV to enjoy the Twin View feature. Installing...
Operating Instructions
Page 32
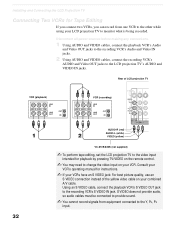
Disconnect all power sources before making any connections. 1 Using AUDIO and VIDEO cables, connect the ...and Video OUT jacks to the recording VCR's S VIDEO IN jack. Installing and Connecting the LCD Projection TV Connecting Two VCRs for playback by pressing TV/VIDEO on the remote control. ✍ You may need to change the video input on your combined...A/V cable. Using an S VIDEO cable, connect the playback VCR's S VIDEO OUT jack to the LCD projection TV's AUDIO and VIDEO IN jacks. Rear of the yellow video cable on your VCR. S VIDEO does not provide audio, so audio cables must be...
Disconnect all power sources before making any connections. 1 Using AUDIO and VIDEO cables, connect the ...and Video OUT jacks to the recording VCR's S VIDEO IN jack. Installing and Connecting the LCD Projection TV Connecting Two VCRs for playback by pressing TV/VIDEO on the remote control. ✍ You may need to change the video input on your combined...A/V cable. Using an S VIDEO cable, connect the playback VCR's S VIDEO OUT jack to the LCD projection TV's AUDIO and VIDEO IN jacks. Rear of the yellow video cable on your VCR. S VIDEO does not provide audio, so audio cables must be...
Operating Instructions
Page 33
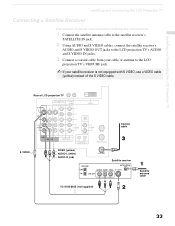
...Projection TV Installing and Connecting the LCD Projection TV Connecting a Satellite Receiver Disconnect all power sources before making any connections. 1 Connect the satellite antenna cable to the satellite receiver's SATELLITE IN jack. 2 Using AUDIO and S VIDEO cables, connect the satellite receiver's AUDIO and S VIDEO OUT jacks to the LCD projection TV... from your cable or antenna to the LCD projection TV's VHF/UHF jack. ✍ If your satellite receiver is not equipped with S VIDEO, use a VIDEO cable (yellow) instead of LCD projection TV S VIDEO Coaxial cable VIDEO (yellow) AUDIO-L...
...Projection TV Installing and Connecting the LCD Projection TV Connecting a Satellite Receiver Disconnect all power sources before making any connections. 1 Connect the satellite antenna cable to the satellite receiver's SATELLITE IN jack. 2 Using AUDIO and S VIDEO cables, connect the satellite receiver's AUDIO and S VIDEO OUT jacks to the LCD projection TV... from your cable or antenna to the LCD projection TV's VHF/UHF jack. ✍ If your satellite receiver is not equipped with S VIDEO, use a VIDEO cable (yellow) instead of LCD projection TV S VIDEO Coaxial cable VIDEO (yellow) AUDIO-L...
Operating Instructions
Page 34
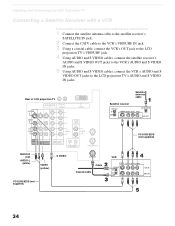
...Projection TV Connecting a Satellite Receiver with a VCR Disconnect all power sources before making any connections. 1 Connect the satellite antenna cable to the satellite receiver's SATELLITE IN jack. 2 Connect the CATV cable to the VCR's VHF/UHF IN jack. 3 Using a coaxial cable, connect the VCR's OUT jack to the LCD projection TV...Using AUDIO and S VIDEO cables, connect the VCR's AUDIO and S VIDEO OUT jacks to the LCD projection TV's AUDIO and S VIDEO IN jacks. Rear of LCD projection TV Satellite receiver Satellite antenna cable AUDIO-R (red) AUDIO-L (white) S VIDEO VIDEO (yellow) VC-810S...
...Projection TV Connecting a Satellite Receiver with a VCR Disconnect all power sources before making any connections. 1 Connect the satellite antenna cable to the satellite receiver's SATELLITE IN jack. 2 Connect the CATV cable to the VCR's VHF/UHF IN jack. 3 Using a coaxial cable, connect the VCR's OUT jack to the LCD projection TV...Using AUDIO and S VIDEO cables, connect the VCR's AUDIO and S VIDEO OUT jacks to the LCD projection TV's AUDIO and S VIDEO IN jacks. Rear of LCD projection TV Satellite receiver Satellite antenna cable AUDIO-R (red) AUDIO-L (white) S VIDEO VIDEO (yellow) VC-810S...
Operating Instructions
Page 36
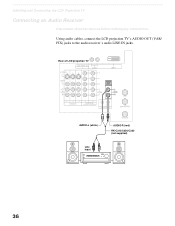
Installing and Connecting the LCD Projection TV Connecting an Audio Receiver Disconnect all power sources before making any connections. Rear of LCD projection TV AUDIO-L (white) Line input AUDIO-R (red) RK-C310/C320/C330 (not supplied) 36 Using audio cables, connect the LCD projection TV's AUDIO OUT (VAR/ FIX) jacks to the audio receiver's audio LINE IN jacks.
Installing and Connecting the LCD Projection TV Connecting an Audio Receiver Disconnect all power sources before making any connections. Rear of LCD projection TV AUDIO-L (white) Line input AUDIO-R (red) RK-C310/C320/C330 (not supplied) 36 Using audio cables, connect the LCD projection TV's AUDIO OUT (VAR/ FIX) jacks to the audio receiver's audio LINE IN jacks.
Operating Instructions
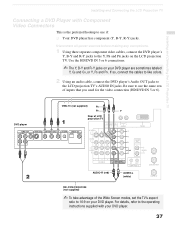
Page 37
... the Y, PB and PR jacks on the LCD projection TV. Installing and Connecting the LCD Projection TV Installing and Connecting the LCD Projection TV Connecting a DVD Player with your DVD player. 37 DVD player VMC-10 (not supplied) PB PR Y Rear of LCD projection TV AUDIO-R (red) AUDIO-L (white) RK-C310/...C320/C330 (not supplied) ✍ To take advantage of inputs that you used for the video connection (HD/DVD IN 5 or 6). Disconnect all power sources before making any connections. 1 ...
... the Y, PB and PR jacks on the LCD projection TV. Installing and Connecting the LCD Projection TV Installing and Connecting the LCD Projection TV Connecting a DVD Player with your DVD player. 37 DVD player VMC-10 (not supplied) PB PR Y Rear of LCD projection TV AUDIO-R (red) AUDIO-L (white) RK-C310/...C320/C330 (not supplied) ✍ To take advantage of inputs that you used for the video connection (HD/DVD IN 5 or 6). Disconnect all power sources before making any connections. 1 ...
Operating Instructions
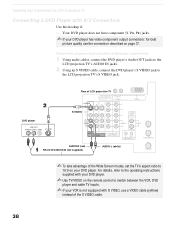
Page 38
...refer to the operating instructions supplied with your DVD player. ✍ Use TV/VIDEO on page 37. Disconnect all power sources before making any connections. 1 Using audio cables, connect the DVD player's Audio OUT jacks to the LCD projection TV's AUDIO IN jacks. 2 Using an S VIDEO cable, connect the DVD...A/V Connectors Use this hookup if: ❑ Your DVD player does not have component (Y, PB, PR) jacks. ✍ If your DVD player. Rear of LCD projection TV DVD player S VIDEO AUDIO-R (red) RK-C310/C320/C330 (not supplied) AUDIO-L (white) ✍ To take advantage of the S VIDEO cable...
...refer to the operating instructions supplied with your DVD player. ✍ Use TV/VIDEO on page 37. Disconnect all power sources before making any connections. 1 Using audio cables, connect the DVD player's Audio OUT jacks to the LCD projection TV's AUDIO IN jacks. 2 Using an S VIDEO cable, connect the DVD...A/V Connectors Use this hookup if: ❑ Your DVD player does not have component (Y, PB, PR) jacks. ✍ If your DVD player. Rear of LCD projection TV DVD player S VIDEO AUDIO-R (red) RK-C310/C320/C330 (not supplied) AUDIO-L (white) ✍ To take advantage of the S VIDEO cable...
Operating Instructions
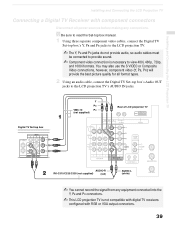
Page 39
...not supplied) Rear of LCD projection TV Digital TV Set-top box AUDIO-R RK-C310/C320/C330 (not supplied) (red) AUDIO-L (white) ✍ You cannot record the signal from any connections. Installing and Connecting the LCD Projection TV Installing and Connecting the LCD Projection TV Connecting a Digital TV Receiver with ... (Y, PB, PR) will provide the best picture quality for all power sources before making any equipment connected into the Y, PB and PR connectors. ✍ This LCD projection TV is necessary to the LCD projection TV's AUDIO IN jacks. z Be sure to read the Set-top box...
...not supplied) Rear of LCD projection TV Digital TV Set-top box AUDIO-R RK-C310/C320/C330 (not supplied) (red) AUDIO-L (white) ✍ You cannot record the signal from any connections. Installing and Connecting the LCD Projection TV Installing and Connecting the LCD Projection TV Connecting a Digital TV Receiver with ... (Y, PB, PR) will provide the best picture quality for all power sources before making any equipment connected into the Y, PB and PR connectors. ✍ This LCD projection TV is necessary to the LCD projection TV's AUDIO IN jacks. z Be sure to read the Set-top box...
Operating Instructions
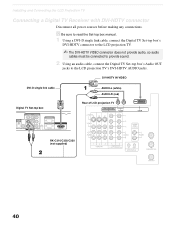
Page 40
z Be sure to read the Set-top box manual. 1 Using a DVI-D single link cable, connect the Digital TV Set-top box's DVI-HDTV connector to the LCD projection TV. ✍ The DVI-HDTV VIDEO connector does not provide audio, so audio cables must be connected to provide sound.... ONLY RGB OUT (1080i/720p/480p) DVI-HDTV OUT (1080i/720p/480p) AUDIO-L (white) AUDIO-R (red) Rear of LCD projection TV RK-C310/C320/C330 (not supplied) 40 Installing and Connecting the LCD Projection TV Connecting a Digital TV Receiver with DVI-HDTV connector Disconnect all power sources before making any connections.
z Be sure to read the Set-top box manual. 1 Using a DVI-D single link cable, connect the Digital TV Set-top box's DVI-HDTV connector to the LCD projection TV. ✍ The DVI-HDTV VIDEO connector does not provide audio, so audio cables must be connected to provide sound.... ONLY RGB OUT (1080i/720p/480p) DVI-HDTV OUT (1080i/720p/480p) AUDIO-L (white) AUDIO-R (red) Rear of LCD projection TV RK-C310/C320/C330 (not supplied) 40 Installing and Connecting the LCD Projection TV Connecting a Digital TV Receiver with DVI-HDTV connector Disconnect all power sources before making any connections.


