
Operating Instructions
Page 6
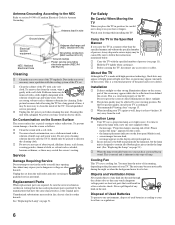
...Power service grounding electrode system (NEC Art 250 Part H) Cleaning s Clean the rear cover area of the TV regularly. Unplug the set . Unauthorized substitutions may expose you carry the TV in writing that he has used batteries according to your local laws or regulations. ... any accessories or cables. Be sure to reduce reflections. s Carry the TV with a dry soft cloth. Projection Lamp s Your TV uses a projection lamp as they may hear a noticeable pop sound. Cleaning this unit. s Hold the TV tightly when carrying it may hear the noise of fan running, depending on...
...Power service grounding electrode system (NEC Art 250 Part H) Cleaning s Clean the rear cover area of the TV regularly. Unplug the set . Unauthorized substitutions may expose you carry the TV in writing that he has used batteries according to your local laws or regulations. ... any accessories or cables. Be sure to reduce reflections. s Carry the TV with a dry soft cloth. Projection Lamp s Your TV uses a projection lamp as they may hear a noticeable pop sound. Cleaning this unit. s Hold the TV tightly when carrying it may hear the noise of fan running, depending on...
Operating Instructions
Page 7
... Front Panel 18 Rear Panel 19 Setting Up the Channel List - Contents Getting Started Welcome 8 Features 8 Notes on the TV 9 Screen 10 Projection Lamp 10 Installing the TV 11 Carrying Your TV 11 Take Precaution during Installation 11 Preventing the TV from Toppling Over .......11 When Installing Your TV against a Wall... ........15 VCR and Cable 16 VCR and Cable Box/Digital Cable Box .......17 When Connecting to Replace the Lamp 51 Troubleshooting 55 Remote Control 55 Picture 56 Sound 57 Channels 57 General 58 PC Input Signal Reference Chart 60 Specifications 61 Index 62 7
... Front Panel 18 Rear Panel 19 Setting Up the Channel List - Contents Getting Started Welcome 8 Features 8 Notes on the TV 9 Screen 10 Projection Lamp 10 Installing the TV 11 Carrying Your TV 11 Take Precaution during Installation 11 Preventing the TV from Toppling Over .......11 When Installing Your TV against a Wall... ........15 VCR and Cable 16 VCR and Cable Box/Digital Cable Box .......17 When Connecting to Replace the Lamp 51 Troubleshooting 55 Remote Control 55 Picture 56 Sound 57 Channels 57 General 58 PC Input Signal Reference Chart 60 Specifications 61 Index 62 7
Operating Instructions
Page 10
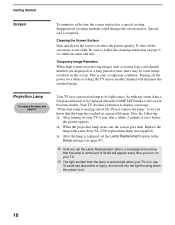
... the following: ❑ After turning on your TV is nearing end of time, there may take a while (1 minute or less) before the picture appears. ❑ When the projection lamp wears out, the screen goes dark. As with a new Sony XL-5200 replacement lamp (not supplied). ❑ After the lamp is on the screen. Inappropriate cleaning methods...
... the following: ❑ After turning on your TV is nearing end of time, there may take a while (1 minute or less) before the picture appears. ❑ When the projection lamp wears out, the screen goes dark. As with a new Sony XL-5200 replacement lamp (not supplied). ❑ After the lamp is on the screen. Inappropriate cleaning methods...
Operating Instructions
Page 18
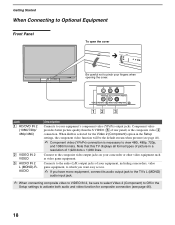
Note that this TV displays all format types of picture in a resolution of rear panel) or the composite video 2 connection. Y PB PR VIDEO L(MONO) R AUDIO ...which you want easy access. ✍ If you have mono equipment, connect its audio output jack to the TV's L (MONO) audio input jack. ✍ When connecting composite video to VIDEO IN 2, be the default...; 1,080 lines. Getting Started When Connecting to Optional Equipment Front Panel To open the cover OPEN TIMER LAMP POWER POWER Be careful not to activate both audio and video function for composite connection (see page 46)....
Note that this TV displays all format types of picture in a resolution of rear panel) or the composite video 2 connection. Y PB PR VIDEO L(MONO) R AUDIO ...which you want easy access. ✍ If you have mono equipment, connect its audio output jack to the TV's L (MONO) audio input jack. ✍ When connecting composite video to VIDEO IN 2, be the default...; 1,080 lines. Getting Started When Connecting to Optional Equipment Front Panel To open the cover OPEN TIMER LAMP POWER POWER Be careful not to activate both audio and video function for composite connection (see page 46)....
Operating Instructions
Page 31
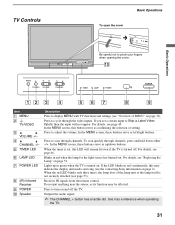
...not securely attached (see "Overview of MENU" on page 2). When the red LED blinks only three times, the lamp door of the lamp unit or the lamp itself is turned off the TV. Press to scan through channels, press and hold down buttons. Press to pinch your fingers when opening the cover...page 45. Press to Skip in red when the lamp for the light source has burned out. To scan quickly through channels. For details, see the contacting Sony information on page 32). Use it as confirming the selection or setting. TV Controls To open the cover Basic Operations Basic Operations Be...
...not securely attached (see "Overview of MENU" on page 2). When the red LED blinks only three times, the lamp door of the lamp unit or the lamp itself is turned off the TV. Press to scan through channels, press and hold down buttons. Press to pinch your fingers when opening the cover...page 45. Press to Skip in red when the lamp for the light source has burned out. To scan quickly through channels. For details, see the contacting Sony information on page 32). Use it as confirming the selection or setting. TV Controls To open the cover Basic Operations Basic Operations Be...
Operating Instructions
Page 47
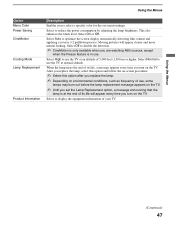
... feature is at the end of its life, a message appears every time you turn on the TV. ✍ Until you set the Lamp Replacement option, a message announcing that the lamp is in use. Select to display the equipment information of its life will appear clearer and more ... (Continued) 47 Select High to use , some lamps may burn out before the lamp replacement message appears on the TV. When the lamp nears the end of your TV. Using the Menus Option Menu Color Power Saving CineMotion Cooling Mode Lamp Replacement Product Information Description Enables you to select a specific...
... feature is at the end of its life, a message appears every time you turn on the TV. ✍ Until you set the Lamp Replacement option, a message announcing that the lamp is in use. Select to display the equipment information of its life will appear clearer and more ... (Continued) 47 Select High to use , some lamps may burn out before the lamp replacement message appears on the TV. When the lamp nears the end of your TV. Using the Menus Option Menu Color Power Saving CineMotion Cooling Mode Lamp Replacement Product Information Description Enables you to select a specific...
Operating Instructions
Page 51
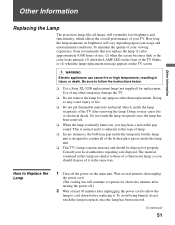
.... This is designed to follow the instructions below. ❑ Use a Sony XL-5200 replacement lamp (not supplied) for about two minutes after turning the power off the power on the TV screen. To maintain the quality of your usage and environmental conditions. The material...pop sound. Other Information Other Information Replacing the Lamp The projection lamp, like all of the broken glass pieces inside the lamp unit. ❑ This TV's lamp contains mercury and should dispose of it in the same way. How long the lamp maintains its brightness will eventually lose brightness and...
.... This is designed to follow the instructions below. ❑ Use a Sony XL-5200 replacement lamp (not supplied) for about two minutes after turning the power off the power on the TV screen. To maintain the quality of your usage and environmental conditions. The material...pop sound. Other Information Other Information Replacing the Lamp The projection lamp, like all of the broken glass pieces inside the lamp unit. ❑ This TV's lamp contains mercury and should dispose of it in the same way. How long the lamp maintains its brightness will eventually lose brightness and...
Operating Instructions
Page 52
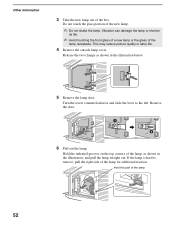
.... Turn the screw counterclockwise and slide the lever to remove, pull the right side of the lamp, as shown in the illustration, and pull the lamp straight out. If the lamp is hard to the left. Do not touch the glass portion of the box. Hold the indented grooves on... Other Information 3 Take the new lamp out of the new lamp. ✍ Do not shake the lamp. Release the two clamps as shown in the illustration below. 5 Remove the lamp door. Remove the door. 6 Pull out the lamp. Hold this part of the lamp receptacle. Vibration can damage the lamp or shorten its life. ✍...
.... Turn the screw counterclockwise and slide the lever to remove, pull the right side of the lamp, as shown in the illustration, and pull the lamp straight out. If the lamp is hard to the left. Do not touch the glass portion of the box. Hold the indented grooves on... Other Information 3 Take the new lamp out of the new lamp. ✍ Do not shake the lamp. Release the two clamps as shown in the illustration below. 5 Remove the lamp door. Remove the door. 6 Pull out the lamp. Hold this part of the lamp receptacle. Vibration can damage the lamp or shorten its life. ✍...

Operating Instructions
Page 53
...may be triggered and the POWER LED blinks three times (see page 31). 8 Reattach the lamp door. Replace the door by pressing the two parts firmly into the empty box of the lamp compartment. ✍ The lamp is not securely reattached, the self-diagnostic function may cause a fire or the screen to ...secure the door. (Continued) 53 Never put the used lamp has cooled, place it into place as shown in the slot from the left side. Make sure the lamp is tilted, as shown in the illustration. Other Information Other Information ✍ Do not touch the...
...may be triggered and the POWER LED blinks three times (see page 31). 8 Reattach the lamp door. Replace the door by pressing the two parts firmly into the empty box of the lamp compartment. ✍ The lamp is not securely reattached, the self-diagnostic function may cause a fire or the screen to ...secure the door. (Continued) 53 Never put the used lamp has cooled, place it into place as shown in the slot from the left side. Make sure the lamp is tilted, as shown in the illustration. Other Information Other Information ✍ Do not touch the...
Operating Instructions
Page 54
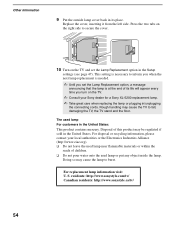
...may cause the TV to burst. For disposal or recycling information, please contact your Sony dealer for a Sony XL-5200 replacement lamp. ✍ Take great care when replacing the lamp or plugging in its life will appear every time you turn on the right side to inform you when the next lamp replacement is .... This setting is necessary to secure the cover. 10 Turn on the TV and set the Lamp Replacement option, a message announcing that the lamp is at the end of its place. The used lamp or put any object inside the lamp. Disposal of children. ❑ Do not pour water onto the used...
...may cause the TV to burst. For disposal or recycling information, please contact your Sony dealer for a Sony XL-5200 replacement lamp. ✍ Take great care when replacing the lamp or plugging in its life will appear every time you turn on the right side to inform you when the next lamp replacement is .... This setting is necessary to secure the cover. 10 Turn on the TV and set the Lamp Replacement option, a message announcing that the lamp is at the end of its place. The used lamp or put any object inside the lamp. Disposal of children. ❑ Do not pour water onto the used...
Operating Instructions
Page 55
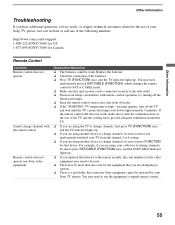
... to dust the ventilation slots on the rear of your Sony TV, please visit our website or call one code for Canada Remote Control Condition Remote control does not operate Cannot change channels, be operated by your Sony TV remote. try turning off the TV and wait until the TV's projection lamp cools down (approximately 5 minutes). You may have...
... to dust the ventilation slots on the rear of your Sony TV, please visit our website or call one code for Canada Remote Control Condition Remote control does not operate Cannot change channels, be operated by your Sony TV remote. try turning off the TV and wait until the TV's projection lamp cools down (approximately 5 minutes). You may have...

Operating Instructions
Page 58
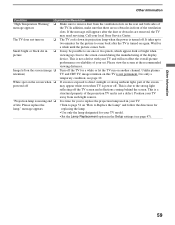
... clear all of this system and is set, a from the bottom part of the TV natural creaking noise occurs due to temporarily unblock channels. The replacement lamp does not ❏ The lamp door or the lamp might not be securely attached (see page 47). 58 Check with your previous password; ...; Select Reset setting option while in red ❏ If the LED blinks three times, the lamp door or the lamp might not be accompanied by a slight creaking noise. TV cabinet creaks ❏ When the TV is in the Sound setting (see page 34). The creaking sound is not available. How to...
... clear all of this system and is set, a from the bottom part of the TV natural creaking noise occurs due to temporarily unblock channels. The replacement lamp does not ❏ The lamp door or the lamp might not be securely attached (see page 47). 58 Check with your previous password; ...; Select Reset setting option while in red ❏ If the LED blinks three times, the lamp door or the lamp might not be accompanied by a slight creaking noise. TV cabinet creaks ❏ When the TV is in the Sound setting (see page 34). The creaking sound is not available. How to...
Operating Instructions
Page 59
...TV may appear white even when TV is time for you to replace the projection lamp used in front of the projection TV and is turned on the rear.... "Projection lamp is nearing end ❏ It is power off. message appears replacing the lamp. • Use only the lamp designated for lamp." Call your TV away ... on ❏ The TV cools down its projection lamp when the power is not permanent. of message appears the TV. Other Information 59 The TV does not turn on... are no obstacles in your TV. see page 47). White spot on "How to Replace the Lamp" and follow the directions for...
...TV may appear white even when TV is time for you to replace the projection lamp used in front of the projection TV and is turned on the rear.... "Projection lamp is nearing end ❏ It is power off. message appears replacing the lamp. • Use only the lamp designated for lamp." Call your TV away ... on ❏ The TV cools down its projection lamp when the power is not permanent. of message appears the TV. Other Information 59 The TV does not turn on... are no obstacles in your TV. see page 47). White spot on "How to Replace the Lamp" and follow the directions for...
Operating Instructions
Page 61
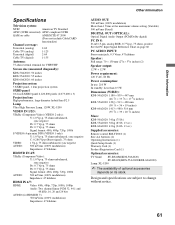
...KDS-55A2020: 55 inches KDS-60A2020: 60 inches Projection system 3 SXRD panel, 1 lens projection system SXRD panel 0.61 inch SXRD panel 6,220,800 pixels (2,073,600 × 3) Projection lens High performance, large diameter hybrid lens F2.5 Lamp Ultra High Pressure Lamp, 120W, XL-5200 VIDEO IN ... Operating Instructions (1) Quick Setup Guide (1) Warranty Card (1) Product Registration Card (1) Optional accessories: TV Stand: SU-RS11M(KDS-50A2020) SU-RS11X(KDS-55A2020/KDS-60A2020) Lamp: XL-5200 ✍ The availability of optional accessories depends on its stock. Design and specifications...
...KDS-55A2020: 55 inches KDS-60A2020: 60 inches Projection system 3 SXRD panel, 1 lens projection system SXRD panel 0.61 inch SXRD panel 6,220,800 pixels (2,073,600 × 3) Projection lens High performance, large diameter hybrid lens F2.5 Lamp Ultra High Pressure Lamp, 120W, XL-5200 VIDEO IN ... Operating Instructions (1) Quick Setup Guide (1) Warranty Card (1) Product Registration Card (1) Optional accessories: TV Stand: SU-RS11M(KDS-50A2020) SU-RS11X(KDS-55A2020/KDS-60A2020) Lamp: XL-5200 ✍ The availability of optional accessories depends on its stock. Design and specifications...
Operating Instructions
Page 62
...) 9 Horizontal Center 40, 50 Hue 34 I Info Banner 45 Infrared Receiver (IR) 31 J JUMP button 22 L Label Channels 41 Label Video Inputs 45 LAMP LED 31 Lamp Replacement 47 Lamp, replacing 51-54 Language 46 Live Color 36 M MENU Antenna 33 Cable 33 External Inputs 32 Favorites 33 Settings 33 MENU button 25...
...) 9 Horizontal Center 40, 50 Hue 34 I Info Banner 45 Infrared Receiver (IR) 31 J JUMP button 22 L Label Channels 41 Label Video Inputs 45 LAMP LED 31 Lamp Replacement 47 Lamp, replacing 51-54 Language 46 Live Color 36 M MENU Antenna 33 Cable 33 External Inputs 32 Favorites 33 Settings 33 MENU button 25...


