Operating Instructions
Page 2
... attention to the following Sony WALL-MOUNT BRACKET with other countries. It meets strict energy efficiency guidelines set up, it is subject to safety during the installation. Operation is designed to Part 15 of Apple Inc., registered in the spaces provided below 41°F (5 °C). This equipment generates, uses and can slightly change the power consumption. Model Name Serial No. To Customers Sufficient...
... attention to the following Sony WALL-MOUNT BRACKET with other countries. It meets strict energy efficiency guidelines set up, it is subject to safety during the installation. Operation is designed to Part 15 of Apple Inc., registered in the spaces provided below 41°F (5 °C). This equipment generates, uses and can slightly change the power consumption. Model Name Serial No. To Customers Sufficient...
Operating Instructions
Page 3
... Started Setting Up Your TV 6 Locating Inputs and Outputs 7 Connecting Other Equipment 9 Bundling the Connecting Cables 10 Securing the TV 10 Inserting Batteries into the Remote Control 11 Initial Setup 11 Operating the TV Remote Control Button Description 12 TV Controls and Indicators 14 Using Features Using BRAVIA® Sync™ with Control for HDMI 15 Favorites 15 Wide Mode 16 Wide Mode with PC 17 Photo and Music 18 Energy Saving Switch 19 Presence Sensor 19 Using the...
... Started Setting Up Your TV 6 Locating Inputs and Outputs 7 Connecting Other Equipment 9 Bundling the Connecting Cables 10 Securing the TV 10 Inserting Batteries into the Remote Control 11 Initial Setup 11 Operating the TV Remote Control Button Description 12 TV Controls and Indicators 14 Using Features Using BRAVIA® Sync™ with Control for HDMI 15 Favorites 15 Wide Mode 16 Wide Mode with PC 17 Photo and Music 18 Energy Saving Switch 19 Presence Sensor 19 Using the...
Operating Instructions
Page 4
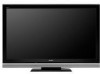
... compatible external equipment Contact your TV with minimal customizations. Introducing Your New BRAVIA® Welcome to HD programming. Use the documentation listed below to keep you to reduce the consumption of your TV. Experiencing Stunning HD with screen size measured diagonally. 4 Access it receives. Safety Booklet Provides precautionary measures to get the most complete TV operation information available for the 40, 46 and 52 inch BRAVIA KDL-VE5 series models...
... compatible external equipment Contact your TV with minimal customizations. Introducing Your New BRAVIA® Welcome to HD programming. Use the documentation listed below to keep you to reduce the consumption of your TV. Experiencing Stunning HD with screen size measured diagonally. 4 Access it receives. Safety Booklet Provides precautionary measures to get the most complete TV operation information available for the 40, 46 and 52 inch BRAVIA KDL-VE5 series models...

Operating Instructions
Page 5
... BRAVIA TV communicates with other Sony equipment supporting the Control for connecting other optional equipment. 16:9 (high-definition) source Most HDTV signals use a boxy 4:3 aspect ratio. Eliminates all power consumption when activated. • Check more details on the online Reference Book at your fingertips for easy access to programs and inputs (page 15). ➢ USB Digital Photo and Music Player: Connect your USB storage device directly to your HDTV's USB input to view digital photos...
... BRAVIA TV communicates with other Sony equipment supporting the Control for connecting other optional equipment. 16:9 (high-definition) source Most HDTV signals use a boxy 4:3 aspect ratio. Eliminates all power consumption when activated. • Check more details on the online Reference Book at your fingertips for easy access to programs and inputs (page 15). ➢ USB Digital Photo and Music Player: Connect your USB storage device directly to your HDTV's USB input to view digital photos...
Operating Instructions
Page 6
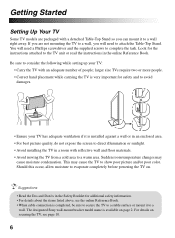
... online Reference Book. You will need a Phillips screwdriver and the supplied screws to a warm area. The designated Sony wall-mount bracket model name is installed against a wall or in an enclosed area. • For best picture quality, do not expose the screen to direct illumination or sunlight. • Avoid installing the TV in a room with an adequate number of people; If you are packaged with a detached Table-Top Stand...
... online Reference Book. You will need a Phillips screwdriver and the supplied screws to a warm area. The designated Sony wall-mount bracket model name is installed against a wall or in an enclosed area. • For best picture quality, do not expose the screen to direct illumination or sunlight. • Avoid installing the TV in a room with an adequate number of people; If you are packaged with a detached Table-Top Stand...
Operating Instructions
Page 7
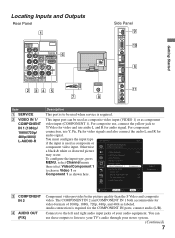
... menu then select Video/Component 1 to the left and right audio input jacks of 1080p, 1080i, 720p, 480p, and 480i as labeled. Screen Channel USB Auto Program Manage Channels Manage Inputs Video/Component 1 Component 1 Control for the COMPONENT IN ports, connect audio (L/R). The COMPONENT IN 2 and COMPONENT IN 1 both accommodate for audio signal. Otherwise Video/Component 1 Picture a black & white or distorted picture Cable/Antenna Cable may occur. Getting Started Locating Inputs and Outputs Rear Panel 1 VIDEO IN VIDEO Y SERVICE PB IN (OPTICAL) PR 1 DIGITAL...
... menu then select Video/Component 1 to the left and right audio input jacks of 1080p, 1080i, 720p, 480p, and 480i as labeled. Screen Channel USB Auto Program Manage Channels Manage Inputs Video/Component 1 Component 1 Control for the COMPONENT IN ports, connect audio (L/R). The COMPONENT IN 2 and COMPONENT IN 1 both accommodate for audio signal. Otherwise Video/Component 1 Picture a black & white or distorted picture Cable/Antenna Cable may occur. Getting Started Locating Inputs and Outputs Rear Panel 1 VIDEO IN VIDEO Y SERVICE PB IN (OPTICAL) PR 1 DIGITAL...
Operating Instructions
Page 8
... audio output connector. VIDEO IN 2 input is PCM optical OUT (OPTICAL) compatible. 7 AC IN Connects the supplied AC power cord. 8 CABLE/ ANTENNA RF input that has S VIDEO which provides better picture quality than composite video. Connect your DVD or other analog RGB equipment. This TV displays all - If an adapter is necessary. qa VIDEO IN 2 S VIDEO/ VIDEO/ L (MONO)AUDIO-R Connects to the computer before connecting the HD15-HD15 cable. Item Description 5 HDMI IN 1/2/3/4 HDMI (High-Definition Multimedia Interface) provides an uncompressed, all picture format types...
... audio output connector. VIDEO IN 2 input is PCM optical OUT (OPTICAL) compatible. 7 AC IN Connects the supplied AC power cord. 8 CABLE/ ANTENNA RF input that has S VIDEO which provides better picture quality than composite video. Connect your DVD or other analog RGB equipment. This TV displays all - If an adapter is necessary. qa VIDEO IN 2 S VIDEO/ VIDEO/ L (MONO)AUDIO-R Connects to the computer before connecting the HD15-HD15 cable. Item Description 5 HDMI IN 1/2/3/4 HDMI (High-Definition Multimedia Interface) provides an uncompressed, all picture format types...

Operating Instructions
Page 11
... signal source directly connected to the TV's CABLE/ANTENNA input and may take sometime to Setup menu then select Clock/Timers and adjust Current Time. Set • IMPORTANT: Auto Program is only effective when cable or antenna is connected. If you have cable and antenna available, please connect cable first. Initial Setup Please select the type of the remote control. During this TV. Home Retail Set 11 Follow the help text provided on the TV for store display. "Retail" optimizes the picture...
... signal source directly connected to the TV's CABLE/ANTENNA input and may take sometime to Setup menu then select Clock/Timers and adjust Current Time. Set • IMPORTANT: Auto Program is only effective when cable or antenna is connected. If you have cable and antenna available, please connect cable first. Initial Setup Please select the type of the remote control. During this TV. Home Retail Set 11 Follow the help text provided on the TV for store display. "Retail" optimizes the picture...
Operating Instructions
Page 12
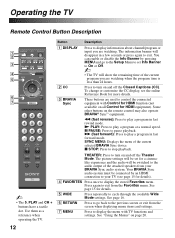
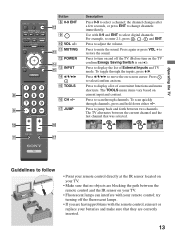
... off the Closed Captions (CC). X PAUSE: Press to stop playback. Use them as a reference when operating the TV. Operating the TV Remote Control Button Description 1 2 3 DISPLAY CC POWER 4 5 WIDE INPUT 6 7 TOOLS ~ • The 5, PLAY and CH + buttons have a tactile dot. You can enable or disable the Info Banner by an HDMI connection to display information about channel/program or input you are watching. Press to the previous screen or exit from the Favorites menu.
... off the Closed Captions (CC). X PAUSE: Press to stop playback. Use them as a reference when operating the TV. Operating the TV Remote Control Button Description 1 2 3 DISPLAY CC POWER 4 5 WIDE INPUT 6 7 TOOLS ~ • The 5, PLAY and CH + buttons have a tactile dot. You can enable or disable the Info Banner by an HDMI connection to display information about channel/program or input you are watching. Press to the previous screen or exit from the Favorites menu.
Operating Instructions
Page 13
... turn on the TV confirm Energy Saving Switch is on (z)). Press to restore the sound. To scan quickly through the inputs, press V/v. Press to change channels immediately. the channel changes after a few seconds, or press ENT to jump back and forth between two channels. For example, to adjust the volume. Press to enter 2.1, press 2 , , 1 and ENT. Operating the TV DISPLAY CC POWER Button 8 0-9 ENT qs 9 0 VOL +/- Press to display the list...
... turn on the TV confirm Energy Saving Switch is on (z)). Press to restore the sound. To scan quickly through the inputs, press V/v. Press to change channels immediately. the channel changes after a few seconds, or press ENT to jump back and forth between two channels. For example, to adjust the volume. Press to enter 2.1, press 2 , , 1 and ENT. Operating the TV DISPLAY CC POWER Button 8 0-9 ENT qs 9 0 VOL +/- Press to display the list...
Operating Instructions
Page 14
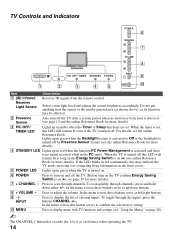
...). 3 PIC OFF/ TIMER LED Lights up in red when the function PC Power Management is activated and there is activated to display menu with TV functions and settings (see page 19 for more details). Receiver Light Sensor Senses room light level and adjusts the screen brightness accordingly. For details, see contacting Sony information on and off . Press to display the list of external inputs. TV Controls and Indicators POWER 6 CHANNEL 7 VOLUME 8 PIC OFF / TIMER STANDBY POWER INPUT 9 1 2 3 4 5 MENU 0 Item Description...
...). 3 PIC OFF/ TIMER LED Lights up in red when the function PC Power Management is activated and there is activated to display menu with TV functions and settings (see page 19 for more details). Receiver Light Sensor Senses room light level and adjusts the screen brightness accordingly. For details, see contacting Sony information on and off . Press to display the list of external inputs. TV Controls and Indicators POWER 6 CHANNEL 7 VOLUME 8 PIC OFF / TIMER STANDBY POWER INPUT 9 1 2 3 4 5 MENU 0 Item Description...
Operating Instructions
Page 15
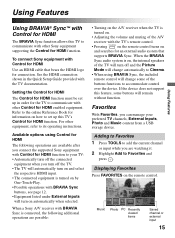
... viewed items Saved channel or external input 15 See the HDMI connection shown in order for the TV to communicate with other Control for HDMI function. To connect Sony equipment with Control for HDMI function. When a Sony A/V receiver with BRAVIA Sync is connected, the following operations are available after you turn off the connected equipment when you connect the supported Sony equipment with Control for HDMI Use an HDMI cable that bears the HDMI logo for an external audio system that supports BRAVIA...
... viewed items Saved channel or external input 15 See the HDMI connection shown in order for the TV to communicate with other Control for HDMI function. To connect Sony equipment with Control for HDMI function. When a Sony A/V receiver with BRAVIA Sync is connected, the following operations are available after you turn off the connected equipment when you connect the supported Sony equipment with Control for HDMI Use an HDMI cable that bears the HDMI logo for an external audio system that supports BRAVIA...
Operating Instructions
Page 16
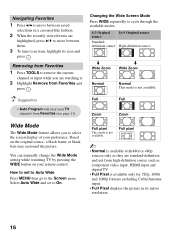
... source such as component video input, HDMI input and digital TV. • Full Pixel is available only for 720p, 1080i and 1080p formats excluding Cable/Antenna input. • Full Pixel displays the picture in its icon and press . Navigating Favorites 1 Press B/b to move between them. 3 To tune to an item, highlight its native resolution. 16 How to set to On. Full Full • Auto Program will clear your remote control...
... source such as component video input, HDMI input and digital TV. • Full Pixel is available only for 720p, 1080i and 1080p formats excluding Cable/Antenna input. • Full Pixel displays the picture in its icon and press . Navigating Favorites 1 Press B/b to move between them. 3 To tune to an item, highlight its native resolution. 16 How to set to On. Full Full • Auto Program will clear your remote control...
Operating Instructions
Page 17
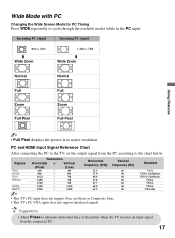
... VESA VESA VESA CEA-861 • Adjust Phase to eliminate horizontal lines of the picture when the TV receives an input signal from the PC according to the chart below. Wide Mode with PC Changing the Wide Screen Mode for PC Timing Press WIDE repeatedly to cycle through the available modes while in its native resolution. PC and HDMI Input Signal Reference Chart After connecting the PC to the TV, set the output signal...
... VESA VESA VESA CEA-861 • Adjust Phase to eliminate horizontal lines of the picture when the TV receives an input signal from the PC according to the chart below. Wide Mode with PC Changing the Wide Screen Mode for PC Timing Press WIDE repeatedly to cycle through the available modes while in its native resolution. PC and HDMI Input Signal Reference Chart After connecting the PC to the TV, set the output signal...
Operating Instructions
Page 18
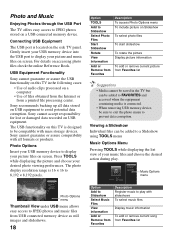
... avoid potential data corruption. Connecting USB Equipment The USB port is 16 × 16 to display your picture files on the side TV panel. Gently insert your USB memory device into the USB port to 8,192 × 8,192 pixels. The photo display resolution range is located on screen. Viewing a Slideshow Individual files can be added to FAVORITES and accessed when the equipment containing media is designed to Slideshow...
... avoid potential data corruption. Connecting USB Equipment The USB port is 16 × 16 to display your picture files on the side TV panel. Gently insert your USB memory device into the USB port to 8,192 × 8,192 pixels. The photo display resolution range is located on screen. Viewing a Slideshow Individual files can be added to FAVORITES and accessed when the equipment containing media is designed to Slideshow...
Operating Instructions
Page 19
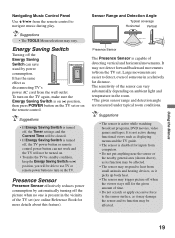
... TV power button or remote control power button can vary substantially depending on the TV. The sensitivity of time. • Do not scratch or apply excessive force to turn on the TV again, make the TV be standby condition, keep the Energy Saving Switch on the remote control. Navigating Music Control Panel Use V/v/B/b from the remote control to navigate music during functional views such as displaying menus and the TV guide. • The sensor is disabled for inputs...
... TV power button or remote control power button can vary substantially depending on the TV. The sensitivity of time. • Do not scratch or apply excessive force to turn on the TV again, make the TV be standby condition, keep the Energy Saving Switch on the remote control. Navigating Music Control Panel Use V/v/B/b from the remote control to navigate music during functional views such as displaying menus and the TV guide. • The sensor is disabled for inputs...
Operating Instructions
Page 20
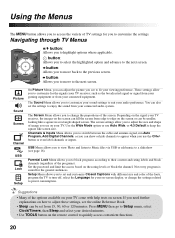
... sound settings to suit your audio preference. Set the password and limit the access based on the remote control to quickly access convenient functions. 20 Setup Menu allows you use Auto Wide, or 4:3 Default to keep the square like a square in a rectangle shaped screen. Channels & Inputs Menu allows you to switch between the cable and antenna signal, run Auto Program, Add Digital Channels, or you can show or hide channels to appear when you to set and customize Closed Captions with different size...
... sound settings to suit your audio preference. Set the password and limit the access based on the remote control to quickly access convenient functions. 20 Setup Menu allows you use Auto Wide, or 4:3 Default to keep the square like a square in a rectangle shaped screen. Channels & Inputs Menu allows you to switch between the cable and antenna signal, run Auto Program, Add Digital Channels, or you can show or hide channels to appear when you to set and customize Closed Captions with different size...
Operating Instructions
Page 21
... is no picture from some video sources, check the input selection by pressing INPUT button. Press and hold down the V button on the remote, press the POWER button on securing the TV section or use a Sony designed wall mount bracket to mount the TV to wall. refer to discoloration and scratches. This password clears your remote control; Troubleshooting Many problems with a soft cloth. Follow the instruction provided in the online Reference Book on the TV set. press the...
... is no picture from some video sources, check the input selection by pressing INPUT button. Press and hold down the V button on the remote, press the POWER button on securing the TV section or use a Sony designed wall mount bracket to mount the TV to wall. refer to discoloration and scratches. This password clears your remote control; Troubleshooting Many problems with a soft cloth. Follow the instruction provided in the online Reference Book on the TV set. press the...
Operating Instructions
Page 22
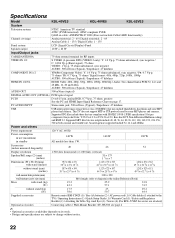
...; 300 M6 (length: refer to the TV) / Operating Instructions (1) / Quick Setup Guide (1) / Warranty Card (1) / Safety and Regulatory Booklet (1) / Attaching the Table-Top stand flyer (1) / Screws (4) (For KDL-52VE5 the screws are attached) Connecting cables / Wall-Mount Bracket: SU-WL500 see page 2 ~ • Optional accessories availability depends on its stock. • Design and specifications are compliant with stand (kg) (lb.) without notice. 22 Scan frequencies supported include 32, 44.1 and 48 Khz...
...; 300 M6 (length: refer to the TV) / Operating Instructions (1) / Quick Setup Guide (1) / Warranty Card (1) / Safety and Regulatory Booklet (1) / Attaching the Table-Top stand flyer (1) / Screws (4) (For KDL-52VE5 the screws are attached) Connecting cables / Wall-Mount Bracket: SU-WL500 see page 2 ~ • Optional accessories availability depends on its stock. • Design and specifications are compliant with stand (kg) (lb.) without notice. 22 Scan frequencies supported include 32, 44.1 and 48 Khz...
Operating Instructions
Page 23
... 23 button 13, 14 Channels Setting up 11 COMPONENT IN (1080p/1080i/720p/480p/480i) 7 D DISPLAY button 12 E Energy Saving Switch 19 ENT button 13 F Favorites 15 FAVORITES button 12 H HDMI IN jack, described 8 I Infrared Receiver (IR) 14 INPUT button 13, 14 J JUMP button 13 M MENU button 12, 14 MUTING button 13 P PC IN 8 PIC OFF/TIMER LED 14 POWER button 13, 14 POWER LED 14 Presence Sensor 14, 19 R RETURN button 12 S STANDBY LED 14 T Troubleshooting 21 U USB 8 V VIDEO/AUDIO...
... 23 button 13, 14 Channels Setting up 11 COMPONENT IN (1080p/1080i/720p/480p/480i) 7 D DISPLAY button 12 E Energy Saving Switch 19 ENT button 13 F Favorites 15 FAVORITES button 12 H HDMI IN jack, described 8 I Infrared Receiver (IR) 14 INPUT button 13, 14 J JUMP button 13 M MENU button 12, 14 MUTING button 13 P PC IN 8 PIC OFF/TIMER LED 14 POWER button 13, 14 POWER LED 14 Presence Sensor 14, 19 R RETURN button 12 S STANDBY LED 14 T Troubleshooting 21 U USB 8 V VIDEO/AUDIO...


