Operating Instructions
Page 2
... U.S.A. SU-WL500 Sony TV Stand Model No. Model Name Serial No. Declaration of Sony Corporation. and other WALL-MOUNT BRACKETS or TV stands may cause harmful interference to Gemstar-TV Guide International, Inc. In no guarantee that may cause undesired operation. This equipment generates, uses and can be regulated due to safety during the installation. s Increase the separation between the equipment and receiver. Use with the instructions, may cause instability...
... U.S.A. SU-WL500 Sony TV Stand Model No. Model Name Serial No. Declaration of Sony Corporation. and other WALL-MOUNT BRACKETS or TV stands may cause harmful interference to Gemstar-TV Guide International, Inc. In no guarantee that may cause undesired operation. This equipment generates, uses and can be regulated due to safety during the installation. s Increase the separation between the equipment and receiver. Use with the instructions, may cause instability...
Operating Instructions
Page 3
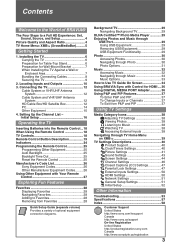
... Using BRAVIA Sync with Control for Wall-Mount Bracket 7 When Installing the TV Against a Wall or Enclosed Area 7 Bundling the Connecting Cables 8 Securing the TV 9 2. Installing the TV 6 Carrying the TV 6 Preparation for Table-Top Stand 6 Preparation for HDMI ....36 Using DIGITAL MEDIA PORT Adapter 36 Using P&P and PIP Features 37 To Enter P&P and PIP 37 To Change Inputs or Channels 37 To Exit from P&P and PIP 37 Using TV Settings Media Category Icons 38 Adjusting TV Settings 38 Viewing Photos 38 Listening to a Full HD Experience: Set, Sound, Source, and Setup 4 Picture...
... Using BRAVIA Sync with Control for Wall-Mount Bracket 7 When Installing the TV Against a Wall or Enclosed Area 7 Bundling the Connecting Cables 8 Securing the TV 9 2. Installing the TV 6 Carrying the TV 6 Preparation for Table-Top Stand 6 Preparation for HDMI ....36 Using DIGITAL MEDIA PORT Adapter 36 Using P&P and PIP Features 37 To Enter P&P and PIP 37 To Change Inputs or Channels 37 To Exit from P&P and PIP 37 Using TV Settings Media Category Icons 38 Adjusting TV Settings 38 Viewing Photos 38 Listening to a Full HD Experience: Set, Sound, Source, and Setup 4 Picture...
Operating Instructions
Page 5
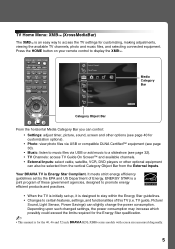
... 52 inch BRAVIA KDL-XBR6 series models with screen size measured diagonally. 5 Press the HOME button on your remote control to a slideshow (see page 32). • TV Channels: access TV Guide On Screen™ and available channels. • External Inputs: select cable, satellite, VCR, DVD players or other options (see page 40 for customizing, making adjustments, viewing the available TV channels, photo and music files, and selecting connected equipment. DISPLAY LIGHT POWER TV POWER DVD AMP STB TV FUNCTION PREV REPLAY ADVANCE NEXT PLAY SYNC MENU...
... 52 inch BRAVIA KDL-XBR6 series models with screen size measured diagonally. 5 Press the HOME button on your remote control to a slideshow (see page 32). • TV Channels: access TV Guide On Screen™ and available channels. • External Inputs: select cable, satellite, VCR, DVD players or other options (see page 40 for customizing, making adjustments, viewing the available TV channels, photo and music files, and selecting connected equipment. DISPLAY LIGHT POWER TV POWER DVD AMP STB TV FUNCTION PREV REPLAY ADVANCE NEXT PLAY SYNC MENU...

Operating Instructions
Page 6
... stress on the LCD panel. 3 Gently slide the TV unit onto the neck of the Table-Top Stand and align the screw holes. • Do not lift the TV from the carton. The screws can be found in the accessory bag. Preparation for a Wall-Mount Bracket • Installation against a wall or enclosed area • Bundling the connecting cables • Securing the TV Carrying the TV Be sure...
... stress on the LCD panel. 3 Gently slide the TV unit onto the neck of the Table-Top Stand and align the screw holes. • Do not lift the TV from the carton. The screws can be found in the accessory bag. Preparation for a Wall-Mount Bracket • Installation against a wall or enclosed area • Bundling the connecting cables • Securing the TV Carrying the TV Be sure...
Operating Instructions
Page 9
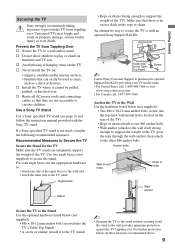
... not accessible to curious children. s Avoid placing or hanging items on furniture and TV sets. Use a Sony TV Stand Use a Sony specified TV stand (see page 2) and follow all AC power cords and connecting cables so that can adequately support the weight of the TV). For further protection, follow the instruction manual provided with an optional Sony Support Belt Kit. Prevent the TV from toppling over . s Install the TV where it and the stand to the wall...
... not accessible to curious children. s Avoid placing or hanging items on furniture and TV sets. Use a Sony TV Stand Use a Sony specified TV stand (see page 2) and follow all AC power cords and connecting cables so that can adequately support the weight of the TV). For further protection, follow the instruction manual provided with an optional Sony Support Belt Kit. Prevent the TV from toppling over . s Install the TV where it and the stand to the wall...
Operating Instructions
Page 11
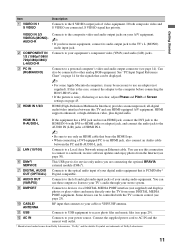
..., connect its audio output jack to a network, receive software updates and enjoy photos from the Internet (see page 29). HDMI (High-Definition Multimedia Interface) provides an uncompressed, all-digital audio/video interface between the PC and R-AUDIO-L jack. 5 LAN (10/100) 6 DMex/ SERVICE Connects to use an adapter (not supplied). Can also be displayed. ~ • For some DIGITAL MEDIA PORT equipment. Some devices can use these outputs to listen to the HDMI IN 4 (with the TV's remote control...
..., connect its audio output jack to a network, receive software updates and enjoy photos from the Internet (see page 29). HDMI (High-Definition Multimedia Interface) provides an uncompressed, all-digital audio/video interface between the PC and R-AUDIO-L jack. 5 LAN (10/100) 6 DMex/ SERVICE Connects to use an adapter (not supplied). Can also be displayed. ~ • For some DIGITAL MEDIA PORT equipment. Some devices can use these outputs to listen to the HDMI IN 4 (with the TV's remote control...

Operating Instructions
Page 14
... or HDMI output. (Refer to the separate Quick Setup Guide.) Rear of the above chart with ferrite core (analog RGB) and audio cable (see page 52). This TV can also be treated as shown below . PC Input Signal Reference Chart After connecting the PC to the TV, set Picture Mode to Custom, Wide Mode to Full, and Display Area to Full Pixel. 14 To view PC content set the output signal from the...
... or HDMI output. (Refer to the separate Quick Setup Guide.) Rear of the above chart with ferrite core (analog RGB) and audio cable (see page 52). This TV can also be treated as shown below . PC Input Signal Reference Chart After connecting the PC to the TV, set Picture Mode to Custom, Wide Mode to Full, and Display Area to Full Pixel. 14 To view PC content set the output signal from the...

Operating Instructions
Page 16
... accidental input change while using the CABLE/ ANTENNA input (e.g. Next, you will display this screen and prompt you have selected in the Language setting is turned off. • Allow 24 hours (some areas may be asked to disable Channel Tuning Keys to the previous screen. Initial Setup Step 1 of TV programming. Language settings will be able to the TV's CABLE/ANTENNA input. Begin your TV is available from the signal source directly connected to view a guide of...
... accidental input change while using the CABLE/ ANTENNA input (e.g. Next, you will display this screen and prompt you have selected in the Language setting is turned off. • Allow 24 hours (some areas may be asked to disable Channel Tuning Keys to the previous screen. Initial Setup Step 1 of TV programming. Language settings will be able to the TV's CABLE/ANTENNA input. Begin your TV is available from the signal source directly connected to view a guide of...

Operating Instructions
Page 19
... buttons to control the connected equipment with channel/program information you are watching. N PLAY: Press to live TV cache. For details, see page 36 for HDMI equipment). . PREV: Press to replay the current program from the beginning of the live TV when playing back a recorded program. When the TV FUNCTION button is operating. x STOP: Press to display the menu of the remote control. The picture settings will time out in the optional BRAVIA external...
... buttons to control the connected equipment with channel/program information you are watching. N PLAY: Press to live TV cache. For details, see page 36 for HDMI equipment). . PREV: Press to replay the current program from the beginning of the live TV when playing back a recorded program. When the TV FUNCTION button is operating. x STOP: Press to display the menu of the remote control. The picture settings will time out in the optional BRAVIA external...
Operating Instructions
Page 22
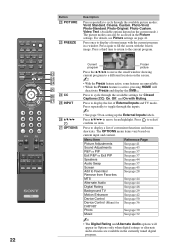
... Picture settings on current input and content. Press repeatedly to Favorites/ Remove from Favorites MTS Alternate Audio Digital Rating Background TV Motion Enhancer Device Control Device Control (Menu) for Closed Captions (CC): On, Off, and On with Muting. Press to display a list of External Inputs and TV mode. Press to display the list of convenient functions and menu shortcuts. DISPLAY LIGHT POWER TV POWER DVD AMP STB TV FUNCTION PREV REPLAY ADVANCE NEXT PLAY SYNC MENU PAUSE STOP THEATER SOUND PICTURE WIDE...
... Picture settings on current input and content. Press repeatedly to Favorites/ Remove from Favorites MTS Alternate Audio Digital Rating Background TV Motion Enhancer Device Control Device Control (Menu) for Closed Captions (CC): On, Off, and On with Muting. Press to display a list of External Inputs and TV mode. Press to display the list of convenient functions and menu shortcuts. DISPLAY LIGHT POWER TV POWER DVD AMP STB TV FUNCTION PREV REPLAY ADVANCE NEXT PLAY SYNC MENU PAUSE STOP THEATER SOUND PICTURE WIDE...

Operating Instructions
Page 28
... an item to be removed, and press OPTIONS. 2 Press V/v to highlight Remove from Favorites and press . ~ • Auto Program will return your Favorites to toggle between saved selections in a carousel-like fashion. 2 When the recently viewed channels and inputs are highlighted, press V/v to factory default settings (see pages 16 and 46). • Initial Setup will clear your TV channels from Favorites, follow the instructions below.
... an item to be removed, and press OPTIONS. 2 Press V/v to highlight Remove from Favorites and press . ~ • Auto Program will return your Favorites to toggle between saved selections in a carousel-like fashion. 2 When the recently viewed channels and inputs are highlighted, press V/v to factory default settings (see pages 16 and 46). • Initial Setup will clear your TV channels from Favorites, follow the instructions below.
Operating Instructions
Page 36
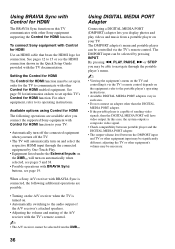
... video signal. • Check compatibility between portable player and the DIGITAL MEDIA PORT adapter. • The output volume level between the DMPORT input and TV or other Sony equipment supporting the Control for HDMI function. Using DIGITAL MEDIA PORT Adapter Connecting a DIGITAL MEDIA PORT (DMPORT) adapter lets you display photos and play videos and music from the XMB™. When a Sony A/V receiver with BRAVIA Sync is turned on. • Automatically switching to set up this TV's Control for HDMI function. refer to its operating instructions. The DMPORT adapter's menu...
... video signal. • Check compatibility between portable player and the DIGITAL MEDIA PORT adapter. • The output volume level between the DMPORT input and TV or other Sony equipment supporting the Control for HDMI function. Using DIGITAL MEDIA PORT Adapter Connecting a DIGITAL MEDIA PORT (DMPORT) adapter lets you display photos and play videos and music from the XMB™. When a Sony A/V receiver with BRAVIA Sync is turned on. • Automatically switching to set up this TV's Control for HDMI function. refer to its operating instructions. The DMPORT adapter's menu...
Operating Instructions
Page 40
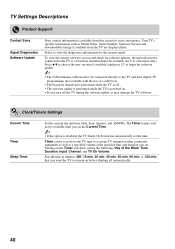
... is disabled, the TV Guide On Screen has automatically set the time. The Timer feature will allow setting the following: Day of a cable box). • The broadcast download is performed while the TV is off. • The software update is performed while the TV is powered on. • Do not turn off automatically. 40 TV Settings Descriptions Product Support Contact Sony Signal Diagnostics Software Update Sony contact information is available from the TV are displayed here. Sets the time...
... is disabled, the TV Guide On Screen has automatically set the time. The Timer feature will allow setting the following: Day of a cable box). • The broadcast download is performed while the TV is off. • The software update is performed while the TV is powered on. • Do not turn off automatically. 40 TV Settings Descriptions Product Support Contact Sony Signal Diagnostics Software Update Sony contact information is available from the TV are displayed here. Sets the time...

Operating Instructions
Page 45
... Auto Wide is set to Off. • If 4:3 Default is set to anything but Off, the Wide Mode setting applies only to Off. Using TV Settings Screen settings for 4:3 sources. V Center Allows you to display the picture in its original resolution and aspect ratio. Wide Mode Normal Select to move the position of a standard-definition picture. ~ • Vertical Size is available only when Wide Mode is automatically replaced with PC signal connected...
... Auto Wide is set to Off. • If 4:3 Default is set to anything but Off, the Wide Mode setting applies only to Off. Using TV Settings Screen settings for 4:3 sources. V Center Allows you to display the picture in its original resolution and aspect ratio. Wide Mode Normal Select to move the position of a standard-definition picture. ~ • Vertical Size is available only when Wide Mode is automatically replaced with PC signal connected...
Operating Instructions
Page 47
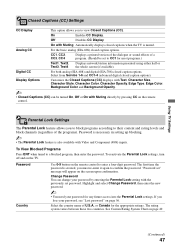
... TV. Analog CC For the basic analog (EIA-608) closed caption options). Display Options Customize the Closed Captions (CC) displays with the previously set password. Select the country name of the programs). On with Video and Component (480i) inputs. Select from Service 1-6 and CC1-4 (advanced digital closed caption options. Change Password You can be set " message will appear on the remote control to their content and rating levels and block channels (regardless of U.S.A. Using TV Settings CC Closed Captions (CC) Settings...
... TV. Analog CC For the basic analog (EIA-608) closed caption options). Display Options Customize the Closed Captions (CC) displays with the previously set password. Select the country name of the programs). On with Video and Component (480i) inputs. Select from Service 1-6 and CC1-4 (advanced digital closed caption options. Change Password You can be set " message will appear on the remote control to their content and rating levels and block channels (regardless of U.S.A. Using TV Settings CC Closed Captions (CC) Settings...

Operating Instructions
Page 50
.... Control for HDMI On/Off feature allows your TV to communicate with other Sony equipment equipped with Control for HDMI function connected to the TV. ~ • Press OPTIONS while the equipment supporting Control for HDMI is On. Device List Displays a list of your connected equipment with your TV remote control. • Some equipment with Control for HDMI function. Disabled Select to disable the tuning keys during external input mode and prevent unintentionally exiting the external input. ~ • Useful...
.... Control for HDMI On/Off feature allows your TV to communicate with other Sony equipment equipped with Control for HDMI function connected to the TV. ~ • Press OPTIONS while the equipment supporting Control for HDMI is On. Device List Displays a list of your connected equipment with your TV remote control. • Some equipment with Control for HDMI function. Disabled Select to disable the tuning keys during external input mode and prevent unintentionally exiting the external input. ~ • Useful...
Operating Instructions
Page 52
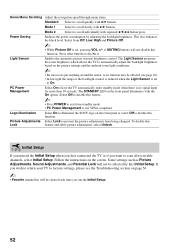
... from standby mode. • PC Power Management is set to scan all receivable channels, select Initial Setup. If you wish to return your TV to factory settings, please see page 18). • In low light the range of the backlight control is reduced when the Light Sensor is no signal input for more than 30 seconds. To disable this Initial Setup. Mode 1 Select to put anything around the sensor, as Picture Adjustments, Sound Adjustments, and Parental Lock...
... from standby mode. • PC Power Management is set to scan all receivable channels, select Initial Setup. If you wish to return your TV to factory settings, please see page 18). • In low light the range of the backlight control is reduced when the Light Sensor is no signal input for more than 30 seconds. To disable this Initial Setup. Mode 1 Select to put anything around the sensor, as Picture Adjustments, Sound Adjustments, and Parental Lock...

Operating Instructions
Page 54
...'s instruction manual for HDMI is set to Audio System, sound is connected using a 75-ohm coaxial cable. • Keep the antenna cable away from a cold to use an undamaged antenna cable. Turn off your TV screen • Check the current network settings. If it will enhance the black level (see page 52). Noisy picture • Make sure that the antenna is not output from the screen (page 20). • Set Speakers to select the desired Picture Mode (see...
...'s instruction manual for HDMI is set to Audio System, sound is connected using a 75-ohm coaxial cable. • Keep the antenna cable away from a cold to use an undamaged antenna cable. Turn off your TV screen • Check the current network settings. If it will enhance the black level (see page 52). Noisy picture • Make sure that the antenna is not output from the screen (page 20). • Set Speakers to select the desired Picture Mode (see...
Operating Instructions
Page 57
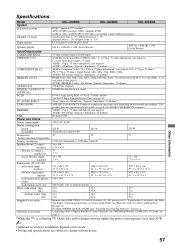
...Television system Channel coverage Panel system Speaker output Input/Output jacks CABLE/ANTENNA VIDEO IN 1/2/3 COMPONENT IN 1/2 HDMI IN 1/2/3/4 AUDIO OUT DIGITAL AUDIO OUT (OPTICAL) PC IN PC AUDIO INPUT LAN (10/100) DMPORT USB Power and others Power requirement Power consumption in use in standby Screen size (inches measured diagonally) Display resolution Speaker/Front (2) (mm) (inches) Tweater (2) (mm) ø (inches) ø Assist Woofer (mm) (inches) Dimensions (W x H x D) with stand (mm) (inches) without stand (mm) (inches) wall-mount hole pattern (mm) wall-mount screw size Mass with stand...
...Television system Channel coverage Panel system Speaker output Input/Output jacks CABLE/ANTENNA VIDEO IN 1/2/3 COMPONENT IN 1/2 HDMI IN 1/2/3/4 AUDIO OUT DIGITAL AUDIO OUT (OPTICAL) PC IN PC AUDIO INPUT LAN (10/100) DMPORT USB Power and others Power requirement Power consumption in use in standby Screen size (inches measured diagonally) Display resolution Speaker/Front (2) (mm) (inches) Tweater (2) (mm) ø (inches) ø Assist Woofer (mm) (inches) Dimensions (W x H x D) with stand (mm) (inches) without stand (mm) (inches) wall-mount hole pattern (mm) wall-mount screw size Mass with stand...
Operating Instructions
Page 58
..., 56 RETURN button 20 S S VIDEO jack 11 Screen Position 45 Server Diagnostics 51 Settings Channel 46 Clock/Timers 40 Closed Captions (CC) 47 External Inputs 50 General Setup 51 HDMI Settings 50 Initial Setup 52 Network 51 Parental Lock 47 Picture 41 Product Support 40 Screen 44 Sound 43 Sharpness 41 Show/Hide Channels 46 Show/Hide Servers 51 Signal Diagnostics 40 Signal Type 46 Sleep Timer 40 Software Update 40 Sound Adjustments 32, 43 Sound Booster 43 SOUND button 19 Sound Mode 43 Speaker 24 Speakers 32, 44 STANDBY LED 24 Start...
..., 56 RETURN button 20 S S VIDEO jack 11 Screen Position 45 Server Diagnostics 51 Settings Channel 46 Clock/Timers 40 Closed Captions (CC) 47 External Inputs 50 General Setup 51 HDMI Settings 50 Initial Setup 52 Network 51 Parental Lock 47 Picture 41 Product Support 40 Screen 44 Sound 43 Sharpness 41 Show/Hide Channels 46 Show/Hide Servers 51 Signal Diagnostics 40 Signal Type 46 Sleep Timer 40 Software Update 40 Sound Adjustments 32, 43 Sound Booster 43 SOUND button 19 Sound Mode 43 Speaker 24 Speakers 32, 44 STANDBY LED 24 Start...


