Operating Instructions
Page 8
...(1.8 or 2.0 m) for KDF-42WE655 or KDF-50WE655, or approx. 6.8 or 7 ft. (2.1 or 2.2 m) for KDF-55WF655 or KDF-60WF655 away from your LCD projection TV, and within 60º of the vertical and 130º of the horizontal viewing area for KDF-42WE655 or KDF50WE655, or within 55º of the vertical ...LCD panel and is a structural property of the LCD projection TV. If you sit too close to the TV, you may be placed on the front panel blinks in this type of lamp. Projection lamp ❑ Your LCD projection TV uses a projection lamp as its light source. Important Safety Instructions 1) Read ...
...(1.8 or 2.0 m) for KDF-42WE655 or KDF-50WE655, or approx. 6.8 or 7 ft. (2.1 or 2.2 m) for KDF-55WF655 or KDF-60WF655 away from your LCD projection TV, and within 60º of the vertical and 130º of the horizontal viewing area for KDF-42WE655 or KDF50WE655, or within 55º of the vertical ...LCD panel and is a structural property of the LCD projection TV. If you sit too close to the TV, you may be placed on the front panel blinks in this type of lamp. Projection lamp ❑ Your LCD projection TV uses a projection lamp as its light source. Important Safety Instructions 1) Read ...
Operating Instructions
Page 9
...Sony LCD Projection TV Presenting the Sony LCD Projection TV 11 Package Contents 11 Using This Manual 11 Features 12 Enjoying Your LCD Projection TV 14 Notes on the LCD Projection TV 15 Cleaning the Screen Surface 15 Replacing the Lamp 16 Setting Up the LCD Projection TV Overview 23 LCD Projection TV Front Panel and Connectors ..24 Front Panel 24 Front and Rear... Connector 54 Using the CONTROL S Feature 55 Using CableCARD 56 About Using CableCARD 56 Activating CableCARD Service 56 Removing the CableCARD 57 Setting Up the LCD Projection TV Channel List..58 Using Initial Setup 58 ...
...Sony LCD Projection TV Presenting the Sony LCD Projection TV 11 Package Contents 11 Using This Manual 11 Features 12 Enjoying Your LCD Projection TV 14 Notes on the LCD Projection TV 15 Cleaning the Screen Surface 15 Replacing the Lamp 16 Setting Up the LCD Projection TV Overview 23 LCD Projection TV Front Panel and Connectors ..24 Front Panel 24 Front and Rear... Connector 54 Using the CONTROL S Feature 55 Using CableCARD 56 About Using CableCARD 56 Activating CableCARD Service 56 Removing the CableCARD 57 Setting Up the LCD Projection TV Channel List..58 Using Initial Setup 58 ...
Operating Instructions
Page 14
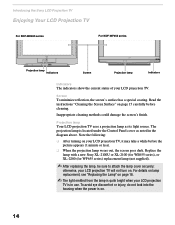
... methods could damage the screen's finish. For details on lamp replacement, see "Replacing the Lamp" on . Read the instructions "Cleaning the Screen Surface" on . 14 Introducing the Sony LCD Projection TV Enjoying Your LCD Projection TV For KDF-WE655 series For KDF-WF655 series POWER STANDBY TIMER LAMP Projection lamp Indicators Screen Projection lamp LAMP STD/DUO PRO POWER TIMER POWER/STANDBY Indicators Indicators The...
... methods could damage the screen's finish. For details on lamp replacement, see "Replacing the Lamp" on . Read the instructions "Cleaning the Screen Surface" on . 14 Introducing the Sony LCD Projection TV Enjoying Your LCD Projection TV For KDF-WE655 series For KDF-WF655 series POWER STANDBY TIMER LAMP Projection lamp Indicators Screen Projection lamp LAMP STD/DUO PRO POWER TIMER POWER/STANDBY Indicators Indicators The...
Operating Instructions
Page 15
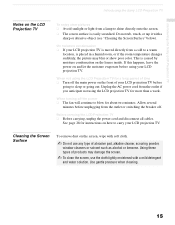
Introducing the Sony LCD Projection TV Introducing the Sony LCD Projection TV Notes on the LCD Projection TV To enjoy clear pictures ❑ Avoid sunlight or light from a cold to a warm location, is placed in a humid room, or if the room temperature changes ... scratched. This is caused by moisture condensation on how to shine directly onto the screen. ❑ The screen surface is moved directly from a lamp to carry your LCD projection TV. Do not rub, touch, or tap it with a mild detergent and water solution. Unplug the AC power cord from the outlet or switching...
Introducing the Sony LCD Projection TV Introducing the Sony LCD Projection TV Notes on the LCD Projection TV To enjoy clear pictures ❑ Avoid sunlight or light from a cold to a warm location, is placed in a humid room, or if the room temperature changes ... scratched. This is caused by moisture condensation on how to shine directly onto the screen. ❑ The screen surface is moved directly from a lamp to carry your LCD projection TV. Do not rub, touch, or tap it with a mild detergent and water solution. Unplug the AC power cord from the outlet or switching...
Operating Instructions
Page 16
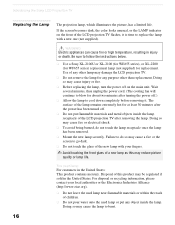
... the power off . ❑ Do not put any purpose other lamp may cause a fire or the screen to do not touch the lamp receptacle once the lamp has been removed. ❑ Mount the new lamp securely. Introducing the Sony LCD Projection TV Replacing the Lamp The projection lamp, which illuminates the picture, has a limited life. For disposal or recycling information...
... the power off . ❑ Do not put any purpose other lamp may cause a fire or the screen to do not touch the lamp receptacle once the lamp has been removed. ❑ Mount the new lamp securely. Introducing the Sony LCD Projection TV Replacing the Lamp The projection lamp, which illuminates the picture, has a limited life. For disposal or recycling information...
Operating Instructions
Page 17
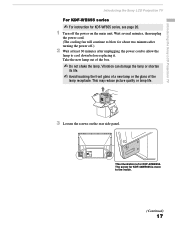
...blow for about two minutes after unplugging the power cord to allow the lamp to the inside. (Continued) 17 Introducing the Sony LCD Projection TV Introducing the Sony LCD Projection TV For KDF-WE655 series ✍ For instruction for KDF-WF655 series, see page 20. 1 Turn off .) 2 Wait at... least 30 minutes after turning the power off the power on the rear side panel. This may reduce picture quality or lamp life....
...blow for about two minutes after unplugging the power cord to allow the lamp to the inside. (Continued) 17 Introducing the Sony LCD Projection TV Introducing the Sony LCD Projection TV For KDF-WE655 series ✍ For instruction for KDF-WF655 series, see page 20. 1 Turn off .) 2 Wait at... least 30 minutes after turning the power off the power on the rear side panel. This may reduce picture quality or lamp life....
Operating Instructions
Page 18
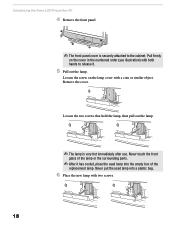
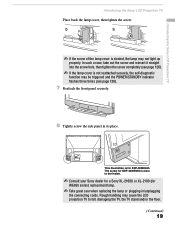
... front glass of the replacement lamp. Remove the cover. Never put the used lamp into a plastic bag. 6 Place the new lamp with a coin or similar object. Introducing the Sony LCD Projection TV 4 Remove the front panel. ✍ The front panel cover is very hot immediately after use. Pull firmly on the lamp cover with two screws. 18...
... front glass of the replacement lamp. Remove the cover. Never put the used lamp into a plastic bag. 6 Place the new lamp with a coin or similar object. Introducing the Sony LCD Projection TV 4 Remove the front panel. ✍ The front panel cover is very hot immediately after use. Pull firmly on the lamp cover with two screws. 18...
Operating Instructions
Page 19
... the front panel securely. 8 Tightly screw the side panel in /unplugging the connecting cords. Introducing the Sony LCD Projection TV Introducing the Sony LCD Projection TV Place back the lamp cover, then tighten the screw. ✍ If the screw of the lamp cover is for KDF-50WE655. Rough handling may not light up properly. This illustration is slanted, the...
... the front panel securely. 8 Tightly screw the side panel in /unplugging the connecting cords. Introducing the Sony LCD Projection TV Introducing the Sony LCD Projection TV Place back the lamp cover, then tighten the screw. ✍ If the screw of the lamp cover is for KDF-50WE655. Rough handling may not light up properly. This illustration is slanted, the...
Operating Instructions
Page 20
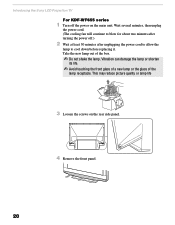
Introducing the Sony LCD Projection TV For KDF-WF655 series 1 Turn off .) 2 Wait at least 30 minutes after unplugging the power cord to allow the lamp to cool down before replacing it. Vibration can damage the lamp or shorten its life. ✍ Avoid touching the front glass of a new lamp or the glass of the box. &#...may reduce picture quality or lamp life 3 Loosen the screws on the main unit. STD/DUO PRO POWER Wait several minutes, then unplug the power cord. (The cooling fan will continue to blow for about two minutes after turning the power off the power on the rear side panel. 20 4 ...
Introducing the Sony LCD Projection TV For KDF-WF655 series 1 Turn off .) 2 Wait at least 30 minutes after unplugging the power cord to allow the lamp to cool down before replacing it. Vibration can damage the lamp or shorten its life. ✍ Avoid touching the front glass of a new lamp or the glass of the box. &#...may reduce picture quality or lamp life 3 Loosen the screws on the main unit. STD/DUO PRO POWER Wait several minutes, then unplug the power cord. (The cooling fan will continue to blow for about two minutes after turning the power off the power on the rear side panel. 20 4 ...
Operating Instructions
Page 21
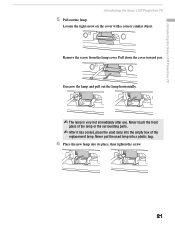
... parts. ✍ After it has cooled, place the used lamp into a plastic bag. 6 Place the new lamp into the empty box of the replacement lamp. Introducing the Sony LCD Projection TV Introducing the Sony LCD Projection TV 5 Pull out the lamp. Unscrew the lamp and pull out the lamp horizontally. ✍ The lamp is very hot immediately after use. Loosen the right screw...
... parts. ✍ After it has cooled, place the used lamp into a plastic bag. 6 Place the new lamp into the empty box of the replacement lamp. Introducing the Sony LCD Projection TV Introducing the Sony LCD Projection TV 5 Pull out the lamp. Unscrew the lamp and pull out the lamp horizontally. ✍ The lamp is very hot immediately after use. Loosen the right screw...
Operating Instructions
Page 22
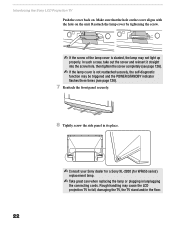
... side panel in its place. ✍ Consult your Sony dealer for a Sony XL-2200 (for WF655 series) replacement lamp. ✍ Take great care when replacing the lamp or plugging in/unplugging the connecting cords. Introducing the Sony LCD Projection TV Push the cover back on the unit. Reattach the lamp cover by tightening the screw. ✍ If the...
... side panel in its place. ✍ Consult your Sony dealer for a Sony XL-2200 (for WF655 series) replacement lamp. ✍ Take great care when replacing the lamp or plugging in/unplugging the connecting cords. Introducing the Sony LCD Projection TV Push the cover back on the unit. Reattach the lamp cover by tightening the screw. ✍ If the...
Operating Instructions
Page 24
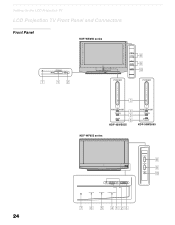
TIMER LAMP POWER POWER 3 POWER/STANDBY TIMER LAMP 4 5 6 KDF-42WE655 POWER/STANDBY TIMER LAMP KDF-50WE655 KDF-WF655 series 24 LAMP STD/DUO PRO POWER TIMER POWER/STANDBY LAMP STD/DUO PRO POWER TIMER POWER/STANDBY 7 6 5 4123 CHANNEL 3 VOLUME 3 # TV/VIDEO 8 9 q; Setting Up the LCD Projection TV LCD Projection TV Front Panel and Connectors Front Panel KDF-WE655 series STD/DUO PRO 7 12 + CHANNEL 8 + VOLUME 9 POWER STANDBY TV/VIDEO q;
TIMER LAMP POWER POWER 3 POWER/STANDBY TIMER LAMP 4 5 6 KDF-42WE655 POWER/STANDBY TIMER LAMP KDF-50WE655 KDF-WF655 series 24 LAMP STD/DUO PRO POWER TIMER POWER/STANDBY LAMP STD/DUO PRO POWER TIMER POWER/STANDBY 7 6 5 4123 CHANNEL 3 VOLUME 3 # TV/VIDEO 8 9 q; Setting Up the LCD Projection TV LCD Projection TV Front Panel and Connectors Front Panel KDF-WE655 series STD/DUO PRO 7 12 + CHANNEL 8 + VOLUME 9 POWER STANDBY TV/VIDEO q;

Operating Instructions
Page 25
... inserting Memory Stick media to view on page 119). 5 TIMER LED When lit, indicates one of the timers is set. For details, see "Replacing the Lamp" on /off the LCD projection TV. 4 POWER/ STANDBY LED Lights up when the main power is turned off . For details, see page 116... red when the lamp for the light source has burned out. TV/VIDEO Press to adjust the volume. The LED does not light up in green when the TV set is turned off . When the timer is set, this may indicate the display unit needs servicing (see "Contacting Sony" on your LCD projection TV. For details...
... inserting Memory Stick media to view on page 119). 5 TIMER LED When lit, indicates one of the timers is set. For details, see "Replacing the Lamp" on /off the LCD projection TV. 4 POWER/ STANDBY LED Lights up when the main power is turned off . For details, see page 116... red when the lamp for the light source has burned out. TV/VIDEO Press to adjust the volume. The LED does not light up in green when the TV set is turned off . When the timer is set, this may indicate the display unit needs servicing (see "Contacting Sony" on your LCD projection TV. For details...
Operating Instructions
Page 26
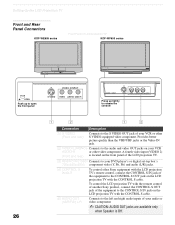
... CONTROL S OUT jack on the LCD projection TV with the CONTROL S cable. A fourth video input (VIDEO 2) (Front and rear) is Off. Setting Up the LCD Projection TV Front and Rear Panel Connectors KDF-WE655 series Front Panel of LCD projection TV KDF-WF655 series VIDEO 2 INPUT S-VIDEO VIDEO L(MONO) -AUDIO-R POWER STANDBY TIMER LAMP LAMP STD/DUO PRO POWER TIMER POWER/STANDBY...
... CONTROL S OUT jack on the LCD projection TV with the CONTROL S cable. A fourth video input (VIDEO 2) (Front and rear) is Off. Setting Up the LCD Projection TV Front and Rear Panel Connectors KDF-WE655 series Front Panel of LCD projection TV KDF-WF655 series VIDEO 2 INPUT S-VIDEO VIDEO L(MONO) -AUDIO-R POWER STANDBY TIMER LAMP LAMP STD/DUO PRO POWER TIMER POWER/STANDBY...
Operating Instructions
Page 125
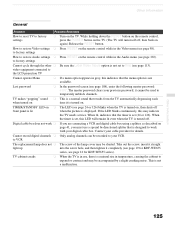
...up into the screw hole, and then tighten it completely (see page 19 for KDF-WE655 series, see page 108), enter the following master password: 4357. How to VCR The replacement lamp does not ❏ The screw of the lamp cover may be used to factory ❏ Turn on ❏ The LED (see... remote control while in the Video menu (see page 24 or 126) blinks when the TV is turned on the TV. (The TV will remain lit even when the TV is in gray, this may be recorded to the LCD projection TV Cannot operate Menu ❏ If a menu option appears in use a special bi-directional ...
...up into the screw hole, and then tighten it completely (see page 19 for KDF-WE655 series, see page 108), enter the following master password: 4357. How to VCR The replacement lamp does not ❏ The screw of the lamp cover may be used to factory ❏ Turn on ❏ The LED (see... remote control while in the Video menu (see page 24 or 126) blinks when the TV is turned on the TV. (The TV will remain lit even when the TV is in gray, this may be recorded to the LCD projection TV Cannot operate Menu ❏ If a menu option appears in use a special bi-directional ...
Operating Instructions
Page 126
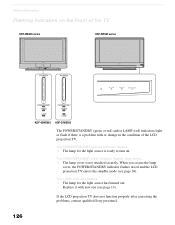
If the LCD projection TV does not function properly after correcting the problems, contact qualified Sony personnel. 126 When you secure the lamp cover, the POWER/STANDBY indicator flashes in the condition of the TV KDF-WE655 series KDF-WF655 series POWER STANDBY TIMER LAMP POWER POWER LAMP STD/DUO PRO POWER TIMER POWER/STANDBY LAMP TIMER POWER/STANDBY POWER/STANDBY...
If the LCD projection TV does not function properly after correcting the problems, contact qualified Sony personnel. 126 When you secure the lamp cover, the POWER/STANDBY indicator flashes in the condition of the TV KDF-WE655 series KDF-WF655 series POWER STANDBY TIMER LAMP POWER POWER LAMP STD/DUO PRO POWER TIMER POWER/STANDBY LAMP TIMER POWER/STANDBY POWER/STANDBY...
Operating Instructions
Page 127
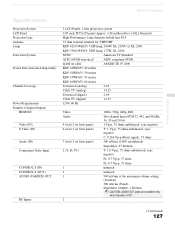
... projection system 0.87 inch TFT LCD panel Approx. 3.28 million dots (1,042,168 pixels) High Performance, large diameter hybrid lens F2.4 75 ohm external terminal for VHF/UHF KDF-42/50 WE655: UHP lamp, 100W, XL-2100U or XL-2100 KDF-55/60 WF655: UHP lamp, 132W, XL-2200 NTSC American TV ...Standard ATSC (8VSB terrestrial) ATSC compliant 8VSB QAM on cable ANSI/SCTE 07 2000 KDF-42WE655: 42 inches KDF-50WE655: 50 inches KDF-55WF655: 55 inches KDF-60WF655: 60 ...
... projection system 0.87 inch TFT LCD panel Approx. 3.28 million dots (1,042,168 pixels) High Performance, large diameter hybrid lens F2.4 75 ohm external terminal for VHF/UHF KDF-42/50 WE655: UHP lamp, 100W, XL-2100U or XL-2100 KDF-55/60 WF655: UHP lamp, 132W, XL-2200 NTSC American TV ...Standard ATSC (8VSB terrestrial) ATSC compliant 8VSB QAM on cable ANSI/SCTE 07 2000 KDF-42WE655: 42 inches KDF-50WE655: 50 inches KDF-55WF655: 55 inches KDF-60WF655: 60 ...
Operating Instructions
Page 130
... H Hue, adjusting 98 I Inputs, labeling 113 Installation of the projection TV 31-55 interlaced 118 J JUMP button 61, 67 L Label Channels 58, 107 video inputs 113 Lamp, replacing 16-22 M Memory Stick Duo 83 features 79 Index 85...48 DVD player 46 Satellite receiver 43-45 VCR 39-42, 44 CONTROL S 55 D Digital subchannels 69 DISPLAY button 61, 67 Display unit controls 24 Display, turning off 61 DRC... Mode 100 DVD player using with TV remote control 65 with A/V connectors, connecting 47 with component video connectors, connecting 46 E Enlarging ...
... H Hue, adjusting 98 I Inputs, labeling 113 Installation of the projection TV 31-55 interlaced 118 J JUMP button 61, 67 L Label Channels 58, 107 video inputs 113 Lamp, replacing 16-22 M Memory Stick Duo 83 features 79 Index 85...48 DVD player 46 Satellite receiver 43-45 VCR 39-42, 44 CONTROL S 55 D Digital subchannels 69 DISPLAY button 61, 67 Display unit controls 24 Display, turning off 61 DRC... Mode 100 DVD player using with TV remote control 65 with A/V connectors, connecting 47 with component video connectors, connecting 46 E Enlarging ...


