Operating Instructions
Page 3
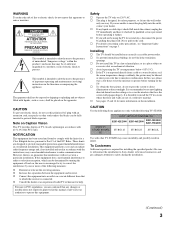
...you will not occur in a residential installation. Installing s The TV should fall inside the cabinet, unplug the TV immediately and have it further. KDF-42E2000 KDF-46E2000 KDF-50E2000 KDF-55E2000 SONY TV STAND MODEL NO. CAUTION To prevent electric shock, do not expose the screen to fit into an outlet on 120 V AC. s To... and receiver. Never pull on the apparatus. s If the TV is desirable to install the TV in injury. It is transported directly from a cold to dripping or splashing and no guarantee that face the screen with §15.119 of the FCC rules. SU-RG11S ...
...you will not occur in a residential installation. Installing s The TV should fall inside the cabinet, unplug the TV immediately and have it further. KDF-42E2000 KDF-46E2000 KDF-50E2000 KDF-55E2000 SONY TV STAND MODEL NO. CAUTION To prevent electric shock, do not expose the screen to fit into an outlet on 120 V AC. s To... and receiver. Never pull on the apparatus. s If the TV is desirable to install the TV in injury. It is transported directly from a cold to dripping or splashing and no guarantee that face the screen with §15.119 of the FCC rules. SU-RG11S ...
Operating Instructions
Page 6
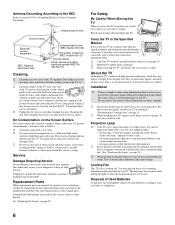
... laws or regulations. 6 s When installing your TV against a wall, keep it . It is time to "Recommended Viewing Area" on the screen, part of the screen may be sprayed to drop it gently with a new one (not supplied) when: • the message, "Projection lamp is not a defect. The noise may ...expose you carry the TV in writing that he has used batteries according to...
... laws or regulations. 6 s When installing your TV against a wall, keep it . It is time to "Recommended Viewing Area" on the screen, part of the screen may be sprayed to drop it gently with a new one (not supplied) when: • the message, "Projection lamp is not a defect. The noise may ...expose you carry the TV in writing that he has used batteries according to...

Operating Instructions
Page 7
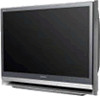
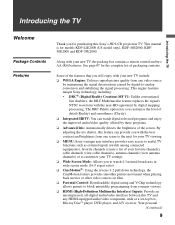
...TV Welcome 9 Package Contents 9 Features 9 Enjoying Your TV 11 Notes on the TV 11 Screen 11 Indicators 12 Projection Lamp 12 Installing the TV 13 Carrying Your TV 13 Take Precaution during Installation 13 Preventing the TV from Toppling Over ..........14 When Installing Your TV against a Wall.........14 Recommended Viewing Area 15 TV... Other Equipment with Your Remote Control 43 Special Buttons on the Remote Control .......... 46 Using the TOOLS Button 46 Using the TOOLS Button in PC Mode........... 46 Using the JUMP Button 47 Using the FREEZE Button 47 Using the GUIDE Button ...
...TV Welcome 9 Package Contents 9 Features 9 Enjoying Your TV 11 Notes on the TV 11 Screen 11 Indicators 12 Projection Lamp 12 Installing the TV 13 Carrying Your TV 13 Take Precaution during Installation 13 Preventing the TV from Toppling Over ..........14 When Installing Your TV against a Wall.........14 Recommended Viewing Area 15 TV... Other Equipment with Your Remote Control 43 Special Buttons on the Remote Control .......... 46 Using the TOOLS Button 46 Using the TOOLS Button in PC Mode........... 46 Using the JUMP Button 47 Using the FREEZE Button 47 Using the GUIDE Button ...
Operating Instructions
Page 9
... you for your new TV include: ❑ WEGA Engine: Delivers superb picture quality from any video source by minimizing the signal deterioration caused by digital-to block unsuitable programming from younger viewers. ❑ HDMI (High-Definition Multimedia Interface) Inputs: Provide an uncompressed, all-digital audio/video interface between this Sony's HD LCD projection TV. Along with the...
... you for your new TV include: ❑ WEGA Engine: Delivers superb picture quality from any video source by minimizing the signal deterioration caused by digital-to block unsuitable programming from younger viewers. ❑ HDMI (High-Definition Multimedia Interface) Inputs: Provide an uncompressed, all-digital audio/video interface between this Sony's HD LCD projection TV. Along with the...
Operating Instructions
Page 11
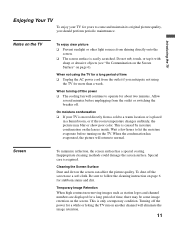
... other light sources from the outlet if you should perform periodic maintenance. Allow several minutes before turning on the TV. Screen To minimize reflection, the screen surface has a special coating. Temporary Image Retention When high contrast non-moving images such as station logos and ...the AC power cord from shining directly onto the screen. ❑ The screen surface is easily scratched. Inappropriate cleaning methods could damage the screen surface. Special care is only a temporary condition. Enjoying Your TV To enjoy your TV is moved directly from the outlet or switching ...
... other light sources from the outlet if you should perform periodic maintenance. Allow several minutes before turning on the TV. Screen To minimize reflection, the screen surface has a special coating. Temporary Image Retention When high contrast non-moving images such as station logos and ...the AC power cord from shining directly onto the screen. ❑ The screen surface is easily scratched. Inappropriate cleaning methods could damage the screen surface. Special care is only a temporary condition. Enjoying Your TV To enjoy your TV is moved directly from the outlet or switching ...
Operating Instructions
Page 12
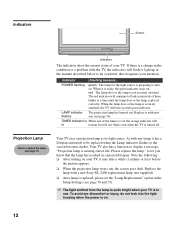
... a while (1 minute or less) before the picture appears. ❑ When the projection lamp wears out, the screen goes dark. red : The lamp door or the lamp is turned off. When the lamp door or the lamp is securely attached, the TV will turn on. TIMER indicator is When one (see page 76). Please... replace the lamp." to turn on . 12 To avoid eye discomfort or injury, do not look into the light housing when the power is on with a new Sony XL-2400 replacement lamp (not...
... a while (1 minute or less) before the picture appears. ❑ When the projection lamp wears out, the screen goes dark. red : The lamp door or the lamp is turned off. When the lamp door or the lamp is securely attached, the TV will turn on. TIMER indicator is When one (see page 76). Please... replace the lamp." to turn on . 12 To avoid eye discomfort or injury, do not look into the light housing when the power is on with a new Sony XL-2400 replacement lamp (not...
Operating Instructions
Page 20
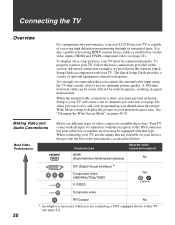
... below. Making Video and Audio Connections Best Video Performance Below are available on pages 49-51. Connecting the TV Overview For optimum picture performance, your new LCD Projection TV is capable of video connectors available these days. A 300-ohm twin lead cable can view (see page ... DVI connector but your cable box or satellite receiver may be equipped with your preferred aspect ratio. See "Changing the Wide Screen Mode" on your devices that you are provided in signal deterioration. Advanced connection examples are connecting a DVI-equipped device to receive...
... below. Making Video and Audio Connections Best Video Performance Below are available on pages 49-51. Connecting the TV Overview For optimum picture performance, your new LCD Projection TV is capable of video connectors available these days. A 300-ohm twin lead cable can view (see page ... DVI connector but your cable box or satellite receiver may be equipped with your preferred aspect ratio. See "Changing the Wide Screen Mode" on your devices that you are provided in signal deterioration. Advanced connection examples are connecting a DVI-equipped device to receive...
Operating Instructions
Page 28
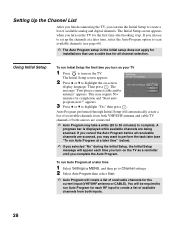
... Channel List After you finish connecting the TV, you can run the Initial Setup to create a list of receivable channels for the current input (VHF/UHF antenna or CABLE). The message "First please connect cable and/or antenna" appears. The Initial Setup screen appears. 2 Press V or v to... complete. A progress bar is displayed while available channels are connected. ✍ Auto Program may take a while (20 to 50 minutes) to highlight the on the TV. To run Auto Program at a later time 1...
... Channel List After you finish connecting the TV, you can run the Initial Setup to create a list of receivable channels for the current input (VHF/UHF antenna or CABLE). The message "First please connect cable and/or antenna" appears. The Initial Setup screen appears. 2 Press V or v to... complete. A progress bar is displayed while available channels are connected. ✍ Auto Program may take a while (20 to 50 minutes) to highlight the on the TV. To run Auto Program at a later time 1...

Operating Instructions
Page 39
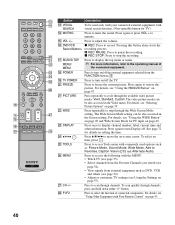
...a tactile dot. Press RETURN to either close the menu screen or move back to turn this feature off automatically. Watching the TV RETURN Button Descriptions TV/VIDEO SLEEP POWER TV POWER BD/DVD DVR/VCR SAT/CABLE TV FUNCTION Button 1 TV/VIDEO 2 SLEEP ENT JUMP ANT FREEZE MODE SURROUND SOUND ...you choose. Press to cycle through the video equipment connected to show which external equipment the remote control is set period of the live TV when playing back a recorded program. m (fast reverse): Press to operate the external equipment, these buttons operate the video equipment you...
...a tactile dot. Press RETURN to either close the menu screen or move back to turn this feature off automatically. Watching the TV RETURN Button Descriptions TV/VIDEO SLEEP POWER TV POWER BD/DVD DVR/VCR SAT/CABLE TV FUNCTION Button 1 TV/VIDEO 2 SLEEP ENT JUMP ANT FREEZE MODE SURROUND SOUND ...you choose. Press to cycle through the video equipment connected to show which external equipment the remote control is set period of the live TV when playing back a recorded program. m (fast reverse): Press to operate the external equipment, these buttons operate the video equipment you...
Operating Instructions
Page 40
...the sound. Press to turn on -screen cursor. button. Press V/v/B/b to cycle through the Wide Screen Mode setting. For details, see "Using the FREEZE Button" on setting the time. TV/VIDEO SLEEP POWER TV POWER BD/DVD DVR/VCR SAT/CABLE TV FUNCTION ENT JUMP ANT FREEZE MODE SURROUND ...Press to pause the recording. Press again to turn Display off the TV. To scan quickly through channels. Press to turn on page 59. The Wide Screen Mode setting can be also accessed in the Screen setting. Press to access Tools menu with commonly used only with your...
...the sound. Press to turn on -screen cursor. button. Press V/v/B/b to cycle through the Wide Screen Mode setting. For details, see "Using the FREEZE Button" on setting the time. TV/VIDEO SLEEP POWER TV POWER BD/DVD DVR/VCR SAT/CABLE TV FUNCTION ENT JUMP ANT FREEZE MODE SURROUND ...Press to pause the recording. Press again to turn Display off the TV. To scan quickly through channels. Press to turn on page 59. The Wide Screen Mode setting can be also accessed in the Screen setting. Press to access Tools menu with commonly used only with your...

Operating Instructions
Page 43
... of the disc Select a track directly Press ... Activate the remote control to operate the DVD DVD/VCR (FUNCTION) Turn on the screen for your TV, first turn to operate the cable box SAT/CABLE (FUNCTION) Turn on /off POWER Change channels CH +/- In that case, operate... ENT CH +/- Record z Play H Stop x Operating a DVD Player or DVD Changer To Do This ... JUMP To Do This ... Press ... Watching the TV Using Other Equipment with the equipment. to step forward or . Select a channel Change channels Back to operate the VCR DVR/VCR (FUNCTION) Turn on the...
... of the disc Select a track directly Press ... Activate the remote control to operate the DVD DVD/VCR (FUNCTION) Turn on the screen for your TV, first turn to operate the cable box SAT/CABLE (FUNCTION) Turn on /off POWER Change channels CH +/- In that case, operate... ENT CH +/- Record z Play H Stop x Operating a DVD Player or DVD Changer To Do This ... JUMP To Do This ... Press ... Watching the TV Using Other Equipment with the equipment. to step forward or . Select a channel Change channels Back to operate the VCR DVR/VCR (FUNCTION) Turn on the...
Operating Instructions
Page 49
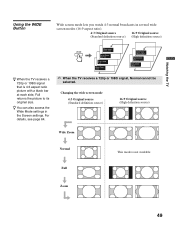
... see page 64. z You can also access the Wide Mode settings in several wide screen modes (16:9 aspect ratio). 4:3 Original source 16:9 Original source (Standard definition source) (High definition source) z When the TV receives a 720p or 1080i signal that is not available Full Zoom 49 WIDE Wide Mode ... : Normal Wide Mode : Full Wide Mode : Zoom Wide Mode : Wide Zoom Wide Mode : Full Wide Mode : Zoom ✍ When the TV receives a 720p or 1080i signal, Normal cannot be selected. Watching the TV Using the WIDE Button Wide screen mode lets you watch 4:3 normal broadcasts in the...
... see page 64. z You can also access the Wide Mode settings in several wide screen modes (16:9 aspect ratio). 4:3 Original source 16:9 Original source (Standard definition source) (High definition source) z When the TV receives a 720p or 1080i signal that is not available Full Zoom 49 WIDE Wide Mode ... : Normal Wide Mode : Full Wide Mode : Zoom Wide Mode : Wide Zoom Wide Mode : Full Wide Mode : Zoom ✍ When the TV receives a 720p or 1080i signal, Normal cannot be selected. Watching the TV Using the WIDE Button Wide screen mode lets you watch 4:3 normal broadcasts in the...
Operating Instructions
Page 50
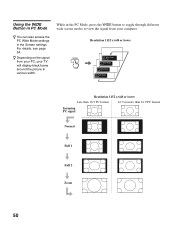
... the signal from your TV will display black frame around the picture in various width. While in the Screen settings. Using the WIDE Button in PC Mode z You can also access the PC Wide Mode settings in the PC Mode, press the WIDE button to toggle through different wide screen modes to view...
... the signal from your TV will display black frame around the picture in various width. While in the Screen settings. Using the WIDE Button in PC Mode z You can also access the PC Wide Mode settings in the PC Mode, press the WIDE button to toggle through different wide screen modes to view...

Operating Instructions
Page 52
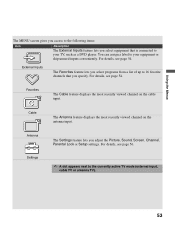
.... GUIDE TOOLS DISPLAY RETURN MENU PREV REPLAY ADVANCE NEXT PLAY VISUAL SEARCH PAUSE STOP VOL CH MUTING 1 Press MENU on the screen rather than a variety of remote control button presses. Using the Menus Overview of tasks intuitively with a control panel on the remote...When you press the button, you to exit. 52 MENU External Inputs Favorites C Cable Antenna Settings Select from basic TV functions: External Inputs, Favorites, Cable, Antenna or adjust TV settings. It enables you can select from connected equipment Exit: MENU 2 Press V/v to highlight the item. 3 ...
.... GUIDE TOOLS DISPLAY RETURN MENU PREV REPLAY ADVANCE NEXT PLAY VISUAL SEARCH PAUSE STOP VOL CH MUTING 1 Press MENU on the screen rather than a variety of remote control button presses. Using the Menus Overview of tasks intuitively with a control panel on the remote...When you press the button, you to exit. 52 MENU External Inputs Favorites C Cable Antenna Settings Select from basic TV functions: External Inputs, Favorites, Cable, Antenna or adjust TV settings. It enables you can select from connected equipment Exit: MENU 2 Press V/v to highlight the item. 3 ...
Operating Instructions
Page 53
... unused inputs conveniently. Antenna Settings The Settings feature lets you adjust the Picture, Sound, Screen, Channel, Parental Lock or Setup settings. You can assign a label to your TV, such as a DVD player. Using the Menus The MENU screen gives you access to the following items: Icon Description The External Inputs feature lets you... Cable feature displays the most recently viewed channel on the cable input. For details, see page 56. ✍ A dot appears next to the currently active TV mode (external input, cable TV or antenna TV). 53
... unused inputs conveniently. Antenna Settings The Settings feature lets you adjust the Picture, Sound, Screen, Channel, Parental Lock or Setup settings. You can assign a label to your TV, such as a DVD player. Using the Menus The MENU screen gives you access to the following items: Icon Description The External Inputs feature lets you... Cable feature displays the most recently viewed channel on the cable input. For details, see page 56. ✍ A dot appears next to the currently active TV mode (external input, cable TV or antenna TV). 53

Operating Instructions
Page 56
Unavailable options are performed. Navigating Through Settings The Settings screen provides access to the features: 1 Press . 2 Select . 3 Highlight the item: Picture, Sound, Screen, Channel, Parental Lock, Setup. 4 Press to the settings screen where most of advanced settings and adjustments are grayed out. 56 Using Settings in MENU The Settings feature lets you can adjust vary depending on page 57. See "Overview " on the situation. To exit Settings, press . ✍ The options you enter to select an option.
Unavailable options are performed. Navigating Through Settings The Settings screen provides access to the features: 1 Press . 2 Select . 3 Highlight the item: Picture, Sound, Screen, Channel, Parental Lock, Setup. 4 Press to the settings screen where most of advanced settings and adjustments are grayed out. 56 Using Settings in MENU The Settings feature lets you can adjust vary depending on page 57. See "Overview " on the situation. To exit Settings, press . ✍ The options you enter to select an option.

Operating Instructions
Page 57
...Color Hue Color Temp. Settings displayed here are with the 720p signal.) Allows you may see "Menu Color" on page 73. (Depending on your TV, see a different Setting options on the signal tuned, you to set/change Picture Mode (page 59) Reset (page 59) Advanced Iris (page 59... Cool 50 Sound Antenna Sound Sound Mode Reset Treble Bass Balance Steady Sound Volume Offset Surround BBE Exit: MENU Custom 0 0 0 Off 0 Off Off Screen Antenna Screen Exit: MENU Wide Mode PC Wide Mode Auto Wide 4:3 Default Display Area Horizontal Center Vertical Center Vertical Size Full Full 1 On Off Normal 0 0 ...
...Color Hue Color Temp. Settings displayed here are with the 720p signal.) Allows you may see "Menu Color" on page 73. (Depending on your TV, see a different Setting options on the signal tuned, you to set/change Picture Mode (page 59) Reset (page 59) Advanced Iris (page 59... Cool 50 Sound Antenna Sound Sound Mode Reset Treble Bass Balance Steady Sound Volume Offset Surround BBE Exit: MENU Custom 0 0 0 Off 0 Off Off Screen Antenna Screen Exit: MENU Wide Mode PC Wide Mode Auto Wide 4:3 Default Display Area Horizontal Center Vertical Center Vertical Size Full Full 1 On Off Normal 0 0 ...
Operating Instructions
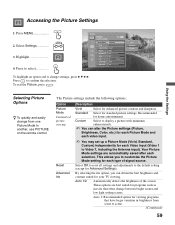
Page 59
...settings and adjustments to display a picture with minimum enhancements. ✍ You can obtain the best brightness and contrast suited for your TV viewing. To exit the Picture, press MENU . Custom Select to the default setting (except for standard picture settings. Your Picture ...4. Standard Select for Advanced Settings). Press to change settings, press V v B b. These options are automatically saved after each type of the screen. Sharpness Standard Auto 1 Max 50 65 0 Cool 50 Vivid Standard Custom To highlight an option and to confirm the selection. The Picture settings ...
...settings and adjustments to display a picture with minimum enhancements. ✍ You can obtain the best brightness and contrast suited for your TV viewing. To exit the Picture, press MENU . Custom Select to the default setting (except for standard picture settings. Your Picture ...4. Standard Select for Advanced Settings). Press to change settings, press V v B b. These options are automatically saved after each type of the screen. Sharpness Standard Auto 1 Max 50 65 0 Cool 50 Vivid Standard Custom To highlight an option and to confirm the selection. The Picture settings ...

Operating Instructions
Page 60
...available. Option Picture Brightness Color Hue Color Temp. White intensity adjustment Sharpness Noise Reduction DRC Mode Description Auto 2: Recommended option for TV viewing in a brightly lit room. Select Auto to give the white colors a red tint. Neutral Select to reduce the noise...intensity. High With this option, the screen is dimmed but contrast is set to Custom. Low With this option, the screen has maximum level of connected equipment. High Density Creates a high-resolution picture with 4 x density, for TV viewing in use, Auto is most ...
...available. Option Picture Brightness Color Hue Color Temp. White intensity adjustment Sharpness Noise Reduction DRC Mode Description Auto 2: Recommended option for TV viewing in a brightly lit room. Select Auto to give the white colors a red tint. Neutral Select to reduce the noise...intensity. High With this option, the screen is dimmed but contrast is set to Custom. Low With this option, the screen has maximum level of connected equipment. High Density Creates a high-resolution picture with 4 x density, for TV viewing in use, Auto is most ...
Operating Instructions
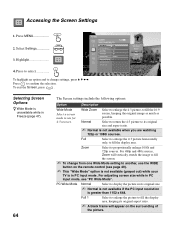
Page 64
... ratio. ✍ Normal is not available when you are watching 720p or 1080i sources. Press MENU MENU 2. Press to fill the 16:9 screen, keeping the original image as much as possible. Full Select to enlarge the 4:3 picture horizontally only, to proportionally enlarge 1080i and 720p sources....input mode, see page 49). ✍ This "Wide Mode" option is not available (grayed out) while your TV is greater than 1152 x 648. Press to select Antenna Screen Adjust the picture size Exit: MENU Wide Mode PC Wide Mode Auto Wide 4:3 Default Display Area Horizontal Center Vertical ...
... ratio. ✍ Normal is not available when you are watching 720p or 1080i sources. Press MENU MENU 2. Press to fill the 16:9 screen, keeping the original image as much as possible. Full Select to enlarge the 4:3 picture horizontally only, to proportionally enlarge 1080i and 720p sources....input mode, see page 49). ✍ This "Wide Mode" option is not available (grayed out) while your TV is greater than 1152 x 648. Press to select Antenna Screen Adjust the picture size Exit: MENU Wide Mode PC Wide Mode Auto Wide 4:3 Default Display Area Horizontal Center Vertical ...


