Warranty Card
Page 1
... Sony Partnership within the Warranty period must be defective, Sony will supply, at no charge, new or rebuilt replacements in exchange for defective parts for product information or operation, call : 1-(800)-488-SONY (7669) Printed in the form of a bill of two (2) years. This warranty is invalid if the factory applied serial number has been altered or removed from state to any part of a service problem...
... Sony Partnership within the Warranty period must be defective, Sony will supply, at no charge, new or rebuilt replacements in exchange for defective parts for product information or operation, call : 1-(800)-488-SONY (7669) Printed in the form of a bill of two (2) years. This warranty is invalid if the factory applied serial number has been altered or removed from state to any part of a service problem...
Marketing Specifications
Page 1
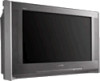
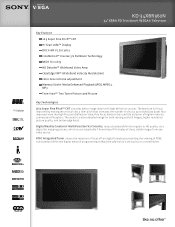
... Circuitry raises standard definition signals to 65% (16x9 base). A display of a set top box or a monthly fee. ATSC Integrated Tuner allows the reception of local, off-air digital broadcasts providing the viewing of FREE, true standard definition digital network programming without the addition of clear, stable images from any video source. The result is user adjustable. The end result? KD-34XBR960N 34" XBR® FD Trinitron® WEGA® Televison Key Features 16:9 Super...
... Circuitry raises standard definition signals to 65% (16x9 base). A display of a set top box or a monthly fee. ATSC Integrated Tuner allows the reception of local, off-air digital broadcasts providing the viewing of FREE, true standard definition digital network programming without the addition of clear, stable images from any video source. The result is user adjustable. The end result? KD-34XBR960N 34" XBR® FD Trinitron® WEGA® Televison Key Features 16:9 Super...
Marketing Specifications
Page 2
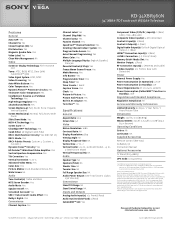
... Parts / 2 Years Picture Tube Dimensions Weight: 191 lbs, 6 oz (86.8 Kg) Measurements: 39 1/8" x 25 5/8" x 23 7/8" (994 x 652 x 605mm) Operating Conditions Colors: NA Luminance: NA Supplied Accessories Remote Control (RM-Y201) AA Battery (2) Instruction Manual Optional Accessories TV Stand (SU-34XBR3) UPC Code: 027242678712 Confidential Sony Information. KD-34XBR960N 34" XBR® FD Trinitron® WEGA® Televison Features General Auto SAP: Yes Channel Fix: Yes Closed Caption (CC): NA ID1 Detection: Yes Magnetic Quadra Pole: Yes Video Label...
... Parts / 2 Years Picture Tube Dimensions Weight: 191 lbs, 6 oz (86.8 Kg) Measurements: 39 1/8" x 25 5/8" x 23 7/8" (994 x 652 x 605mm) Operating Conditions Colors: NA Luminance: NA Supplied Accessories Remote Control (RM-Y201) AA Battery (2) Instruction Manual Optional Accessories TV Stand (SU-34XBR3) UPC Code: 027242678712 Confidential Sony Information. KD-34XBR960N 34" XBR® FD Trinitron® WEGA® Televison Features General Auto SAP: Yes Channel Fix: Yes Closed Caption (CC): NA ID1 Detection: Yes Magnetic Quadra Pole: Yes Video Label...
Operating Instructions
Page 2
... installer's attention to Article 820-40 of the National Electrical Code (NEC) that the cable ground shall be determined by direct connection to operate this instruction manual and at low settings. Owner's Record The model and serial numbers are cautioned that interference will increase the risk of the FCC Rules. For more of the FCC rules. Never use of receiving analog basic, digital basic and digital premium cable television programming...
... installer's attention to Article 820-40 of the National Electrical Code (NEC) that the cable ground shall be determined by direct connection to operate this instruction manual and at low settings. Owner's Record The model and serial numbers are cautioned that interference will increase the risk of the FCC Rules. For more of the FCC rules. Never use of receiving analog basic, digital basic and digital premium cable television programming...

Operating Instructions
Page 3
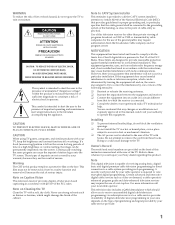
..., on an unstable cart, stand, tripod, bracket, table or shelf. Disconnect all warnings, cautions and instructions placed on the serial/model plate. Overloading Do not overload wall outlets, extension cords or convenience receptacles beyond their capacity, since this manual for grounding). Use a cloth lightly dampened with all cables and cords from the set before cleaning or polishing it in the installation, use attachments not recommended by...
..., on an unstable cart, stand, tripod, bracket, table or shelf. Disconnect all warnings, cautions and instructions placed on the serial/model plate. Overloading Do not overload wall outlets, extension cords or convenience receptacles beyond their capacity, since this manual for grounding). Use a cloth lightly dampened with all cables and cords from the set before cleaning or polishing it in the installation, use attachments not recommended by...
Operating Instructions
Page 4
... attempt to service the set , and to protect it from the wall outlet and refer servicing to qualified service personnel under the following the operating instructions. WHEN INSTALLING AN OUTDOOR ANTENNA SYSTEM, EXTREME CARE SHOULD BE TAKEN TO KEEP FROM CONTACTING SUCH POWER LINES OR CIRCUITS AS CONTACT WITH THEM IS ALMOST INVARIABLY FATAL. Adjust only those controls that the set is damaged...
... attempt to service the set , and to protect it from the wall outlet and refer servicing to qualified service personnel under the following the operating instructions. WHEN INSTALLING AN OUTDOOR ANTENNA SYSTEM, EXTREME CARE SHOULD BE TAKEN TO KEEP FROM CONTACTING SUCH POWER LINES OR CIRCUITS AS CONTACT WITH THEM IS ALMOST INVARIABLY FATAL. Adjust only those controls that the set is damaged...
Operating Instructions
Page 6
... the FD Trinitron Wega Overview ...9 Presenting the FD Trinitron Wega 9 Package Contents 9 Features 9 Setting Up the TV Overview ...13 About the AC Power Cord 13 TV Controls and Connectors 14 Front Panel 14 Rear Panel 15 Basic Connections: Connecting a Cable or Antenna 17 About Using CableCARD 17 Cable or Antenna Only 18 Cable and Antenna Only 19 Cable Box and Cable Only 20 Cable Box Only 21 Connecting Optional Equipment 22 Making Video Connections 23 About Using S VIDEO 23 VCR and Cable 24...
... the FD Trinitron Wega Overview ...9 Presenting the FD Trinitron Wega 9 Package Contents 9 Features 9 Setting Up the TV Overview ...13 About the AC Power Cord 13 TV Controls and Connectors 14 Front Panel 14 Rear Panel 15 Basic Connections: Connecting a Cable or Antenna 17 About Using CableCARD 17 Cable or Antenna Only 18 Cable and Antenna Only 19 Cable Box and Cable Only 20 Cable Box Only 21 Connecting Optional Equipment 22 Making Video Connections 23 About Using S VIDEO 23 VCR and Cable 24...
Operating Instructions
Page 15
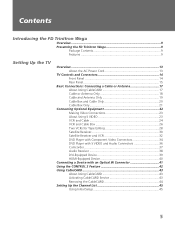
... page 89. SETUP Setup SETUP TV Controls and Connectors Front Panel 12 3 4 5 6 7 8 9 q; Provides a secure digital connection between your TV and your i.LINK-compatible portable device. Press to display the i.LINK Control Panel. Press again to the TV's video inputs. Press to scan through the video equipment connected to exit from the TV's remote control. For details, see "Contacting Sony" on your camcorder or other video equipment. Receives IR signals from the Menu. Press...
... page 89. SETUP Setup SETUP TV Controls and Connectors Front Panel 12 3 4 5 6 7 8 9 q; Provides a secure digital connection between your TV and your i.LINK-compatible portable device. Press to display the i.LINK Control Panel. Press again to the TV's video inputs. Press to scan through the video equipment connected to exit from the TV's remote control. For details, see "Contacting Sony" on your camcorder or other video equipment. Receives IR signals from the Menu. Press...
Operating Instructions
Page 17
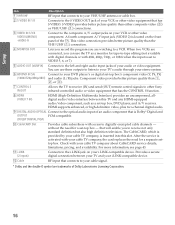
... (OUT) remote control signals to the composite A/V output jacks on your VCR or other video equipment that has S VIDEO. that will enable you can use the TV as a set to VIDEO 5, 6, or 7). 5 AUDIO OUT (VAR/FIX) Connects to your i.LINK-compatible device. Check with your cable TV company, the card replaces the need for a separate settop box. SETUP SETUP SETUP 16 HDMI supports enhanced, or high-definition video, plus two-channel digital audio. 9 DIGITAL AUDIO OPTICAL Connect to the optical audio input of...
... (OUT) remote control signals to the composite A/V output jacks on your VCR or other video equipment that has S VIDEO. that will enable you can use the TV as a set to VIDEO 5, 6, or 7). 5 AUDIO OUT (VAR/FIX) Connects to your i.LINK-compatible device. Check with your cable TV company, the card replaces the need for a separate settop box. SETUP SETUP SETUP 16 HDMI supports enhanced, or high-definition video, plus two-channel digital audio. 9 DIGITAL AUDIO OPTICAL Connect to the optical audio input of...
Operating Instructions
Page 22
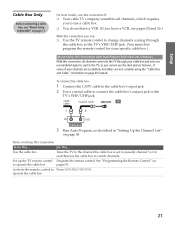
... Picture (Twin View, etc.) Features With this connection, all channels, which requires you to use a cable box. ❑ You do not have a VCR. (If you have a VCR, see "About Using CableCARD" on to the TV's VHF/UHF jack. operate the cable box SETUP SETUP SETUP 21 See "Programming the Remote Control" on page 17. To connect the cable box 1 Connect the CATV cable to the cable box's input jack. 2 Use a coaxial cable to connect the cable box's output jack to operate the cable box...
... Picture (Twin View, etc.) Features With this connection, all channels, which requires you to use a cable box. ❑ You do not have a VCR. (If you have a VCR, see "About Using CableCARD" on to the TV's VHF/UHF jack. operate the cable box SETUP SETUP SETUP 21 See "Programming the Remote Control" on page 17. To connect the cable box 1 Connect the CATV cable to the cable box's input jack. 2 Use a coaxial cable to connect the cable box's output jack to operate the cable box...
Operating Instructions
Page 39
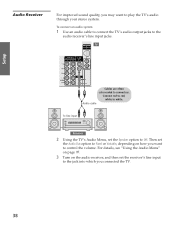
... the audio receiver's line input jacks. To connect an audio system 1 Use an audio cable to connect the TV's audio output jacks to play the TV's audio through your stereo system. Then set the Speaker option to Off. SETUP SETUP SETUP 38 TV Audio cable Cables are often color-coded to white. Connect red to red, white to connectors. To line input Receiver 2 Using the TV's Audio Menu, set the Audio Out option to Fixed or Variable, depending on the audio receiver, and then set the receiver's line input to control the volume...
... the audio receiver's line input jacks. To connect an audio system 1 Use an audio cable to connect the TV's audio output jacks to play the TV's audio through your stereo system. Then set the Speaker option to Off. SETUP SETUP SETUP 38 TV Audio cable Cables are often color-coded to white. Connect red to red, white to connectors. To line input Receiver 2 Using the TV's Audio Menu, set the Audio Out option to Fixed or Variable, depending on the audio receiver, and then set the receiver's line input to control the volume...
Operating Instructions
Page 40
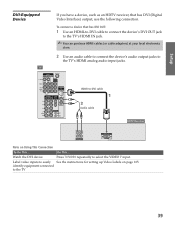
To connect a device that has DVI (Digital Video Interface) output, use the following connection. Watch the DVI device Press TV/VIDEO repeatedly to easily See the instructions for setting up Video Labels on Using This Connection To Do This ... Label video inputs to select the VIDEO 7 input. SETUP Setup SETUP DVI-Equipped Device TV If you have a device, such as an HDTV receiver, that has DVI OUT: 1 Use an HDMI-to-DVI cable to connect the...
To connect a device that has DVI (Digital Video Interface) output, use the following connection. Watch the DVI device Press TV/VIDEO repeatedly to easily See the instructions for setting up Video Labels on Using This Connection To Do This ... Label video inputs to select the VIDEO 7 input. SETUP Setup SETUP DVI-Equipped Device TV If you have a device, such as an HDTV receiver, that has DVI OUT: 1 Use an HDMI-to-DVI cable to connect the...
Operating Instructions
Page 46
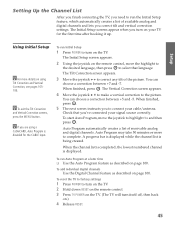
... channel list is displayed. When the channel list is completed, the lowest numbered channel is being created. SETUP Setting Up the Channel List After you finish connecting the TV, you need to run Auto Program at a later time ❑ Use the Auto Program feature as described on your TV for the CABLE input. To run Initial Setup 1 Press POWER to the picture. The Vertical Correction screen appears. 4 Move the joystick V v to make a vertical correction to turn...
... channel list is displayed. When the channel list is completed, the lowest numbered channel is being created. SETUP Setting Up the Channel List After you finish connecting the TV, you need to run Auto Program at a later time ❑ Use the Auto Program feature as described on your TV for the CABLE input. To run Initial Setup 1 Press POWER to the picture. The Vertical Correction screen appears. 4 Move the joystick V v to make a vertical correction to turn...
Operating Instructions
Page 49
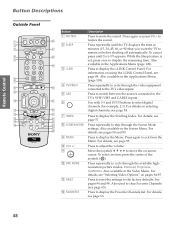
... to adjust the volume. Press to exit from the TV RM-Y201 Menu. qf FAVORITES Press to the TV's VHF/UHF and CABLE inputs. Press to switch between the sources connected to display the Favorite Channels list. For wk details, see page 93. qd RESET Press to reset the settings to mute the sound. SETUP SETUP Remote Control Button Descriptions Outside Panel Button Description 1 MUTING MUTING SLEEP SAT/CABLE POWER 1 qh 2 2 SLEEP Press to the factory defaults. Press...
... to adjust the volume. Press to exit from the TV RM-Y201 Menu. qf FAVORITES Press to the TV's VHF/UHF and CABLE inputs. Press to switch between the sources connected to display the Favorite Channels list. For wk details, see page 93. qd RESET Press to reset the settings to mute the sound. SETUP SETUP Remote Control Button Descriptions Outside Panel Button Description 1 MUTING MUTING SLEEP SAT/CABLE POWER 1 qh 2 2 SLEEP Press to the factory defaults. Press...
Operating Instructions
Page 50
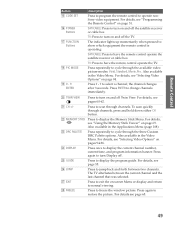
... cable box. Also available in the Video Menu. For details, see pages 60-62. TV: Press to change channels immediately. To scan quickly through channels. Press again to have the remote control operate the TV. The indicator lights up momentarily when pressed to show which equipment the remote control is operating: SAT/CABLE: Press to restore the picture. w; wd DRC PALETTE Press repeatedly to display the current channel number, current time, and program...
... cable box. Also available in the Video Menu. For details, see pages 60-62. TV: Press to change channels immediately. To scan quickly through channels. Press again to have the remote control operate the TV. The indicator lights up momentarily when pressed to show which equipment the remote control is operating: SAT/CABLE: Press to restore the picture. w; wd DRC PALETTE Press repeatedly to display the current channel number, current time, and program...
Operating Instructions
Page 103
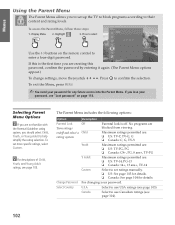
... details. To exit the Menu, press MENU. ✍ You need your password, see page 103). To set more specific ratings, select Custom. If this password, confirm the password by entering it again. (The Parent Menu options appear.) To change settings, move the joystick V v B b. Menus SETUP SETUP Using the Parent Menu The Parent Menu allows you to set up the TV to block programs according to enter a four-digit password. SETUP Menus Menus 102 Press...
... details. To exit the Menu, press MENU. ✍ You need your password, see page 103). To set more specific ratings, select Custom. If this password, confirm the password by entering it again. (The Parent Menu options appear.) To change settings, move the joystick V v B b. Menus SETUP SETUP Using the Parent Menu The Parent Menu allows you to set up the TV to block programs according to enter a four-digit password. SETUP Menus Menus 102 Press...
Operating Instructions
Page 107
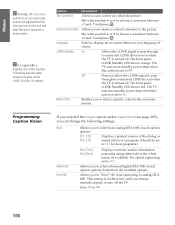
Allows you can change channels, inputs, or turn on -screen menus. The TV uses more standby power than when this option is set to Off. The front panel i.LINK Standby LED shows red. Programming Caption Vision If you selected the Program option under Caption Vision (see page 105), you to make a vertical correction to select advanced digital (EIA-708) closed caption options. Allows you to "force" the close captioning to On or Off...
Allows you can change channels, inputs, or turn on -screen menus. The TV uses more standby power than when this option is set to Off. The front panel i.LINK Standby LED shows red. Programming Caption Vision If you selected the Program option under Caption Vision (see page 105), you to make a vertical correction to select advanced digital (EIA-708) closed caption options. Allows you to "force" the close captioning to On or Off...

Operating Instructions
Page 114
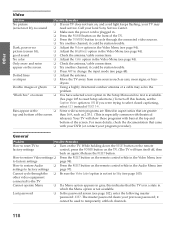
... the TV/VIDEO button. Try changing program in the left window, but TV channels Check that the Video Label option is not set to Skip. (See the Setup Menu on work page 21), you cannot use the Twin View feature. Troubleshooting Twin View Problem Possible Remedies I cannot get Twin View to ❏ If you are using a cable box to unscramble all channels (as any sources connected to the VIDEO 5, VIDEO 6, VIDEO 7 inputs, display in both a cable and cable box, as...
... the TV/VIDEO button. Try changing program in the left window, but TV channels Check that the Video Label option is not set to Skip. (See the Setup Menu on work page 21), you cannot use the Twin View feature. Troubleshooting Twin View Problem Possible Remedies I cannot get Twin View to ❏ If you are using a cable box to unscramble all channels (as any sources connected to the VIDEO 5, VIDEO 6, VIDEO 7 inputs, display in both a cable and cable box, as...
Operating Instructions
Page 119
... input mode (see page 94). While holding down the RESET button on the remote factory settings control, press the POWER button on the TV. (The TV will show these programs with theatrical releases). Other Info Other SETUP Video Problem Possible Remedies No picture ❏ If your TV does not turn on, and a red light keeps flashing, your previous password; it cannot be station trouble. Only snow and noise ❏ Check the antenna/cable connections. "Black box...
... input mode (see page 94). While holding down the RESET button on the remote factory settings control, press the POWER button on the TV. (The TV will show these programs with theatrical releases). Other Info Other SETUP Video Problem Possible Remedies No picture ❏ If your TV does not turn on, and a red light keeps flashing, your previous password; it cannot be station trouble. Only snow and noise ❏ Check the antenna/cable connections. "Black box...
Operating Instructions
Page 124
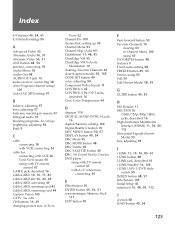
..., 54 antenna, connecting 18 Audio Menu 93 Audio Out 98 AUDIO OUT jack 16 audio receiver, connecting 38 Auto Program (channel setup) 100 Auto SAP, MTS setting 97 B balance, adjusting 97 bass, adjusting 97 batteries, inserting in Twin View 62 Channel Fix 100 channel list, setting up 45 Channel Menu 93 Channel Skip/Add 101 CineMotion 11, 48, 95 ClearEdge VM 95 ClearEdge VM Velocity Modulation 10 clearing, Favorite Channels 63 closed caption modes 93, 105 CODE SET button 49 color, adjusting 94 Component Video Inputs 11 CONTROL S 42 CONTROL...
..., 54 antenna, connecting 18 Audio Menu 93 Audio Out 98 AUDIO OUT jack 16 audio receiver, connecting 38 Auto Program (channel setup) 100 Auto SAP, MTS setting 97 B balance, adjusting 97 bass, adjusting 97 batteries, inserting in Twin View 62 Channel Fix 100 channel list, setting up 45 Channel Menu 93 Channel Skip/Add 101 CineMotion 11, 48, 95 ClearEdge VM 95 ClearEdge VM Velocity Modulation 10 clearing, Favorite Channels 63 closed caption modes 93, 105 CODE SET button 49 color, adjusting 94 Component Video Inputs 11 CONTROL S 42 CONTROL...

