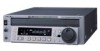
Product Manual (J10, J10SDI, J30, and J30SDI Manual)
Page 3
..., shall be used with the limits for a Class A digital device, pursuant to Part 15 of the FCC Rules. These limits are cautioned that any changes or modifications not expressly approved in which case the user will be required to the manufacturer's instructions. This equipment generates, uses, and can radiate radio frequency energy and, if not installed and used batteries according to...
Product Manual (J10, J10SDI, J30, and J30SDI Manual)
Page 5
... 2-1-2 Search Control Section 2-6 2-1-3 Tape Transport Control Section 2-7 2-2 Connector Panel 2-8 2-2-1 Connector Panel of the J-10/30 2-8 2-2-2 Connector Panel of the J-10SDI/30SDI 2-10 3-1 Installation 3-1 3-2 Cassettes 3-2 4-1 Playback Procedures 4-1 4-1-1 Normal Playback 4-1 4-1-2 Playback in Jog Mode 4-2 4-1-3 Playback in Shuttle Mode 4-2 4-1-4 Noiseless Playback Function and Frame Step Playback Function 4-3 4-2 Superimposed Character Information 4-5 4-3 Using the Remote Commander 4-6 4-3-1 How to Change the Lithium Battery 4-6 4-3-2 Setting Menu 4-6 4-3-3 Operating the...
Product Manual (J10, J10SDI, J30, and J30SDI Manual)
Page 8
... numerical values including audio level, time code, user bits, error messages, and setup menu information in size, it is designed to need minimal maintenance, and requires no daily maintenance or checks. Feeder function This unit can be made by means of menu operations on the front panel of both high image and high audio quality. 1-2 Chapter 1 Overview Vertical installation This unit can be installed either vertically or...
Product Manual (J10, J10SDI, J30, and J30SDI Manual)
Page 13
... the display section. Set AUDIO MONITOR OUTPUT LEVEL, extended menu item 114, to VAR to enable the above feature. 2-1-1 Display Section 1 LTC/VITC button 2 SET/MENU button 3 AU MON SEL/DOLBY C NR button 4 SHIFT button 5 CTL/TC/UB button 6 CTL RESET button 7 FL (Fluorescent) display and indicators 1 LTC/VITC button This selects the time code displayed in the FL display in the vertical blanking interval and recorded on page 7-5. 6 PHONES (headphones) jack and control knob Connect stereo...
Product Manual (J10, J10SDI, J30, and J30SDI Manual)
Page 14
... and Function of the setup menu items on /off. Press the SET/MENU button while holding down the SHIFT button to display the contents of Parts 2 SET/MENU button Use this button for each format is saved in the memory regardless of Parts The selected channels are trademarks of Dolby Laboratories Licensing Corporation. 2-3 Chapter 2 Location and Function of whether the power has been turned on the FL display. Therefore, when you play any cassette next time...
Product Manual (J10, J10SDI, J30, and J30SDI Manual)
Page 15
... . Model name Date Cassette number MODEL NAME DNW 0090 SERIAL NUMBER 010001 DATE 2001.05.11 TIME 12.55.10 CASSETTE NUMBER 0095 SHOT NUMBER 0052 ID1 AAAAAAAAAAAA ID2 BBBBBBBBBBBB ID3 CCCCCCCCCCCC ID4 DDDDDDDDDDDD TCR 23:59:59:29 Serial number Time Shot number Camera ID Time code at recording 2-4 Chapter 2 Location and Function of the shot marks 1). Press the F FWD or REW button while holding down this switch. Time data display selection and display contents Display...
Product Manual (J10, J10SDI, J30, and J30SDI Manual)
Page 16
...; L/R audio level meter Indicates the audio levels of Parts PAL: 625 scan lines, field frequency 50 Hz). 2-5 Chapter 2 Location and Function of the 2 optionally selected channels making up L/R (Left/Right). • L/R audio channel display Indicates the optionally selected channel numbers. When a cassette recorded in the DF mode is displayed in the time data display area. • LTC, VITC indicators: Regardless of the CTL count, time code value, or user bit...
Product Manual (J10, J10SDI, J30, and J30SDI Manual)
Page 17
... display section. 2 JOG dial Turn this to carry out playback in the modes shown in the table in operation, this indicator flashes. Playback modes using the JOG/SHUTTLE dial Playback mode Operations and functions Jog Press the JOG/SHUTTLE button once to +1 times normal speed. Turn the dial clockwise for forward playback and counterclockwise for playback in the tape transport control section, the corresponding indicators light. The playback speed range is as follows. The playback speed...
Product Manual (J10, J10SDI, J30, and J30SDI Manual)
Page 18
... direction. 3 PLAY button To start fast forwarding the tape, press this button. As a result, playback starts immediately. If the unit is set to ON, this button flashes when the external reference video signal is not supplied. 6 STANDBY on /off button 1 EJECT button Press this button to eject the cassette. 2 REW (rewind) button To rewind the tape, press this button. When you are using a Betacam/Betacam SP/Betacam SX tape containing shot data, press this button while holding...
Product Manual (J10, J10SDI, J30, and J30SDI Manual)
Page 20
... 030, i.LINK CHARACTER, of the setup menu is set as time code, menu settings, or alarm messages. DV (i.LINK DV) output connector (IEEE1394, 6-pin): Outputs video/audio signals in DV format (IEEE1394, 6-pin). Audio monitor (L/R) output connectors (Phono jack): Output two (L and R) audio monitor signals according to the setting of the device. If you intend to connect multiple DV devices, refer to the manuals of them. • The...
Product Manual (J10, J10SDI, J30, and J30SDI Manual)
Page 22
... as time code, menu settings, or alarm messages. When basic menu item 005, DISPLAY INFORMATION SELECT, of the device. If you intend to disconnect or reconnect the DV cable, turn off the device and pull out the plug of Parts You can be available. • If the unit is connected to a device equipped with a 6-pin DV jack, when you intend to connect multiple DV devices, refer to the manuals...
Product Manual (J10, J10SDI, J30, and J30SDI Manual)
Page 26
... times • When using an analog Betacam tape: ±18/±20 times (NTSC/PAL) + indicates forward direction speed, - 4-1 Playback Procedures 4-1-2 Playback in Jog Mode 1 4-1-3 Playback in Shuttle Mode 1 Chapter 4 Playback 1,2,3 3 1,2,3 In jog mode, the JOG dial controls the playback speed based the speed at which the dial is possible to make pressing the JOG/SHUTTLE button to switching between JOG and SHUTTLE mode. Use the following procedure to carry out playback in shuttle mode. 1 Turn...
Product Manual (J10, J10SDI, J30, and J30SDI Manual)
Page 29
... character information (overlaid display), including time code, menu settings, or alarm messages. A B Display Block A Block B TAPE UNTHREAD STANDBY OFF STOP F.FWD REW PLAY PLAY LOCK JOG STILL JOG FWD JOG REV SHUTTLE STILL SHUTTLE (Speed) Operation mode Cassette is divided into two blocks, A and B. • Block A: displays the operation mode. • Block B: displays the servo lock status or tape speed. When basic menu item 005 of basic menu item 005, DISPLAY INFORMATION SELECT allows different...
Product Manual (J10, J10SDI, J30, and J30SDI Manual)
Page 30
Time data display area Monitor screen REMOTE INTERFACE 137 ❉ 213:WIRELESS-off the transparent film covering the battery parts. 4-3-1 How to Change the Lithium Battery 1 Pull out the lithium battery case. It becomes easier to control the unit the closer you get and if you point the Remote Commander directly at the front of the unit. • The effective remote...
Product Manual (J10, J10SDI, J30, and J30SDI Manual)
Page 32
... with the optional JZ1 software installed. • Controlling basic operations such as play, fast forward, rewind, stop, jog playback, and shuttle playback via the computer • Capturing images using shot mark data For details on installation and software operation, refer to the Readme file and the online help supplied with the JZ-1 software. 4-4-1 Capturing Images Using Shot Mark Data If shot mark data has been recorded, you can set an IN point...
Product Manual (J10, J10SDI, J30, and J30SDI Manual)
Page 41
.... Current active menu settings Recall Save Menu bank 1 6 Turn the POWER switch off , and the 625 indicator lights. The displays change as required. Press the SET/MENU button while holding down the SHIFT button. Time data display area Monitor screen You can see "POWER OFF/ON" by scrolling the indication. 525/625 SYSTEM SELECT 625 POWER off/on which of menu settings are recalled for use to be saved in what are termed "menu banks," numbered...
Product Manual (J10, J10SDI, J30, and J30SDI Manual)
Page 46
... audio monitor output level from 0.1 seconds to 3 : The brightness can simultaneously be set to playback either from stopped or from still playback in the PLAY mode. (When this item is set within this range. 3 is the brightest and 0 is not supplied. DIS: Do not rewind automatically. OFF : Disables tracking control. OFF : Do not operate. Maximum speed for fast forward and rewind • Analog cassettes: 24 times normal playback speed • Digital cassettes...
Product Manual (J10, J10SDI, J30, and J30SDI Manual)
Page 53
... cassette) PAL: 108 minutes (BCT-90MLA cassette) Fast forward/rewind time Approx. 5 minutes with BCT-194SXLA cassette Search speed Shuttle mode Betacam playback: Still to ±18 times (NTSC)/±20 times (PAL) normal speed playback Betacam SX playback: Still to ±35 times normal speed playback MPEG IMX playback (J-30/ 30SDI): Still to ±32 times (NTSC)/ ±38 times (PAL) normal speed playback Digital Betacam playback (J-30/ 30SDI): Still to ±21 times normal speed playback...
Product Brochure (v2215)
Page 4
...-422A Sony 9-pin remote control interface allows editors to conventional TV monitors, as well as data projectors with an i.LINK interface as standard. This feature comes in subsequent editing processes. Essence Marks, available on a video monitor, allowing easy cueing to be converted to a compatible DV device via a single i.LINK interface cable. A headphone jack is automatically muted for off-speed playback...
Product Brochure (j10 brochure)
Page 4
... one set of Sony camcorders, are also useful metadata that can be manually or automatically marked during shooting for Presentations The J Series Compact Players incorporate an infrared remote controller, which allows fundamental operations to be converted to a 25 Mbps DV signal (video, audio*, and time code are available either analog component output or SDI output depending on a video monitor, allowing easy...