Warranty Card
Page 1
... THIS PRODUCT. 4-557-147-22 Tape Cassette Player/Recorder/CD Player/Mini Disc ® DAT/Radio/Head Phone/Speaker/MIC/Personals Portable Audio LIMITED WARRANTY Sony Electronics Inc. ("Sony") warrants this Product is determined to be presented to obtain warranty service. REPAIR OR REPLACEMENT AS PROVIDED UNDER THIS WARRANTY IS THE EXCLUSIVE REMEDY OF THE CONSUMER. PARTS: In addition, Sony will repair or replace the Product, at its original...
... THIS PRODUCT. 4-557-147-22 Tape Cassette Player/Recorder/CD Player/Mini Disc ® DAT/Radio/Head Phone/Speaker/MIC/Personals Portable Audio LIMITED WARRANTY Sony Electronics Inc. ("Sony") warrants this Product is determined to be presented to obtain warranty service. REPAIR OR REPLACEMENT AS PROVIDED UNDER THIS WARRANTY IS THE EXCLUSIVE REMEDY OF THE CONSUMER. PARTS: In addition, Sony will repair or replace the Product, at its original...
Operating Instructions
Page 1
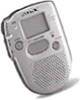
3-047-938-11 (1) IC Recorder Operating Instructions ICD-37/57/67 ©2000 Sony Corporation
3-047-938-11 (1) IC Recorder Operating Instructions ICD-37/57/67 ©2000 Sony Corporation
Operating Instructions
Page 2
... manual could void your Sony dealer regarding this equipment. 2 Consult the dealer or an experienced radio/TV technician for a Class B digital device, pursuant to correct the interference by turning the equipment off and on a circuit different from that interference will not occur in the United States Owner's Record The model number is located at the rear and the serial number is...
... manual could void your Sony dealer regarding this equipment. 2 Consult the dealer or an experienced radio/TV technician for a Class B digital device, pursuant to correct the interference by turning the equipment off and on a circuit different from that interference will not occur in the United States Owner's Record The model number is located at the rear and the serial number is...
Operating Instructions
Page 3
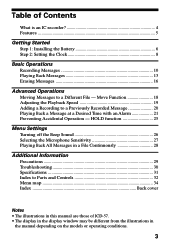
... Accidental Operation - Move Function 18 Adjusting the Playback Speed 19 Adding a Recording to Parts and Controls 32 Menu map ...34 Index Back cover Notes • The illustrations in this manual are those of Contents What is an IC recorder 4 Features ...5 Getting Started Step 1: Installing the Battery 6 Step 2: Setting the Clock 8 Basic Operations Recording Messages 10 Playing Back Messages 13 Erasing Messages 16 Advanced Operations Moving Messages to a Different File - Table of ICD-57. • The display in the display window...
... Accidental Operation - Move Function 18 Adjusting the Playback Speed 19 Adding a Recording to Parts and Controls 32 Menu map ...34 Index Back cover Notes • The illustrations in this manual are those of Contents What is an IC recorder 4 Features ...5 Getting Started Step 1: Installing the Battery 6 Step 2: Setting the Clock 8 Basic Operations Recording Messages 10 Playing Back Messages 13 Erasing Messages 16 Advanced Operations Moving Messages to a Different File - Table of ICD-57. • The display in the display window...
Operating Instructions
Page 4
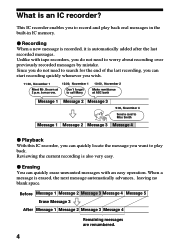
... recording, you can start recording quickly whenever you do not need to record and play back. When a message is also very easy. tomorrow. z Erasing You can quickly locate the message you to worry about recording over previously recorded messages by mistake. Reviewing the current recording is erased, the next message automatically advances, leaving no blank space. This IC recorder enables you want to Miss Smith Message 1 Message 2 Message 3 Message 4 z Playback With this IC recorder, you can quickly erase unwanted messages with tape recorders...
... recording, you can start recording quickly whenever you do not need to record and play back. When a message is also very easy. tomorrow. z Erasing You can quickly locate the message you to worry about recording over previously recorded messages by mistake. Reviewing the current recording is erased, the next message automatically advances, leaving no blank space. This IC recorder enables you want to Miss Smith Message 1 Message 2 Message 3 Message 4 z Playback With this IC recorder, you can quickly erase unwanted messages with tape recorders...
Operating Instructions
Page 5
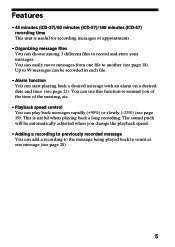
... change the playback speed. • Adding a recording to previously recorded message You can easily move messages from one message (see page 20). 5 You can add a recording to the message being played back to count as one file to another (see page 18). Up to record and store your messages. Features • 45 minutes (ICD-37)/90 minutes (ICD-57)/180 minutes (ICD-67) recording time This unit is useful when playing back a long recording...
... change the playback speed. • Adding a recording to previously recorded message You can easily move messages from one message (see page 20). 5 You can add a recording to the message being played back to count as one file to another (see page 18). Up to record and store your messages. Features • 45 minutes (ICD-37)/90 minutes (ICD-57)/180 minutes (ICD-67) recording time This unit is useful when playing back a long recording...

Operating Instructions
Page 7
.... • When you replace the battery, insert the new one . Replace the battery with VOL control at around 3 The battery life may show the clock setting display or incorrect date and time when you are not going to use manganese batteries for a long time, remove the battery to set the date and time again. Replacing the battery "E" appears on the operation of time. Battery life* With continuous use, approx. 5 hours recording/4.5 hours playback * Using Sony alkaline battery LR03 (SG), playing back through the...
.... • When you replace the battery, insert the new one . Replace the battery with VOL control at around 3 The battery life may show the clock setting display or incorrect date and time when you are not going to use manganese batteries for a long time, remove the battery to set the date and time again. Replacing the battery "E" appears on the operation of time. Battery life* With continuous use, approx. 5 hours recording/4.5 hours playback * Using Sony alkaline battery LR03 (SG), playing back through the...

Operating Instructions
Page 9
The minute digits will return to select the digits of the hour. 2 Press NxPLAY/STOP. The display will flash. 3 Set the minute. 4 Press NxPLAY/STOP at the time signal. Press MENU. 9 or >+ to "SET DATE". 4 Exit from the menu mode. Getting Started 3 Set the time. 1 Press -.
The minute digits will return to select the digits of the hour. 2 Press NxPLAY/STOP. The display will flash. 3 Set the minute. 4 Press NxPLAY/STOP at the time signal. Press MENU. 9 or >+ to "SET DATE". 4 Exit from the menu mode. Getting Started 3 Set the time. 1 Press -.
Operating Instructions
Page 10
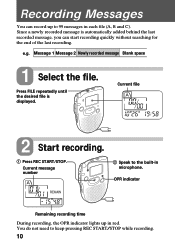
Since a newly recorded message is displayed. You do not need to 99 messages in each file (A, B and C). Press FILE repeatedly until the desired file is automatically added behind the last recorded message, you can record up in microphone. Current message number 2 Speak to the built-in red. OPR indicator Remaining recording time During recording, the OPR indicator lights up to keep pressing REC START/STOP while recording. 10 Basic Operations Recording Messages You can start recording quickly without searching...
Since a newly recorded message is displayed. You do not need to 99 messages in each file (A, B and C). Press FILE repeatedly until the desired file is automatically added behind the last recorded message, you can record up in microphone. Current message number 2 Speak to the built-in red. OPR indicator Remaining recording time During recording, the OPR indicator lights up to keep pressing REC START/STOP while recording. 10 Basic Operations Recording Messages You can start recording quickly without searching...
Operating Instructions
Page 12
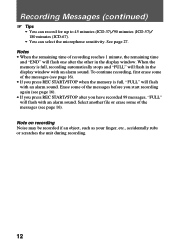
...; If you press REC START/STOP when the memory is full, recording automatically stops and "FULL" will flash in the display window. Erase some of the messages (see page 16). Recording Messages (continued) 1 Tips • You can record for up to 45 minutes (ICD-37)/90 minutes (ICD-57)/ 180 minutes (ICD-67). • You can select the microphone sensitivity. See page 27. Select another file or erase some of recording reaches 1 minute...
...; If you press REC START/STOP when the memory is full, recording automatically stops and "FULL" will flash in the display window. Erase some of the messages (see page 16). Recording Messages (continued) 1 Tips • You can record for up to 45 minutes (ICD-37)/90 minutes (ICD-57)/ 180 minutes (ICD-67). • You can select the microphone sensitivity. See page 27. Select another file or erase some of recording reaches 1 minute...
Operating Instructions
Page 14
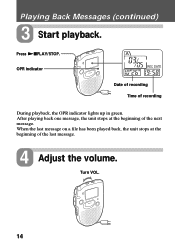
When the last message on a file has been played back, the unit stops at the beginning of the next message. Playing Back Messages (continued) 3 Start playback. Turn VOL. 14 After playing back one message, the unit stops at the beginning of recording During playback, the OPR indicator lights up in green. OPR indicator Date of recording Time of the last message. 4 Adjust the volume. Press NxPLAY/STOP.
When the last message on a file has been played back, the unit stops at the beginning of the next message. Playing Back Messages (continued) 3 Start playback. Turn VOL. 14 After playing back one message, the unit stops at the beginning of recording During playback, the OPR indicator lights up in green. OPR indicator Date of recording Time of the last message. 4 Adjust the volume. Press NxPLAY/STOP.

Operating Instructions
Page 18
FILE NxPLAY/STOP e.g. The file and "MOVE" will flash and the first and last 5 seconds of the message will be played back 10 times. 3 Press NxPLAY/STOP. To move the seventh message in the file A to the file C 1 Play back the message you want to move. 2 Press FILE during playback to select the file you want to move recorded messages to a different file. Move Function You can move the message to a Different File - To cancel moving the message(s) Press STOP before Step 3. 18 BAdvanced Operations Moving Messages to .
FILE NxPLAY/STOP e.g. The file and "MOVE" will flash and the first and last 5 seconds of the message will be played back 10 times. 3 Press NxPLAY/STOP. To move the seventh message in the file A to the file C 1 Play back the message you want to move. 2 Press FILE during playback to select the file you want to move recorded messages to a different file. Move Function You can move the message to a Different File - To cancel moving the message(s) Press STOP before Step 3. 18 BAdvanced Operations Moving Messages to .

Operating Instructions
Page 21
FILE NxPLAY/STOP -./>+ MENU Display window Advanced Operations 1 Use FILE and -./>+ to select the file and the message you do not wish to change the setting, press MENU and exit the menu mode.) Note "ALARM OFF (or On)" will be set if the clock has not been set . Continued 21 The unit enters the menu mode and "ALARM OFF" will not appear and the alarm cannot be displayed. (If "ALARM On" is...
FILE NxPLAY/STOP -./>+ MENU Display window Advanced Operations 1 Use FILE and -./>+ to select the file and the message you do not wish to change the setting, press MENU and exit the menu mode.) Note "ALARM OFF (or On)" will be set if the clock has not been set . Continued 21 The unit enters the menu mode and "ALARM OFF" will not appear and the alarm cannot be displayed. (If "ALARM On" is...
Operating Instructions
Page 24
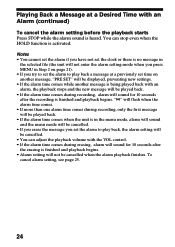
... displayed, preventing new settings. • If the alarm time comes while another message is being played back with an alarm, the playback stops and the new message will be played back. • If the alarm time comes during recording, alarm will sound for 10 seconds after the recording is finished and playback begins. • Alarm setting will sound for 10 seconds after the erasing is finished and playback begins. "," will flash...
... displayed, preventing new settings. • If the alarm time comes while another message is being played back with an alarm, the playback stops and the new message will be played back. • If the alarm time comes during recording, alarm will sound for 10 seconds after the recording is finished and playback begins. • Alarm setting will sound for 10 seconds after the erasing is finished and playback begins. "," will flash...
Operating Instructions
Page 25
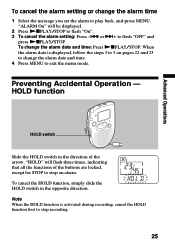
.... or >+ to play back, and press MENU. HOLD function HOLD switch Slide the HOLD switch in the opposite direction. To change the alarm date and time. 4 Press MENU to flash "On". 3 To cancel the alarm setting: Press -. Preventing Accidental Operation - Note When the HOLD function is displayed, follow the steps 3 to 5 on pages 22 and 23 to change the alarm date and time: Press NxPLAY/STOP. "HOLD" will be displayed. 2 Press NxPLAY/STOP to exit the menu mode.
.... or >+ to play back, and press MENU. HOLD function HOLD switch Slide the HOLD switch in the opposite direction. To change the alarm date and time. 4 Press MENU to flash "On". 3 To cancel the alarm setting: Press -. Preventing Accidental Operation - Note When the HOLD function is displayed, follow the steps 3 to 5 on pages 22 and 23 to change the alarm date and time: Press NxPLAY/STOP. "HOLD" will be displayed. 2 Press NxPLAY/STOP to exit the menu mode.

Operating Instructions
Page 29
... checked by accidental operation or malfunction of the IC recorder, we recommend that you save a backup copy of data loss caused by qualified personnel before operating it any further. Keep personal credit cards using magnetic coding or spring-wound watches, etc., away from the magnet used in a place subject to prevent possible damage from the unit to direct sunlight, excessive dust...
... checked by accidental operation or malfunction of the IC recorder, we recommend that you save a backup copy of data loss caused by qualified personnel before operating it any further. Keep personal credit cards using magnetic coding or spring-wound watches, etc., away from the magnet used in a place subject to prevent possible damage from the unit to direct sunlight, excessive dust...
Operating Instructions
Page 30
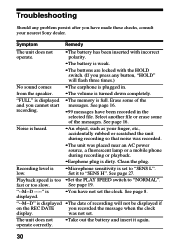
... is too •Set the PLAY SPEED switch to "NORMAL". Select another file or erase some of the messages. fast or too slow. was placed near an AC power source, a fluorescent lamp or a mobile phone during recording so that noise was recorded. •The unit was not set. "FULL" is displayed and you recorded the message when the clock display. Erase some of recording will flash three times.) No sound comes •The...
... is too •Set the PLAY SPEED switch to "NORMAL". Select another file or erase some of the messages. fast or too slow. was placed near an AC power source, a fluorescent lamp or a mobile phone during recording so that noise was recorded. •The unit was not set. "FULL" is displayed and you recorded the message when the clock display. Erase some of recording will flash three times.) No sound comes •The...
Operating Instructions
Page 31
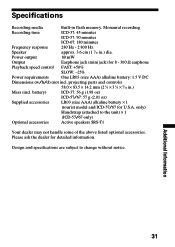
...;16 in .) dia. Power output 80 mW Output Earphone jack (mini jack) for detailed information. only) Handstrap (attached to change without notice. Please ask the dealer for 8 - 300 Ω earphone Playback speed control FAST: +50% SLOW: -25% Power requirements One LR03 (size AAA) alkaline battery: 1.5 V DC Dimensions (w/h/d) (not incl. Specifications Recording media Built-in flash memory, Monaural recording Recording time ICD-37: 45 minutes ICD-57: 90 minutes ICD-67: 180 minutes...
...;16 in .) dia. Power output 80 mW Output Earphone jack (mini jack) for detailed information. only) Handstrap (attached to change without notice. Please ask the dealer for 8 - 300 Ω earphone Playback speed control FAST: +50% SLOW: -25% Power requirements One LR03 (size AAA) alkaline battery: 1.5 V DC Dimensions (w/h/d) (not incl. Specifications Recording media Built-in flash memory, Monaural recording Recording time ICD-37: 45 minutes ICD-57: 90 minutes ICD-67: 180 minutes...
Operating Instructions
Page 32
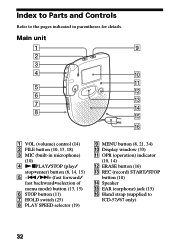
... 1 VOL (volume) control (14) 2 FILE button (10, 13, 18) 3 MIC (built-in parentheses for details. Index to Parts and Controls Refer to the pages indicated in microphone) (10) 4 NxPLAY/STOP (play/ stop•enter) button (8, 14, 15) 5 -./>+ (fast forward/ fast backward•selection of menu mode) button (13, 15) 6 STOP button (11) 7 HOLD switch (25) 8 PLAY SPEED selector (19) 9 MENU button (8, 21, 34) 0 Display window (33) qa OPR (operation) indicator (10, 14) qs ERASE button (16) qd REC (record) START/STOP button (10) qf Speaker...
... 1 VOL (volume) control (14) 2 FILE button (10, 13, 18) 3 MIC (built-in parentheses for details. Index to Parts and Controls Refer to the pages indicated in microphone) (10) 4 NxPLAY/STOP (play/ stop•enter) button (8, 14, 15) 5 -./>+ (fast forward/ fast backward•selection of menu mode) button (13, 15) 6 STOP button (11) 7 HOLD switch (25) 8 PLAY SPEED selector (19) 9 MENU button (8, 21, 34) 0 Display window (33) qa OPR (operation) indicator (10, 14) qs ERASE button (16) qd REC (record) START/STOP button (10) qf Speaker...
Operating Instructions
Page 36
... Alarm 21 B Battery 6 Beep 26 Built-in microphone 10 C Clock setting 8 D Display window 33 E Earphone 15 Erase 16 F, G Fast backward 15 Fast forward 15 File 10, 13, 17, 18 H Hold 25 I IC memory 4 J, K, L, M, N, O Menu 8, 21, 34 Message, erasing 16 Message, playing back 13 Message, recording 10 Message number 10 Microphone, built-in 10 Microphone sensitivity 27 Move 18 P, Q Playback 13 Playback Pause function 15 Playback speed 19 R Recording 10 Remaining time 10 Repeat play 15 S, T, U Scanning play 15 Stop 11, 15 V, W, X, Y, Z Volume control 14 3So6ny Corporation...
... Alarm 21 B Battery 6 Beep 26 Built-in microphone 10 C Clock setting 8 D Display window 33 E Earphone 15 Erase 16 F, G Fast backward 15 Fast forward 15 File 10, 13, 17, 18 H Hold 25 I IC memory 4 J, K, L, M, N, O Menu 8, 21, 34 Message, erasing 16 Message, playing back 13 Message, recording 10 Message number 10 Microphone, built-in 10 Microphone sensitivity 27 Move 18 P, Q Playback 13 Playback Pause function 15 Playback speed 19 R Recording 10 Remaining time 10 Repeat play 15 S, T, U Scanning play 15 Stop 11, 15 V, W, X, Y, Z Volume control 14 3So6ny Corporation...


