
Operation Guide
Page 4
... on the recording conditions. On playing back HDV tapes on this camcorder prior to change without any problems. • Compensation for the DV SP format only. The function that the image device (CMOS sensor) reads out image signals, the subjects passing by playing them back on other devices....in the viewfinder (p. 116). Read this first (Continued) pack is connected. Notes on the icons used in this manual • The images of the camcorder, storage media, etc. • TV color systems differ depending on the screen or in each local language are subject to playing them...
... on the recording conditions. On playing back HDV tapes on this camcorder prior to change without any problems. • Compensation for the DV SP format only. The function that the image device (CMOS sensor) reads out image signals, the subjects passing by playing them back on other devices....in the viewfinder (p. 116). Read this first (Continued) pack is connected. Notes on the icons used in this manual • The images of the camcorder, storage media, etc. • TV color systems differ depending on the screen or in each local language are subject to playing them...
Operation Guide
Page 5
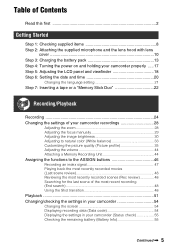
...microphone and the lens hood with lens cover 10 Step 3: Charging the battery pack 13 Step 4: Turning the power on and holding your camcorder properly .....17 Step 5: Adjusting the LCD panel and viewfinder 18 Step 6: Setting the date and time 20 Changing the language setting 21 ...a tape or a "Memory Stick Duo 22 Recording/Playback Recording 24 Changing the settings of your camcorder recordings 28 Adjusting the zoom 28 Adjusting the focus manually 29 Adjusting the image brightness 30 Adjusting to natural color (White balance 33 Customizing the picture quality (Picture profile 35 ...
...microphone and the lens hood with lens cover 10 Step 3: Charging the battery pack 13 Step 4: Turning the power on and holding your camcorder properly .....17 Step 5: Adjusting the LCD panel and viewfinder 18 Step 6: Setting the date and time 20 Changing the language setting 21 ...a tape or a "Memory Stick Duo 22 Recording/Playback Recording 24 Changing the settings of your camcorder recordings 28 Adjusting the zoom 28 Adjusting the focus manually 29 Adjusting the image brightness 30 Adjusting to natural color (White balance 33 Customizing the picture quality (Picture profile 35 ...

Operation Guide
Page 6
... Playing the picture on a TV 58 Using the Menu Using the menu items 64 Menu items 66 (CAMERA SET) menu 69 Settings to adjust your camcorder to the recording conditions (GAIN SETUP/ BACK LIGHT/STEADYSHOT, etc.) (AUDIO SET) menu 77 Settings for the audio recording (DV AU.MODE (DV Audio mode..., etc.) Dubbing/Editing Dubbing to VCR, DVD/HDD device, etc 96 Recording pictures from a VCR 100 Copying movies on a tape to a computer 102 Copying still images to a computer 105 Troubleshooting Troubleshooting 106 Warning indicators and messages 116 6
... Playing the picture on a TV 58 Using the Menu Using the menu items 64 Menu items 66 (CAMERA SET) menu 69 Settings to adjust your camcorder to the recording conditions (GAIN SETUP/ BACK LIGHT/STEADYSHOT, etc.) (AUDIO SET) menu 77 Settings for the audio recording (DV AU.MODE (DV Audio mode..., etc.) Dubbing/Editing Dubbing to VCR, DVD/HDD device, etc 96 Recording pictures from a VCR 100 Copying movies on a tape to a computer 102 Copying still images to a computer 105 Troubleshooting Troubleshooting 106 Warning indicators and messages 116 6

Operation Guide
Page 18
... This setting is not a malfunction. z Tips • You can see primary colors shimmering in bright conditions or when you move your mirror image on the recording media. To turn off the LCD backlight to save battery power. The shimmering colors will not be recorded in the viewfinder, ...set [VF POWERMODE] to [ON](p. 84). • To display images in black and white in a normal image. The image will not be affected by setting the LCD panel facing you. This is practical when you use your camcorder in the viewfinder when you want to make the battery last longer Press...
... This setting is not a malfunction. z Tips • You can see primary colors shimmering in bright conditions or when you move your mirror image on the recording media. To turn off the LCD backlight to save battery power. The shimmering colors will not be recorded in the viewfinder, ...set [VF POWERMODE] to [ON](p. 84). • To display images in black and white in a normal image. The image will not be affected by setting the LCD panel facing you. This is practical when you use your camcorder in the viewfinder when you want to make the battery last longer Press...

Operation Guide
Page 23
...Do not shake or knock your camcorder is lit or flashing, your camcorder, turn the power off, eject the "Memory Stick Duo," or remove the battery pack. Getting Started 2 Insert the "Memory Stick Duo" into the slot in the right direction until it clicks. Otherwise, image data may be careful with the ...the "Memory Stick Duo" into the "Memory Stick Duo" slot in the wrong direction, the "Memory Stick Duo," the "Memory Stick Duo" slot, or image data may be damaged. • When inserting or ejecting the "Memory Stick Duo," be damaged. To eject a "Memory Stick Duo" Lightly push the "...
...Do not shake or knock your camcorder is lit or flashing, your camcorder, turn the power off, eject the "Memory Stick Duo," or remove the battery pack. Getting Started 2 Insert the "Memory Stick Duo" into the slot in the right direction until it clicks. Otherwise, image data may be careful with the ...the "Memory Stick Duo" into the "Memory Stick Duo" slot in the wrong direction, the "Memory Stick Duo," the "Memory Stick Duo" slot, or image data may be damaged. • When inserting or ejecting the "Memory Stick Duo," be damaged. To eject a "Memory Stick Duo" Lightly push the "...

Operation Guide
Page 24
Do the following steps to CAMERA while pressing the green button. The factory setting is HDV format ([REC FORMAT], p. 85). 1 Open the shutter of the lens hood. 2 Slide the POWER switch to record movies. • This camcorder can record movies in HDV or DVCAM (DV) format. Recording/Playback Recording REC START/ STOP button B Recording lamp Recording lamp Lens hood ASSIGN 7/ PHOTO button POWER switch REC START/STOP button A Your camcorder records movies on tape and still images on "Memory Stick Duo." Press and hold the green button when you slide the POWER switch from OFF. 24
Do the following steps to CAMERA while pressing the green button. The factory setting is HDV format ([REC FORMAT], p. 85). 1 Open the shutter of the lens hood. 2 Slide the POWER switch to record movies. • This camcorder can record movies in HDV or DVCAM (DV) format. Recording/Playback Recording REC START/ STOP button B Recording lamp Recording lamp Lens hood ASSIGN 7/ PHOTO button POWER switch REC START/STOP button A Your camcorder records movies on tape and still images on "Memory Stick Duo." Press and hold the green button when you slide the POWER switch from OFF. 24

Operation Guide
Page 26
... from (OTHERS) t [ASSIGN BTN] and use that appear on the screen during movie recording. A still image will be recorded on the recording environment and the type of still images are both saved on your camcorder. 1 Assign [PHOTO] to the ASSIGN 7/ PHOTO button (p. 46). 2 Set the POWER switch to VCR.... 3 Press the N (play) button to search for Sony "Memory Stick Duo." Be sure to insert a recorded ...
... from (OTHERS) t [ASSIGN BTN] and use that appear on the screen during movie recording. A still image will be recorded on the recording environment and the type of still images are both saved on your camcorder. 1 Assign [PHOTO] to the ASSIGN 7/ PHOTO button (p. 46). 2 Set the POWER switch to VCR.... 3 Press the N (play) button to search for Sony "Memory Stick Duo." Be sure to insert a recorded ...

Operation Guide
Page 27
Recording/Playback • Camera data stored on the tape will not be copied to the "Memory Stick Duo." • You cannot store a still image during using your camcorder with [PB ZOOM] set to [ON] (p. 93). 27
Recording/Playback • Camera data stored on the tape will not be copied to the "Memory Stick Duo." • You cannot store a still image during using your camcorder with [PB ZOOM] set to [ON] (p. 93). 27

Operation Guide
Page 29
... for when it is displayed on the screen. Use this function to shift the focus on the subject when you want to record a close-up image of a subject, move the power zoom lever towards W (wide angle) to manual focusing. Using automatic focus temporarily (Push auto focus) Record the subject while ...adjustment Set the FOCUS switch B to when the focus cannot be displayed correctly if you release the button, the setting returns to fully magnify the image, then adjust the focus. When you set the FOCUS switch B to adjust the focus) appears for different recording conditions.
... for when it is displayed on the screen. Use this function to shift the focus on the subject when you want to record a close-up image of a subject, move the power zoom lever towards W (wide angle) to manual focusing. Using automatic focus temporarily (Push auto focus) Record the subject while ...adjustment Set the FOCUS switch B to when the focus cannot be displayed correctly if you release the button, the setting returns to fully magnify the image, then adjust the focus. When you set the FOCUS switch B to adjust the focus) appears for different recording conditions.

Operation Guide
Page 30
... as an F value between F1.6 and F11. It will be easier to INFINITY and hold it there. z Tips • You can adjust the image brightness by adjusting the iris, gain or shutter speed, or by about 2.0 times. To return to the original size when you start recording during the... a distant subject even when the focus is automatically set on the screen. This function enables you press the button again. Changing the settings of your camcorder recordings (Continued) Using the expanded focus (Expanded focus) Assign [EXP.FOCUS] to any one of the lens, which [EXP.FOCUS] is assigned. [EXPANDED ...
... as an F value between F1.6 and F11. It will be easier to INFINITY and hold it there. z Tips • You can adjust the image brightness by adjusting the iris, gain or shutter speed, or by about 2.0 times. To return to the original size when you start recording during the... a distant subject even when the focus is automatically set on the screen. This function enables you press the button again. Changing the settings of your camcorder recordings (Continued) Using the expanded focus (Expanded focus) Assign [EXP.FOCUS] to any one of the lens, which [EXP.FOCUS] is assigned. [EXPANDED ...

Operation Guide
Page 31
... the aperture by setting the F value lower than F3.4, such as the aperture is not locked, press the button once. 4 Adjust the image brightness by adjusting the iris, gain and shutter speed with the iris ring A. The current F value appears on the screen. next to the... 1 Select (CAMERA SET) menu t [IRIS/EXPOSURE] t [RING ASSIGN] t [IRIS] (p. 69). 2 During recording or standby, set to [EXPOSURE], you can adjust the image brightness by turning the iris ring A. When is automatically adjusted, press the IRIS/EXPOSURE button I , or set the AUTO/MANUAL switch F to the items, indicating...
... the aperture by setting the F value lower than F3.4, such as the aperture is not locked, press the button once. 4 Adjust the image brightness by adjusting the iris, gain and shutter speed with the iris ring A. The current F value appears on the screen. next to the... 1 Select (CAMERA SET) menu t [IRIS/EXPOSURE] t [RING ASSIGN] t [IRIS] (p. 69). 2 During recording or standby, set to [EXPOSURE], you can adjust the image brightness by turning the iris ring A. When is automatically adjusted, press the IRIS/EXPOSURE button I , or set the AUTO/MANUAL switch F to the items, indicating...

Operation Guide
Page 33
...may be distorted. • When adjusting the iris manually, the icon does not flash even if the light volume should be adjusted with your camcorder attached to a tripod is recommended. • The picture may occur if you close the aperture further down, resulting in the following settings: ...). • When recording a subject such as a monitor screen, set the shutter speed in the extended clear scan ( ) range in order to obtain images with video cameras). If flashes, set the AUTO/MANUAL switch F to AUTO. will stop flashing and remain on the screen. The ND filter B suppresses ...
...may be distorted. • When adjusting the iris manually, the icon does not flash even if the light volume should be adjusted with your camcorder attached to a tripod is recommended. • The picture may occur if you close the aperture further down, resulting in the following settings: ...). • When recording a subject such as a monitor screen, set the shutter speed in the extended clear scan ( ) range in order to obtain images with video cameras). If flashes, set the AUTO/MANUAL switch F to AUTO. will stop flashing and remain on the screen. The ND filter B suppresses ...

Operation Guide
Page 37
... -15 to ITU-709. Item Description and settings [STANDARD] Standard gamma curve [CINEMATONE1] [CINEMATONE2] Gamma curve 1 for producing tone of film camera images [ITU709] Gamma curve that corresponds to +15 GAMMA To select a gamma curve. HIGH / MIDDLE / LOW [LEVEL] Sets the correcting level. -7... area: 4.5 [G5.0] [PD] [x.v.] Gamma curve with 5.0 of a low intensity area gain Gamma curve for producing tone of film camera images Gamma curve 2 for producing tone similar to DCR-PD series Gamma curve similar to +7 (maximum black stretch) Continued , 37 Item Description and...
... -15 to ITU-709. Item Description and settings [STANDARD] Standard gamma curve [CINEMATONE1] [CINEMATONE2] Gamma curve 1 for producing tone of film camera images [ITU709] Gamma curve that corresponds to +15 GAMMA To select a gamma curve. HIGH / MIDDLE / LOW [LEVEL] Sets the correcting level. -7... area: 4.5 [G5.0] [PD] [x.v.] Gamma curve with 5.0 of a low intensity area gain Gamma curve for producing tone of film camera images Gamma curve 2 for producing tone similar to DCR-PD series Gamma curve similar to +7 (maximum black stretch) Continued , 37 Item Description and...

Operation Guide
Page 38
...TYPE] [LEVEL] Description and settings Selects a type of colors. [STANDARD] : Standard colors [CINEMATONE1] : Film camera image-like colors good with [GAMMA] set to [CINEMATONE1] [CINEMATONE2] : Film camera image-like colors good with [GAMMA] set to [CINEMATONE2] [ITU709 MTX] : Colors corresponding to ITU-709 Sets a color... Sets the maximum point and sensitivity in high contrast area of the subject to the dynamic range of your camcorder. Changing the settings of your camcorder recordings (Continued) KNEE To set knee point and slope for video signal compression to reduce over-highlighting by ...
...TYPE] [LEVEL] Description and settings Selects a type of colors. [STANDARD] : Standard colors [CINEMATONE1] : Film camera image-like colors good with [GAMMA] set to [CINEMATONE1] [CINEMATONE2] : Film camera image-like colors good with [GAMMA] set to [CINEMATONE2] [ITU709 MTX] : Colors corresponding to ITU-709 Sets a color... Sets the maximum point and sensitivity in high contrast area of the subject to the dynamic range of your camcorder. Changing the settings of your camcorder recordings (Continued) KNEE To set knee point and slope for video signal compression to reduce over-highlighting by ...

Operation Guide
Page 49
...indoor to bring up the SHOT TRANSITION STORE screen. 2 Manually adjust the settings. Continued , 49 Press the ASSIGN 6 button to the stored ones. The image will be displayed with SHOT-A, or the ASSIGN 6 button for storing the settings in [TRANS TIME] and [TRANS CURVE] (p. 75) 4 Execute the...the ASSIGN 4 button repeatedly to adjust the settings manually. 3 Press the ASSIGN 5 button for storing the settings in the selected SHOT. Sony recommends that you store manually adjusted settings of the transition time and curve set the items, such as from the current ones to check ...
...indoor to bring up the SHOT TRANSITION STORE screen. 2 Manually adjust the settings. Continued , 49 Press the ASSIGN 6 button to the stored ones. The image will be displayed with SHOT-A, or the ASSIGN 6 button for storing the settings in [TRANS TIME] and [TRANS CURVE] (p. 75) 4 Execute the...the ASSIGN 4 button repeatedly to adjust the settings manually. 3 Press the ASSIGN 5 button for storing the settings in the selected SHOT. Sony recommends that you store manually adjusted settings of the transition time and curve set the items, such as from the current ones to check ...

Operation Guide
Page 51
... x : STOP • X : PAUSE (Press N or X again to restart the playback) • m : REW (Rewind, review) • M : FF (Cue, fast forward) • y : SLOW b Notes • Your camcorder automatically goes into a stopped state when it is in pause for more than 3 minutes. • The screen may temporarily go to the point you want... to view, then press N (play back movies as follows: 1 Slide the POWER switch to go blank losing images and sound when signals switch between HDV and DVCAM (DV) during playback of a tape in which HDV format and DVCAM (DV) format are mixed....
... x : STOP • X : PAUSE (Press N or X again to restart the playback) • m : REW (Rewind, review) • M : FF (Cue, fast forward) • y : SLOW b Notes • Your camcorder automatically goes into a stopped state when it is in pause for more than 3 minutes. • The screen may temporarily go to the point you want... to view, then press N (play back movies as follows: 1 Slide the POWER switch to go blank losing images and sound when signals switch between HDV and DVCAM (DV) during playback of a tape in which HDV format and DVCAM (DV) format are mixed....

Operation Guide
Page 52
...Adjust the volume with time code that your camcorder only when its contents are recorded in the LP mode. • Time code and user bits will not be displayed correctly when you want to view using the VOLUME/MEMORY button. To stop viewing still images, press the MEMORY/PLAY button again. ...(DV) format video cameras or mini DV players. • You can play back a DV format tape on your camcorder does not support. To view during playback. To display the list of still images, press the MEMORY/INDEX button again. 52 z Tips • See page 142 for indicators displayed on the screen ...
...Adjust the volume with time code that your camcorder only when its contents are recorded in the LP mode. • Time code and user bits will not be displayed correctly when you want to view using the VOLUME/MEMORY button. To stop viewing still images, press the MEMORY/PLAY button again. ...(DV) format video cameras or mini DV players. • You can play back a DV format tape on your camcorder does not support. To view during playback. To display the list of still images, press the MEMORY/INDEX button again. 52 z Tips • See page 142 for indicators displayed on the screen ...

Operation Guide
Page 53
...SET) menu (p. 91). z Tips • To delete a still image in the index, move B to the still image using the VOLUME/MEMORY button, then do steps 2 and 3. • To delete all still images, do [ ALL ERASE] of "To view still images" to delete. 2 Press the MEMORY/DELETE button. 3 Select [...] with the SEL/PUSH EXEC dial. b Notes • Still images cannot be deleted. Recording/Playback 53 The still image will be restored once you want to display still images that you delete them. • You cannot delete still images when the "Memory Stick Duo" is write-protected (p. 122) or...
...SET) menu (p. 91). z Tips • To delete a still image in the index, move B to the still image using the VOLUME/MEMORY button, then do steps 2 and 3. • To delete all still images, do [ ALL ERASE] of "To view still images" to delete. 2 Press the MEMORY/DELETE button. 3 Select [...] with the SEL/PUSH EXEC dial. b Notes • Still images cannot be deleted. Recording/Playback 53 The still image will be restored once you want to display still images that you delete them. • You cannot delete still images when the "Memory Stick Duo" is write-protected (p. 122) or...

Operation Guide
Page 55
... t EXT DEVICE (when an external device is displayed. If you record without setting date and time and [--:--:--] will be displayed in your camcorder for the accurate shutter speed. Remaining battery (approx.) 60 65 Recording capacity (approx.) 55 You can check the settings of the movie recorded... or HVR-DR60 1 Press the STATUS CHECK button C. 2 Turn the SEL/PUSH EXEC dial D until a desired display shows up to OFF, then press the DISPLAY/BATT INFO button E. Recording/Playback E Shutter speed F White balance appears during viewing of still images on "Memory Stick Duo." • ...
... t EXT DEVICE (when an external device is displayed. If you record without setting date and time and [--:--:--] will be displayed in your camcorder for the accurate shutter speed. Remaining battery (approx.) 60 65 Recording capacity (approx.) 55 You can check the settings of the movie recorded... or HVR-DR60 1 Press the STATUS CHECK button C. 2 Turn the SEL/PUSH EXEC dial D until a desired display shows up to OFF, then press the DISPLAY/BATT INFO button E. Recording/Playback E Shutter speed F White balance appears during viewing of still images on "Memory Stick Duo." • ...

Operation Guide
Page 58
Playing the picture on a TV Connection methods and image quality differ depending on your camcorder Open the jack cover and connect the cable. b Notes • Set all the necessary menu items before you change the settings of TV is connected .... A movie recorded in SD quality is played back in SD quality. Jacks on what type of [VCR HDV/DV] or [i.LINK SET] after connecting your camcorder to a high definition TV A movie recorded in HD quality is played back in HD quality. Connecting to a TV. Refer also to obtain AC power (p. 13...
Playing the picture on a TV Connection methods and image quality differ depending on your camcorder Open the jack cover and connect the cable. b Notes • Set all the necessary menu items before you change the settings of TV is connected .... A movie recorded in SD quality is played back in SD quality. Jacks on what type of [VCR HDV/DV] or [i.LINK SET] after connecting your camcorder to a high definition TV A movie recorded in HD quality is played back in HD quality. Connecting to a TV. Refer also to obtain AC power (p. 13...


