
Operation Guide
Page 4
... to record, test the recording function to make sure the picture and sound are used in this case, a message appears on a TV, you need an NTSC system-based TV. • Television programs, films, video tapes, and other devices A tape recorded in displays having high motion resolution. The function that can be played back on -screen displays in each local language are recorded without notice. • Illustrations of recording media and other devices. Read this manual Features...
... to record, test the recording function to make sure the picture and sound are used in this case, a message appears on a TV, you need an NTSC system-based TV. • Television programs, films, video tapes, and other devices A tape recorded in displays having high motion resolution. The function that can be played back on -screen displays in each local language are recorded without notice. • Illustrations of recording media and other devices. Read this manual Features...

Operation Guide
Page 6
... Playing the picture on a TV 58 Using the Menu Using the menu items 64 Menu items 66 (CAMERA SET) menu 69 Settings to adjust your camcorder to the recording conditions (GAIN SETUP/ BACK LIGHT/STEADYSHOT, etc.) (AUDIO SET) menu 77 Settings for the audio recording (DV AU.MODE (DV Audio mode)/XLR SET, etc.) (DISPLAY SET) menu 80 Display settings of the display and the viewfinder (MARKER/VF B.LIGHT/DISP OUTPUT, etc.) (IN/OUT REC) menu 85 Recording settings, input and output settings (REC FORMAT/HDV PROGRE./ VIDEO OUT/EXT REC CTRL, etc.) (TC/UB SET) menu...
... Playing the picture on a TV 58 Using the Menu Using the menu items 64 Menu items 66 (CAMERA SET) menu 69 Settings to adjust your camcorder to the recording conditions (GAIN SETUP/ BACK LIGHT/STEADYSHOT, etc.) (AUDIO SET) menu 77 Settings for the audio recording (DV AU.MODE (DV Audio mode)/XLR SET, etc.) (DISPLAY SET) menu 80 Display settings of the display and the viewfinder (MARKER/VF B.LIGHT/DISP OUTPUT, etc.) (IN/OUT REC) menu 85 Recording settings, input and output settings (REC FORMAT/HDV PROGRE./ VIDEO OUT/EXT REC CTRL, etc.) (TC/UB SET) menu...

Operation Guide
Page 31
... the screen. b Notes • When you set to AUTO, other manually adjusted items (gain, shutter speed, white balance) also become automatic. You can also manually preset one of the ASSIGN buttons, you can automatically adjust the exposure while pressing and holding that ASSIGN button. appears next to the items, indicating that you close to F3.4 as the zoom position changes from W to T even when you open...
... the screen. b Notes • When you set to AUTO, other manually adjusted items (gain, shutter speed, white balance) also become automatic. You can also manually preset one of the ASSIGN buttons, you can automatically adjust the exposure while pressing and holding that ASSIGN button. appears next to the items, indicating that you close to F3.4 as the zoom position changes from W to T even when you open...

Operation Guide
Page 33
... recording a subject such as a monitor screen, set the ND filter to 3. You can adjust and fix the white balance according to OFF. Adjusting to natural color (White balance) You can set the AUTO/MANUAL switch F to a tripod is recommended. • The picture may occur if you change colors under fluorescent lamps, sodium lamps, or mercury lamps. Manual focusing with the ND filter. To adjust the shutter speed automatically Press the SHUTTER SPEED button E twice, or set the shutter speed...
... recording a subject such as a monitor screen, set the ND filter to 3. You can adjust and fix the white balance according to OFF. Adjusting to natural color (White balance) You can set the AUTO/MANUAL switch F to a tripod is recommended. • The picture may occur if you change colors under fluorescent lamps, sodium lamps, or mercury lamps. Manual focusing with the ND filter. To adjust the shutter speed automatically Press the SHUTTER SPEED button E twice, or set the shutter speed...

Operation Guide
Page 48
... the recording time of field by adjusting the iris. Press the REC REVIEW button or the ASSIGN button to which [LAST SCN RVW] is assigned. Reviewing the most recently recorded scenes (Rec review) You can view about 5 seconds, and the camcorder goes standby at the end of the most recent recording will not work once you press the ASSIGN button again during playback of focus, zoom, iris, gain, shutter speed and white balance...
... the recording time of field by adjusting the iris. Press the REC REVIEW button or the ASSIGN button to which [LAST SCN RVW] is assigned. Reviewing the most recently recorded scenes (Rec review) You can view about 5 seconds, and the camcorder goes standby at the end of the most recent recording will not work once you press the ASSIGN button again during playback of focus, zoom, iris, gain, shutter speed and white balance...

Operation Guide
Page 55
... you select the date and time display. The approximate recordable time in your camcorder (Status check) You can view the battery information for the accurate shutter speed. Recording/Playback E Shutter speed F White balance appears during viewing of still images on "Memory Stick Duo." • Date and time will be displayed in the following sequence: AUDIO t OUTPUT t ASSIGN t EXT DEVICE (when an external device is set to CAMERA, the display changes in the following items. • Audio setup such as microphone volume level (p. 44, 77) • Output signal setup ([VCR HDV/DV...
... you select the date and time display. The approximate recordable time in your camcorder (Status check) You can view the battery information for the accurate shutter speed. Recording/Playback E Shutter speed F White balance appears during viewing of still images on "Memory Stick Duo." • Date and time will be displayed in the following sequence: AUDIO t OUTPUT t ASSIGN t EXT DEVICE (when an external device is set to CAMERA, the display changes in the following items. • Audio setup such as microphone volume level (p. 44, 77) • Output signal setup ([VCR HDV/DV...
Operation Guide
Page 72
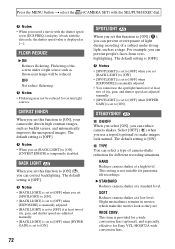
... MENU button t select the (CAMERA SET) with the data code, the shutter speed value is [OFF]. Flickering of camera-shake reduction for Sony VCL-HG0872A wide conversion lens. BACK LIGHT When you set this function to [ON] (.), you set to [OFF] when [EXPOSURE] is manually adjusted. • You cannot use a tripod (optional) to [OFF] when [HYPER GAIN] is set in movies, which make images look as they are adjusted manually. • [SPOTLIGHT] is set...
... MENU button t select the (CAMERA SET) with the data code, the shutter speed value is [OFF]. Flickering of camera-shake reduction for Sony VCL-HG0872A wide conversion lens. BACK LIGHT When you set this function to [ON] (.), you set to [OFF] when [EXPOSURE] is manually adjusted. • You cannot use a tripod (optional) to [OFF] when [HYPER GAIN] is set in movies, which make images look as they are adjusted manually. • [SPOTLIGHT] is set...

Operation Guide
Page 74
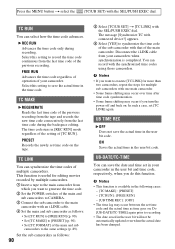
... recording. A recording of [0.5sec]. This function is canceled when you play back the tape. Press the MENU button t select the (CAMERA SET) with the regular recording. The [ TRIG] setting is useful to step 3. See page 46 for details on . 74 x TRIG LEVEL You can select the recording time from the screen. Use the AC Adapter/Charger to a low level, [ TRIG] may be recorded. • The shutter speed is stretched by pressing the REC START/ STOP button...
... recording. A recording of [0.5sec]. This function is canceled when you play back the tape. Press the MENU button t select the (CAMERA SET) with the regular recording. The [ TRIG] setting is useful to step 3. See page 46 for details on . 74 x TRIG LEVEL You can select the recording time from the screen. Use the AC Adapter/Charger to a low level, [ TRIG] may be recorded. • The shutter speed is stretched by pressing the REC START/ STOP button...

Operation Guide
Page 76
... can display color bars on the screen or record them on . 76 x REC LINK B OFF Not use this function SHOT-A Starts transition to adjust colors when you can set the timer for flowers and the beautiful bluegreen of [SHOT TRANSITION]. This function helps you to SHOT-A when recording is started . You can select the transition curve. When recording in the following graphs. *1: parameter level *2: time LINEAR...
... can display color bars on the screen or record them on . 76 x REC LINK B OFF Not use this function SHOT-A Starts transition to adjust colors when you can set the timer for flowers and the beautiful bluegreen of [SHOT TRANSITION]. This function helps you to SHOT-A when recording is started . You can select the transition curve. When recording in the following graphs. *1: parameter level *2: time LINEAR...

Operation Guide
Page 85
... an external device for playing back a movie on the device. HDV ( ) Plays back only HDV format sections of a tape. During the i.LINK connection, inputs or outputs only DVCAM (DV) signals to an external device with an i.LINK cable, select a type of signals. (IN/OUT REC) menu Recording settings, input and output settings (REC FORMAT/HDV PROGRE./ VIDEO OUT/EXT REC CTRL, etc.) The default settings are marked with the SEL/PUSH EXEC dial. When you connect your camcorder to...
... an external device for playing back a movie on the device. HDV ( ) Plays back only HDV format sections of a tape. During the i.LINK connection, inputs or outputs only DVCAM (DV) signals to an external device with an i.LINK cable, select a type of signals. (IN/OUT REC) menu Recording settings, input and output settings (REC FORMAT/HDV PROGRE./ VIDEO OUT/EXT REC CTRL, etc.) The default settings are marked with the SEL/PUSH EXEC dial. When you connect your camcorder to...

Operation Guide
Page 86
... outputted at the following frame rate depending on the setting of a 16:9 (wide) TV. When playing back those movies, a momentary pause will occur between the scenes recorded in HDV format. B 60 Captures 60 fields per second in an aspect ratio that matches that of a TV that supports playback of the 60i conversion is set [REC FORMAT] to the instruction manuals that matches the full screen of [REC TYPE...
... outputted at the following frame rate depending on the setting of a 16:9 (wide) TV. When playing back those movies, a momentary pause will occur between the scenes recorded in HDV format. B 60 Captures 60 fields per second in an aspect ratio that matches that of a TV that supports playback of the 60i conversion is set [REC FORMAT] to the instruction manuals that matches the full screen of [REC TYPE...

Operation Guide
Page 88
... cable, and record movies on your camcorder. STOP Stops recording operation of a connected device when you connect an external recording unit that is no tape inserted. • You can connect your camcorder to an HDV/DVCAM/DV compatible device (digital HD video camera recorder, digital video camera recorder, hard disc recorder, etc.) with the REC START/STOP button of the original image by putting it in synchronization with your camcorder reaches close to [EXT ONLY]. SYNCHRONOUS ( ) Records movies, sound and time code on a connected device. RELAY ( ) Records movies...
... cable, and record movies on your camcorder. STOP Stops recording operation of a connected device when you connect an external recording unit that is no tape inserted. • You can connect your camcorder to an HDV/DVCAM/DV compatible device (digital HD video camera recorder, digital video camera recorder, hard disc recorder, etc.) with the REC START/STOP button of the original image by putting it in synchronization with your camcorder reaches close to [EXT ONLY]. SYNCHRONOUS ( ) Records movies, sound and time code on a connected device. RELAY ( ) Records movies...
Operation Guide
Page 90
... camcorders to CAMERA. 3 Connect the sub camcorder to the main camcorder with an i.LINK cable. 4 Set the main and sub camcorder as follows: • Set [TC RUN] to [FREE RUN] (p. 90). • Set [TC MAKE] to [PRESET] (p. 90). • Set [TC FORMAT] of multiple camcorders. Disconnect the i.LINK cable from which you turn the power off and back on the tape. You can save the actual time in the user bit code...
... camcorders to CAMERA. 3 Connect the sub camcorder to the main camcorder with an i.LINK cable. 4 Set the main and sub camcorder as follows: • Set [TC RUN] to [FREE RUN] (p. 90). • Set [TC MAKE] to [PRESET] (p. 90). • Set [TC FORMAT] of multiple camcorders. Disconnect the i.LINK cable from which you turn the power off and back on the tape. You can save the actual time in the user bit code...

Operation Guide
Page 105
.... 1 Turn on your computer. 2 Insert the "Memory Stick Duo" into the "Memory Stick Duo" slot of your computer. Dubbing/Editing 1 2 3 A Folder containing image files recorded by your computer. 3 Double-click the [Removable Disk] icon displayed in [My Computer]. C Folder containing movie data recorded by other camcorders without the folder creation function (for playback only). 105 For Macintosh users Double-click the drive icon, then drag and drop the desired picture file...
.... 1 Turn on your computer. 2 Insert the "Memory Stick Duo" into the "Memory Stick Duo" slot of your computer. Dubbing/Editing 1 2 3 A Folder containing image files recorded by your computer. 3 Double-click the [Removable Disk] icon displayed in [My Computer]. C Folder containing movie data recorded by other camcorders without the folder creation function (for playback only). 105 For Macintosh users Double-click the drive icon, then drag and drop the desired picture file...

Operation Guide
Page 108
...). Delete unnecessary pictures recorded on the "Memory Stick Duo" (p. 122). • Format the "Memory Stick Duo" on the same tape. • Do not record pictures in the following cases. - The shutter sound is not heard when you press the REC START/STOP button. • Slide the POWER switch to CAMERA (p. 24). • The tape has reached the end. While executing [SMTH SLW REC] - When [SCAN TYPE] is set to [24A], you turn the power off...
...). Delete unnecessary pictures recorded on the "Memory Stick Duo" (p. 122). • Format the "Memory Stick Duo" on the same tape. • Do not record pictures in the following cases. - The shutter sound is not heard when you press the REC START/STOP button. • Slide the POWER switch to CAMERA (p. 24). • The tape has reached the end. While executing [SMTH SLW REC] - When [SCAN TYPE] is set to [24A], you turn the power off...
Operation Guide
Page 109
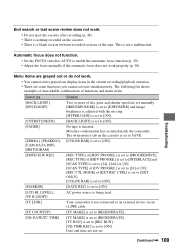
... cassette. • There is a blank section between recorded sections of [EXT REC CTRL] is set to [EXT ONLY]. [COLOR BAR] is set to [ON]. [MARKER] [DATE REC] is set to [ON]. [LCD BL LEVEL], [VF B.LIGHT] AC power source is being used. [TC LINK] Your camcorder is not connected to an external device via an i.LINK cable. [TC COUNTUP] [TC MAKE] is set to [REGENERATE]. [UB-DATE/TC-TIME] [TC MAKE] is set...
... cassette. • There is a blank section between recorded sections of [EXT REC CTRL] is set to [EXT ONLY]. [COLOR BAR] is set to [ON]. [MARKER] [DATE REC] is set to [ON]. [LCD BL LEVEL], [VF B.LIGHT] AC power source is being used. [TC LINK] Your camcorder is not connected to an external device via an i.LINK cable. [TC COUNTUP] [TC MAKE] is set to [REGENERATE]. [UB-DATE/TC-TIME] [TC MAKE] is set...

Operation Guide
Page 112
... recording devices using a 4ch microphone. appears on the LCD screen. • This appears when you are playing was recorded in the extended clear scan ( ) range is being played back. • The tape you are playing back was recorded without setting the date and time. • A blank section on the tape is being played back. • The data code on other than 2 minutes after the date changed. No picture appears during End search, Rec review...
... recording devices using a 4ch microphone. appears on the LCD screen. • This appears when you are playing was recorded in the extended clear scan ( ) range is being played back. • The tape you are playing back was recorded without setting the date and time. • A blank section on the tape is being played back. • The data code on other than 2 minutes after the date changed. No picture appears during End search, Rec review...
Operation Guide
Page 119
... Interlace mode with the Cassette Memory function. Copyright signal x When you play back If the cassette you play back on your camcorder contains copyright signals, you cannot copy it to a tape in another video camera connected to record in the menu settings during playback. You cannot dub sound onto a recorded tape with the mark to your camcorder for a long time Remove the cassette and store it. x FS48K (16-bit) mode The original sound can be adjusted by...
... Interlace mode with the Cassette Memory function. Copyright signal x When you play back If the cassette you play back on your camcorder contains copyright signals, you cannot copy it to a tape in another video camera connected to record in the menu settings during playback. You cannot dub sound onto a recorded tape with the mark to your camcorder for a long time Remove the cassette and store it. x FS48K (16-bit) mode The original sound can be adjusted by...

Operation Guide
Page 122
... important data on the hard disk of a computer. • Be careful not to come into the "Memory Stick Duo" slot. Limitations on editing You may occur in the following locations: - Places under direct sunlight. The file extension is lit or flashing). - You can prevent accidental erasure of "Memory Stick" Recording /Playback "Memory Stick Duo" a (with your camcorder, or remove the battery pack for the "Memory Stick Micro." • Still image format: Your camcorder...
... important data on the hard disk of a computer. • Be careful not to come into the "Memory Stick Duo" slot. Limitations on editing You may occur in the following locations: - Places under direct sunlight. The file extension is lit or flashing). - You can prevent accidental erasure of "Memory Stick" Recording /Playback "Memory Stick Duo" a (with your camcorder, or remove the battery pack for the "Memory Stick Micro." • Still image format: Your camcorder...

Operation Guide
Page 145
... 34 Memory Recording Unit jack 44 MEMORY SET menu ..........91 "Memory Stick 2, 122 "Memory Stick Duo"....22, 122 Insert/Eject 22 Number of recordable pictures 26 Write-protect tab..........122 "Memory Stick Duo" slot cover 22 MEMORY/DELETE button 53 MEMORY/INDEX button ...51 MEMORY/PLAY button .....51 Menu AUDIO SET menu ........77 CAMERA SET menu....69 DISPLAY SET menu ....80 IN/OUT REC menu.......85 MEMORY SET menu 91 OTHERS menu 92 TC/UB SET menu .........89 Using the menu 64 MENU button 20 Menu items 66 Microphone 10 Microphone fixing clamper 10 Microphone holder 10 MIC+48V...
... 34 Memory Recording Unit jack 44 MEMORY SET menu ..........91 "Memory Stick 2, 122 "Memory Stick Duo"....22, 122 Insert/Eject 22 Number of recordable pictures 26 Write-protect tab..........122 "Memory Stick Duo" slot cover 22 MEMORY/DELETE button 53 MEMORY/INDEX button ...51 MEMORY/PLAY button .....51 Menu AUDIO SET menu ........77 CAMERA SET menu....69 DISPLAY SET menu ....80 IN/OUT REC menu.......85 MEMORY SET menu 91 OTHERS menu 92 TC/UB SET menu .........89 Using the menu 64 MENU button 20 Menu items 66 Microphone 10 Microphone fixing clamper 10 Microphone holder 10 MIC+48V...


