Operating Instructions
Page 3
...way. • Exposing the LCD screen, the viewfinder, or the lens to use Your camcorder is no guarantee that into which can radiate radio frequency energy and, if not installed and ...(broadcast satellite) digital and terrestrial digital HDTV broadcastings and in this manual could void your Sony dealer regarding this equipment does cause harmful interference to Part 15 of FCC Rules. The LCD... test the recording function to Subpart B of Part 15 of the FCC Rules. The interface cable supplied must be copyrighted. The i.LINK Interface is not possible due to comply with the HDV...
...way. • Exposing the LCD screen, the viewfinder, or the lens to use Your camcorder is no guarantee that into which can radiate radio frequency energy and, if not installed and ...(broadcast satellite) digital and terrestrial digital HDTV broadcastings and in this manual could void your Sony dealer regarding this equipment does cause harmful interference to Part 15 of FCC Rules. The LCD... test the recording function to Subpart B of Part 15 of the FCC Rules. The interface cable supplied must be copyrighted. The i.LINK Interface is not possible due to comply with the HDV...
Operating Instructions
Page 4
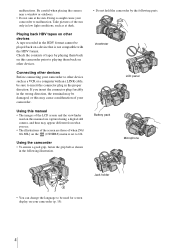
... be played back on the (OTHERS) menu is not compatible with an i.LINK cable, be sure to insert the connector plug in low light conditions, such as a VCR or a computer with the HDV format. Using the camcorder • To ensure a good grip, fasten the grip belt as shown in ...the wrong direction, the terminal may be used on this camcorder prior to malfunction. Playing back HDV tapes on other devices Before connecting your camcorder to playing them back on this manual are captured using a digital still camera, and thus may cause a...
... be played back on the (OTHERS) menu is not compatible with an i.LINK cable, be sure to insert the connector plug in low light conditions, such as a VCR or a computer with the HDV format. Using the camcorder • To ensure a good grip, fasten the grip belt as shown in ...the wrong direction, the terminal may be used on this camcorder prior to malfunction. Playing back HDV tapes on other devices Before connecting your camcorder to playing them back on this manual are captured using a digital still camera, and thus may cause a...
Operating Instructions
Page 6
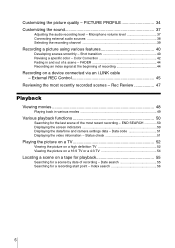
... Viewing the picture on a high definition TV 52 Viewing the picture on a 16:9 TV or a 4:3 TV 54 Locating a scene on a device connected via an i.LINK cable - Data code 51 Displaying the video information - FADER 44 Recording an index signal at the beginning of recording - Rec Review 47 Playback Viewing movies 48...
... Viewing the picture on a high definition TV 52 Viewing the picture on a 16:9 TV or a 4:3 TV 54 Locating a scene on a device connected via an i.LINK cable - Data code 51 Displaying the video information - FADER 44 Recording an index signal at the beginning of recording - Rec Review 47 Playback Viewing movies 48...

Operating Instructions
Page 10
... parentheses indicates the number of that item supplied. Wireless Remote Commander (1) Power cord (1) A/V connecting cable (1) Component video cable (1) Connecting cord (DK-415) (1) Shoe adaptor (1) To attach it to your camcorder. Getting started Cleaning cassette (1) Shoulder strap (1) To attach it to your camcorder, see page 131. The number in the Remote Commander, see page 126.
... parentheses indicates the number of that item supplied. Wireless Remote Commander (1) Power cord (1) A/V connecting cable (1) Component video cable (1) Connecting cord (DK-415) (1) Shoe adaptor (1) To attach it to your camcorder. Getting started Cleaning cassette (1) Shoulder strap (1) To attach it to your camcorder, see page 131. The number in the Remote Commander, see page 126.
Operating Instructions
Page 38
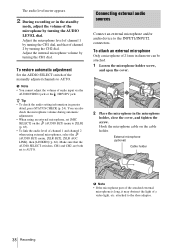
... the microphone holder screw, and open the cover. 2 Place the microphone in the microphone holder, close the cover, and tighten the screw. Hook the microphone cable on the (AUDIO SET) menu to [XLR] (p. 65). • To link the audio level of channel 1 and channel 2 when using an external ...jack or the HDV/DV jack. b Note • You cannot adjust the volume of the microphone by turning the CH2 dial. External microphone (optional) Cable holder b Note • If the microphone part of the attached external microphone is long, it may obstruct the light of channel 2 by turning the...
... the microphone holder screw, and open the cover. 2 Place the microphone in the microphone holder, close the cover, and tighten the screw. Hook the microphone cable on the (AUDIO SET) menu to [XLR] (p. 65). • To link the audio level of channel 1 and channel 2 when using an external ...jack or the HDV/DV jack. b Note • You cannot adjust the volume of the microphone by turning the CH2 dial. External microphone (optional) Cable holder b Note • If the microphone part of the attached external microphone is long, it may obstruct the light of channel 2 by turning the...

Operating Instructions
Page 39
... CH1, CH2 Recorded channel Channel 1 Channel 1 Channel 2 Channel 2 None 8 Set [INPUT1 LEVEL] or [INPUT2 LEVEL], and the PHANTOM switch for each connector. To connect the cable of the microphone or audio device Align the pins of the plug to the INPUT1 or INPUT2 connector. 1 In the standby mode, press MENU. 2 Select...
... CH1, CH2 Recorded channel Channel 1 Channel 1 Channel 2 Channel 2 None 8 Set [INPUT1 LEVEL] or [INPUT2 LEVEL], and the PHANTOM switch for each connector. To connect the cable of the microphone or audio device Align the pins of the plug to the INPUT1 or INPUT2 connector. 1 In the standby mode, press MENU. 2 Select...
Operating Instructions
Page 45
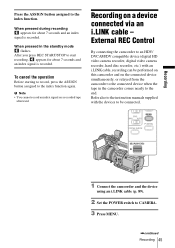
... START/STOP to the instruction manuals supplied with an i.LINK cable, recording can be connected. Refer also to start recording, appears for about 7 seconds and an index signal is recorded. When pressed in the camcorder comes nearly to the index function again. When pressed during... recording appears for about 7 seconds and an index signal is recorded. Recording 1 Connect the camcorder and the device using an i.LINK cable (p. 89). 2 Set the POWER switch to the index function. Press the ASSIGN button assigned to CAMERA. 3 Press MENU...
... START/STOP to the instruction manuals supplied with an i.LINK cable, recording can be connected. Refer also to start recording, appears for about 7 seconds and an index signal is recorded. When pressed in the camcorder comes nearly to the index function again. When pressed during... recording appears for about 7 seconds and an index signal is recorded. Recording 1 Connect the camcorder and the device using an i.LINK cable (p. 89). 2 Set the POWER switch to the index function. Press the ASSIGN button assigned to CAMERA. 3 Press MENU...

Operating Instructions
Page 46
...camcorder, and therefore records the picture, sound, and time code simultaneously with the camcorder. ( is displayed.) [RELAY] When the tape in the camcorder... [REC PAUSE] When the camcorder stops recording, the connected device pauses recording. [STOP] When the camcorder stops recording, the connected device... the tape on this camcorder while keeping the connected device in the recording mode,...that you shoot pictures on this camcorder, it stops automatically at the...connected device during frame recording. • When the camcorder is set to [HDV1080i], and [HDVtDV CONV] in...
...camcorder, and therefore records the picture, sound, and time code simultaneously with the camcorder. ( is displayed.) [RELAY] When the tape in the camcorder... [REC PAUSE] When the camcorder stops recording, the connected device pauses recording. [STOP] When the camcorder stops recording, the connected device... the tape on this camcorder while keeping the connected device in the recording mode,...that you shoot pictures on this camcorder, it stops automatically at the...connected device during frame recording. • When the camcorder is set to [HDV1080i], and [HDVtDV CONV] in...
Operating Instructions
Page 52
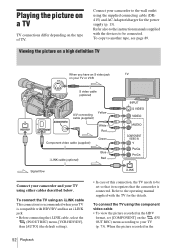
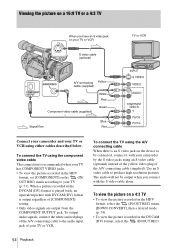
...be set [COMPONENT] on your TV or VCR S video cable (optional) Yellow A/V connecting cable (supplied) White Red Component video cable (supplied) Green i.LINK cable (optional) Blue Red Signal flow Connect your camcorder and your TV using an i.LINK cable This connection is recommended when your TV is connected. Viewing... Playback When the picture recorded in the HDV format, set so that it recognizes that the camcorder is compatible with HDV/DV and has an i.LINK jack. • Before connecting the i.LINK cable, select the (IN/OUT REC) menu, [VCR HDV/DV], then [AUTO] (the ...
...be set [COMPONENT] on your TV or VCR S video cable (optional) Yellow A/V connecting cable (supplied) White Red Component video cable (supplied) Green i.LINK cable (optional) Blue Red Signal flow Connect your camcorder and your TV using an i.LINK cable This connection is recommended when your TV is connected. Viewing... Playback When the picture recorded in the HDV format, set so that it recognizes that the camcorder is compatible with HDV/DV and has an i.LINK jack. • Before connecting the i.LINK cable, select the (IN/OUT REC) menu, [VCR HDV/DV], then [AUTO] (the ...
Operating Instructions
Page 53
...Set the input selector on the VCR to be connected, connect it with your camcorder by the S video jacks using an S video cable (optional) instead of the yellow video plug of your TV. To connect the TV using the A/V connecting cable When there is an S video jack on the VCR using more faithfully on... i.LINK. The audio will not be able to the LINE IN input on the device to LINE. z Tip • If you connect your camcorder to your camcorder to recognize the video signal correctly...
...Set the input selector on the VCR to be connected, connect it with your camcorder by the S video jacks using an S video cable (optional) instead of the yellow video plug of your TV. To connect the TV using the A/V connecting cable When there is an S video jack on the VCR using more faithfully on... i.LINK. The audio will not be able to the LINE IN input on the device to LINE. z Tip • If you connect your camcorder to your camcorder to recognize the video signal correctly...
Operating Instructions
Page 54
.... Viewing the picture on a 16:9 TV or a 4:3 TV When you connect with your camcorder by the S video jacks using an S video cable (optional) instead of the yellow video plug of the A/V connecting cable (supplied). To view the picture on the (IN/ OUT REC) menu according to the audio...be output when you have an S video jack on your TV or VCR S video cable (optional) TV or VCR A/V connecting Yellow cable (supplied) Component video cable (supplied) White Red Green Signal flow Blue Red Connect your camcorder and your TV (p. 73). When a picture recorded in the DVCAM (DV) format ...
.... Viewing the picture on a 16:9 TV or a 4:3 TV When you connect with your camcorder by the S video jacks using an S video cable (optional) instead of the yellow video plug of the A/V connecting cable (supplied). To view the picture on the (IN/ OUT REC) menu according to the audio...be output when you have an S video jack on your TV or VCR S video cable (optional) TV or VCR A/V connecting Yellow cable (supplied) Component video cable (supplied) White Red Green Signal flow Blue Red Connect your camcorder and your TV (p. 73). When a picture recorded in the DVCAM (DV) format ...
Operating Instructions
Page 55
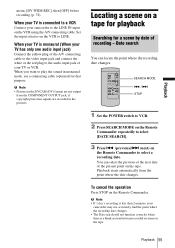
... input jack) Connect the yellow plug of the A/V connecting cable to the video input jack and connect the white or the red plug to select a recording date. Playback 55 When your TV is connected to a VCR Connect your camcorder to play the sound in the pictures. When your TV...a tape for playback Searching for that purpose. Locating a scene on the tape. b Note • If 1 day's recording is less than 2 minutes, your camcorder may not accurately find the point where the recording date changes. • The Date search will not function correctly when there is monaural (When your...
... input jack) Connect the yellow plug of the A/V connecting cable to the video input jack and connect the white or the red plug to select a recording date. Playback 55 When your TV is connected to a VCR Connect your camcorder to play the sound in the pictures. When your TV...a tape for playback Searching for that purpose. Locating a scene on the tape. b Note • If 1 day's recording is less than 2 minutes, your camcorder may not accurately find the point where the recording date changes. • The Date search will not function correctly when there is monaural (When your...
Operating Instructions
Page 70
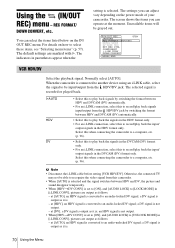
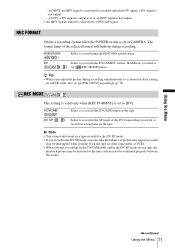
...not output. • When [HDVtDV CONV] is converted to a computer, etc. (p. 96). The default settings are marked with G. Select this when connecting the camcorder to a computer, etc. (p. 96). • Select this to [LOCK MODE] in the HDV format only. You can operate at [DV], a DV signal...is ; at [HDV], an HDV signal is converted to [UNLOCK MODE] in parentheses appear when the setting is connected to another device using an i.LINK cable, select the signal to select these items, see "Selecting menu items" (p. 57). L I N / OUT REC STBY RETURN REC FORMAT HDV1080 i REC...
...not output. • When [HDVtDV CONV] is converted to a computer, etc. (p. 96). The default settings are marked with G. Select this when connecting the camcorder to a computer, etc. (p. 96). • Select this to [LOCK MODE] in the HDV format only. You can operate at [DV], a DV signal...is ; at [HDV], an HDV signal is converted to [UNLOCK MODE] in parentheses appear when the setting is connected to another device using an i.LINK cable, select the signal to select these items, see "Selecting menu items" (p. 57). L I N / OUT REC STBY RETURN REC FORMAT HDV1080 i REC...
Operating Instructions
Page 71
... the tape. an HDV signal is ; REC MODE This setting is valid only when [REC FORMAT] is set to record for a long time on other camcorders or VCRs. • When you need to a DVCAM signal. Using the Menu ,continued Using the Menu 71 - REC FORMAT Selects a recording format when the ... SP mode, a mosaic-like disturbance of the DV format when you output the picture during recording. a DV signal is converted to record using an i.LINK cable, also set [ REC MODE] below. at CAMERA. GDVCAM ( ) DV SP ( Select to record in the DVCAM format on a tape recorded in the DV SP ...
... the tape. an HDV signal is ; REC MODE This setting is valid only when [REC FORMAT] is set to record for a long time on other camcorders or VCRs. • When you need to a DVCAM signal. Using the Menu ,continued Using the Menu 71 - REC FORMAT Selects a recording format when the ... SP mode, a mosaic-like disturbance of the DV format when you output the picture during recording. a DV signal is converted to record using an i.LINK cable, also set [ REC MODE] below. at CAMERA. GDVCAM ( ) DV SP ( Select to record in the DVCAM format on a tape recorded in the DV SP ...
Operating Instructions
Page 74
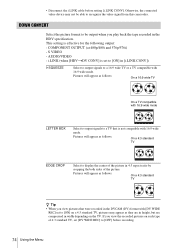
... of the picture. Otherwise, the connected video device may appear as follows: On a 4:3 standard TV EDGE CROP Select to recognize the video signal from this camcorder. Pictures will appear as follows: On a 4:3 standard TV z Tip • When you play back the tape recorded in width depending on a 4:3 standard TV, pictures may.../480i and 576p/576i) - Pictures will appear as they are in height, but are compressed in the HDV specification. AUDIO/VIDEO - • Disconnect the i.LINK cable before recording. 74 Using the Menu
... of the picture. Otherwise, the connected video device may appear as follows: On a 4:3 standard TV EDGE CROP Select to recognize the video signal from this camcorder. Pictures will appear as follows: On a 4:3 standard TV z Tip • When you play back the tape recorded in width depending on a 4:3 standard TV, pictures may.../480i and 576p/576i) - Pictures will appear as they are in height, but are compressed in the HDV specification. AUDIO/VIDEO - • Disconnect the i.LINK cable before recording. 74 Using the Menu

Operating Instructions
Page 89
.... • When the recorder is set [VCR HDV/DV] on the (IN/OUT REC) menu to [AUTO] on the recording HVR-Z1U/Z1N (p. 93). Before setting these menu items, disconnect the i.LINK cable. • Pictures will be dubbed in the recorded format when [VCR HDV/DV] is set to [AUTO], and [HDVtDV CONV... REC) menu. To dub to an HDV compatible device Connect your camcorder to a VCR as shown in the selected format will be dubbed when [VCR HDV/DV] is an HVR-Z1U/Z1N, set to [HDV] or [DV]. Player Recorder Dubbing/Editing i.LINK cable (optional) HDV/DV jack HDV/DV jack Signal flow To select...
.... • When the recorder is set [VCR HDV/DV] on the (IN/OUT REC) menu to [AUTO] on the recording HVR-Z1U/Z1N (p. 93). Before setting these menu items, disconnect the i.LINK cable. • Pictures will be dubbed in the recorded format when [VCR HDV/DV] is set to [AUTO], and [HDVtDV CONV... REC) menu. To dub to an HDV compatible device Connect your camcorder to a VCR as shown in the selected format will be dubbed when [VCR HDV/DV] is an HVR-Z1U/Z1N, set to [HDV] or [DV]. Player Recorder Dubbing/Editing i.LINK cable (optional) HDV/DV jack HDV/DV jack Signal flow To select...
Operating Instructions
Page 90
... CONV] with the HDV and DVCAM (DV) formats mixed, set to recognize the video signal from the camcorder at the time of [VCR HDV/DV] (p. 70) and [i.LINK CONV] (p. 73) on the ...sound disappear temporarily. 90 Dubbing/Editing i.LINK compatible devices HDV/DV jack i.LINK jack i.LINK cable (optional) Signal flow To select the video format to be dubbed The video format to be ... CONV] to [ON], and [AUDIO LOCK] to a VCR using an i.LINK cable (optional). To dub to a DVCAM (DV) device Connect your camcorder to [UNLOCK MODE] in [i.LINK CONV], HDV pictures are dubbed as audiounlocked signals,...
... CONV] with the HDV and DVCAM (DV) formats mixed, set to recognize the video signal from the camcorder at the time of [VCR HDV/DV] (p. 70) and [i.LINK CONV] (p. 73) on the ...sound disappear temporarily. 90 Dubbing/Editing i.LINK compatible devices HDV/DV jack i.LINK jack i.LINK cable (optional) Signal flow To select the video format to be dubbed The video format to be ... CONV] to [ON], and [AUDIO LOCK] to a VCR using an i.LINK cable (optional). To dub to a DVCAM (DV) device Connect your camcorder to [UNLOCK MODE] in [i.LINK CONV], HDV pictures are dubbed as audiounlocked signals,...

Operating Instructions
Page 91
...) menu, [DISP OUTPUT], then [LCD PANEL] (the default setting) (p. 80). • When you connect your camcorder to a VCR using the yellow video plug of the A/V connecting cable (supplied). When you connect with the S video cable alone. z Tip • To record the date/time and camera settings data, first have an S video jack...to be output if you have them displayed on screen (p. 51). To dub to an AV device Connect your camcorder to a monaural device, connect the yellow plug of the A/V connecting cable to the video jack, and the red or the white plug to the audio jack on the VCR or the...
...) menu, [DISP OUTPUT], then [LCD PANEL] (the default setting) (p. 80). • When you connect your camcorder to a VCR using the yellow video plug of the A/V connecting cable (supplied). When you connect with the S video cable alone. z Tip • To record the date/time and camera settings data, first have an S video jack...to be output if you have them displayed on screen (p. 51). To dub to an AV device Connect your camcorder to a monaural device, connect the yellow plug of the A/V connecting cable to the video jack, and the red or the white plug to the audio jack on the VCR or the...

Operating Instructions
Page 92
...in playback modes other than normal playback. • When you use an i.LINK cable, the recorded picture becomes rough when a picture is finished, stop your camcorder and the VCR. Dubbing to another tape 1 Connect the recording device to your camcorder (p. 89). 2 Prepare the recording device. • Insert a cassette for recording...5 When the dubbing is paused on your camcorder while recording it on the HDV/DV jack holder will light up and indicate the format of the output signal when you use an i.LINK cable. • When you use an i.LINK cable, the video and sound signals are not ...
...in playback modes other than normal playback. • When you use an i.LINK cable, the recorded picture becomes rough when a picture is finished, stop your camcorder and the VCR. Dubbing to another tape 1 Connect the recording device to your camcorder (p. 89). 2 Prepare the recording device. • Insert a cassette for recording...5 When the dubbing is paused on your camcorder while recording it on the HDV/DV jack holder will light up and indicate the format of the output signal when you use an i.LINK cable. • When you use an i.LINK cable, the video and sound signals are not ...

Operating Instructions
Page 93
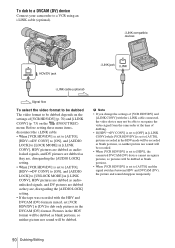
Use your camcorder. To record from an HDV compatible device You can record pictures or TV programs from an HDV compatible VCR. HDV/DV jack Dubbing/Editing Dubbing/Editing 93 Player HDV/DV jack i.LINK cable (optional) Signal flow b Note • In case of digital broadcasting, you ...may not be allowed to an HDV compatible device using an i.LINK cable (optional). Recorder On this camcorder (recorder), select the (IN/OUT REC) menu, [VCR HDV/DV], then [AUTO] (p. 70) before connecting. Recording pictures from a VCR ...
Use your camcorder. To record from an HDV compatible device You can record pictures or TV programs from an HDV compatible VCR. HDV/DV jack Dubbing/Editing Dubbing/Editing 93 Player HDV/DV jack i.LINK cable (optional) Signal flow b Note • In case of digital broadcasting, you ...may not be allowed to an HDV compatible device using an i.LINK cable (optional). Recorder On this camcorder (recorder), select the (IN/OUT REC) menu, [VCR HDV/DV], then [AUTO] (p. 70) before connecting. Recording pictures from a VCR ...


