
Operating Instructions
Page 3
... the speakers in accordance with FCC technical regulations. If this equipment does cause harmful interference to radio or television reception, which the receiver is used in accordance with the limits for a Class B digital device, pursuant to Part 15 of the FCC Rules. Also ...only with the cart, stand, tripod, bracket, or table specified by the manufacturer, or sold with the apparatus. Reorient or relocate the receiving antenna. - CAUTION You are designed to provide reasonable protection against harmful interference in this manual could void your authority to operate this equipment...
... the speakers in accordance with FCC technical regulations. If this equipment does cause harmful interference to radio or television reception, which the receiver is used in accordance with the limits for a Class B digital device, pursuant to Part 15 of the FCC Rules. Also ...only with the cart, stand, tripod, bracket, or table specified by the manufacturer, or sold with the apparatus. Reorient or relocate the receiving antenna. - CAUTION You are designed to provide reasonable protection against harmful interference in this manual could void your authority to operate this equipment...
Operating Instructions
Page 4
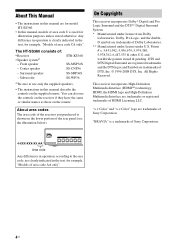
... logo are trademarks of DTS, Inc. © 1996-2008 DTS, Inc. Front speaker - About area codes The area code of the receiver you purchased is a trademarks of Sony Corporation. DTS and DTS Digital Surround are registered trademarks and the DTS logos and Symbol are trademarks of... Dolby* Digital and Pro Logic Surround and the DTS** Digital Surround System. * Manufactured under U.S. "BRAVIA" is shown on the lower portion of the rear panel (see the illustration below). The HT-SS360 consists of: • Receiver • Speaker systema) - Any difference in operation is used for ...
... logo are trademarks of DTS, Inc. © 1996-2008 DTS, Inc. Front speaker - About area codes The area code of the receiver you purchased is a trademarks of Sony Corporation. DTS and DTS Digital Surround are registered trademarks and the DTS logos and Symbol are trademarks of... Dolby* Digital and Pro Logic Surround and the DTS** Digital Surround System. * Manufactured under U.S. "BRAVIA" is shown on the lower portion of the rear panel (see the illustration below). The HT-SS360 consists of: • Receiver • Speaker systema) - Any difference in operation is used for ...
Operating Instructions
Page 5
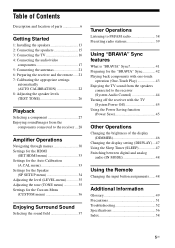
... 2: Connecting the speakers 15 3: Connecting the TV 16 4: Connecting the audio/video components 17 5: Connecting the antennas 21 6: Preparing the receiver and the remote..... 21 7: Calibrating the appropriate settings automatically (AUTO CALIBRATION 22 8: Adjusting the speaker levels (TEST TONE 26 Playback Selecting a...touch operation (One-Touch Play 43 Enjoying the TV sound from the speakers connected to the receiver (System Audio Control 44 Turning off the receiver with the TV (System Power Off 45 Using the Power Saving function (Power Save 45 Other Operations Changing the brightness...
... 2: Connecting the speakers 15 3: Connecting the TV 16 4: Connecting the audio/video components 17 5: Connecting the antennas 21 6: Preparing the receiver and the remote..... 21 7: Calibrating the appropriate settings automatically (AUTO CALIBRATION 22 8: Adjusting the speaker levels (TEST TONE 26 Playback Selecting a...touch operation (One-Touch Play 43 Enjoying the TV sound from the speakers connected to the receiver (System Audio Control 44 Turning off the receiver with the TV (System Power Off 45 Using the Power Saving function (Power Save 45 Other Operations Changing the brightness...
Operating Instructions
Page 6
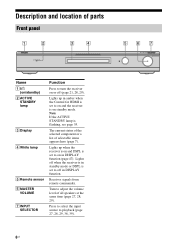
...3 4 567 INPUT SELECTOR MASTER VOLUME Name A ?/1 (on/standby) B ACTIVE STANDBY lamp C Display D White lamp E Remote sensor F MASTER VOLUME G INPUT SELECTOR Function Press to turn the receiver on or off in DISPLAY function. The current status of the selected component or a list of all speakers at the same time (page 27, 28..., 29). Note If the ACTIVE STANDBY lamp is set to on and the receiver is on standby mode. Lights off when the receiver is in standby mode or DSPL is flashing, see page 55. Turn to playback (page 27, 28, 29, 38, 39)....
...3 4 567 INPUT SELECTOR MASTER VOLUME Name A ?/1 (on/standby) B ACTIVE STANDBY lamp C Display D White lamp E Remote sensor F MASTER VOLUME G INPUT SELECTOR Function Press to turn the receiver on or off in DISPLAY function. The current status of the selected component or a list of all speakers at the same time (page 27, 28..., 29). Note If the ACTIVE STANDBY lamp is set to on and the receiver is on standby mode. Lights off when the receiver is in standby mode or DSPL is flashing, see page 55. Turn to playback (page 27, 28, 29, 38, 39)....
Operating Instructions
Page 7
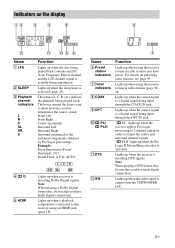
... being reproduced. AUTO D D E HDMI LCR SW SL SR Lights up when the source signal is decoding Dolby Digital signals. Lights up when the receiver applies Pro Logic processing to 2 channel signals in order to tune in radio stations you have made digital connections. " PL" lights up when using ... IN jack. Lights up when the sleep timer is decoding DTS signals. Indicators on presetting radio stations, see page 39. Lights up when the receiver is activated (page 47). The boxes around the letters vary to tune in radio stations (page 38), etc. Note When playing a DTS format...
... being reproduced. AUTO D D E HDMI LCR SW SL SR Lights up when the source signal is decoding Dolby Digital signals. Lights up when the receiver applies Pro Logic processing to 2 channel signals in order to tune in radio stations you have made digital connections. " PL" lights up when using ... IN jack. Lights up when the sleep timer is decoding DTS signals. Indicators on presetting radio stations, see page 39. Lights up when the receiver is activated (page 47). The boxes around the letters vary to tune in radio stations (page 38), etc. Note When playing a DTS format...
Operating Instructions
Page 8
...-ray disc player. The image is output to a TV or a projector while the sound can be output from a TV or/and speakers connected to this receiver (page 18).
...-ray disc player. The image is output to a TV or a projector while the sound can be output from a TV or/and speakers connected to this receiver (page 18).
Operating Instructions
Page 9
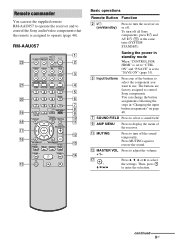
...to display the menu of the buttons to select the component you want to use the supplied remote RM-AAU057 to operate the receiver and to control the Sony audio/video components that the remote is set to "SAVE ON" (page 33). continued 9US Remote commander You can change the...SYSTEM STANDBY VIDEO1 VIDEO2 BD DVD SAT TV SA-CD/CD TUNER BD/DVD TOP MENU MENU F1 F2 JUMP PICTURE WIDE FAVORITES THEATER 123 GUIDE 456 789 CLEAR DISPLAY AMP MENU 0 ENTER TOOLS/ OPTIONS MUTING TV VOL MASTER VOL RETURN/EXIT MENU/HOME TV CH - REPLAY ADVANCE PRESET + .< > < TUNING - To turn the receiver...
...to display the menu of the buttons to select the component you want to use the supplied remote RM-AAU057 to operate the receiver and to control the Sony audio/video components that the remote is set to "SAVE ON" (page 33). continued 9US Remote commander You can change the...SYSTEM STANDBY VIDEO1 VIDEO2 BD DVD SAT TV SA-CD/CD TUNER BD/DVD TOP MENU MENU F1 F2 JUMP PICTURE WIDE FAVORITES THEATER 123 GUIDE 456 789 CLEAR DISPLAY AMP MENU 0 ENTER TOOLS/ OPTIONS MUTING TV VOL MASTER VOL RETURN/EXIT MENU/HOME TV CH - REPLAY ADVANCE PRESET + .< > < TUNING - To turn the receiver...

Operating Instructions
Page 10
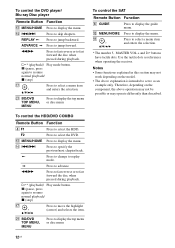
... or fast forward. Press A ?/1 and B TV ?/1/AV ?/1 at the same time to operate. WIDE E THEATER F GUIDE J TOOLS/ OPTIONS To select the wide picture mode. S CLEAR Press to clear a mistake when you... 1 Press one of the input buttons C (TV, BD, DVD, or SAT) to operate (SYSTEM STANDBY). Also, the audio is automatically switched to the audio output of TV. To control the TV... stored favorite channel list of this receiver when you connect a Sony TV which is assigned to select the component you input a wrong character. M MENU/HOME Press to skip the track. T...
... or fast forward. Press A ?/1 and B TV ?/1/AV ?/1 at the same time to operate. WIDE E THEATER F GUIDE J TOOLS/ OPTIONS To select the wide picture mode. S CLEAR Press to clear a mistake when you... 1 Press one of the input buttons C (TV, BD, DVD, or SAT) to operate (SYSTEM STANDBY). Also, the audio is automatically switched to the audio output of TV. To control the TV... stored favorite channel list of this receiver when you connect a Sony TV which is assigned to select the component you input a wrong character. M MENU/HOME Press to skip the track. T...
Operating Instructions
Page 12
...enters the selection. * The number 5, MASTER VOL + and H buttons have tactile dots. m/M Press to fast reverse or to select the DVD. F2 M MENU/HOME N ./> Press to fast forward the disc when pressed during playback. H* (playback)/ Play mode button. X (pause, press again to resume normal playback/ x (stop...selects the item. < < To control the DVD player/ Blu-ray Disc player Remote Button Function M MENU/HOME Press to serve as references when operating the receiver. Notes • Some functions explained in this section may not work depending on the component, the above ...
...enters the selection. * The number 5, MASTER VOL + and H buttons have tactile dots. m/M Press to fast reverse or to select the DVD. F2 M MENU/HOME N ./> Press to fast forward the disc when pressed during playback. H* (playback)/ Play mode button. X (pause, press again to resume normal playback/ x (stop...selects the item. < < To control the DVD player/ Blu-ray Disc player Remote Button Function M MENU/HOME Press to serve as references when operating the receiver. Notes • Some functions explained in this section may not work depending on the component, the above ...

Operating Instructions
Page 13
... two surround speakers) and a subwoofer (5.1 channel). Getting Started Getting Started 1: Installing the speakers This receiver allows you install the speaker and subwoofer, be sure to the operating instructions supplied with the speaker stand. To fully enjoy theater-like multi channel surround sound, be sure to attach the supplied foot pads to prevent... speaker DSurround speaker (left) ESurround speaker (right) F Subwoofer Installing the speakers on the speaker stand For greater flexibility in positioning the speakers, use a 5.1 channel speaker system.
... two surround speakers) and a subwoofer (5.1 channel). Getting Started Getting Started 1: Installing the speakers This receiver allows you install the speaker and subwoofer, be sure to the operating instructions supplied with the speaker stand. To fully enjoy theater-like multi channel surround sound, be sure to attach the supplied foot pads to prevent... speaker DSurround speaker (left) ESurround speaker (right) F Subwoofer Installing the speakers on the speaker stand For greater flexibility in positioning the speakers, use a 5.1 channel speaker system.

Operating Instructions
Page 15
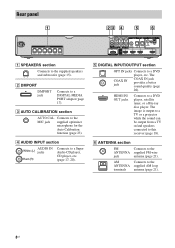
For details on the speaker label. When connecting a speaker cord, be connected. Character on the receiver: Connector Red White Grey Blue Green Purple Speaker jack FRONT R FRONT L SUR R SUR L CENTER SUBWOOFER To connect the speakers correctly Check the speaker type by ...
For details on the speaker label. When connecting a speaker cord, be connected. Character on the receiver: Connector Red White Grey Blue Green Purple Speaker jack FRONT R FRONT L SUR R SUR L CENTER SUBWOOFER To connect the speakers correctly Check the speaker type by ...
Operating Instructions
Page 16
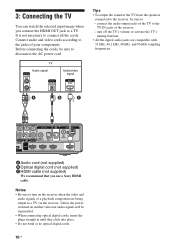
... are being output to a TV. Before connecting the cords, be sure to - 3: Connecting the TV You can watch the selected input image when you use a Sony HDMI cable. Connect audio and video cords according to the TV IN jacks of your components. connect the audio output jacks of the TV to... the jacks of the receiver. - It is turned on the receiver when the video and audio signals of the TV from the speakers connected to the receiver, be sure to connect all the cords. Unless the power is not necessary to disconnect...
... are being output to a TV. Before connecting the cords, be sure to - 3: Connecting the TV You can watch the selected input image when you use a Sony HDMI cable. Connect audio and video cords according to the TV IN jacks of your components. connect the audio output jacks of the TV to... the jacks of the receiver. - It is turned on the receiver when the video and audio signals of the TV from the speakers connected to the receiver, be sure to connect all the cords. Unless the power is not necessary to disconnect...
Operating Instructions
Page 17
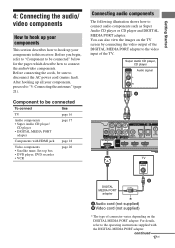
... 20 Connecting audio components The following illustration shows how to disconnect the AC power cord (mains lead). After hooking up your components, proceed to this receiver. Getting Started 4: Connecting the audio/ video components How to hook up your components This section describes how to hook up all your components to "5: Connecting...
... 20 Connecting audio components The following illustration shows how to disconnect the AC power cord (mains lead). After hooking up your components, proceed to this receiver. Getting Started 4: Connecting the audio/ video components How to hook up your components This section describes how to hook up all your components to "5: Connecting...
Operating Instructions
Page 18
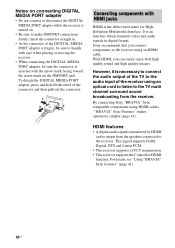
... Do not connect or disconnect the DIGITAL MEDIA PORT adapter while the receiver is turned on. • Be sure to make DMPORT connections firmly, insert the connector straight in digital format. By connecting Sony "BRAVIA" Sync compatible components using an optical cord to listen to the... images. HDMI features • A digital audio signals transmitted by HDMI can easily enjoy both sided of the receiver using HDMI cables, ""BRAVIA" Sync Features" makes operations simpler (page 41). Sony recommends that you can be sure the connector is the abbreviated name for HDMI function.
... Do not connect or disconnect the DIGITAL MEDIA PORT adapter while the receiver is turned on. • Be sure to make DMPORT connections firmly, insert the connector straight in digital format. By connecting Sony "BRAVIA" Sync compatible components using an optical cord to listen to the... images. HDMI features • A digital audio signals transmitted by HDMI can easily enjoy both sided of the receiver using HDMI cables, ""BRAVIA" Sync Features" makes operations simpler (page 41). Sony recommends that you can be sure the connector is the abbreviated name for HDMI function.

Operating Instructions
Page 20
... • To input multi channel digital audio from the DVD player, set the digital audio output setting on the DVD recorder or VCR via this receiver.
... • To input multi channel digital audio from the DVD player, set the digital audio output setting on the DVD recorder or VCR via this receiver.
Operating Instructions
Page 21
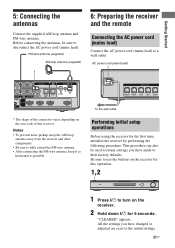
...cord (mains lead) to fully extend the FM wire antenna. • After connecting the FM wire antenna, keep the AM loop antenna away from the receiver and other components. • Be sure to a wall outlet. This procedure can also be sure to disconnect the AC power cord (mains lead). Be... to the initial settings. 21US All the settings you have changed or adjusted are reset to use the buttons on the receiver for the first time, initialize the receiver by performing the following procedure. Before connecting the antennas, be used to return settings you have made to turn on the...
...cord (mains lead) to fully extend the FM wire antenna. • After connecting the FM wire antenna, keep the AM loop antenna away from the receiver and other components. • Be sure to a wall outlet. This procedure can also be sure to disconnect the AC power cord (mains lead). Be... to the initial settings. 21US All the settings you have changed or adjusted are reset to use the buttons on the receiver for the first time, initialize the receiver by performing the following procedure. Before connecting the antennas, be used to return settings you have made to turn on the...

Operating Instructions
Page 22
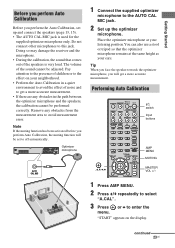
... the buttons again (page 48). • When the remote no longer operates the receiver, replace all the batteries with new ones. 7: Calibrating the appropriate settings automatically (AUTO CALIBRATION) This receiver is equipped with a sampling frequency of each speaker and the receiver. • Adjust the speaker level. • Measure the distance of more than...
... the buttons again (page 48). • When the remote no longer operates the receiver, replace all the batteries with new ones. 7: Calibrating the appropriate settings automatically (AUTO CALIBRATION) This receiver is equipped with a sampling frequency of each speaker and the receiver. • Adjust the speaker level. • Measure the distance of more than...
Operating Instructions
Page 23
... measurement. Performing Auto Calibration TV ?/1 TV INPUT DMPORT AV ?/1 ?/1 SYSTEM STANDBY VIDEO1 VIDEO2 BD DVD SAT TV SA-CD/CD TUNER BD/DVD TOP MENU MENU F1 F2 JUMP PICTURE WIDE FAVORITES THEATER 123 GUIDE 456 SOUND FIELD 789 AMP MENU 0 ENTER CLEAR DISPLAY TOOLS.../ OPTIONS MUTING TV VOL MASTER VOL ,V,v,B,b RETURN/EXIT MENU/HOME ?/1 switch Input buttons AMP MENU MUTING MASTER VOL +/- 1 Press AMP MENU. 2 Press V/v repeatedly to this jack. Doing so may damage the receiver ...
... measurement. Performing Auto Calibration TV ?/1 TV INPUT DMPORT AV ?/1 ?/1 SYSTEM STANDBY VIDEO1 VIDEO2 BD DVD SAT TV SA-CD/CD TUNER BD/DVD TOP MENU MENU F1 F2 JUMP PICTURE WIDE FAVORITES THEATER 123 GUIDE 456 SOUND FIELD 789 AMP MENU 0 ENTER CLEAR DISPLAY TOOLS.../ OPTIONS MUTING TV VOL MASTER VOL ,V,v,B,b RETURN/EXIT MENU/HOME ?/1 switch Input buttons AMP MENU MUTING MASTER VOL +/- 1 Press AMP MENU. 2 Press V/v repeatedly to this jack. Doing so may damage the receiver ...

Operating Instructions
Page 24
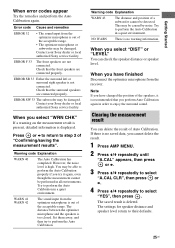
... following during measurement. - Confirming/saving the measurement results 1 Confirm the measurement result. When the measurement ends, a beep sounds and the measurement result appears on the receiver. -
... following during measurement. - Confirming/saving the measurement results 1 Confirm the measurement result. When the measurement ends, a beep sounds and the measurement result appears on the receiver. -
Operating Instructions
Page 25
... Clearing the measurement result You can check the speaker distance or speaker level. Contact your Sony dealer or local authorized Sony service facility. ERROR SR 33 Either the surround left or surround right speaker is too ...to select "A.CAL CLR", then press or b. 4 Press V/v repeatedly to enjoy the surround sound. Contact your Sony dealer or local authorized Sony service facility. When you select "WRN CHK" If a warning on the measurement result is present, detailed information ... WARN 41 WARN 42 The sound input from the receiver. Press or B to return to their defaults. 25US
... Clearing the measurement result You can check the speaker distance or speaker level. Contact your Sony dealer or local authorized Sony service facility. ERROR SR 33 Either the surround left or surround right speaker is too ...to select "A.CAL CLR", then press or b. 4 Press V/v repeatedly to enjoy the surround sound. Contact your Sony dealer or local authorized Sony service facility. When you select "WRN CHK" If a warning on the measurement result is present, detailed information ... WARN 41 WARN 42 The sound input from the receiver. Press or B to return to their defaults. 25US


