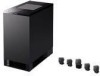
Operating Instructions
Page 4
..., be sure to insert the plug fully into the wall outlet (mains) only one way. If you are unable to disconnect the system from the TV set. The operating voltage is not disconnected from the wall socket immediately in the event of the subwoofer. • If you have been... oil, polish, etc.) as staining or discoloration of the back and bottom rises considerably. On placement • Place the system in a location with adequate ventilation to your nearest Sony dealer. 4US On operation Before connecting other for a long time, be sure to turn it is identical to prevent heat ...
..., be sure to insert the plug fully into the wall outlet (mains) only one way. If you are unable to disconnect the system from the TV set. The operating voltage is not disconnected from the wall socket immediately in the event of the subwoofer. • If you have been... oil, polish, etc.) as staining or discoloration of the back and bottom rises considerably. On placement • Place the system in a location with adequate ventilation to your nearest Sony dealer. 4US On operation Before connecting other for a long time, be sure to turn it is identical to prevent heat ...
Operating Instructions
Page 5
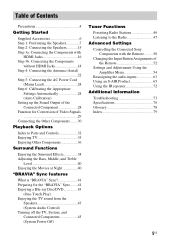
... for the "BRAVIA" Sync........41 Enjoying a Blu-ray Disc/DVD 43 (One-Touch Play) Enjoying the TV sound from the Speakers 43 (System Audio Control) Turning off the TV, System, and Connected Components 45 (System Power Off) Tuner Functions Presetting Radio Stations 46 Listening to the Radio 47 Advanced Settings Controlling the Connected Sony Components with...
... for the "BRAVIA" Sync........41 Enjoying a Blu-ray Disc/DVD 43 (One-Touch Play) Enjoying the TV sound from the Speakers 43 (System Audio Control) Turning off the TV, System, and Connected Components 45 (System Power Off) Tuner Functions Presetting Radio Stations 46 Listening to the Radio 47 Advanced Settings Controlling the Connected Sony Components with...
Operating Instructions
Page 7
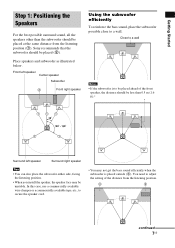
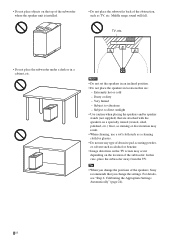
...8226; You may be placed (2). In this case, use a commercially available wire clamper or a commercially available tape, etc., to adjust the setting of the front speaker, the distance should be unstable. Getting Started Step 1: Positioning the Speakers For the best possible surround sound, all the... (1). Place speakers and subwoofer as illustrated below. Close to a wall Notes • If the subwoofer is placed outside (3). Sony recommends that the subwoofer should be less than the subwoofer should be placed at the same distance from the listening position. 3 3 continued ...
...8226; You may be placed (2). In this case, use a commercially available wire clamper or a commercially available tape, etc., to adjust the setting of the front speaker, the distance should be unstable. Getting Started Step 1: Positioning the Speakers For the best possible surround sound, all the... (1). Place speakers and subwoofer as illustrated below. Close to a wall Notes • If the subwoofer is placed outside (3). Sony recommends that the subwoofer should be less than the subwoofer should be placed at the same distance from the listening position. 3 3 continued ...
Operating Instructions
Page 8
.... • Do not place the speakers in a cabinet, etc. Very humid - Subject to vibrations - For details, see "Step 6: Calibrating the Appropriate Settings Automatically" (page 24). 8US In this case, place the subwoofer away from the TV. TV, etc. • Do not place the subwoofer under a ...any type of abrasive pad, scouring powder, or solvent such as TV, etc. Tip • When you change the positions of the speakers, Sony recommends that are attached with the speakers on a specially treated (waxed, oiled, polished, etc.) floor, as staining or discoloration may occur depending ...
.... • Do not place the speakers in a cabinet, etc. Very humid - Subject to vibrations - For details, see "Step 6: Calibrating the Appropriate Settings Automatically" (page 24). 8US In this case, place the subwoofer away from the TV. TV, etc. • Do not place the subwoofer under a ...any type of abrasive pad, scouring powder, or solvent such as TV, etc. Tip • When you change the positions of the speakers, Sony recommends that are attached with the speakers on a specially treated (waxed, oiled, polished, etc.) floor, as staining or discoloration may occur depending ...
Operating Instructions
Page 22
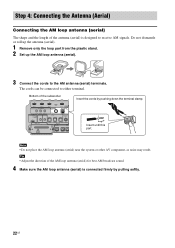
... Insert the cords by pulling softly. 22US Do not dismantle or roll up the antenna (aerial). 1 Remove only the loop part from the plastic stand. 2 Set up the AM loop antenna (aerial). 3 Connect the cords to either terminal. Note • Do not place the AM loop antenna (aerial) near the... system or other AV component, as noise may result. Bottom of the antenna (aerial) is connected firmly by pushing down the terminal clamp. The cords can ...
... Insert the cords by pulling softly. 22US Do not dismantle or roll up the antenna (aerial). 1 Remove only the loop part from the plastic stand. 2 Set up the AM loop antenna (aerial). 3 Connect the cords to either terminal. Note • Do not place the AM loop antenna (aerial) near the... system or other AV component, as noise may result. Bottom of the antenna (aerial) is connected firmly by pushing down the terminal clamp. The cords can ...
Operating Instructions
Page 24
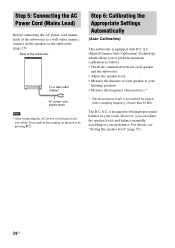
... Cinema Auto Calibration) Technology which allows you can adjust the speaker levels and balance manually according to the subwoofer (page 15). The D.C.A.C. For details, see "Setting the speaker level" (page 57). 24US is designed to obtain proper sound balance in your listening position. • Measure the frequency characteristics.* * The measurement result...
... Cinema Auto Calibration) Technology which allows you can adjust the speaker levels and balance manually according to the subwoofer (page 15). The D.C.A.C. For details, see "Setting the speaker level" (page 57). 24US is designed to obtain proper sound balance in your listening position. • Measure the frequency characteristics.* * The measurement result...

Operating Instructions
Page 25
... measurement. Place the calibration mic at the same height as your listening position. You will turn off automatically. • When you perform the Auto Calibration, set up the calibration mic. continued 25US Do not connect other microphones to the ECM-AC2 jack on the subwoofer.... 2 Set up and connect the speakers (page 15). • The ECM-AC2 jack is used for the calibration mic (supplied) only. Doing so may damage the ...
... measurement. Place the calibration mic at the same height as your listening position. You will turn off automatically. • When you perform the Auto Calibration, set up the calibration mic. continued 25US Do not connect other microphones to the ECM-AC2 jack on the subwoofer.... 2 Set up and connect the speakers (page 15). • The ECM-AC2 jack is used for the calibration mic (supplied) only. Doing so may damage the ...
Operating Instructions
Page 27
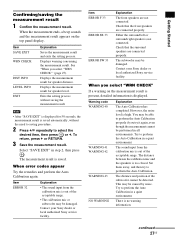
...panel display. Select "SAVE EXIT" in a quiet environment. Check that the surround speakers are connected properly. Contact your Sony dealer or local authorized Sony service facility. You may be performed in a quiet environment. There is saved. The measurement result is no warning information.... However, the noise level is too closed. The distance between the calibration mic and the speakers is high. Exits the setting process...
...panel display. Select "SAVE EXIT" in a quiet environment. Check that the surround speakers are connected properly. Contact your Sony dealer or local authorized Sony service facility. You may be performed in a quiet environment. There is saved. The measurement result is no warning information.... However, the noise level is too closed. The distance between the calibration mic and the speakers is high. Exits the setting process...

Operating Instructions
Page 28
After you have changed the position of the speakers, Sony recommends that the speaker is no saved data, you cannot delete the result. 1 Press AMP MENU. 2 Press x/X repeatedly until "A.CAL MENU" appears, then press or c. 3 ...Press x/X repeatedly to select "A.CAL CLEAR," then press or c. 4 Press x/X to the operating instructions of the connected component. For details on the audio output settings of the connected component, the sound may output in multi channel sound format (PCM, DTS, Dolby Digital). If there is connected. Note • The measurement...
After you have changed the position of the speakers, Sony recommends that the speaker is no saved data, you cannot delete the result. 1 Press AMP MENU. 2 Press x/X repeatedly until "A.CAL MENU" appears, then press or c. 3 ...Press x/X repeatedly to select "A.CAL CLEAR," then press or c. 4 Press x/X to the operating instructions of the connected component. For details on the audio output settings of the connected component, the sound may output in multi channel sound format (PCM, DTS, Dolby Digital). If there is connected. Note • The measurement...
Operating Instructions
Page 29
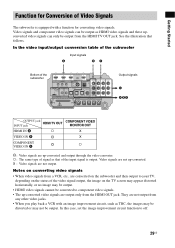
... subwoofer and then output to off. 29US Notes on converting video signals • When video signals from the HDMI TV OUT jack. In this case, set the image improvement circuit function to your TV, depending on the status of Video Signals The subwoofer is output. Getting Started Function for converting video...
... subwoofer and then output to off. 29US Notes on converting video signals • When video signals from the HDMI TV OUT jack. In this case, set the image improvement circuit function to your TV, depending on the status of Video Signals The subwoofer is output. Getting Started Function for converting video...

Operating Instructions
Page 34
...settings. TV CH + PRESET - REPLAY ADVANCE PRESET + .< > < TUNING m TUNING + H M TV X x * The 5, H, and VOL + buttons have a tactile dot. For details, see "Changing the Input Button Assignments of the connected components. Then press to select the sound field (page 38). 34US TV ?/1 THEATER TV INPUT AV ?/1 ?/1 SYSTEM...) Press to "CTRL OFF" (page 41). - "CTRL: HDMI" is set to turn off . G MASTER VOL +/- D NIGHT MODE Press to "STBY OFF" (page 71). Press to control Sony components. See page 50 for the buttons for watching movies at the remote sensor...
...settings. TV CH + PRESET - REPLAY ADVANCE PRESET + .< > < TUNING m TUNING + H M TV X x * The 5, H, and VOL + buttons have a tactile dot. For details, see "Changing the Input Button Assignments of the connected components. Then press to select the sound field (page 38). 34US TV ?/1 THEATER TV INPUT AV ?/1 ?/1 SYSTEM...) Press to "CTRL OFF" (page 41). - "CTRL: HDMI" is set to turn off . G MASTER VOL +/- D NIGHT MODE Press to "STBY OFF" (page 71). Press to control Sony components. See page 50 for the buttons for watching movies at the remote sensor...
Operating Instructions
Page 35
...?/1 THEATER TV INPUT AV ?/1 ?/1 SYSTEM STANDBY TV BD DVD SAT SOUND FIELD VIDEO TUNER/BAND DMPORT BD/DVD TOP MENU MENU F1 F2 JUMP PICTURE WIDE FAVORITE GUIDE 123 TONE 456 NIGHT MODE 789 CLEAR DISPLAY AMP MENU 0 ENTER TOOLS/ OPTIONS MUTING F TV VOL MASTER VOL G g f RETURN/EXIT MENU/HOME TV... case, turn the volume of the TV is displayed on the TV and choose a program. In this setting, see "Changing the Input Button Assignments of the system. Tips • When you connect a Sony TV, the audio input of the TV's speaker down to the operating instructions of the TV. 2 Turn...
...?/1 THEATER TV INPUT AV ?/1 ?/1 SYSTEM STANDBY TV BD DVD SAT SOUND FIELD VIDEO TUNER/BAND DMPORT BD/DVD TOP MENU MENU F1 F2 JUMP PICTURE WIDE FAVORITE GUIDE 123 TONE 456 NIGHT MODE 789 CLEAR DISPLAY AMP MENU 0 ENTER TOOLS/ OPTIONS MUTING F TV VOL MASTER VOL G g f RETURN/EXIT MENU/HOME TV... case, turn the volume of the TV is displayed on the TV and choose a program. In this setting, see "Changing the Input Button Assignments of the system. Tips • When you connect a Sony TV, the audio input of the TV's speaker down to the operating instructions of the TV. 2 Turn...
Operating Instructions
Page 36
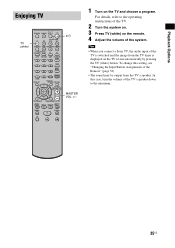
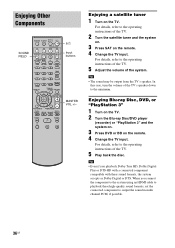
.... 3 Press DVD or BD on the remote. 4 Change the TV input. Enjoying Other Components SOUND FIELD TV ?/1 THEATER TV INPUT AV ?/1 ?/1 SYSTEM STANDBY TV BD DVD SAT SOUND FIELD VIDEO TUNER/BAND DMPORT BD/DVD TOP MENU MENU F1 F2 JUMP PICTURE WIDE FAVORITE ...TV VOL MASTER VOL G g f RETURN/EXIT MENU/HOME TV CH - When you playback Dolby True HD, Dolby Digital Plus or DTS-HD with a connected component compatible with these high-quality sound formats, set the connected component to playback these sound formats, the system accepts as Dolby Digital or DTS. Enjoying a satellite ...
.... 3 Press DVD or BD on the remote. 4 Change the TV input. Enjoying Other Components SOUND FIELD TV ?/1 THEATER TV INPUT AV ?/1 ?/1 SYSTEM STANDBY TV BD DVD SAT SOUND FIELD VIDEO TUNER/BAND DMPORT BD/DVD TOP MENU MENU F1 F2 JUMP PICTURE WIDE FAVORITE ...TV VOL MASTER VOL G g f RETURN/EXIT MENU/HOME TV CH - When you playback Dolby True HD, Dolby Digital Plus or DTS-HD with a connected component compatible with these high-quality sound formats, set the connected component to playback these sound formats, the system accepts as Dolby Digital or DTS. Enjoying a satellite ...
Operating Instructions
Page 41
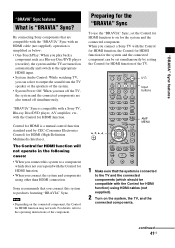
...BRAVIA" Sync. C, X, x, c, TV ?/1 THEATER TV INPUT AV ?/1 ?/1 SYSTEM STANDBY TV BD DVD SAT SOUND FIELD VIDEO TUNER/BAND DMPORT BD/DVD TOP MENU MENU F1 F2 JUMP PICTURE WIDE FAVORITE GUIDE 123 TONE 456 NIGHT MODE 789 CLEAR DISPLAY AMP MENU 0 ENTER TOOLS/ OPTIONS MUTING F TV VOL MASTER VOL G g f RETURN/EXIT MENU/HOME...you connect a Sony TV with the Control for HDMI function, the Control for HDMI function for the system and the connected component can select to a component which should be set simultaneously by CEC (Consumer Electronics Control) for the system and the ...
...BRAVIA" Sync. C, X, x, c, TV ?/1 THEATER TV INPUT AV ?/1 ?/1 SYSTEM STANDBY TV BD DVD SAT SOUND FIELD VIDEO TUNER/BAND DMPORT BD/DVD TOP MENU MENU F1 F2 JUMP PICTURE WIDE FAVORITE GUIDE 123 TONE 456 NIGHT MODE 789 CLEAR DISPLAY AMP MENU 0 ENTER TOOLS/ OPTIONS MUTING F TV VOL MASTER VOL G g f RETURN/EXIT MENU/HOME...you connect a Sony TV with the Control for HDMI function, the Control for HDMI function for the system and the connected component can select to a component which should be set simultaneously by CEC (Consumer Electronics Control) for the system and the ...
Operating Instructions
Page 42
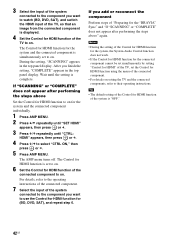
... you add or reconnect the component Perform steps of "Preparing for the "BRAVIA" Sync" and "If "SCANNING" or "COMPLETE" does not appear after performing the steps above " again. 3 Select the input of the system connected to the component you finish the setting, "COMPLETE" appears in the top panel display. After you want to...
... you add or reconnect the component Perform steps of "Preparing for the "BRAVIA" Sync" and "If "SCANNING" or "COMPLETE" does not appear after performing the steps above " again. 3 Select the input of the system connected to the component you finish the setting, "COMPLETE" appears in the top panel display. After you want to...

Operating Instructions
Page 44
Using the input buttons of the system. When you connect a Sony TV, you set the maximum volume level to a little lower than the volume you usually listen to the system speaker automatically, loud sound may be output depending on the volume level of the remote The input buttons (TV (...TV is active, and the output method changes from the system speaker to limit the maximum volume level, select "MAX." Tip • You can control connected Sony components by pressing the input buttons. Tips • Sony recommends that you set , the VOLUME +/- Notes • This function is...
Using the input buttons of the system. When you connect a Sony TV, you set the maximum volume level to a little lower than the volume you usually listen to the system speaker automatically, loud sound may be output depending on the volume level of the remote The input buttons (TV (...TV is active, and the output method changes from the system speaker to limit the maximum volume level, select "MAX." Tip • You can control connected Sony components by pressing the input buttons. Tips • Sony recommends that you set , the VOLUME +/- Notes • This function is...

Operating Instructions
Page 46
... TV ?/1 THEATER TV INPUT AV ?/1 ?/1 SYSTEM STANDBY TV BD DVD SAT SOUND FIELD VIDEO TUNER/BAND DMPORT BD/DVD TOP MENU MENU F1 F2 JUMP PICTURE WIDE FAVORITE GUIDE 123 TONE 456 NIGHT MODE 789 CLEAR DISPLAY AMP MENU 0 ENTER TOOLS/ OPTIONS MUTING F TV VOL MASTER VOL G g TUNER/ BAND f RETURN/EXIT MENU/HOME TV...appears in the top panel display. 2 Press MENU. 3 Press X/x repeatedly until the auto scanning starts. Tuner Functions Presetting Radio Stations You can be set to either 10 kHz or 9 kHz. 1 Press TUNER/BAND repeatedly until "AM" appears in the top panel display.
... TV ?/1 THEATER TV INPUT AV ?/1 ?/1 SYSTEM STANDBY TV BD DVD SAT SOUND FIELD VIDEO TUNER/BAND DMPORT BD/DVD TOP MENU MENU F1 F2 JUMP PICTURE WIDE FAVORITE GUIDE 123 TONE 456 NIGHT MODE 789 CLEAR DISPLAY AMP MENU 0 ENTER TOOLS/ OPTIONS MUTING F TV VOL MASTER VOL G g TUNER/ BAND f RETURN/EXIT MENU/HOME TV...appears in the top panel display. 2 Press MENU. 3 Press X/x repeatedly until the auto scanning starts. Tuner Functions Presetting Radio Stations You can be set to either 10 kHz or 9 kHz. 1 Press TUNER/BAND repeatedly until "AM" appears in the top panel display.

Operating Instructions
Page 48
... C/c repeatedly until "FM Mode?" repeatedly. appears in the top panel display when a station is stored. 8 Press MENU. 48US The default setting is noisy, you want to the next position. Tip • To improve reception, reorient the supplied antennas (aerials). Note that no stereo ...station. 1 Press TUNER/BAND. "Complete!" To stop the automatic tuning manually, press TUNING + or -. The automatic tuning stops automatically when the system receives a radio station. You can select monaural reception. To listen to be erased flashes, then press CLEAR. 7 Press . repeatedly to select...
... C/c repeatedly until "FM Mode?" repeatedly. appears in the top panel display when a station is stored. 8 Press MENU. 48US The default setting is noisy, you want to the next position. Tip • To improve reception, reorient the supplied antennas (aerials). Note that no stereo ...station. 1 Press TUNER/BAND. "Complete!" To stop the automatic tuning manually, press TUNING + or -. The automatic tuning stops automatically when the system receives a radio station. You can select monaural reception. To listen to be erased flashes, then press CLEAR. 7 Press . repeatedly to select...

Operating Instructions
Page 49
Viewing the station name or frequency in the top panel display by pressing DISPLAY repeatedly (page 49). Press DISPLAY. Tuner Functions Tip • You can check the frequency using the top panel display. Each time you press DISPLAY, the top panel display changes as shown. 1 Station name* 2 Frequency** * This is set to the original display when several seconds have entered a name for a preset station. ** Returns to "FM" or "AM," you can check the frequency in the top panel display When the system is displayed if you have elapsed. 49US
Viewing the station name or frequency in the top panel display by pressing DISPLAY repeatedly (page 49). Press DISPLAY. Tuner Functions Tip • You can check the frequency using the top panel display. Each time you press DISPLAY, the top panel display changes as shown. 1 Station name* 2 Frequency** * This is set to the original display when several seconds have entered a name for a preset station. ** Returns to "FM" or "AM," you can check the frequency in the top panel display When the system is displayed if you have elapsed. 49US
Operating Instructions
Page 50
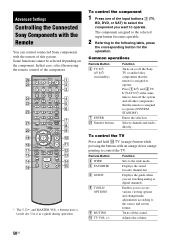
...you want to operate. Remote Button 4 WIDE 5 FAVORITE 6 GUIDE 8 TOOLS/ OPTIONS 9 MUTING q; Advanced Settings Controlling the Connected Sony Components with the Remote You can control connected Sony components with an orange dot or orange printing to control the TV. Press 1 ?/1 and 2 TV ?/1/AV...THEATER TV INPUT AV ?/1 ?/1 SYSTEM STANDBY TV BD DVD SAT SOUND FIELD VIDEO TUNER/BAND DMPORT BD/DVD TOP MENU MENU F1 F2 JUMP PICTURE WIDE FAVORITE GUIDE 123 TONE 456 NIGHT MODE 789 CLEAR DISPLAY AMP MENU 0 ENTER TOOLS/ OPTIONS MUTING F TV VOL MASTER VOL G g f RETURN/EXIT MENU/HOME...
...you want to operate. Remote Button 4 WIDE 5 FAVORITE 6 GUIDE 8 TOOLS/ OPTIONS 9 MUTING q; Advanced Settings Controlling the Connected Sony Components with the Remote You can control connected Sony components with an orange dot or orange printing to control the TV. Press 1 ?/1 and 2 TV ?/1/AV...THEATER TV INPUT AV ?/1 ?/1 SYSTEM STANDBY TV BD DVD SAT SOUND FIELD VIDEO TUNER/BAND DMPORT BD/DVD TOP MENU MENU F1 F2 JUMP PICTURE WIDE FAVORITE GUIDE 123 TONE 456 NIGHT MODE 789 CLEAR DISPLAY AMP MENU 0 ENTER TOOLS/ OPTIONS MUTING F TV VOL MASTER VOL G g f RETURN/EXIT MENU/HOME...


