
Child Safety: It Makes A Difference Where Your TV Stands
Page 1
Many homes, in your home. As a result, TV sets may fall over . 7 Share our safety message on this hidden hazard of the home with your furniture to the wall (but never screw anything directly into the TV). 3 Carefully read and understand the manufacturer's instructions ... and their families about television safety. The home theater entertainment experience is large enough to support the weight of your television (and other electronic components). 2 Use appropriate angle braces, straps and anchors to climb on or play with furniture and television sets. 5 Avoid placing any items on top ...
Many homes, in your home. As a result, TV sets may fall over . 7 Share our safety message on this hidden hazard of the home with your furniture to the wall (but never screw anything directly into the TV). 3 Carefully read and understand the manufacturer's instructions ... and their families about television safety. The home theater entertainment experience is large enough to support the weight of your television (and other electronic components). 2 Use appropriate angle braces, straps and anchors to climb on or play with furniture and television sets. 5 Avoid placing any items on top ...
Operating Instructions
Page 5
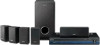
... the appropriate settings automatically (AUTO CALIBRATION 25 7: Adjusting the speaker levels and balance (TEST TONE 30 Playback Selecting a component 31 Listening/Watching a component 32 Amplifier ...Operations Navigating through menus 34 Adjusting the level (LEVEL menu 38 Adjusting the tone (TONE menu 39 Settings for the surround sound (SUR menu 39 Settings for the tuner (TUNER menu) ........ 40 Settings for the audio (AUDIO menu)........ 40 Settings for the video (VIDEO menu) ........ 41 Settings for the system (SYSTEM...
... the appropriate settings automatically (AUTO CALIBRATION 25 7: Adjusting the speaker levels and balance (TEST TONE 30 Playback Selecting a component 31 Listening/Watching a component 32 Amplifier ...Operations Navigating through menus 34 Adjusting the level (LEVEL menu 38 Adjusting the tone (TONE menu 39 Settings for the surround sound (SUR menu 39 Settings for the tuner (TUNER menu) ........ 40 Settings for the audio (AUDIO menu)........ 40 Settings for the video (VIDEO menu) ........ 41 Settings for the system (SYSTEM...

Operating Instructions
Page 7
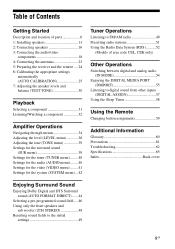
...when using the receiver to this receiver using the receiver to output the center and surround channel signals. Note "RDS" lights up when the disc being played back contains an LFE (Low Frequency Effect) channel and the LFE channel signal is actually being input through the COAX IN jack..., or when IN MODE is connected to tune in radio stations (page 49), etc. "; "; DIGITAL Lights up when a playback component is set to "AUTO IN" and the source signal is a digital signal being played back. E HDMI Lights up when receiver is activated. PLII" lights up ...
...when using the receiver to this receiver using the receiver to output the center and surround channel signals. Note "RDS" lights up when the disc being played back contains an LFE (Low Frequency Effect) channel and the LFE channel signal is actually being input through the COAX IN jack..., or when IN MODE is connected to tune in radio stations (page 49), etc. "; "; DIGITAL Lights up when a playback component is set to "AUTO IN" and the source signal is a digital signal being played back. E HDMI Lights up when receiver is activated. PLII" lights up ...
Operating Instructions
Page 12
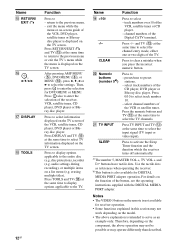
... MEDIA PORT adapter operation. For details on a list menu (e.g. Then, press to select TV information displayed on the TV screen. audio settings during recording), or multiple items on the function of the button, see the operating instructions supplied with the DIGITAL MEDIA PORT adapter. Press...select the channel entry mode, either one or two digits of the VCR, DVD player, satellite tuner or Blu-ray disc player is intended to select information displayed on the component, the above explanation is displayed on the model. • The above operation may not be possible or ...
... MEDIA PORT adapter operation. For details on a list menu (e.g. Then, press to select TV information displayed on the TV screen. audio settings during recording), or multiple items on the function of the button, see the operating instructions supplied with the DIGITAL MEDIA PORT adapter. Press...select the channel entry mode, either one or two digits of the VCR, DVD player, satellite tuner or Blu-ray disc player is intended to select information displayed on the component, the above explanation is displayed on the model. • The above operation may not be possible or ...

Operating Instructions
Page 18
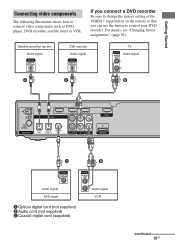
... player/ CD player page 18 Video components • DVD player/DVD recorder • Blu-ray disc player • Satellite tuner/Set-top box • VCR • TV page 19 Components with HDMI jack page 21 Connecting audio components The following illustration shows how to connect the audio/video components. After hooking up your components, proceed to "4: Connecting the antennas...
... player/ CD player page 18 Video components • DVD player/DVD recorder • Blu-ray disc player • Satellite tuner/Set-top box • VCR • TV page 19 Components with HDMI jack page 21 Connecting audio components The following illustration shows how to connect the audio/video components. After hooking up your components, proceed to "4: Connecting the antennas...
Operating Instructions
Page 19
For details, see "Changing button assignments" (page 59). Getting Started Connecting video components The following illustration shows how to control your DVD recorder. If you connect a DVD recorder Be sure to change the factory setting of the VIDEO 1 input button on the remote so that you can use the ...button to connect video components such as DVD player, DVD recorder, satellite tuner or VCR. Satellite tuner/Set-top box Audio signal DVD recorder Audio signal TV Audio signal A A B AM SAT IN DVD IN VIDEO 2/BD...
For details, see "Changing button assignments" (page 59). Getting Started Connecting video components The following illustration shows how to control your DVD recorder. If you connect a DVD recorder Be sure to change the factory setting of the VIDEO 1 input button on the remote so that you can use the ...button to connect video components such as DVD player, DVD recorder, satellite tuner or VCR. Satellite tuner/Set-top box Audio signal DVD recorder Audio signal TV Audio signal A A B AM SAT IN DVD IN VIDEO 2/BD...

Operating Instructions
Page 20
... DVD recorder or VCR via this receiver. Notes • You cannot do recording on the receiver. To output sound from the DVD player, set the digital audio output setting on the DVD player. Tip All the digital audio jacks are compatible with the DVD recorder or VCR. • To input multi channel...
... DVD recorder or VCR via this receiver. Notes • You cannot do recording on the receiver. To output sound from the DVD player, set the digital audio output setting on the DVD player. Tip All the digital audio jacks are compatible with the DVD recorder or VCR. • To input multi channel...

Operating Instructions
Page 22
...multi channel software, set "AUDIO" to "TV+AMP" in the VIDEO menu (page 41). Check the setup of the connected component if the image is not output from any other audio jacks. • Video signals input to the HDMI IN jack can use the button to control your Blu-ray disc player. It ...TV via the HDMI cable. • Sound may be suppressed by Sony). • An audio signal input to the HDMI IN jack is not compatible with the connected component. 22GB If you connect a Blu-ray disc player Be sure to change the factory setting of the VIDEO 2 input button on the remote so that you ...
...multi channel software, set "AUDIO" to "TV+AMP" in the VIDEO menu (page 41). Check the setup of the connected component if the image is not output from any other audio jacks. • Video signals input to the HDMI IN jack can use the button to control your Blu-ray disc player. It ...TV via the HDMI cable. • Sound may be suppressed by Sony). • An audio signal input to the HDMI IN jack is not compatible with the connected component. 22GB If you connect a Blu-ray disc player Be sure to change the factory setting of the VIDEO 2 input button on the remote so that you ...

Operating Instructions
Page 24
..."VOL MIN". • Input is set to their factory defaults. 5: Preparing the receiver and the remote Connecting the AC power cord Connect the AC power cord to their factory settings. • All settings in the LEVEL, TONE, SUR, TUNER, AUDIO, VIDEO, SYSTEM and A. The following procedure. This ...procedure can also be used to return settings you have made to a wall outlet. AC power cord Performing...
..."VOL MIN". • Input is set to their factory defaults. 5: Preparing the receiver and the remote Connecting the AC power cord Connect the AC power cord to their factory settings. • All settings in the LEVEL, TONE, SUR, TUNER, AUDIO, VIDEO, SYSTEM and A. The following procedure. This ...procedure can also be used to return settings you have made to a wall outlet. AC power cord Performing...
Operating Instructions
Page 25
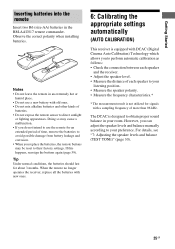
...batteries, the remote buttons may cause a malfunction. • If you can adjust the speaker levels and balance manually according to their factory settings. If this happens, reassign the buttons again (page 59). For details, see "7: Adjusting the speaker levels and balance (TEST TONE)" ...more than 96 kHz. When the remote no longer operates the receiver, replace all the batteries with new ones. 6: Calibrating the appropriate settings automatically (AUTO CALIBRATION) This receiver is not utilized for about 3 months. Tip Under normal conditions, the batteries should last for signals...
...batteries, the remote buttons may cause a malfunction. • If you can adjust the speaker levels and balance manually according to their factory settings. If this happens, reassign the buttons again (page 59). For details, see "7: Adjusting the speaker levels and balance (TEST TONE)" ...more than 96 kHz. When the remote no longer operates the receiver, replace all the batteries with new ones. 6: Calibrating the appropriate settings automatically (AUTO CALIBRATION) This receiver is not utilized for about 3 months. Tip Under normal conditions, the batteries should last for signals...
Operating Instructions
Page 26
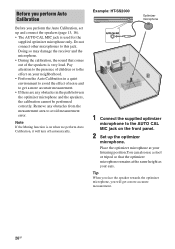
...the AUTO CAL MIC jack on the front panel. 2 Set up and connect the speakers (page 13, 16). • The AUTO CAL MIC jack is very loud. Note If the Muting function is on your ears. Example: HT-SS2000 PRESET TUNING SOUND FIELD MASTER VOLUME MUTING AUTO CAL MIC ... Calibration, it will get a more accurate measurement. 26GB Tip When you face the speaker towards the optimizer microphone, you perform the Auto Calibration, set up the optimizer microphone. Remove any obstacles from the measurement area to get a more accurate measurement. • If there are any obstacles in...
...the AUTO CAL MIC jack on the front panel. 2 Set up and connect the speakers (page 13, 16). • The AUTO CAL MIC jack is very loud. Note If the Muting function is on your ears. Example: HT-SS2000 PRESET TUNING SOUND FIELD MASTER VOLUME MUTING AUTO CAL MIC ... Calibration, it will get a more accurate measurement. 26GB Tip When you face the speaker towards the optimizer microphone, you perform the Auto Calibration, set up the optimizer microphone. Remove any obstacles from the measurement area to get a more accurate measurement. • If there are any obstacles in...

Operating Instructions
Page 27
... measurement ends, a beep sounds and the measurement result appears on the receiver. - You can also select "A.CAL YES" in the SYSTEM menu (page 36). WOOFER Note You cannot measure the speaker height of the surround speakers. Stand some distance from the speakers during the... SAVE When the measurement process fails ERROR XXXX Explanation Proceed to get a more accurate measurement. See "When error codes appear" (page 28). Set this value using "SUR POS." Change the volume level. - Tip When Auto Calibration starts: - Confirming/saving the measurement results 1 Confirm the...
... measurement ends, a beep sounds and the measurement result appears on the receiver. - You can also select "A.CAL YES" in the SYSTEM menu (page 36). WOOFER Note You cannot measure the speaker height of the surround speakers. Stand some distance from the speakers during the... SAVE When the measurement process fails ERROR XXXX Explanation Proceed to get a more accurate measurement. See "When error codes appear" (page 28). Set this value using "SUR POS." Change the volume level. - Tip When Auto Calibration starts: - Confirming/saving the measurement results 1 Confirm the...

Operating Instructions
Page 28
LEVEL Displays the measurement result for speaker distance. EXIT Exits the setting process without saving the measurement results. 3 Save the measurement result. Error code Cause and remedies ERROR 32 ERROR F 33 None of phase). ERROR..." above. 4 Press to allow proper measurement. 28GB DISTANCE Displays the measurement result for speaker level. SAVE Saves the measurement results and exits the setting process. The measurement results are connected or only one front speaker is connected. • The optimizer microphone is connected properly but the error code ...
LEVEL Displays the measurement result for speaker distance. EXIT Exits the setting process without saving the measurement results. 3 Save the measurement result. Error code Cause and remedies ERROR 32 ERROR F 33 None of phase). ERROR..." above. 4 Press to allow proper measurement. 28GB DISTANCE Displays the measurement result for speaker level. SAVE Saves the measurement results and exits the setting process. The measurement results are connected or only one front speaker is connected. • The optimizer microphone is connected properly but the error code ...

Operating Instructions
Page 29
... parameters You can continue to load the saved Auto Calibration result. * You can select this case, you have performed the Auto Calibration and saved the settings. 29GB However, there will be caused by noise. This may be detected. A. CAL" in phase. For details on the position of each speaker (in a quiet... of the speakers' specifications. The speaker is no problems even if you have finished Disconnect the optimizer microphone from the receiver. CAL menu to make settings for polarity may vary.
... parameters You can continue to load the saved Auto Calibration result. * You can select this case, you have performed the Auto Calibration and saved the settings. 29GB However, there will be caused by noise. This may be detected. A. CAL" in phase. For details on the position of each speaker (in a quiet... of the speakers' specifications. The speaker is no problems even if you have finished Disconnect the optimizer microphone from the receiver. CAL menu to make settings for polarity may vary.
Operating Instructions
Page 31
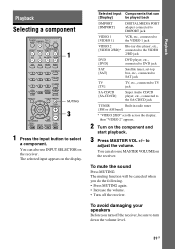
... 1] VCR, etc., connected to the VIDEO 1 jack VIDEO 2 Blu-ray disc player, etc., [VIDEO 2/BD]* connected to the VIDEO 2/BD jack DVD [DVD] DVD player, etc., connected to DVD jack SAT [SAT] Satellite tuner, set-top box, etc., connected to SAT jack TV [TV] TV,... CH + PRESET - Selected input Components that can also use MASTER VOLUME on the component and start playback. 3 Press MASTER VOL +/- You can also use INPUT SELECTOR on the display. Playback 3 Playback Selecting a component TV INPUT TV ?/1 SLEEP DMPORT AV ?/1 ?/1 SYSTEM STANDBY VIDEO 1 VIDEO 2 VIDEO ...
... 1] VCR, etc., connected to the VIDEO 1 jack VIDEO 2 Blu-ray disc player, etc., [VIDEO 2/BD]* connected to the VIDEO 2/BD jack DVD [DVD] DVD player, etc., connected to DVD jack SAT [SAT] Satellite tuner, set-top box, etc., connected to SAT jack TV [TV] TV,... CH + PRESET - Selected input Components that can also use MASTER VOLUME on the component and start playback. 3 Press MASTER VOL +/- You can also use INPUT SELECTOR on the display. Playback 3 Playback Selecting a component TV INPUT TV ?/1 SLEEP DMPORT AV ?/1 ?/1 SYSTEM STANDBY VIDEO 1 VIDEO 2 VIDEO ...

Operating Instructions
Page 33
... player via a digital connection. - You can select the sound field to the TV. 5 Set up properly. If no image is displayed on the TV screen, make sure that an image ... sound. - REPLAY ADVANCE PRESET + .< > < TUNING - Be sure the digital audio output of the disc to be played, if necessary. • You can also use INPUT SELECTOR on the receiver. 3 Press ... audio format of the DVD player is displayed. Playback Watching a DVD TV INPUT TV ?/1 SLEEP DMPORT AV ?/1 ?/1 SYSTEM STANDBY VIDEO 1 VIDEO 2 VIDEO 3 DVD SAT TV SA-CD/CD TUNER 2CH A.F.D. MOVIE MUSIC AMP MENU 123 AUTO...
... player via a digital connection. - You can select the sound field to the TV. 5 Set up properly. If no image is displayed on the TV screen, make sure that an image ... sound. - REPLAY ADVANCE PRESET + .< > < TUNING - Be sure the digital audio output of the disc to be played, if necessary. • You can also use INPUT SELECTOR on the receiver. 3 Press ... audio format of the DVD player is displayed. Playback Watching a DVD TV INPUT TV ?/1 SLEEP DMPORT AV ?/1 ?/1 SYSTEM STANDBY VIDEO 1 VIDEO 2 VIDEO 3 DVD SAT TV SA-CD/CD TUNER 2CH A.F.D. MOVIE MUSIC AMP MENU 123 AUTO...

Operating Instructions
Page 34
...either unavailable or fixed and unchangeable. 34GB "1-LEVEL" appears on the display. MOVIE MUSIC AMP MENU 123 1 AUTO CAL 456 7 >10/ - The setting is entered automatically. Amplifier Operations Navigating through menus By using the amplifier menus, you want . Note Some parameters and... settings may appear dimmed on the display. 2 Press V/v repeatedly to select the menu you can make various adjustments to customize the receiver. 2CH ...
...either unavailable or fixed and unchangeable. 34GB "1-LEVEL" appears on the display. MOVIE MUSIC AMP MENU 123 1 AUTO CAL 456 7 >10/ - The setting is entered automatically. Amplifier Operations Navigating through menus By using the amplifier menus, you want . Note Some parameters and... settings may appear dimmed on the display. 2 Press V/v repeatedly to select the menu you can make various adjustments to customize the receiver. 2CH ...

Operating Instructions
Page 35
... SW +10 dB (1 dB step) SW 0 dB COMP. MAX COMP. OFF, COMP. MAX EFCT. SELCT] Effect levela)b) [EFFECT] FM station receiving modea) [FM MODE] Settings Initial setting T. Amplifier Operations Overview of the menus The following options are available in each menu. TONE] Front speaker balancea) [FRT BAL] Center speaker level [CNT LVL...
... SW +10 dB (1 dB step) SW 0 dB COMP. MAX COMP. OFF, COMP. MAX EFCT. SELCT] Effect levela)b) [EFFECT] FM station receiving modea) [FM MODE] Settings Initial setting T. Amplifier Operations Overview of the menus The following options are available in each menu. TONE] Front speaker balancea) [FRT BAL] Center speaker level [CNT LVL...

Operating Instructions
Page 36
... 1.0 m to DIST. 22 ft.) (0.1 m (1 ft.) step) BEHD/HI, BEHD/LO, SIDE/HI, SIDE/LO 0% dim, 40% dim, 70% dim Initial setting DEC. to DIST. 22 ft.) (0.1 m (1 ft.) step) Surround left speaker distancea)d)f) DIST. 1.0 m to A.V.SYNC. 20 outputa) [A.V. PCM for : VIDEO ...to DIST. 7.0 m (DIST. 3 ft. ASSIGN] Switching the audio input modea) [IN MODE] For details, see page 57 [D. PCM VIDEO [6-VIDEO] (page 41) SYSTEM [7-SYSTEM] (page 42) Digital broadcast language selectiona) [DUAL] DUAL M/S, DUAL M, DUAL S, DUAL M+S Synchronizes audio with video A.V.SYNC. 0 to DIST. 7.0 m [FL DIST.]...
... 1.0 m to DIST. 22 ft.) (0.1 m (1 ft.) step) BEHD/HI, BEHD/LO, SIDE/HI, SIDE/LO 0% dim, 40% dim, 70% dim Initial setting DEC. to DIST. 22 ft.) (0.1 m (1 ft.) step) Surround left speaker distancea)d)f) DIST. 1.0 m to A.V.SYNC. 20 outputa) [A.V. PCM for : VIDEO ...to DIST. 7.0 m (DIST. 3 ft. ASSIGN] Switching the audio input modea) [IN MODE] For details, see page 57 [D. PCM VIDEO [6-VIDEO] (page 41) SYSTEM [7-SYSTEM] (page 42) Digital broadcast language selectiona) [DUAL] DUAL M/S, DUAL M, DUAL S, DUAL M+S Synchronizes audio with video A.V.SYNC. 0 to DIST. 7.0 m [FL DIST.]...

Operating Instructions
Page 37
... to confirm the selection. Amplifier Operations 37GB CAL menu to the page in the display. mode. e)After you can adjust the setting in A. and for 2CH STEREO and A.F.D. d)When you select this parameter, the "HDMI" indicator flashes in the parentheses. Menu [Display] A. CAL... CAL] Calibration loada)d) [CAL LOAD] Settings A.CAL YES, A.CAL NO LOAD NO, LOAD YES Initial setting A.CAL NO LOAD YES a)For details, refer to "LOAD YES", the setting is "ft." c)When you set "CAL LOAD" in 0.01 meter (1 inch) increment. f) The default setting for models of other area code is ...
... to confirm the selection. Amplifier Operations 37GB CAL menu to the page in the display. mode. e)After you can adjust the setting in A. and for 2CH STEREO and A.F.D. d)When you select this parameter, the "HDMI" indicator flashes in the parentheses. Menu [Display] A. CAL... CAL] Calibration loada)d) [CAL LOAD] Settings A.CAL YES, A.CAL NO LOAD NO, LOAD YES Initial setting A.CAL NO LOAD YES a)For details, refer to "LOAD YES", the setting is "ft." c)When you set "CAL LOAD" in 0.01 meter (1 inch) increment. f) The default setting for models of other area code is ...


