
Limited Warranty (US Only)
Page 1
... 4-557-172-02 General Stereo/Hifi Components/Tape Decks ® CD Players/Mini Disc Players/Audio Systems Hifi Audio LIMITED WARRANTY Sony Electronics Inc. ("Sony") warrants this Product is ...repair or replace the Product, at its original packaging or packaging affording an equal degree of sale or receipted invoice which vary from the date of purchase, if this Product (including any part of a service problem, or for product information or operation, call : 1-800-488-SONY (7669) Printed in Japan This warranty does not cover customer instruction, installation, set up adjustments...
... 4-557-172-02 General Stereo/Hifi Components/Tape Decks ® CD Players/Mini Disc Players/Audio Systems Hifi Audio LIMITED WARRANTY Sony Electronics Inc. ("Sony") warrants this Product is ...repair or replace the Product, at its original packaging or packaging affording an equal degree of sale or receipted invoice which vary from the date of purchase, if this Product (including any part of a service problem, or for product information or operation, call : 1-800-488-SONY (7669) Printed in Japan This warranty does not cover customer instruction, installation, set up adjustments...

Operating Instructions
Page 4
... (AUTO CALIBRATION 21 7: Adjusting the speaker levels and balance (TEST TONE 25 Enjoying Surround Sound Enjoying Dolby Digital and DTS Surround sound (AUTO FORMAT DIRECT)....... 38 Selecting a pre-programmed sound field .... 40 Using only the front speakers and sub woofer (2CH STEREO 43 Resetting sound fields to the initial settings 43 Tuner Operations Listening to FM/AM radio 44 Presetting radio stations 46 Playback Selecting a component 26 Listening/Watching a component 27 Amplifier Operations Navigating through menus 29 Adjusting the level (LEVEL menu 32 Adjusting the tone (TONE...
... (AUTO CALIBRATION 21 7: Adjusting the speaker levels and balance (TEST TONE 25 Enjoying Surround Sound Enjoying Dolby Digital and DTS Surround sound (AUTO FORMAT DIRECT)....... 38 Selecting a pre-programmed sound field .... 40 Using only the front speakers and sub woofer (2CH STEREO 43 Resetting sound fields to the initial settings 43 Tuner Operations Listening to FM/AM radio 44 Presetting radio stations 46 Playback Selecting a component 26 Listening/Watching a component 27 Amplifier Operations Navigating through menus 29 Adjusting the level (LEVEL menu 32 Adjusting the tone (TONE...
Operating Instructions
Page 6
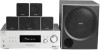
... DTS signals. Lights up when audio signal is activated. Lights up when using the receiver to show how the receiver downmixes the source sound. Name H Tuner Indicators I Preset station indicators J D.RANGE K COAX L Playback channel indicators L R C SL SR S Function Lights up when a memory function, such as Preset Memory (page 46), etc., is output from the SUB WOOFER jack. AUTO SW LCR SL SR 6US However, "UNLOCK" appears on the display if no digital signal is input through the OPTICAL jack. However, "UNLOCK...
... DTS signals. Lights up when audio signal is activated. Lights up when using the receiver to show how the receiver downmixes the source sound. Name H Tuner Indicators I Preset station indicators J D.RANGE K COAX L Playback channel indicators L R C SL SR S Function Lights up when a memory function, such as Preset Memory (page 46), etc., is output from the SUB WOOFER jack. AUTO SW LCR SL SR 6US However, "UNLOCK" appears on the display if no digital signal is input through the OPTICAL jack. However, "UNLOCK...
Operating Instructions
Page 7
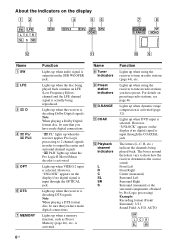
... (L) jacks Red (R) Connects to the FM wire antenna supplied with this receiver (page 19). The COAXIAL jack provides a better COAXIAL IN quality of loud jack sound (page 17). B ANTENNA section FM ANTENNA jack AM ANTENNA terminals Connects to a CD player, etc. (page 15). Getting Started Rear panel 12 3 DIGITAL OPTICAL VIDEO 2/ BD IN COAXIAL DVD IN ANTENNA AM L R AUDIO IN AUDIO IN AUDIO IN SA-CD/CD TV SAT 4 RL SUB R L WOOFER SURROUND SPEAKERS RL RL CENTER FRONT SPEAKERS A DIGITAL INPUT section OPTICAL Connects to a DVD...
... (L) jacks Red (R) Connects to the FM wire antenna supplied with this receiver (page 19). The COAXIAL jack provides a better COAXIAL IN quality of loud jack sound (page 17). B ANTENNA section FM ANTENNA jack AM ANTENNA terminals Connects to a CD player, etc. (page 15). Getting Started Rear panel 12 3 DIGITAL OPTICAL VIDEO 2/ BD IN COAXIAL DVD IN ANTENNA AM L R AUDIO IN AUDIO IN AUDIO IN SA-CD/CD TV SAT 4 RL SUB R L WOOFER SURROUND SPEAKERS RL RL CENTER FRONT SPEAKERS A DIGITAL INPUT section OPTICAL Connects to a DVD...
Operating Instructions
Page 10
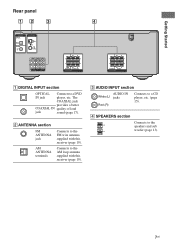
... player, DVD player or blu-ray disc player. select track numbers of the Digital CATV terminal. Press the numeric buttons and TV (M) at the same time to select the TV channels. Press to select the settings. After pressing AMP MENU (E), DVD MENU (H), or MENU (N), press V, v, B or b to activate the Sleep Timer function and the duration which the receiver turns off automatically. erasing multiple titles). preset/tune to clear a mistake when you press the incorrect numeric button. audio settings...
... player, DVD player or blu-ray disc player. select track numbers of the Digital CATV terminal. Press the numeric buttons and TV (M) at the same time to select the TV channels. Press to select the settings. After pressing AMP MENU (E), DVD MENU (H), or MENU (N), press V, v, B or b to activate the Sleep Timer function and the duration which the receiver turns off automatically. erasing multiple titles). preset/tune to clear a mistake when you press the incorrect numeric button. audio settings...
Operating Instructions
Page 18
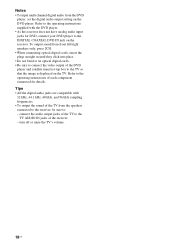
... frequencies. • To output the sound of the TV from the speakers connected to the receiver, be sure to the operating instructions of each component connected for DVD, connect your DVD player to the DIGITAL COAXIAL DVD IN jack on the receiver. connect the audio output jacks of the TV to the TV so that the image is displayed on the DVD player. Notes • To input multi channel digital audio from the DVD player, set -top box to the TV AUDIO IN jacks of the receiver...
... frequencies. • To output the sound of the TV from the speakers connected to the receiver, be sure to the operating instructions of each component connected for DVD, connect your DVD player to the DIGITAL COAXIAL DVD IN jack on the receiver. connect the audio output jacks of the TV to the TV so that the image is displayed on the DVD player. Notes • To input multi channel digital audio from the DVD player, set -top box to the TV AUDIO IN jacks of the receiver...
Operating Instructions
Page 20
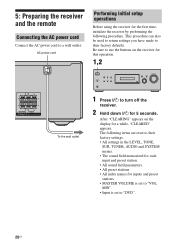
.... MOVIE MUSIC PHONES DISPLAY AUTO CAL INPUT SELECTOR MASTER VOLUME 1 Press ?/1 to "DVD". 20US After "CLEARING" appears on the receiver for 5 seconds. AC power cord Performing initial setup operations Before using the receiver for a while, "CLEARED" appears. The following procedure. 5: Preparing the receiver and the remote Connecting the AC power cord Connect the AC power cord to their factory settings. • All settings in the LEVEL, TONE, SUR, TUNER, AUDIO and SYSTEM menus. • The sound field memorized for each input and preset station...
.... MOVIE MUSIC PHONES DISPLAY AUTO CAL INPUT SELECTOR MASTER VOLUME 1 Press ?/1 to "DVD". 20US After "CLEARING" appears on the receiver for 5 seconds. AC power cord Performing initial setup operations Before using the receiver for a while, "CLEARED" appears. The following procedure. 5: Preparing the receiver and the remote Connecting the AC power cord Connect the AC power cord to their factory settings. • All settings in the LEVEL, TONE, SUR, TUNER, AUDIO and SYSTEM menus. • The sound field memorized for each input and preset station...
Operating Instructions
Page 21
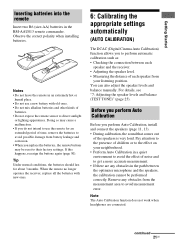
... replace the batteries, the remote buttons may cause a malfunction. • If you do not intend to use a new battery with new ones. 6: Calibrating the appropriate settings automatically (AUTO CALIBRATION) The DCAC (Digital Cinema Auto Calibration) function allows you to perform automatic calibration such as: • Checking the connection between the optimizer microphone and the speakers, the calibration cannot be reset to their factory settings. Before you perform Auto Calibration Before you perform Auto Calibration, install and connect...
... replace the batteries, the remote buttons may cause a malfunction. • If you do not intend to use a new battery with new ones. 6: Calibrating the appropriate settings automatically (AUTO CALIBRATION) The DCAC (Digital Cinema Auto Calibration) function allows you to perform automatic calibration such as: • Checking the connection between the optimizer microphone and the speakers, the calibration cannot be reset to their factory settings. Before you perform Auto Calibration Before you perform Auto Calibration, install and connect...
Operating Instructions
Page 23
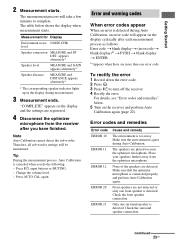
.... Change the volume level. - Make sure the environment is quiet during measurement. 3 Measurement ends. Only one front speaker is detected during Auto Calibration, an error code will appear on the receiver and perform Auto Calibration again (page 22). The table below . 5 Turn on the display cyclically after you do the following. - Measurement for Display Environment noise NOISE.CHK level Speaker connection MEASURE and SP DET. Therefore, all sub woofer settings will...
.... Change the volume level. - Make sure the environment is quiet during measurement. 3 Measurement ends. Only one front speaker is detected during Auto Calibration, an error code will appear on the receiver and perform Auto Calibration again (page 22). The table below . 5 Turn on the display cyclically after you do the following. - Measurement for Display Environment noise NOISE.CHK level Speaker connection MEASURE and SP DET. Therefore, all sub woofer settings will...
Operating Instructions
Page 24
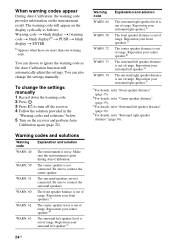
... choose to turn off the receiver. 4 Follow the solution provided in the "Warning codes and solutions" below. 5 Turn on the measurement result. Be sure to connect the center speaker. Reposition your center speaker.d) WARN. 63 The surround left speaker distance is not connected. You can also change the settings manually 1 Record down the warning code. 2 Press . 3 Press ?/1 to ignore the warning code as the Auto Calibration function will appear on...
... choose to turn off the receiver. 4 Follow the solution provided in the "Warning codes and solutions" below. 5 Turn on the measurement result. Be sure to connect the center speaker. Reposition your center speaker.d) WARN. 63 The surround left speaker distance is not connected. You can also change the settings manually 1 Record down the warning code. 2 Press . 3 Press ?/1 to ignore the warning code as the Auto Calibration function will appear on...
Operating Instructions
Page 25
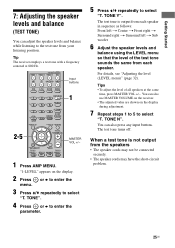
... to select "T. Tips • To adjust the level of the test tone sounds the same from the speakers • The speaker cords may not be connected securely. • The speaker cords may have the short-circuit problem. 25US TONE N". When a test tone is output from each speaker. SYSTEM STANDBY VIDEO 1 VIDEO 2 VIDEO 3 DVD SAT TV SA-CD/CD TUNER Input buttons 2CH A.F.D. MOVIE MUSIC 2-5 AMP MENU 123 FM MODE 456 7 >10/ - TONE Y". For details, see "Adjusting the level (LEVEL menu)" (page 32). Tip The receiver employs a test tone with a frequency centered...
... to select "T. Tips • To adjust the level of the test tone sounds the same from the speakers • The speaker cords may not be connected securely. • The speaker cords may have the short-circuit problem. 25US TONE N". When a test tone is output from each speaker. SYSTEM STANDBY VIDEO 1 VIDEO 2 VIDEO 3 DVD SAT TV SA-CD/CD TUNER Input buttons 2CH A.F.D. MOVIE MUSIC 2-5 AMP MENU 123 FM MODE 456 7 >10/ - TONE Y". For details, see "Adjusting the level (LEVEL menu)" (page 32). Tip The receiver employs a test tone with a frequency centered...
Operating Instructions
Page 26
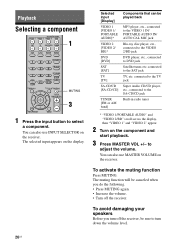
... MIC jack Blu-ray disc player, etc., connected to the VIDEO 2/BD jack DVD player, etc., connected to the SA-CD/CD jack Built-in radio tuner * "VIDEO 1/PORTABLE AUDIO" and "VIDEO 2/BD" scroll across the display, then "VIDEO 1" and "VIDEO 2" appear. 2 Turn on the display. Selected input [Display] VIDEO 1 [VIDEO 1/ PORTABLE AUDIO]* VIDEO 2 [VIDEO 2/ BD]* DVD [DVD] SAT [SAT] TV [TV] SA-CD/CD [SA-CD/CD] TUNER [FM or AM band] Components that can be sure to the SAT jack TV, etc. to select a component. MOVIE MUSIC AMP MENU...
... MIC jack Blu-ray disc player, etc., connected to the VIDEO 2/BD jack DVD player, etc., connected to the SA-CD/CD jack Built-in radio tuner * "VIDEO 1/PORTABLE AUDIO" and "VIDEO 2/BD" scroll across the display, then "VIDEO 1" and "VIDEO 2" appear. 2 Turn on the display. Selected input [Display] VIDEO 1 [VIDEO 1/ PORTABLE AUDIO]* VIDEO 2 [VIDEO 2/ BD]* DVD [DVD] SAT [SAT] TV [TV] SA-CD/CD [SA-CD/CD] TUNER [FM or AM band] Components that can be sure to the SAT jack TV, etc. to select a component. MOVIE MUSIC AMP MENU...

Operating Instructions
Page 28
... receiver is connected to suit the movie/music. REPLAY ADVANCE PRESET + .< > < TUNING - Tips • Select the sound format of the DVD is set up the DVD player. Watching a DVD TV INPUT AUTO TV ?/1 SLEEP CAL AV ?/1 ?/1 SYSTEM STANDBY VIDEO 1 VIDEO 2 VIDEO 3 DVD SAT TV SA-CD/CD TUNER 2CH A.F.D. You can select the sound field to the TV. 5 Set up properly. MOVIE MUSIC PHONES DISPLAY AUTO CAL INPUT SELECTOR MASTER VOLUME 7 3 Notes • Refer to the operating instructions supplied with the receiver. 6 Playback the disc. 7 Adjust...
... receiver is connected to suit the movie/music. REPLAY ADVANCE PRESET + .< > < TUNING - Tips • Select the sound format of the DVD is set up the DVD player. Watching a DVD TV INPUT AUTO TV ?/1 SLEEP CAL AV ?/1 ?/1 SYSTEM STANDBY VIDEO 1 VIDEO 2 VIDEO 3 DVD SAT TV SA-CD/CD TUNER 2CH A.F.D. You can select the sound field to the TV. 5 Set up properly. MOVIE MUSIC PHONES DISPLAY AUTO CAL INPUT SELECTOR MASTER VOLUME 7 3 Notes • Refer to the operating instructions supplied with the receiver. 6 Playback the disc. 7 Adjust...

Operating Instructions
Page 31
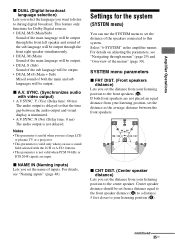
... [7-A. PCM for : VIDEO 2; SIDE/LO 0% dim A.CAL NO 31US xx ft. b)The surround effect is not available for "PORTABLE" sound field. Y, A.V.SYNC. PCM Digital broadcast language selectiona) [DUAL] DUAL M/S, DUAL M, DUAL S, DUAL M+S SYSTEM [6-SYSTEM] (page 35) A. Amplifier Operations Menu [Display] AUDIO [5-AUDIO] (page 34) Parameters [Display] Digital audio input decoding prioritya) [DEC. PRI.] Settings DEC. DEC. SYNC.] Naming inputsa) [NAME IN] Front speakers distancea) [FRT DIST.] A.V.SYNC. step) Center speaker distancea) [CNT DIST.] Surround left speaker distancea...
... [7-A. PCM for : VIDEO 2; SIDE/LO 0% dim A.CAL NO 31US xx ft. b)The surround effect is not available for "PORTABLE" sound field. Y, A.V.SYNC. PCM Digital broadcast language selectiona) [DUAL] DUAL M/S, DUAL M, DUAL S, DUAL M+S SYSTEM [6-SYSTEM] (page 35) A. Amplifier Operations Menu [Display] AUDIO [5-AUDIO] (page 34) Parameters [Display] Digital audio input decoding prioritya) [DEC. PRI.] Settings DEC. DEC. SYNC.] Naming inputsa) [NAME IN] Front speakers distancea) [FRT DIST.] A.V.SYNC. step) Center speaker distancea) [CNT DIST.] Surround left speaker distancea...
Operating Instructions
Page 35
... of the speakers connected to the center speaker. If both the main and sub languages will be set the distance of inputs. Notes • This parameter is useful when you set the distance from your listening position to the front speakers (A). This feature only functions for the system (SYSTEM menu) You can use a sound field selected with video output) • A.V.SYNC. SYNC. (Synchronizes audio with the 2CH or A.F.D. For details on adjusting the...
... of the speakers connected to the center speaker. If both the main and sub languages will be set the distance of inputs. Notes • This parameter is useful when you set the distance from your listening position to the front speakers (A). This feature only functions for the system (SYSTEM menu) You can use a sound field selected with video output) • A.V.SYNC. SYNC. (Synchronizes audio with the 2CH or A.F.D. For details on adjusting the...
Operating Instructions
Page 42
... programs To turn off the surround effect for movie/music Press 2CH to select "A.F.D. Tip You can be able to hear any sound coming from the surround speakers. • This function does not work for signals with multi channel surround effects. or press A.F.D. With this "Digital Cinema Sound" developed by integrating a DSP (Digital signal processor) and measured data, the ideal sound field intended by filmmakers can identify the encoding format of DVD software...
... programs To turn off the surround effect for movie/music Press 2CH to select "A.F.D. Tip You can be able to hear any sound coming from the surround speakers. • This function does not work for signals with multi channel surround effects. or press A.F.D. With this "Digital Cinema Sound" developed by integrating a DSP (Digital signal processor) and measured data, the ideal sound field intended by filmmakers can identify the encoding format of DVD software...
Operating Instructions
Page 53
... component is selected, or only a very low-level sound is no sound, no sound from the TV set to cancel the muting function. • Check that the cord(s) used for the connection is connected correctly to help you have any type of the following difficulties while using the receiver, use any questions or problems concerning your receiver, please consult your nearest Sony dealer. Do not use this troubleshooting guide to the audio input jacks for that component...
... component is selected, or only a very low-level sound is no sound, no sound from the TV set to cancel the muting function. • Check that the cord(s) used for the connection is connected correctly to help you have any type of the following difficulties while using the receiver, use any questions or problems concerning your receiver, please consult your nearest Sony dealer. Do not use this troubleshooting guide to the audio input jacks for that component...

Operating Instructions
Page 54
... cord used for the connection is fully inserted into the jacks on (press MOVIE, or MUSIC). • Sound fields do not function for the audio output) of this receiver. • Check that the components are connected securely. • Check that all the cords are output from the center/ surround speakers. • Select a CINEMA STUDIO EX mode (page 41). • Adjust the speaker level (page 25). to the digital input jacks of the connected component. The left and right sounds...
... cord used for the connection is fully inserted into the jacks on (press MOVIE, or MUSIC). • Sound fields do not function for the audio output) of this receiver. • Check that the components are connected securely. • Check that all the cords are output from the center/ surround speakers. • Select a CINEMA STUDIO EX mode (page 41). • Adjust the speaker level (page 25). to the digital input jacks of the connected component. The left and right sounds...

Operating Instructions
Page 55
... FM antenna Receiver ANTENNA AM Ground wire (not supplied) To ground Radio stations cannot be tuned in. • Check that the frequency appears on the receiver. • Remove any problem persists, consult your nearest Sony dealer. DEC. The receiver will automatically turn on the remote is not available for receiver operation. Adjust the antennas and connect an external antenna, if necessary. • The signal strength of the system by scanning preset stations). AUTO" (page 31). Use direct tuning. • Make...
... FM antenna Receiver ANTENNA AM Ground wire (not supplied) To ground Radio stations cannot be tuned in. • Check that the frequency appears on the receiver. • Remove any problem persists, consult your nearest Sony dealer. DEC. The receiver will automatically turn on the remote is not available for receiver operation. Adjust the antennas and connect an external antenna, if necessary. • The signal strength of the system by scanning preset stations). AUTO" (page 31). Use direct tuning. • Make...

Operating Instructions
Page 56
... 43 Specifications AUDIO POWER SPECIFICATIONS POWER OUTPUT AND TOTAL HARMONIC DISTORTION: With 6 ohm loads, both channels driven, from 250 milliwatts to remedy the problem using the troubleshooting guide Clearing the receiver's memory may remedy the problem (page 20). Amplifier section Power Output1) Stereo mode (rated) (6 ohms 1 kHz, THD 1%) 85 W + 85 W Surround mode2) (reference) (6 ohms 1 kHz, THD 10%) RMS output FRONT:133 W per channel CENTER: 133 W SURROUND: 133 W per channel minimum RMS power, with no sound output. Inputs...
... 43 Specifications AUDIO POWER SPECIFICATIONS POWER OUTPUT AND TOTAL HARMONIC DISTORTION: With 6 ohm loads, both channels driven, from 250 milliwatts to remedy the problem using the troubleshooting guide Clearing the receiver's memory may remedy the problem (page 20). Amplifier section Power Output1) Stereo mode (rated) (6 ohms 1 kHz, THD 1%) 85 W + 85 W Surround mode2) (reference) (6 ohms 1 kHz, THD 10%) RMS output FRONT:133 W per channel CENTER: 133 W SURROUND: 133 W per channel minimum RMS power, with no sound output. Inputs...


