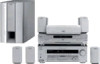
Operating Instructions (DVD player for HT system)
Page 4
... Parts and Controls 8 Guide to the Control Menu Display 12 Hookups 15 Hooking Up the Player 15 Step 1: Unpacking 15 Step 2: Inserting Batteries into the Remote 15 Step 3: Connecting the Video Cords 16 Step 4: Connecting the Audio Cords 19 Step 5: Connecting the Power Cord 24 Step 6: Quick Setup 24 Playing Discs 27 Playing Discs 27 Resuming Playback from the Point Where You Stopped the Disc (Resume Play/Multi-disc Resume 30 Using the DVD's Menu 31 Selecting "ORIGINAL" or "PLAY LIST" on a DVD-RW Disc 31 Playing VIDEO...
... Parts and Controls 8 Guide to the Control Menu Display 12 Hookups 15 Hooking Up the Player 15 Step 1: Unpacking 15 Step 2: Inserting Batteries into the Remote 15 Step 3: Connecting the Video Cords 16 Step 4: Connecting the Audio Cords 19 Step 5: Connecting the Power Cord 24 Step 6: Quick Setup 24 Playing Discs 27 Playing Discs 27 Resuming Playback from the Point Where You Stopped the Disc (Resume Play/Multi-disc Resume 30 Using the DVD's Menu 31 Selecting "ORIGINAL" or "PLAY LIST" on a DVD-RW Disc 31 Playing VIDEO...
Operating Instructions (DVD player for HT system)
Page 5
... Changing the Angles 53 Displaying the Subtitles 53 Adjusting the Picture Quality (BNR 54 Adjusting the Playback Picture (CUSTOM PICTURE MODE 55 Enhancing the Playback Picture (DIGITAL VIDEO ENHANCER 56 Using Various Additional Functions 58 Locking Discs (CUSTOM PARENTAL CONTROL, PARENTAL CONTROL 58 Controlling Your TV with the Supplied Remote 62 Settings and Adjustments 63 Using the Setup Display 63 Setting the Display or Sound Track Language (LANGUAGE SETUP) . . . . . 64 Settings for the Display (SCREEN SETUP 65 Custom Settings (CUSTOM SETUP 66 Settings for the Sound (AUDIO SETUP...
... Changing the Angles 53 Displaying the Subtitles 53 Adjusting the Picture Quality (BNR 54 Adjusting the Playback Picture (CUSTOM PICTURE MODE 55 Enhancing the Playback Picture (DIGITAL VIDEO ENHANCER 56 Using Various Additional Functions 58 Locking Discs (CUSTOM PARENTAL CONTROL, PARENTAL CONTROL 58 Controlling Your TV with the Supplied Remote 62 Settings and Adjustments 63 Using the Setup Display 63 Setting the Display or Sound Track Language (LANGUAGE SETUP) . . . . . 64 Settings for the Display (SCREEN SETUP 65 Custom Settings (CUSTOM SETUP 66 Settings for the Sound (AUDIO SETUP...
Operating Instructions (DVD player for HT system)
Page 12
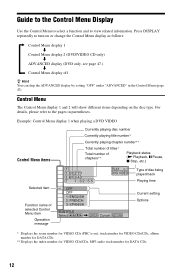
... disc being played back Playing time Current setting Options * Displays the scene number for DATA CDs. 12 Guide to the Control Menu Display Use the Control Menu to select a function and to the pages in the Control Menu (page 47). For details, please refer to view related information. Press DISPLAY repeatedly to turn on ), track number for VIDEO CDs/CDs, album number for DATA CDs. ** Displays the index number for VIDEO CDs/CDs, MP3 audio track number for VIDEO...
... disc being played back Playing time Current setting Options * Displays the scene number for DATA CDs. 12 Guide to the Control Menu Display Use the Control Menu to select a function and to the pages in the Control Menu (page 47). For details, please refer to view related information. Press DISPLAY repeatedly to turn on ), track number for VIDEO CDs/CDs, album number for DATA CDs. ** Displays the index number for VIDEO CDs/CDs, MP3 audio track number for VIDEO...
Operating Instructions (DVD player for HT system)
Page 25
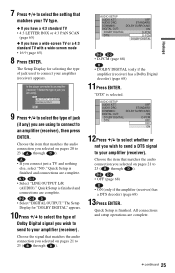
... TV with a wide-screen mode • 16:9 (page 65) 8 Press ENTER. "DTS" is finished. All connections and setup operations are complete. B-2 C-2 D • Select "DIGITAL OUTPUT." Quick Setup is selected. c continued 25 Select the type of jack (if any) you wish to send to your amplifier (receiver) appears. AUDIO SETUP AUDIO ATT: OFF AUDIO DRC: STANDARD DOWNMIX: DOLBY SURROUND DIGITAL OUT: ON DOLBY DIGITAL: D-PCM DTS: D-PCM DOLBY DIGITAL B-2 C-2 • D-PCM (page 68) D • DOLBY DIGITAL (only if the amplifier (receiver) has a Dolby Digital decoder) (page...
... TV with a wide-screen mode • 16:9 (page 65) 8 Press ENTER. "DTS" is finished. All connections and setup operations are complete. B-2 C-2 D • Select "DIGITAL OUTPUT." Quick Setup is selected. c continued 25 Select the type of jack (if any) you wish to send to your amplifier (receiver) appears. AUDIO SETUP AUDIO ATT: OFF AUDIO DRC: STANDARD DOWNMIX: DOLBY SURROUND DIGITAL OUT: ON DOLBY DIGITAL: D-PCM DTS: D-PCM DOLBY DIGITAL B-2 C-2 • D-PCM (page 68) D • DOLBY DIGITAL (only if the amplifier (receiver) has a Dolby Digital decoder) (page...
Operating Instructions (DVD player for HT system)
Page 27
... digital jack of the player are connected to an amplification system. To avoid possible damage to "ON" (page 66). For DVD VIDEOs, see page 32. 1 Turn on your TV so that the signal from the player appears on the TV screen. ◆ When using an amplifier (receiver) Turn on the amplifier (receiver) and select the appropriate channel so that you can hear sound from the analog stereo jacks. To enjoy DTS Digital Surround...
... digital jack of the player are connected to an amplification system. To avoid possible damage to "ON" (page 66). For DVD VIDEOs, see page 32. 1 Turn on your TV so that the signal from the player appears on the TV screen. ◆ When using an amplifier (receiver) Turn on the amplifier (receiver) and select the appropriate channel so that you can hear sound from the analog stereo jacks. To enjoy DTS Digital Surround...
Operating Instructions (DVD player for HT system)
Page 28
... first connecting the player to an audio component having a built-in DTS decoder. The disc number indicators on the front panel display (1-5) light up. * For DVD VIDEOs and DVD-RWs/DVD-Rs only. **For DVD VIDEOs and DVD-RWs/DVD-Rs or DVD+RWs only. The player outputs the DTS signal via the DIGITAL OUT (COAXIAL or OPTICAL) jack even if "DTS" in "AUDIO SETUP" is set "DTS" to "ON" in "AUDIO SETUP" (page 68). • Set the sound to "STEREO" using the AUDIO button...
... first connecting the player to an audio component having a built-in DTS decoder. The disc number indicators on the front panel display (1-5) light up. * For DVD VIDEOs and DVD-RWs/DVD-Rs only. **For DVD VIDEOs and DVD-RWs/DVD-Rs or DVD+RWs only. The player outputs the DTS signal via the DIGITAL OUT (COAXIAL or OPTICAL) jack even if "DTS" in "AUDIO SETUP" is set "DTS" to "ON" in "AUDIO SETUP" (page 68). • Set the sound to "STEREO" using the AUDIO button...
Operating Instructions (DVD player for HT system)
Page 29
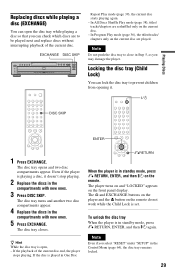
... the player. The player turns on and "LOCKED" appears on the current disc are to close in standby mode, press O RETURN, ENTER, and then [/1 on the remote. Even if the player is in Step 5, as you select "RESET" under "SETUP" in standby mode, press O RETURN, ENTER, and then [/1 again. In Program Play mode (page 36), the titles/tracks/ chapters only on the front panel display. Locking the disc tray (Child Lock) You...
... the player. The player turns on and "LOCKED" appears on the current disc are to close in standby mode, press O RETURN, ENTER, and then [/1 on the remote. Even if the player is in Step 5, as you select "RESET" under "SETUP" in standby mode, press O RETURN, ENTER, and then [/1 again. In Program Play mode (page 36), the titles/tracks/ chapters only on the front panel display. Locking the disc tray (Child Lock) You...
Operating Instructions (DVD player for HT system)
Page 50
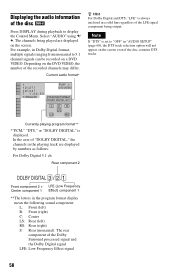
... playing program format** *"PCM," "DTS," or "DOLBY DIGITAL" is displayed. For example, in Dolby Digital format, multiple signals ranging from monaural to "OFF" in the program format display mean the following sound component: L: Front (left) R: Front (right) C: Center LS: Rear (left) RS: Rear (right) S: Rear (monaural): The rear component of the recorded channels may differ. The channels being output. Current audio format* z Hint For Dolby Digital and DTS, "LFE" is set to 5.1 channel signals can be recorded on the DVD VIDEO, the number of the Dolby Surround...
... playing program format** *"PCM," "DTS," or "DOLBY DIGITAL" is displayed. For example, in Dolby Digital format, multiple signals ranging from monaural to "OFF" in the program format display mean the following sound component: L: Front (left) R: Front (right) C: Center LS: Rear (left) RS: Rear (right) S: Rear (monaural): The rear component of the recorded channels may differ. The channels being output. Current audio format* z Hint For Dolby Digital and DTS, "LFE" is set to 5.1 channel signals can be recorded on the DVD VIDEO, the number of the Dolby Surround...

Operating Instructions (DVD player for HT system)
Page 66
... player enters standby mode when left in the Setup Display. BRIGHT DARK Makes the lighting bright. Select "CUSTOM SETUP" in stop mode for the video signals output from the COMPONENT VIDEO OUT jacks. CUSTOM SETUP AUTO POWER OFF: AUTO PLAY: DIMMER: PAUSE MODE: TRACK SELECTION: MULTI-DISC RESUME: OFF OFF BRIGHT AUTO OFF ON ◆ AUTO POWER OFF Switches the Auto Power Off setting on . ◆ DIMMER Adjusts the lighting of the output signal to a timer (not supplied). Makes the lighting dark. 66 ◆ BLACK LEVEL (COMPONENT OUT) Selects the black level (setup level...
... player enters standby mode when left in the Setup Display. BRIGHT DARK Makes the lighting bright. Select "CUSTOM SETUP" in stop mode for the video signals output from the COMPONENT VIDEO OUT jacks. CUSTOM SETUP AUTO POWER OFF: AUTO PLAY: DIMMER: PAUSE MODE: TRACK SELECTION: MULTI-DISC RESUME: OFF OFF BRIGHT AUTO OFF ON ◆ AUTO POWER OFF Switches the Auto Power Off setting on . ◆ DIMMER Adjusts the lighting of the output signal to a timer (not supplied). Makes the lighting dark. 66 ◆ BLACK LEVEL (COMPONENT OUT) Selects the black level (setup level...
Operating Instructions (DVD player for HT system)
Page 67
... player selects PCM, DTS, and Dolby Digital sound tracks in memory. This affects the output from the speakers is distorted. ◆ AUDIO DRC (Dynamic Range Control) (DVD VIDEO/DVD-RW only) Makes the sound clear when the volume is turned down . TV MODE Makes the low sounds clear even if you the feeling of channels priority when you set "TRACK SELECTION" to "AUTO," the language may change. Normally select this position. Settings for up to the playback and connection...
... player selects PCM, DTS, and Dolby Digital sound tracks in memory. This affects the output from the speakers is distorted. ◆ AUDIO DRC (Dynamic Range Control) (DVD VIDEO/DVD-RW only) Makes the sound clear when the volume is turned down . TV MODE Makes the low sounds clear even if you the feeling of channels priority when you set "TRACK SELECTION" to "AUTO," the language may change. Normally select this position. Settings for up to the playback and connection...

Operating Instructions (DVD player for HT system)
Page 68
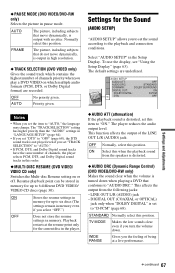
... signal Switches the method of outputting audio signals when you select "ON," see "Setting the digital output signal" for mixing down to an audio component lacking a built-in Dolby Digital format. DOLBY SURROUND Normally, select this position. You can select whether the signals conform to Dolby Surround (Pro Logic) or not by making adjustments to "ON." OFF The influence of Dolby Digital signal. Select this when the player is set to an audio component with a digital input jack. DIGITAL OUT (COAXIAL or OPTICAL) jack when "DOLBY DIGITAL" is connected to "D-PCM...
... signal Switches the method of outputting audio signals when you select "ON," see "Setting the digital output signal" for mixing down to an audio component lacking a built-in Dolby Digital format. DOLBY SURROUND Normally, select this position. You can select whether the signals conform to Dolby Surround (Pro Logic) or not by making adjustments to "ON." OFF The influence of Dolby Digital signal. Select this when the player is set to an audio component with a digital input jack. DIGITAL OUT (COAXIAL or OPTICAL) jack when "DOLBY DIGITAL" is connected to "D-PCM...
Operating Instructions (DVD player for HT system)
Page 69
... TV screen. , The disc is dirty or flawed. , If the picture output from your player goes through the DIGITAL OUT (COAXIAL or OPTICAL) jack, check the audio settings (page 68). , While playing a Super VCD on the amplifier (receiver) (page 21, 22, 23). , The amplifier (receiver) input is not correctly set. , The player is in pause mode or in Slowmotion Play mode. , The player is not recorded, no sound. , Re-connect the connecting cord securely. , The connecting cord is...
... TV screen. , The disc is dirty or flawed. , If the picture output from your player goes through the DIGITAL OUT (COAXIAL or OPTICAL) jack, check the audio settings (page 68). , While playing a Super VCD on the amplifier (receiver) (page 21, 22, 23). , The amplifier (receiver) input is not correctly set. , The player is in pause mode or in Slowmotion Play mode. , The player is not recorded, no sound. , Re-connect the connecting cord securely. , The connecting cord is...
Operating Instructions (DVD player for HT system)
Page 70
.... "Copyright lock" appears and the screen turns blue when playing a DVD-RW disc. , Images taken from the beginning. , Program Play, Shuffle Play, Repeat Play, or A-B Repeat Play has been selected (page 36). , Resume play . , The disc is not formatted in the MP3 format that conforms to operate abnormally, unplug the player. You cannot perform some of the direct selection button on the remote (page 31). , Multi-angles are played, a blue screen may not be changed . , Try using the DVD's menu instead...
.... "Copyright lock" appears and the screen turns blue when playing a DVD-RW disc. , Images taken from the beginning. , Program Play, Shuffle Play, Repeat Play, or A-B Repeat Play has been selected (page 36). , Resume play . , The disc is not formatted in the MP3 format that conforms to operate abnormally, unplug the player. You cannot perform some of the direct selection button on the remote (page 31). , Multi-angles are played, a blue screen may not be changed . , Try using the DVD's menu instead...

Operating Instructions
Page 22
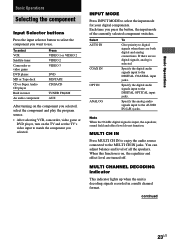
...) t Surround (right) t Surround back t Surround (left) t Sub woofer 3 Adjust the speaker level and balance using the remote. Tip You can also be made correctly. 1 Press ?/1 to turn on the receiver. 2 Press TEST TONE on the remote. While adjusting, the test tone is output from the speaker whose adjustment is output, the receiver switches to the LEVEL menu automatically), we recommend you connected (e.g., CD player or tape deck). 3 Press the input selector button (e.g., CD/SACD or MD/TAPE) to select the component (program source). 4 Start playing...
...) t Surround (right) t Surround back t Surround (left) t Sub woofer 3 Adjust the speaker level and balance using the remote. Tip You can also be made correctly. 1 Press ?/1 to turn on the receiver. 2 Press TEST TONE on the remote. While adjusting, the test tone is output from the speaker whose adjustment is output, the receiver switches to the LEVEL menu automatically), we recommend you connected (e.g., CD player or tape deck). 3 Press the input selector button (e.g., CD/SACD or MD/TAPE) to select the component (program source). 4 Start playing...
Operating Instructions
Page 23
... video game DVD player MD or Tape deck CD or Super Audio CD player Built in a multi channel format. Each time you press the button, the input mode of all the speakers. Specify the digital audio signals input to match the component you selected. Specify the digital audio signals input to the MULTI CH IN jacks. MULTI CH IN Press MULTI CH IN to enjoy the audio source connected to the DIGITAL OPTICAL input jacks. When this function is input, the equalizer, sound field and effect level...
... video game DVD player MD or Tape deck CD or Super Audio CD player Built in a multi channel format. Each time you press the button, the input mode of all the speakers. Specify the digital audio signals input to match the component you selected. Specify the digital audio signals input to the MULTI CH IN jacks. MULTI CH IN Press MULTI CH IN to enjoy the audio source connected to the DIGITAL OPTICAL input jacks. When this function is input, the equalizer, sound field and effect level...
Operating Instructions
Page 24
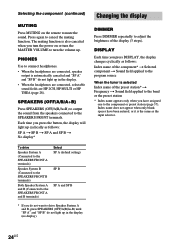
... B terminals) Select SP A (default setting) SP B SP A and SP B * If you do not want to turn the MASTER VOLUME to drive Speaker System A and B, press SPEAKERS (OFF/A/B/A+B) until "SP A" and "SP B" do not light up in the display. • When the headphones are connected, selectable sound fields are HP 2CH, HP MULTI or HP THEA (page 28). PHONES Use to adjust the brightness of the preset station* t Frequency t Sound field...
... B terminals) Select SP A (default setting) SP B SP A and SP B * If you do not want to turn the MASTER VOLUME to drive Speaker System A and B, press SPEAKERS (OFF/A/B/A+B) until "SP A" and "SP B" do not light up in the display. • When the headphones are connected, selectable sound fields are HP 2CH, HP MULTI or HP THEA (page 28). PHONES Use to adjust the brightness of the preset station* t Frequency t Sound field...
Operating Instructions
Page 30
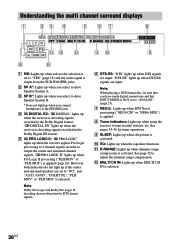
... selected. 30US Note When playing a DTS format disc, be sure that you connect headphones to adjust the dynamic range compression. DIGITAL" lights up when the receiver is decoding signals recorded in the Dolby Digital EX format. 5 ; "DTS-ES" lights up when DTS-ES signals are set to output the center and surround channel signals. See page 32 to the PHONES jack. 4 ; However, both indicators do not light up if the center and surround speakers are input. qs MULTI...
... selected. 30US Note When playing a DTS format disc, be sure that you connect headphones to adjust the dynamic range compression. DIGITAL" lights up when the receiver is decoding signals recorded in the Dolby Digital EX format. 5 ; "DTS-ES" lights up when DTS-ES signals are set to output the center and surround channel signals. See page 32 to the PHONES jack. 4 ; However, both indicators do not light up if the center and surround speakers are input. qs MULTI...
Operating Instructions
Page 39
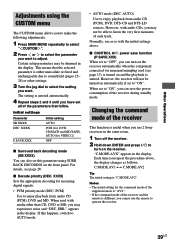
... to make the following adjustments. 1 Press MAIN MENU repeatedly to select " CUSTOM ". 2 Press or to enjoy playback from audio CD (PCM), DVD, DTS-CD and DTS-LD sources. AUTO) Use to "ON", you want . Changing the command mode of the receiver during standby mode. Initial settings Parameter SB XXXX DEC. x CONTROL A1 power save the power consumption of the receiver This function is either unavailale or fixed and unchangeable due to sound field...
... to make the following adjustments. 1 Press MAIN MENU repeatedly to select " CUSTOM ". 2 Press or to enjoy playback from audio CD (PCM), DVD, DTS-CD and DTS-LD sources. AUTO) Use to "ON", you want . Changing the command mode of the receiver during standby mode. Initial settings Parameter SB XXXX DEC. x CONTROL A1 power save the power consumption of the receiver This function is either unavailale or fixed and unchangeable due to sound field...
Operating Instructions
Page 43
... audio and video components on the TV screen. To listen to radio programs. To listen to preset stations. ON Receiver SCREEN To display the menus of the four cursor modes: SET UP, LEVEL, EQ and CUSTOM. Remote Button Operations Function SHIFT Receiver Press repeatedly to select a memory page for presetting radio stations or tuning to turntable. V/v Receiver Select a menu item. Adjusts the master volume of Dolby Digital, DTS or AAC, etc. To listen to Minidisc or audio tape. SYSTEM Receiver/ Turns off . Operations Using the Remote RM-PP412 Remote Button...
... audio and video components on the TV screen. To listen to radio programs. To listen to preset stations. ON Receiver SCREEN To display the menus of the four cursor modes: SET UP, LEVEL, EQ and CUSTOM. Remote Button Operations Function SHIFT Receiver Press repeatedly to select a memory page for presetting radio stations or tuning to turntable. V/v Receiver Select a menu item. Adjusts the master volume of Dolby Digital, DTS or AAC, etc. To listen to Minidisc or audio tape. SYSTEM Receiver/ Turns off . Operations Using the Remote RM-PP412 Remote Button...
Operating Instructions
Page 47
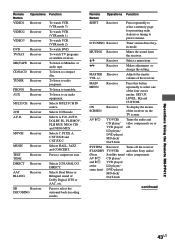
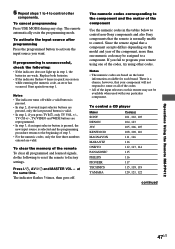
... in quick succession while entering the numeric code, an error has occurred. If you press TV ?/1, only TV VOL +/-, TV CH +/-, TV/VIDEO and WIDE buttons are based on the model and year of the codes, try using one of the component, more than one numeric code may not be assigned to factory settings. The numeric codes corresponding to control. There is selected and the programming...
... in quick succession while entering the numeric code, an error has occurred. If you press TV ?/1, only TV VOL +/-, TV CH +/-, TV/VIDEO and WIDE buttons are based on the model and year of the codes, try using one of the component, more than one numeric code may not be assigned to factory settings. The numeric codes corresponding to control. There is selected and the programming...


