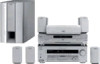
Operating Instructions (DVD player for HT system)
Page 2
... pursuant to radio or television reception, which the receiver is no guarantee that any change or modifications not expressly approved in accordance with this Sony CD/DVD Player. CAUTION : TO PREVENT ELECTRIC SHOCK, MATCH WIDE BLADE OF PLUG TO WIDE SLOT, FULLY INSERT. This equipment generates, uses... to try to rain or moisture. CAUTION You are designed to persons. These limits are cautioned that interference will increase eye hazard. Connect the equipment into an outlet on , the user is intended to alert the user to the presence of electric shock to provide reasonable...
... pursuant to radio or television reception, which the receiver is no guarantee that any change or modifications not expressly approved in accordance with this Sony CD/DVD Player. CAUTION : TO PREVENT ELECTRIC SHOCK, MATCH WIDE BLADE OF PLUG TO WIDE SLOT, FULLY INSERT. This equipment generates, uses... to try to rain or moisture. CAUTION You are designed to persons. These limits are cautioned that interference will increase eye hazard. Connect the equipment into an outlet on , the user is intended to alert the user to the presence of electric shock to provide reasonable...
Operating Instructions (DVD player for HT system)
Page 3
..., please consult your TV for an extended period of optical instruments with this case, remove the disc and leave the player turned on your nearest Sony dealer. 3 IMPORTANT NOTICE Caution: This player is played. Make sure that might block the ventilation holes. • Do not place the player in a location near... to the wall outlet, even if the player itself ; On operation • If the player is brought directly from a cold to a warm location, or is connected to a section with liquids, such as a rug that "NO DISC" appears on your television screen.
..., please consult your TV for an extended period of optical instruments with this case, remove the disc and leave the player turned on your nearest Sony dealer. 3 IMPORTANT NOTICE Caution: This player is played. Make sure that might block the ventilation holes. • Do not place the player in a location near... to the wall outlet, even if the player itself ; On operation • If the player is brought directly from a cold to a warm location, or is connected to a section with liquids, such as a rug that "NO DISC" appears on your television screen.
Operating Instructions (DVD player for HT system)
Page 4
... Display 12 Hookups 15 Hooking Up the Player 15 Step 1: Unpacking 15 Step 2: Inserting Batteries into the Remote 15 Step 3: Connecting the Video Cords 16 Step 4: Connecting the Audio Cords 19 Step 5: Connecting the Power Cord 24 Step 6: Quick Setup 24 Playing Discs 27 Playing Discs 27 Resuming Playback from the Point Where...
... Display 12 Hookups 15 Hooking Up the Player 15 Step 1: Unpacking 15 Step 2: Inserting Batteries into the Remote 15 Step 3: Connecting the Video Cords 16 Step 4: Connecting the Audio Cords 19 Step 5: Connecting the Power Cord 24 Step 6: Quick Setup 24 Playing Discs 27 Playing Discs 27 Resuming Playback from the Point Where...
Operating Instructions (DVD player for HT system)
Page 15
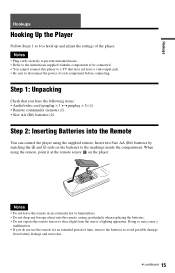
...corrosion. Notes • Plug cords securely to prevent unwanted noise. • Refer to the instructions supplied with the components to be connected. • You cannot connect this player to a TV that you do not use the remote for an extended period of time, remove the batteries to avoid...c continued 15 When using the supplied remote. Hookups Hookups Hooking Up the Player Follow Steps 1 to 6 to disconnect the power of each component before connecting. Doing so may cause a malfunction. • If you have a video input jack. • Be sure to hook up and adjust the settings ...
...corrosion. Notes • Plug cords securely to prevent unwanted noise. • Refer to the instructions supplied with the components to be connected. • You cannot connect this player to a TV that you do not use the remote for an extended period of time, remove the batteries to avoid...c continued 15 When using the supplied remote. Hookups Hookups Hooking Up the Player Follow Steps 1 to 6 to disconnect the power of each component before connecting. Doing so may cause a malfunction. • If you have a video input jack. • Be sure to hook up and adjust the settings ...

Operating Instructions (DVD player for HT system)
Page 16
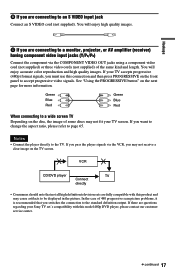
... a TV only.) 16 Yellow (Video) White (L) Red (R) Yellow (Video) White (L) Red (R) Use the red and white plugs to connect to the audio input jacks (page 20). (Do this player to your TV monitor, projector, or AV amplifier (receiver). (yellow) Audio/video cord (supplied)...red) to COMPONENT VIDEO OUT to S VIDEO OUT l : Signal flow S VIDEO cord (not supplied) TV, projector or AV amplifier (receiver) A If you are connecting to a video input jack Connect the yellow plug of the audio/video cord (supplied) to the input jack on your TV monitor, projector, or AV amplifier (receiver) using...
... a TV only.) 16 Yellow (Video) White (L) Red (R) Yellow (Video) White (L) Red (R) Use the red and white plugs to connect to the audio input jacks (page 20). (Do this player to your TV monitor, projector, or AV amplifier (receiver). (yellow) Audio/video cord (supplied)...red) to COMPONENT VIDEO OUT to S VIDEO OUT l : Signal flow S VIDEO cord (not supplied) TV, projector or AV amplifier (receiver) A If you are connecting to a video input jack Connect the yellow plug of the audio/video cord (supplied) to the input jack on your TV monitor, projector, or AV amplifier (receiver) using...
Operating Instructions (DVD player for HT system)
Page 17
... more information. VCR CD/DVD player TV Connect directly • Consumers should note that you are questions regarding your Sony TV set's compatibility with this model 480p DVD player, please contact our customer service center. Notes • Connect the player directly to the TV. c ...continued 17 If there are connecting to an S VIDEO input jack Connect an S VIDEO cord (not ...
... more information. VCR CD/DVD player TV Connect directly • Consumers should note that you are questions regarding your Sony TV set's compatibility with this model 480p DVD player, please contact our customer service center. Notes • Connect the player directly to the TV. c ...continued 17 If there are connecting to an S VIDEO input jack Connect an S VIDEO cord (not ...
Operating Instructions (DVD player for HT system)
Page 18
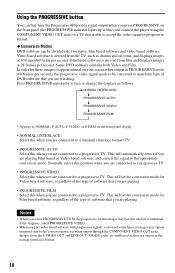
... when output in PROGRESSIVE mode (60 frames per second. Some DVD software contains both Video and Film. Normally select this position when you are connected to a progressive TV. • PROGRESSIVE VIDEO Select this happens, select PROGRESSIVE VIDEO. • When you play video based software with progressive ...-tune the Progressive 480p video signal output when you press PROGRESSIVE on the front panel (the PROGRESSIVE indicator lights up in blue) and connect the player using the COMPONENT VIDEO OUT jacks to a TV that is able to accept the video signal in progressive format. ◆...
... when output in PROGRESSIVE mode (60 frames per second. Some DVD software contains both Video and Film. Normally select this position when you are connected to a progressive TV. • PROGRESSIVE VIDEO Select this happens, select PROGRESSIVE VIDEO. • When you play video based software with progressive ...-tune the Progressive 480p video signal output when you press PROGRESSIVE on the front panel (the PROGRESSIVE indicator lights up in blue) and connect the player using the COMPONENT VIDEO OUT jacks to a TV that is able to accept the video signal in progressive format. ◆...
Operating Instructions (DVD player for HT system)
Page 19
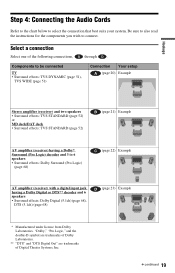
... "Dolby," "Pro Logic," and the double-D symbol are trademarks of Dolby Laboratories. ** "DTS" and "DTS Digital Out" are trademarks of the following connections, A through D . Hookups Step 4: Connecting the Audio Cords Refer to the chart below to 6 speakers • Surround effects: Dolby Surround (Pro Logic) (page 68) C (page 22) Example...page 68) D (page 23) Example * Manufactured under license from Dolby Laboratories. Be sure to also read the instructions for the components you wish to connect. c continued 19 Select a connection Select one of Digital Theater Systems, Inc.
... "Dolby," "Pro Logic," and the double-D symbol are trademarks of Dolby Laboratories. ** "DTS" and "DTS Digital Out" are trademarks of the following connections, A through D . Hookups Step 4: Connecting the Audio Cords Refer to the chart below to 6 speakers • Surround effects: Dolby Surround (Pro Logic) (page 68) C (page 22) Example...page 68) D (page 23) Example * Manufactured under license from Dolby Laboratories. Be sure to also read the instructions for the components you wish to connect. c continued 19 Select a connection Select one of Digital Theater Systems, Inc.

Operating Instructions (DVD player for HT system)
Page 20
z Hint When connecting to audio input 20 Connect the LINE OUT L/R (AUDIO) jacks to the TV's audio input jack. (red) to a monaural TV, use your TV speakers for video signals (page 16). CD/DVD player (yellow)* (yellow)* TV (white) (white) (red) to your TV This connection will use a stereomono conversion cord (not supplied). A Connecting to LINE OUT L/R (AUDIO) Audio/video cord (supplied) l : Signal flow * The yellow plug is used for sound.
z Hint When connecting to audio input 20 Connect the LINE OUT L/R (AUDIO) jacks to the TV's audio input jack. (red) to a monaural TV, use your TV speakers for video signals (page 16). CD/DVD player (yellow)* (yellow)* TV (white) (white) (red) to your TV This connection will use a stereomono conversion cord (not supplied). A Connecting to LINE OUT L/R (AUDIO) Audio/video cord (supplied) l : Signal flow * The yellow plug is used for sound.

Operating Instructions (DVD player for HT system)
Page 21
...supplied) Stereo audio cord (not supplied) (white) or or to DIGITAL OUT (COAXIAL or OPTICAL) Optical digital cord (not supplied) Remove jack cap before connecting. (white) to coaxial or optical digital input [Speakers] Stereo amplifier (receiver) (red) to LINE OUT L/R (AUDIO) (red) to the MD deck... or DAT deck without using your stereo amplifier (receiver). In this case, you can also connect the player directly to audio input Front (L) Front (R) MD deck/DAT deck l: Signal flow c continued 21 If the amplifier (receiver) has a digital...
...supplied) Stereo audio cord (not supplied) (white) or or to DIGITAL OUT (COAXIAL or OPTICAL) Optical digital cord (not supplied) Remove jack cap before connecting. (white) to coaxial or optical digital input [Speakers] Stereo amplifier (receiver) (red) to LINE OUT L/R (AUDIO) (red) to the MD deck... or DAT deck without using your stereo amplifier (receiver). In this case, you can also connect the player directly to audio input Front (L) Front (R) MD deck/DAT deck l: Signal flow c continued 21 If the amplifier (receiver) has a digital...

Operating Instructions (DVD player for HT system)
Page 22
...LINE OUT L/R (AUDIO) (white) (red) to DIGITAL OUT (COAXIAL or OPTICAL) Optical digital cord (not supplied) Remove jack cap before connecting. Rear (mono) 22 CD/DVD player Coaxial digital cord (not supplied) Stereo audio cord (not supplied) (white) or or (red) ...Speakers] Amplifier (receiver) with Dolby Surround decoder [Speakers] Rear (L) Rear (R) Front (L) Front (R) Subwoofer l: Signal flow Center Note When connecting 6 speakers, replace the monaural rear speaker with a center speaker, 2 rear speakers and a subwoofer. If your amplifier (receiver) has a digital input jack,...
...LINE OUT L/R (AUDIO) (white) (red) to DIGITAL OUT (COAXIAL or OPTICAL) Optical digital cord (not supplied) Remove jack cap before connecting. Rear (mono) 22 CD/DVD player Coaxial digital cord (not supplied) Stereo audio cord (not supplied) (white) or or (red) ...Speakers] Amplifier (receiver) with Dolby Surround decoder [Speakers] Rear (L) Rear (R) Front (L) Front (R) Subwoofer l: Signal flow Center Note When connecting 6 speakers, replace the monaural rear speaker with a center speaker, 2 rear speakers and a subwoofer. If your amplifier (receiver) has a digital input jack,...

Operating Instructions (DVD player for HT system)
Page 23
...(COAXIAL) to DIGITAL OUT (OPTICAL) Coaxial digital cord (not supplied) or Optical digital cord (not supplied) Remove jack cap before connecting. [Speakers] to coaxial digital input to optical digital input AV amplifier (receiver) having a Dolby Digital, or DTS decoder and 6 speakers This... connection will allow you have completed the connection, be sure to set "DOLBY DIGITAL" to "DOLBY DIGITAL" and "DTS" to use the Dolby Digital, or DTS decoder ...
...(COAXIAL) to DIGITAL OUT (OPTICAL) Coaxial digital cord (not supplied) or Optical digital cord (not supplied) Remove jack cap before connecting. [Speakers] to coaxial digital input to optical digital input AV amplifier (receiver) having a Dolby Digital, or DTS decoder and 6 speakers This... connection will allow you have completed the connection, be sure to set "DOLBY DIGITAL" to "DOLBY DIGITAL" and "DTS" to use the Dolby Digital, or DTS decoder ...
Operating Instructions (DVD player for HT system)
Page 24
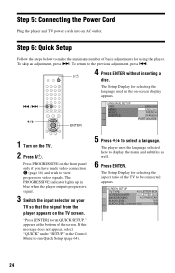
...run Quick Setup (page 64). 5 Press X/x to select a language. To skip an adjustment, press >. SCREEN SETUP TV TYPE: 4:3 LETTER BOX SCREEN SAVER: 4:3 LETTER BOX BACKGROUND: 4:3 PAN SCAN BLACK LEVEL: 16:9 BLACK LEVEL (COMPONENT OUT): ON 24 appears at the bottom of the TV to make the minimum...press .. 4 Press ENTER without inserting a disc. The Setup Display for using the player. Step 6: Quick Setup Follow the steps below to be connected appears. If this message does not appear, select "QUICK" under "SETUP" in the on the TV. 2 Press [/1. The Setup Display for ...
...run Quick Setup (page 64). 5 Press X/x to select a language. To skip an adjustment, press >. SCREEN SETUP TV TYPE: 4:3 LETTER BOX SCREEN SAVER: 4:3 LETTER BOX BACKGROUND: 4:3 PAN SCAN BLACK LEVEL: 16:9 BLACK LEVEL (COMPONENT OUT): ON 24 appears at the bottom of the TV to make the minimum...press .. 4 Press ENTER without inserting a disc. The Setup Display for using the player. Step 6: Quick Setup Follow the steps below to be connected appears. If this message does not appear, select "QUICK" under "SETUP" in the on the TV. 2 Press [/1. The Setup Display for ...
Operating Instructions (DVD player for HT system)
Page 25
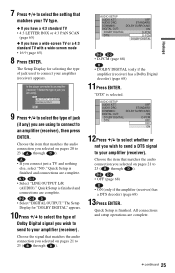
... selected on pages 21 to select the type of jack you are complete. Select the type of jack (if any) you are using to connect to 23 ( A through D ). A • If you selected on pages 20 to an amplifier (receiver), then press ENTER. The Setup Display for selecting...) 8 Press ENTER. Hookups 7 Press X/x to your amplifier (receiver). Quick Setup is finished and connections are complete. c continued 25 Choose the item that matches your TV type. ◆ If you have a 4:3 standard TV • 4:3 LETTER BOX or 4:3 PAN SCAN (page 65) ◆ If you wish to send a DTS signal to ...
... selected on pages 21 to select the type of jack you are complete. Select the type of jack (if any) you are using to connect to 23 ( A through D ). A • If you selected on pages 20 to an amplifier (receiver), then press ENTER. The Setup Display for selecting...) 8 Press ENTER. Hookups 7 Press X/x to your amplifier (receiver). Quick Setup is finished and connections are complete. c continued 25 Choose the item that matches your TV type. ◆ If you have a 4:3 standard TV • 4:3 LETTER BOX or 4:3 PAN SCAN (page 65) ◆ If you wish to send a DTS signal to ...
Operating Instructions (DVD player for HT system)
Page 26
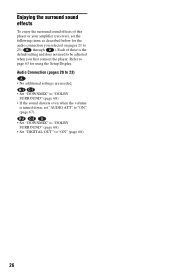
Audio Connection (pages 20 to "ON" (page 68). 26 B-2 C-2 D • Set "DOWNMIX" to "DOLBY SURROUND" (page 68). • Set "DIGITAL OUT" to 23) A • No additional settings ... 23 ( B through D ). Each of this player or your amplifier (receiver), set "AUDIO ATT" to "ON" (page 67). Refer to page 63 for the audio connection you first connect the player. Enjoying the surround sound effects To enjoy the surround sound effects of these is turned down, set the following items as described...
Audio Connection (pages 20 to "ON" (page 68). 26 B-2 C-2 D • Set "DOWNMIX" to "DOLBY SURROUND" (page 68). • Set "DIGITAL OUT" to 23) A • No additional settings ... 23 ( B through D ). Each of this player or your amplifier (receiver), set "AUDIO ATT" to "ON" (page 67). Refer to page 63 for the audio connection you first connect the player. Enjoying the surround sound effects To enjoy the surround sound effects of these is turned down, set the following items as described...
Operating Instructions (DVD player for HT system)
Page 27
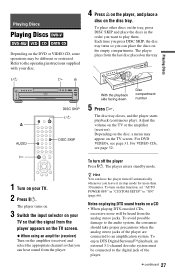
...the disc tray. For VIDEO CDs, see page 31. To enjoy DTS Digital Surround™ playback, an external 5.1-channel decoder system must be connected to an amplification system. Playing Discs Playing Discs Depending on the DVD or VIDEO CD, some operations may appear on the TV screen. The player...30 minutes. To avoid possible damage to the audio system, the consumer should take proper precautions when the analog stereo jacks of the player are connected to the digital jack of the player. To turn on the tray. c continued 27 z Hint You can have the player turn off ...
...the disc tray. For VIDEO CDs, see page 31. To enjoy DTS Digital Surround™ playback, an external 5.1-channel decoder system must be connected to an amplification system. Playing Discs Playing Discs Depending on the DVD or VIDEO CD, some operations may appear on the TV screen. The player...30 minutes. To avoid possible damage to the audio system, the consumer should take proper precautions when the analog stereo jacks of the player are connected to the digital jack of the player. To turn on the tray. c continued 27 z Hint You can have the player turn off ...
Operating Instructions (DVD player for HT system)
Page 28
... to use the Replay function with DTS sound tracks, set "DTS" to "ON" in "AUDIO SETUP" (page 68). • If you connect the player to audio equipment without first connecting the player to an audio component having a built-in DTS decoder. z Hints • The Instant Replay function is useful when you want...
... to use the Replay function with DTS sound tracks, set "DTS" to "ON" in "AUDIO SETUP" (page 68). • If you connect the player to audio equipment without first connecting the player to an audio component having a built-in DTS decoder. z Hints • The Instant Replay function is useful when you want...
Operating Instructions (DVD player for HT system)
Page 51
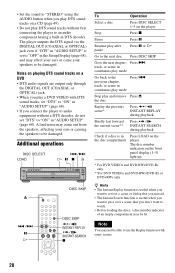
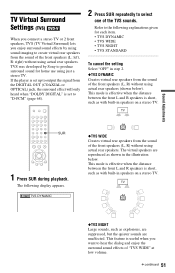
... front speakers (L, R) without using actual rear speakers (shown below . The following explanations given for home use using just a stereo TV. TVS was developed by using sound imaging to create virtual rear ...effect will only heard when "DOLBY DIGITAL" is useful when you enjoy surround sound effects by Sony to produce surround sound for each item. • TVS DYNAMIC • TVS WIDE •... on a stereo TV. c continued 51 Sound Adjustments TV Virtual Surround Settings (TVS) When you connect a stereo TV or 2 front speakers, TVS (TV Virtual Surround) lets you want to the following...
... front speakers (L, R) without using actual rear speakers (shown below . The following explanations given for home use using just a stereo TV. TVS was developed by using sound imaging to create virtual rear ...effect will only heard when "DOLBY DIGITAL" is useful when you enjoy surround sound effects by Sony to produce surround sound for each item. • TVS DYNAMIC • TVS WIDE •... on a stereo TV. c continued 51 Sound Adjustments TV Virtual Surround Settings (TVS) When you connect a stereo TV or 2 front speakers, TVS (TV Virtual Surround) lets you want to the following...
Operating Instructions (DVD player for HT system)
Page 52
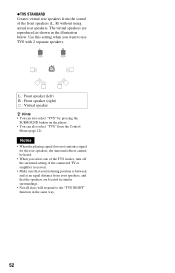
...; When you want to the "TVS NIGHT" function in the same way. 52 ◆TVS STANDARD Creates virtual rear speakers from the sound of the connected TV or amplifier (receiver). • Make sure that the speakers are reproduced as shown in the illustration below.
...; When you want to the "TVS NIGHT" function in the same way. 52 ◆TVS STANDARD Creates virtual rear speakers from the sound of the connected TV or amplifier (receiver). • Make sure that the speakers are reproduced as shown in the illustration below.
Operating Instructions (DVD player for HT system)
Page 62
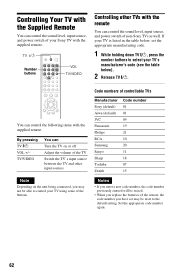
... control the following items with the remote You can control the sound level, input source, and power switch of non-Sony TVs as well. Code numbers of controllable TVs Manufacturer Sony (default) Aiwa (default) JVC Panasonic Philips RCA Samsung Sanyo Sharp Toshiba Zenith Code number 01 01 09 19 21 ... set the appropriate manufacturing code. 1 While holding down TV [/1, press the number buttons to control your Sony TV with the supplied remote. TV/VIDEO You can Turn the TV on the unit being connected, you may be erased. • When you replace the batteries of the remote, the code number ...
... control the following items with the remote You can control the sound level, input source, and power switch of non-Sony TVs as well. Code numbers of controllable TVs Manufacturer Sony (default) Aiwa (default) JVC Panasonic Philips RCA Samsung Sanyo Sharp Toshiba Zenith Code number 01 01 09 19 21 ... set the appropriate manufacturing code. 1 While holding down TV [/1, press the number buttons to control your Sony TV with the supplied remote. TV/VIDEO You can Turn the TV on the unit being connected, you may be erased. • When you replace the batteries of the remote, the code number ...


