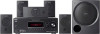
Operating Instructions
Page 4
... video (VIDEO menu).........44 Settings for HDMI function ........ 66 Watching a DVD (One-Touch Play 67 Enjoying the TV sound from the speakers connected to the receiver (System Audio Control 68 Turning off the receiver with the TV (System Power Off 69 Other Operations Switching between digital and analog audio (INPUT MODE 70 Listening to digital sound from other inputs (DIGITAL ASSIGN 70 Enjoying the DIGITAL MEDIA PORT (DMPORT 71 Naming inputs 73 Changing the display 74 Using the Sleep Timer 74 Recording using the receiver 75 Using the Remote Changing button...
... video (VIDEO menu).........44 Settings for HDMI function ........ 66 Watching a DVD (One-Touch Play 67 Enjoying the TV sound from the speakers connected to the receiver (System Audio Control 68 Turning off the receiver with the TV (System Power Off 69 Other Operations Switching between digital and analog audio (INPUT MODE 70 Listening to digital sound from other inputs (DIGITAL ASSIGN 70 Enjoying the DIGITAL MEDIA PORT (DMPORT 71 Naming inputs 73 Changing the display 74 Using the Sleep Timer 74 Recording using the receiver 75 Using the Remote Changing button...
Operating Instructions
Page 9
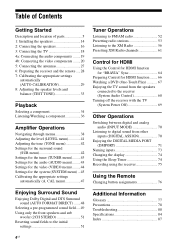
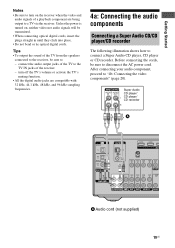
... a better jack sound quality (page 18, 23, 24). B ANTENNA section FM ANTENNA jack Connects to a DVD player, Blu-ray disc player, etc. HDMI IN/ OUT* jacks Connects to the supplied FM wire antenna (page 27). The image is output to this receiver (page 21). XM terminal Connects to the XM Mini-Tuner and Home Dock (not supplied) (page 57). 4 C COMPONENT VIDEO INPUT/ OUTPUT section Green (Y) Blue (PB/CB) Red (PR/CR) Y, PB/CB, PR/CR Connects to a Super Audio CD player, etc...
... a better jack sound quality (page 18, 23, 24). B ANTENNA section FM ANTENNA jack Connects to a DVD player, Blu-ray disc player, etc. HDMI IN/ OUT* jacks Connects to the supplied FM wire antenna (page 27). The image is output to this receiver (page 21). XM terminal Connects to the XM Mini-Tuner and Home Dock (not supplied) (page 57). 4 C COMPONENT VIDEO INPUT/ OUTPUT section Green (Y) Blue (PB/CB) Red (PR/CR) Y, PB/CB, PR/CR Connects to a Super Audio CD player, etc...
Operating Instructions
Page 10
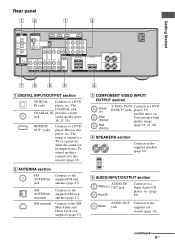
... AMP MENU 0/10 ENTER TOOLS/ OPTIONS MUTING TV VOL MASTER VOL 4 5 6 7 8 9 q; wa TV INPUT TV ?/1 SLEEP DMPORT AV ?/1 ?/1 SYSTEM STANDBY VIDEO 1 VIDEO 2 BD DVD SAT TV SA-CD/CD TUNER 1 2 3 w; F VIDEO/AUDIO INPUT/OUTPUT section AUDIO IN/ White (L) OUT jacks Red (R) Connects to a TV (page 18). VIDEO IN/ Yellow OUT* jacks G DMPORT Connects to a DIGITAL MEDIA PORT adapter (page 72). * You can use the supplied RM-AAU021 Remote Commander to operate the receiver and to control the Sony audio/video components that the remote...
... AMP MENU 0/10 ENTER TOOLS/ OPTIONS MUTING TV VOL MASTER VOL 4 5 6 7 8 9 q; wa TV INPUT TV ?/1 SLEEP DMPORT AV ?/1 ?/1 SYSTEM STANDBY VIDEO 1 VIDEO 2 BD DVD SAT TV SA-CD/CD TUNER 1 2 3 w; F VIDEO/AUDIO INPUT/OUTPUT section AUDIO IN/ White (L) OUT jacks Red (R) Connects to a TV (page 18). VIDEO IN/ Yellow OUT* jacks G DMPORT Connects to a DIGITAL MEDIA PORT adapter (page 72). * You can use the supplied RM-AAU021 Remote Commander to operate the receiver and to control the Sony audio/video components that the remote...

Operating Instructions
Page 11
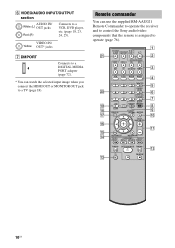
... screen. Refer to the operating instructions supplied with Theater Mode. Press to select a sound field. Press to turn on or off the Sony audio/video components that the remote is compatible with the TV for movies and to output the sound from the speakers connected to activate the Auto Calibration function. AV ?/1 (on/standby) Press to turn off the sound temporarily. MOVIE MUSIC E THEATER F DVD/BD MENU AUTO CAL G D.TUNING D.SKIP H AMP MENU I ENTER MEMORY J MUTING Function Press to enter direct tuning mode. Press to display the menu...
... screen. Refer to the operating instructions supplied with Theater Mode. Press to select a sound field. Press to turn on or off the Sony audio/video components that the remote is compatible with the TV for movies and to output the sound from the speakers connected to activate the Auto Calibration function. AV ?/1 (on/standby) Press to turn off the sound temporarily. MOVIE MUSIC E THEATER F DVD/BD MENU AUTO CAL G D.TUNING D.SKIP H AMP MENU I ENTER MEMORY J MUTING Function Press to enter direct tuning mode. Press to display the menu...
Operating Instructions
Page 13
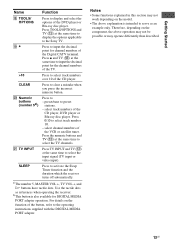
... preset stations. - b)This button is intended to serve as references when operating the receiver. Getting Started Name Function R TOOLS/ OPTIONS Sz Press to clear a mistake when you press the incorrect numeric button. CLEAR T Numeric buttons (number 5a)) U TV INPUT Press to display and select the options of the Digital CATV terminal. Press to the operating instructions supplied with the DIGITAL MEDIA PORT adapter. select channel numbers of the CD player, DVD player or Blu-ray disc player. a)The number 5, MASTER...
... preset stations. - b)This button is intended to serve as references when operating the receiver. Getting Started Name Function R TOOLS/ OPTIONS Sz Press to clear a mistake when you press the incorrect numeric button. CLEAR T Numeric buttons (number 5a)) U TV INPUT Press to display and select the options of the Digital CATV terminal. Press to the operating instructions supplied with the DIGITAL MEDIA PORT adapter. select channel numbers of the CD player, DVD player or Blu-ray disc player. a)The number 5, MASTER...
Operating Instructions
Page 19
... SAT DVD VIDEO 1 SUB WOOF A Audio cord (not supplied) 19US connect the audio output jacks of the TV to a TV via the receiver. Getting Started Notes • Be sure to turn off the TV's volume or activate the TV's muting function. • All the digital audio jacks are being output to the TV IN jacks of the TV from the speakers connected to the receiver, be sure to "4b: Connecting the video components" (page...
... SAT DVD VIDEO 1 SUB WOOF A Audio cord (not supplied) 19US connect the audio output jacks of the TV to a TV via the receiver. Getting Started Notes • Be sure to turn off the TV's volume or activate the TV's muting function. • All the digital audio jacks are being output to the TV IN jacks of the TV from the speakers connected to the receiver, be sure to "4b: Connecting the video components" (page...
Operating Instructions
Page 20
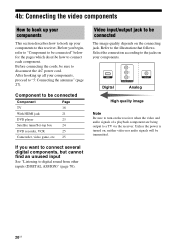
... HDMI Digital Y PB/ CB PR/ CR COMPONENT VIDEO VIDEO Analog High quality image Note Be sure to turn on , neither video nor audio signals will be connected" below for the pages which describe how to connect each component. Refer to a TV via the receiver. Video input/output jack to be sure to disconnect the AC power cord. Select the connection according to the jacks on the connecting jack. 4b: Connecting the video components How to hook up your components...
... HDMI Digital Y PB/ CB PR/ CR COMPONENT VIDEO VIDEO Analog High quality image Note Be sure to turn on , neither video nor audio signals will be connected" below for the pages which describe how to connect each component. Refer to a TV via the receiver. Video input/output jack to be sure to disconnect the AC power cord. Select the connection according to the jacks on the connecting jack. 4b: Connecting the video components How to hook up your components...
Operating Instructions
Page 30
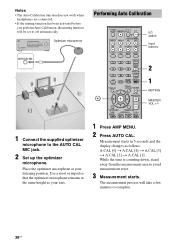
... IN VIDEO L AUDIO R DISPLAY INPUT MODE INPUT SELECTOR MASTER VOLUME MEMORY/ TUNING ENTER MODE TUNING 2CH A.F.D. CATEGORY + TV CH + PRESET - Measurement starts in 5 seconds and the display changes as your listening position. Use a stool or tripod so that the optimizer microphone remains at your ears. MOVIE MUSIC 1 4 7 >10 CLEAR DISPLAY THEATER 23 DVD/BD MENU 56 AUTO CAL D.TUNING 89 D.SKIP MEMORY AMP MENU 0/10 ENTER TOOLS/ OPTIONS MUTING TV VOL MASTER VOL O RETURN/EXIT MENU/HOME TV...
... IN VIDEO L AUDIO R DISPLAY INPUT MODE INPUT SELECTOR MASTER VOLUME MEMORY/ TUNING ENTER MODE TUNING 2CH A.F.D. CATEGORY + TV CH + PRESET - Measurement starts in 5 seconds and the display changes as your listening position. Use a stool or tripod so that the optimizer microphone remains at your ears. MOVIE MUSIC 1 4 7 >10 CLEAR DISPLAY THEATER 23 DVD/BD MENU 56 AUTO CAL D.TUNING 89 D.SKIP MEMORY AMP MENU 0/10 ENTER TOOLS/ OPTIONS MUTING TV VOL MASTER VOL O RETURN/EXIT MENU/HOME TV...
Operating Instructions
Page 31
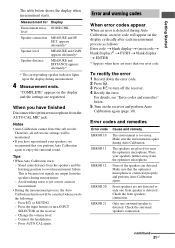
... the optimizer microphone. Avoid making noise to turn INPUT SELECTOR on the receiver. - To rectify the error 1 Record down the error code. 2 Press . 3 Press ?/1 to get a more than one surround speaker is detected. Only one error code. Check the surround speakers connection. appears alternately* Speaker level MEASURE and GAIN appears alternately* Speaker distance MEASURE and DISTANCE appears alternately* * The corresponding speaker indicator lights up in the display during Auto Calibration, an error code will appear...
... the optimizer microphone. Avoid making noise to turn INPUT SELECTOR on the receiver. - To rectify the error 1 Record down the error code. 2 Press . 3 Press ?/1 to get a more than one surround speaker is detected. Only one error code. Check the surround speakers connection. appears alternately* Speaker level MEASURE and GAIN appears alternately* Speaker distance MEASURE and DISTANCE appears alternately* * The corresponding speaker indicator lights up in the display during Auto Calibration, an error code will appear...
Operating Instructions
Page 32
..." below. 5 Turn on the display cyclically as the Auto Calibration function will automatically adjust the settings. WARN. 50 The center speaker is out of range. WARN. 60 The front speaker balance is not connected. Reposition your surround left speaker.d) WARN. 74 The surround right speaker distance is out of range. Warning codes and solutions Warning Explanation and solution code WARN. 40 The environment is quiet during Auto Calibration. Make sure...
..." below. 5 Turn on the display cyclically as the Auto Calibration function will automatically adjust the settings. WARN. 50 The center speaker is out of range. WARN. 60 The front speaker balance is not connected. Reposition your surround left speaker.d) WARN. 74 The surround right speaker distance is out of range. Warning codes and solutions Warning Explanation and solution code WARN. 40 The environment is quiet during Auto Calibration. Make sure...

Operating Instructions
Page 33
.... MOVIE MUSIC 1 4 7 >10 CLEAR DISPLAY THEATER 23 DVD/BD MENU 56 AUTO CAL D.TUNING 89 D.SKIP MEMORY AMP MENU 0/10 ENTER TOOLS/ OPTIONS MUTING TV VOL MASTER VOL O RETURN/EXIT MENU/HOME TV CH - - Tips • To adjust the level of the test tone sounds the same from your listening position. TV INPUT TV ?/1 SLEEP DMPORT AV ?/1 ?/1 SYSTEM STANDBY VIDEO 1 VIDEO 2 BD DVD SAT TV SA-CD/CD TUNER Input buttons 2-5 2CH A.F.D. REPLAY ADVANCE PRESET + .< > 1 MASTER VOL +/- < 1 Press AMP MENU...
.... MOVIE MUSIC 1 4 7 >10 CLEAR DISPLAY THEATER 23 DVD/BD MENU 56 AUTO CAL D.TUNING 89 D.SKIP MEMORY AMP MENU 0/10 ENTER TOOLS/ OPTIONS MUTING TV VOL MASTER VOL O RETURN/EXIT MENU/HOME TV CH - - Tips • To adjust the level of the test tone sounds the same from your listening position. TV INPUT TV ?/1 SLEEP DMPORT AV ?/1 ?/1 SYSTEM STANDBY VIDEO 1 VIDEO 2 BD DVD SAT TV SA-CD/CD TUNER Input buttons 2-5 2CH A.F.D. REPLAY ADVANCE PRESET + .< > 1 MASTER VOL +/- < 1 Press AMP MENU...
Operating Instructions
Page 34
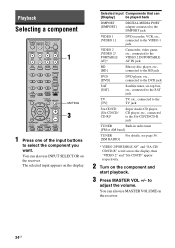
... adjust the volume. MOVIE MUSIC 1 4 7 >10 CLEAR DISPLAY THEATER 23 DVD/BD MENU 56 AUTO CAL D.TUNING 89 D.SKIP MEMORY AMP MENU 0/10 ENTER TOOLS/ OPTIONS MUTING TV VOL MASTER VOL O RETURN/EXIT MENU/HOME TV CH - - CATEGORY + TV CH + PRESET - to select the component you want. Playback Selecting a component TV INPUT TV ?/1 SLEEP DMPORT AV ?/1 ?/1 SYSTEM STANDBY VIDEO 1 VIDEO 2 BD DVD SAT TV SA-CD/CD TUNER 2CH A.F.D. You can [Display] be played back DMPORT [DMPORT] DIGITAL MEDIA PORT adapter connected...
... adjust the volume. MOVIE MUSIC 1 4 7 >10 CLEAR DISPLAY THEATER 23 DVD/BD MENU 56 AUTO CAL D.TUNING 89 D.SKIP MEMORY AMP MENU 0/10 ENTER TOOLS/ OPTIONS MUTING TV VOL MASTER VOL O RETURN/EXIT MENU/HOME TV CH - - CATEGORY + TV CH + PRESET - to select the component you want. Playback Selecting a component TV INPUT TV ?/1 SLEEP DMPORT AV ?/1 ?/1 SYSTEM STANDBY VIDEO 1 VIDEO 2 BD DVD SAT TV SA-CD/CD TUNER 2CH A.F.D. You can [Display] be played back DMPORT [DMPORT] DIGITAL MEDIA PORT adapter connected...
Operating Instructions
Page 36
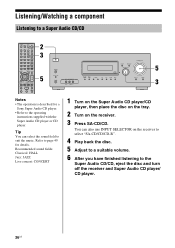
... a Sony Super Audio CD player. • Refer to a Super Audio CD/CD TV INPUT TV ?/1 SLEEP DMPORT AV ?/1 ?/1 SYSTEM STANDBY VIDEO 1 VIDEO 2 BD DVD SAT TV SA-CD/CD TUNER 2CH A.F.D. You can select the sound field to suit the music. CATEGORY MODE TUNING + m H M TV FM MODE X x 2 3 5 ?/1 SPEAKERS (ON/OFF) AUTO CAL MIC PHONES VIDEO 2 IN/PORTABLE AV IN VIDEO L AUDIO R DISPLAY INPUT MODE INPUT SELECTOR MASTER VOLUME MEMORY/ TUNING ENTER MODE TUNING 2CH A.F.D. MOVIE MUSIC 1 4 7 >10 CLEAR DISPLAY THEATER 23 DVD/BD MENU 56 AUTO CAL D.TUNING 89...
... a Sony Super Audio CD player. • Refer to a Super Audio CD/CD TV INPUT TV ?/1 SLEEP DMPORT AV ?/1 ?/1 SYSTEM STANDBY VIDEO 1 VIDEO 2 BD DVD SAT TV SA-CD/CD TUNER 2CH A.F.D. You can select the sound field to suit the music. CATEGORY MODE TUNING + m H M TV FM MODE X x 2 3 5 ?/1 SPEAKERS (ON/OFF) AUTO CAL MIC PHONES VIDEO 2 IN/PORTABLE AV IN VIDEO L AUDIO R DISPLAY INPUT MODE INPUT SELECTOR MASTER VOLUME MEMORY/ TUNING ENTER MODE TUNING 2CH A.F.D. MOVIE MUSIC 1 4 7 >10 CLEAR DISPLAY THEATER 23 DVD/BD MENU 56 AUTO CAL D.TUNING 89...
Operating Instructions
Page 37
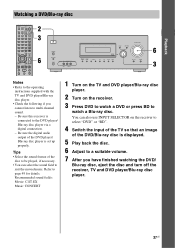
... multi channel sound. - Be sure the digital audio output of the DVD/Blu-ray disc is displayed. 5 Play back the disc. 6 Adjust to a suitable volume. 7 After you cannot listen to the operating instructions supplied with the TV and DVD player/Blu-ray disc player. • Check the following if you have finished watching the DVD/ Blu-ray disc, eject the disc and turn off the receiver, TV and DVD player/Blu-ray disc player. 37US CATEGORY MODE TUNING + m H M TV FM MODE X x 2 3 6 ?/1 SPEAKERS (ON/OFF) AUTO CAL MIC PHONES VIDEO 2 IN/PORTABLE AV IN VIDEO L AUDIO R DISPLAY INPUT...
... multi channel sound. - Be sure the digital audio output of the DVD/Blu-ray disc is displayed. 5 Play back the disc. 6 Adjust to a suitable volume. 7 After you cannot listen to the operating instructions supplied with the TV and DVD player/Blu-ray disc player. • Check the following if you have finished watching the DVD/ Blu-ray disc, eject the disc and turn off the receiver, TV and DVD player/Blu-ray disc player. 37US CATEGORY MODE TUNING + m H M TV FM MODE X x 2 3 6 ?/1 SPEAKERS (ON/OFF) AUTO CAL MIC PHONES VIDEO 2 IN/PORTABLE AV IN VIDEO L AUDIO R DISPLAY INPUT...
Operating Instructions
Page 40
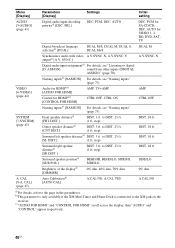
... XM Mini-Tuner and Home Dock is connected to DIST. 23 ft. (1 ft. step) Surround left speaker distancea) DIST. 3 ft. N, A.V.SYNC. SYNC.] Digital audio input assignmenta) For details, see "Listening to DIST. 23 ft. (1 ft. ASSIGN] sound from other inputs (DIGITAL ASSIGN)" (page 70). DIST. 10 ft. Menu [Display] Parameters [Display] Settings Initial setting AUDIO [5-AUDIO] (page 43) Digital audio input decoding DEC. PCM, DEC. DEC. Front speaker distancea) [FRT DIST.] DIST. 3 ft. step) Center speaker distancea) [CNT...
... XM Mini-Tuner and Home Dock is connected to DIST. 23 ft. (1 ft. step) Surround left speaker distancea) DIST. 3 ft. N, A.V.SYNC. SYNC.] Digital audio input assignmenta) For details, see "Listening to DIST. 23 ft. (1 ft. ASSIGN] sound from other inputs (DIGITAL ASSIGN)" (page 70). DIST. 10 ft. Menu [Display] Parameters [Display] Settings Initial setting AUDIO [5-AUDIO] (page 43) Digital audio input decoding DEC. PCM, DEC. DEC. Front speaker distancea) [FRT DIST.] DIST. 3 ft. step) Center speaker distancea) [CNT...
Operating Instructions
Page 44
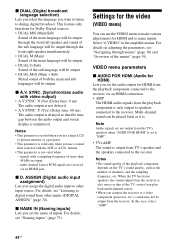
... parameter is not delayed. • A.V.SYNC. In this case, select "AMP". 44US multi channel Linear PCM signals are input. - ASSIGN (Digital audio input assignment) Lets you assign the digital audio input to name inputs. Select "6-VIDEO" in the amplifier menus. VIDEO menu parameters x AUDIO FOR HDMI (Audio for HDMI) Lets you set the audio output for HDMI and to other inputs (DIGITAL ASSIGN)" (page 70). When the TV has stereo speakers, the sound output from TV's speaker and the speakers connected to the receiver via an HDMI jack. x A.V. x D. For details, see...
... parameter is not delayed. • A.V.SYNC. In this case, select "AMP". 44US multi channel Linear PCM signals are input. - ASSIGN (Digital audio input assignment) Lets you assign the digital audio input to name inputs. Select "6-VIDEO" in the amplifier menus. VIDEO menu parameters x AUDIO FOR HDMI (Audio for HDMI) Lets you set the audio output for HDMI and to other inputs (DIGITAL ASSIGN)" (page 70). When the TV has stereo speakers, the sound output from TV's speaker and the speakers connected to the receiver via an HDMI jack. x A.V. x D. For details, see...
Operating Instructions
Page 68
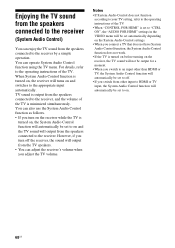
... not be output for a moment. • When you switch to an input other input to HDMI or TV input, the System Audio Control function will automatically be set to off the receiver, the sound will be set to on the System Audio Control settings. • When you connect a TV that does not have System Audio Control function, the System Audio Control function does not work. • If the TV is minimized simultaneously. You can operate System Audio Control function using the TV menu. However, if...
... not be output for a moment. • When you switch to an input other input to HDMI or TV input, the System Audio Control function will automatically be set to off the receiver, the sound will be set to on the System Audio Control settings. • When you connect a TV that does not have System Audio Control function, the System Audio Control function does not work. • If the TV is minimized simultaneously. You can operate System Audio Control function using the TV menu. However, if...
Operating Instructions
Page 76
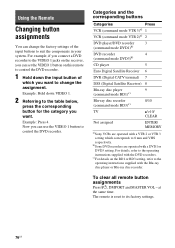
... and MASTER VOL - For example, if you connect a DVD recorder to the VIDEO 1 jacks on the BD1 or BD3 setting, refer to suit the components in your system. Example: Hold down the input button of the input buttons to the operating instructions supplied with the Blu-ray disc player or Blu-ray disc recorder. c)For details on the receiver, you want to 8 mm and VHS respectively. at the same time. Using the Remote Changing button assignments...
... and MASTER VOL - For example, if you connect a DVD recorder to the VIDEO 1 jacks on the BD1 or BD3 setting, refer to suit the components in your system. Example: Hold down the input button of the input buttons to the operating instructions supplied with the Blu-ray disc player or Blu-ray disc recorder. c)For details on the receiver, you want to 8 mm and VHS respectively. at the same time. Using the Remote Changing button assignments...
Operating Instructions
Page 77
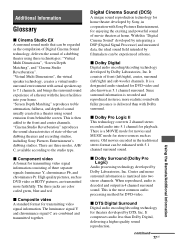
... 2 channel stereo recorded audio into 5.1 channel for transmitting video signal information. x Composite video A standard format for playback. "Virtual Multi Dimensions", the virtual speaker technology, creates a virtual multisurround environment with actual speakers up to the front and center channels. There is the most common audio processing method for stereo sources such as the compilation of Digital Cinema Sound technology, delivers the sound of movie theaters at home. This is a MOVIE mode for movies and MUSIC mode...
... 2 channel stereo recorded audio into 5.1 channel for transmitting video signal information. x Composite video A standard format for playback. "Virtual Multi Dimensions", the virtual speaker technology, creates a virtual multisurround environment with actual speakers up to the front and center channels. There is the most common audio processing method for stereo sources such as the compilation of Digital Cinema Sound technology, delivers the sound of movie theaters at home. This is a MOVIE mode for movies and MUSIC mode...
Operating Instructions
Page 82
... System Audio Control function. • Make sure the TV is compatible with the System Audio Control function. • If the TV does not have System Audio Control function, set the "AUDIO FOR HDMI" settings in VIDEO menu to - Refer to watch a program on this operation. "AMP" if you change the HDMI connection, connect/disconnect the AC power cord, or when there is a power failure (page 66). Select the component or input you watch a TV broadcast. - The source image input to the HDMI jack on the receiver is not output...
... System Audio Control function. • Make sure the TV is compatible with the System Audio Control function. • If the TV does not have System Audio Control function, set the "AUDIO FOR HDMI" settings in VIDEO menu to - Refer to watch a program on this operation. "AMP" if you change the HDMI connection, connect/disconnect the AC power cord, or when there is a power failure (page 66). Select the component or input you watch a TV broadcast. - The source image input to the HDMI jack on the receiver is not output...


