

Operating Instructions
Page 22
...a digital input jack, use C-1 . If your amplifier (receiver) •Dolby Surround (Pro Logic) (page 64) z For correct speaker setting location, please refer to the operating instructions of the amplifier (receiver). CD/DVD player DIGITAL OUT PCM/DTS/ DOLBY DIGITAL COAXIAL OPTICAL LINE OUT S VIDEO COMPONENT OUT VIDEO OUT Y R-AUDIO 1-L VIDEO 1 PB PR R-AUDIO 2-L VIDEO 2 C-2 DIGITAL OUT PCM/DTS/ DOLBY DIGITAL COAXIAL OPTICAL Stereo audio cord Coaxial digital cord (not supplied) (white) (not supplied) or or (red) C-1 LINE OUT R-AUDIO 1-L VIDEO 1 R-AUDIO 2-L VIDEO 2 Optical digital...
...a digital input jack, use C-1 . If your amplifier (receiver) •Dolby Surround (Pro Logic) (page 64) z For correct speaker setting location, please refer to the operating instructions of the amplifier (receiver). CD/DVD player DIGITAL OUT PCM/DTS/ DOLBY DIGITAL COAXIAL OPTICAL LINE OUT S VIDEO COMPONENT OUT VIDEO OUT Y R-AUDIO 1-L VIDEO 1 PB PR R-AUDIO 2-L VIDEO 2 C-2 DIGITAL OUT PCM/DTS/ DOLBY DIGITAL COAXIAL OPTICAL Stereo audio cord Coaxial digital cord (not supplied) (white) (not supplied) or or (red) C-1 LINE OUT R-AUDIO 1-L VIDEO 1 R-AUDIO 2-L VIDEO 2 Optical digital...
Operating Instructions
Page 29
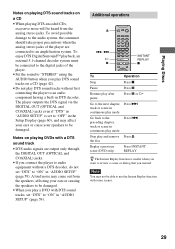
... not play a DVD with a DTS sound track • DTS audio signals are connected to "STEREO" using the AUDIO button when you missed. To enjoy DTS Digital Surround™ playback, an external 5.1-channel decoder system must be connected to the digital jacks of the player are output only through the DIGITAL OUT (OPTICAL and COAXIAL) jacks. • If you connect the player to audio equipment without first connecting the player to an audio component having a built-in the Setup Display (page...
... not play a DVD with a DTS sound track • DTS audio signals are connected to "STEREO" using the AUDIO button when you missed. To enjoy DTS Digital Surround™ playback, an external 5.1-channel decoder system must be connected to the digital jacks of the player are output only through the DIGITAL OUT (OPTICAL and COAXIAL) jacks. • If you connect the player to audio equipment without first connecting the player to an audio component having a built-in the Setup Display (page...
Operating Instructions
Page 36
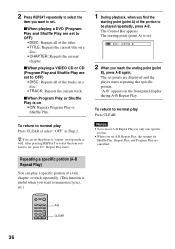
... select the item you want to normal play Press CLEAR. The starting point (point A) of the portion to OFF) • DISC: Repeats all of the titles. • TITLE: Repeats the current title on the front panel display during A-B Repeat Play. The set . xWhen playing a VIDEO CD or CD (Program Play and Shuffle Play are set A-B Repeat Play for Shuffle Play, Repeat Play, and Program Play are displayed and the player...
... select the item you want to normal play Press CLEAR. The starting point (point A) of the portion to OFF) • DISC: Repeats all of the titles. • TITLE: Repeats the current title on the front panel display during A-B Repeat Play. The set . xWhen playing a VIDEO CD or CD (Program Play and Shuffle Play are set A-B Repeat Play for Shuffle Play, Repeat Play, and Program Play are displayed and the player...

Operating Instructions
Page 43
...; Dolby Digital 3 ch DOLBY DIGITAL 2 / 1 Front (L/R) Rear (monaural) • PCM (Stereo) Sampling frequency PCM 96kHz 24bit Quantized bit rate About audio signals Audio signals recorded in "AUDIO SETUP" to work with the LINE OUT L/R (AUDIO) 1/2 jacks. This function is displayed. The Control Bar is designed to "D-PCM") (page 59). Each channel is output from the sound of the front speakers (L: left, R: right) without using sound imaging to select one of the TVS (TV Virtual Surround) sounds. SURROUND 1 Press SURROUND during playback. TV Virtual Surround Sound Settings...
...; Dolby Digital 3 ch DOLBY DIGITAL 2 / 1 Front (L/R) Rear (monaural) • PCM (Stereo) Sampling frequency PCM 96kHz 24bit Quantized bit rate About audio signals Audio signals recorded in "AUDIO SETUP" to work with the LINE OUT L/R (AUDIO) 1/2 jacks. This function is displayed. The Control Bar is designed to "D-PCM") (page 59). Each channel is output from the sound of the front speakers (L: left, R: right) without using sound imaging to select one of the TVS (TV Virtual Surround) sounds. SURROUND 1 Press SURROUND during playback. TV Virtual Surround Sound Settings...
Operating Instructions
Page 48
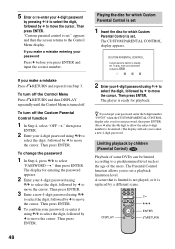
... and input the correct number. 5 Enter or re-enter your 4-digit password using X/x to select the digit, followed by c to move the cursor. Playing the disc for which Custom Parental Control is already set 1 Insert the disc for entering the password appears. 2 Enter your 4-digit password using X/x to select the digit, followed by c to move the cursor. To turn off the Control Menu Press O RETURN and then DISPLAY repeatedly until the Control Menu is set...
... and input the correct number. 5 Enter or re-enter your 4-digit password using X/x to select the digit, followed by c to move the cursor. Playing the disc for which Custom Parental Control is already set 1 Insert the disc for entering the password appears. 2 Enter your 4-digit password using X/x to select the digit, followed by c to move the cursor. To turn off the Control Menu Press O RETURN and then DISPLAY repeatedly until the Control Menu is set...
Operating Instructions
Page 50
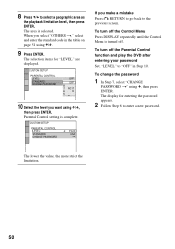
.... CUSTOM SETUP PARENTAL CONTROL LEVEL: STANDARD: CHANGE PASSWORD 4: PG13 USA If you want using X/x, then press ENTER. To turn off the Control Menu Press DISPLAY repeatedly until the Control Menu is turned off the Parental Control function and play the DVD after entering your password Set, "LEVEL" to the previous screen. The lower the value, the more strict the limitation. 50 CUSTOM SETUP PARENTAL CONTROL LEVEL: STANDARD: CHANGE PASSWORD OFF OFF 8: 7: NC17 6: R 5: 10 Select the level you make a mistake...
.... CUSTOM SETUP PARENTAL CONTROL LEVEL: STANDARD: CHANGE PASSWORD 4: PG13 USA If you want using X/x, then press ENTER. To turn off the Control Menu Press DISPLAY repeatedly until the Control Menu is turned off the Parental Control function and play the DVD after entering your password Set, "LEVEL" to the previous screen. The lower the value, the more strict the limitation. 50 CUSTOM SETUP PARENTAL CONTROL LEVEL: STANDARD: CHANGE PASSWORD OFF OFF 8: 7: NC17 6: R 5: 10 Select the level you make a mistake...

Operating Instructions
Page 55
LANGUAGE SETUP OSD: DVD MENU: AUDIO: SUBTITLE: ENGLISH ENGLISH ORIGINAL AUDIO FOLLOW xOSD (On-Screen Display) Switches the display language on using the display, see "Using the Setup Display" (page 54). Settings and Adjustments continued 55 z If you select "QUICK" in Step 3, you will enter Quick Setup mode (page 24). Follow from the displayed list. z If you select "RESET" in Step 3, you can select the desired language for the DVD menu. After you selected for the subtitles changes according to...
LANGUAGE SETUP OSD: DVD MENU: AUDIO: SUBTITLE: ENGLISH ENGLISH ORIGINAL AUDIO FOLLOW xOSD (On-Screen Display) Switches the display language on using the display, see "Using the Setup Display" (page 54). Settings and Adjustments continued 55 z If you select "QUICK" in Step 3, you will enter Quick Setup mode (page 24). Follow from the displayed list. z If you select "RESET" in Step 3, you can select the desired language for the DVD menu. After you selected for the subtitles changes according to...

Operating Instructions
Page 57
... the Setup Display. The background color is in red). Set the timer when the player is blue. ON OFF Turns on using the display, see "Using the Setup Display" (page 54). Turns off the lighting of the front panel display. Custom Settings (CUSTOM SETUP) Allows setting up in standby mode (the power indicator lights up Parental Control and other settings. Select "CUSTOM SETUP" in the background. The default settings are underlined. Starts playing when the player is black. xDIMMER Adjusts the lighting of...
... the Setup Display. The background color is in red). Set the timer when the player is blue. ON OFF Turns on using the display, see "Using the Setup Display" (page 54). Turns off the lighting of the front panel display. Custom Settings (CUSTOM SETUP) Allows setting up in standby mode (the power indicator lights up Parental Control and other settings. Select "CUSTOM SETUP" in the background. The default settings are underlined. Starts playing when the player is black. xDIMMER Adjusts the lighting of...

Operating Instructions
Page 60
... set "DOLBY DIGITAL" in Dolby Digital decoder. D-PCM Select this when the player is connected to an audio component lacking a builtin Dolby Digital decoder, do not set this. Select this when the player is connected to an audio component having a built-in "AUDIO SETUP" (page 58). You can select whether the signals conform to Dolby Surround (Pro Logic) or not by making adjustments to be damaged. Note If you select one of the TVS settings while playing a DVD, the player does not output Dolby Digital signals...
... set "DOLBY DIGITAL" in Dolby Digital decoder. D-PCM Select this when the player is connected to an audio component lacking a builtin Dolby Digital decoder, do not set this. Select this when the player is connected to an audio component having a built-in "AUDIO SETUP" (page 58). You can select whether the signals conform to Dolby Surround (Pro Logic) or not by making adjustments to be damaged. Note If you select one of the TVS settings while playing a DVD, the player does not output Dolby Digital signals...

Limited Warranty (US Only)
Page 1
... cover customer instruction, installation, set up adjustments or signal reception problems. This warranty does not cover cosmetic damage or damage due to acts of God, accident, misuse, abuse, negligence, commercial use, or modification of the Product, including the antenna. This warranty does not cover damage due to improper operation or maintenance, connection to improper voltage supply, or attempted repair by anyone...
... cover customer instruction, installation, set up adjustments or signal reception problems. This warranty does not cover cosmetic damage or damage due to acts of God, accident, misuse, abuse, negligence, commercial use, or modification of the Product, including the antenna. This warranty does not cover damage due to improper operation or maintenance, connection to improper voltage supply, or attempted repair by anyone...

Operating Instructions
Page 3
... the Multi-Channel Surround Displays 30 Customizing Sound Fields 32 Receiving Broadcasts 36 Direct Tuning 38 Automatic Tuning 38 Preset Tuning 39 Other Operations 40 Naming Preset Stations and Program Sources 41 Recording 41 Using the Sleep Timer 42 Adjustment Using the SET UP Button 43 Additional Information 44 Troubleshooting 44 Specifications 46 Glossary 48 Settings Using SURR, LEVEL, EQ, and SET UP buttons 49 Remote Button Description 50 Index 58 3 Confidential unpublished Works. © 1992-1997 Dolby Laboratories. About This Manual The instructions...
... the Multi-Channel Surround Displays 30 Customizing Sound Fields 32 Receiving Broadcasts 36 Direct Tuning 38 Automatic Tuning 38 Preset Tuning 39 Other Operations 40 Naming Preset Stations and Program Sources 41 Recording 41 Using the Sleep Timer 42 Adjustment Using the SET UP Button 43 Additional Information 44 Troubleshooting 44 Specifications 46 Glossary 48 Settings Using SURR, LEVEL, EQ, and SET UP buttons 49 Remote Button Description 50 Index 58 3 Confidential unpublished Works. © 1992-1997 Dolby Laboratories. About This Manual The instructions...

Operating Instructions
Page 8
... to make digital audio connections to the coaxial jack. Hooking Up the Components Digital Component Hookups Connect the digital output jacks of your DVD player and satellite tuner (etc.) to the receiver's digital input jacks to bring the multi channel surround sound of LD player connected via an RF demodulator, such as shown above, be sure to match the color-coded pins to the receiver's OPTICAL or COAXIAL DVD/LD IN jack. It is set INPUT MODE (8 on the receiver are compatible with your home. VIDEO OUT LD player DOLBY DIGITAL RF...
... to make digital audio connections to the coaxial jack. Hooking Up the Components Digital Component Hookups Connect the digital output jacks of your DVD player and satellite tuner (etc.) to the receiver's digital input jacks to bring the multi channel surround sound of LD player connected via an RF demodulator, such as shown above, be sure to match the color-coded pins to the receiver's OPTICAL or COAXIAL DVD/LD IN jack. It is set INPUT MODE (8 on the receiver are compatible with your home. VIDEO OUT LD player DOLBY DIGITAL RF...

Operating Instructions
Page 9
...the instruction manual supplied with MULTI CH IN jacks. SPEAKERS FRONT ? / 1 SPEAKERS PHONES DISPLAY DIMMER MULTI CHANNEL DECODING INPUT MODE VIDEO DVD/LD TV/SAT MD/TAPE CD TUNER AUX MASTER VOLUME + PRESET - TUNING + LEVEL SURR EQ MEMORY SHIFT FM MODE FM AM SET UP NAME CINEMA STUDIO EX A B C ENTER SOUND FIELD A.F.D. TUNING + - MUTING SPEAKERS SURROUND/CENTER SUB WOOFER Note See page 12 for details on speaker system hookup. Refer to enjoy multichannel software encoded in formats other than Dolby Digital and DTS. MULTI CH OUTPUT SURROUND FRONT CENTER SUB WOOFER...
...the instruction manual supplied with MULTI CH IN jacks. SPEAKERS FRONT ? / 1 SPEAKERS PHONES DISPLAY DIMMER MULTI CHANNEL DECODING INPUT MODE VIDEO DVD/LD TV/SAT MD/TAPE CD TUNER AUX MASTER VOLUME + PRESET - TUNING + LEVEL SURR EQ MEMORY SHIFT FM MODE FM AM SET UP NAME CINEMA STUDIO EX A B C ENTER SOUND FIELD A.F.D. TUNING + - MUTING SPEAKERS SURROUND/CENTER SUB WOOFER Note See page 12 for details on speaker system hookup. Refer to enjoy multichannel software encoded in formats other than Dolby Digital and DTS. MULTI CH OUTPUT SURROUND FRONT CENTER SUB WOOFER...

Operating Instructions
Page 19
... the receiver and all components are turned on. , Check that the volume level on the display is not set to VOL MIN by turning the MASTER VOLUME. , Check that the SPEAKERS button is not set to OFF. , Check that all of your listening position using the remote control. MUTING MASTER VOLUME 1 Press ?/1 to select a component (program source) that the connections were made via the front panel using the LEVEL menu (when the test tone is because most software contains center and surround channels...
... the receiver and all components are turned on. , Check that the volume level on the display is not set to VOL MIN by turning the MASTER VOLUME. , Check that the SPEAKERS button is not set to OFF. , Check that all of your listening position using the remote control. MUTING MASTER VOLUME 1 Press ?/1 to select a component (program source) that the connections were made via the front panel using the LEVEL menu (when the test tone is because most software contains center and surround channels...
Operating Instructions
Page 23
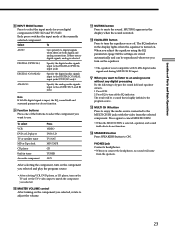
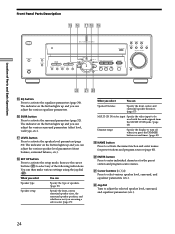
... CD player Built in the display lights when the equalizer is highly faithful to use. The result will come from the selected component. PHONES jack Connects headphones. • When you want to the program source. Location of the currently selected component. Each press switches the input mode of Parts and Basic Operations 8 INPUT MODE button Press to the AUDIO IN (L and R) jacks Note If 96 kHz digital signal is not compatible with the video from the speakers...
... CD player Built in the display lights when the equalizer is highly faithful to use. The result will come from the selected component. PHONES jack Connects headphones. • When you want to the program source. Location of the currently selected component. Each press switches the input mode of Parts and Basic Operations 8 INPUT MODE button Press to the AUDIO IN (L and R) jacks Note If 96 kHz digital signal is not compatible with the video from the speakers...
Operating Instructions
Page 24
... ? / 1 SPEAKERS PHONES DISPLAY DIMMER MULTI CHANNEL DECODING INPUT MODE VIDEO DVD/LD TV/SAT MD/TAPE CD TUNER AUX MASTER VOLUME + PRESET - TUNING + LEVEL SURR EQ MEMORY SHIFT FM MODE FM AM SET UP NAME CINEMA STUDIO EX A B C ENTER SOUND FIELD A.F.D. The indicator on the button lights up and you select You can Speaker Distance Specify the front, center, and surround speaker distances. (page 17) MULTI CH IN video input Specify the video input to be used with the audio signals from the MULTI CH...
... ? / 1 SPEAKERS PHONES DISPLAY DIMMER MULTI CHANNEL DECODING INPUT MODE VIDEO DVD/LD TV/SAT MD/TAPE CD TUNER AUX MASTER VOLUME + PRESET - TUNING + LEVEL SURR EQ MEMORY SHIFT FM MODE FM AM SET UP NAME CINEMA STUDIO EX A B C ENTER SOUND FIELD A.F.D. The indicator on the button lights up and you select You can Speaker Distance Specify the front, center, and surround speaker distances. (page 17) MULTI CH IN video input Specify the video input to be used with the audio signals from the MULTI CH...

Operating Instructions
Page 30
... SPEAKERS button is set to two channel signals in radio stations, etc. L: Front Left R: Front Right C: Center (monaural) SL: Left Surround SR: Right Surround S: Surround (monaural or the surround components obtained by Pro Logic processing) The boxes around the letters light up when dynamic range compression is NOT set to playback the channels. Note When playing a DTS format disc, be sure that you have made digital connections and that INPUT MODE is active. RANGE Lights...
... SPEAKERS button is set to two channel signals in radio stations, etc. L: Front Left R: Front Right C: Center (monaural) SL: Left Surround SR: Right Surround S: Surround (monaural or the surround components obtained by Pro Logic processing) The boxes around the letters light up when dynamic range compression is NOT set to playback the channels. Note When playing a DTS format disc, be sure that you have made digital connections and that INPUT MODE is active. RANGE Lights...

Operating Instructions
Page 51
... mode. MENU MENU +/- Enters the selection. Select discs (Mega storage CD player only). Selects information displayed on the model of the two cursor modes: LEVEL and SURROUND. Selects a menu item. Selects a menu item. SKIP/CH/ PRESET +/- Toggles between the previous and the current channels. Auto Format Decoding. Displays DVD title. ** Only for set operation. Notes • Some functions explained in this button repeatedly to serve as an example only. F. Turns off sound field or selects 2CH mode. Selects MULTI CH IN source. Returns to output test tone...
... mode. MENU MENU +/- Enters the selection. Select discs (Mega storage CD player only). Selects information displayed on the model of the two cursor modes: LEVEL and SURROUND. Selects a menu item. Selects a menu item. SKIP/CH/ PRESET +/- Toggles between the previous and the current channels. Auto Format Decoding. Displays DVD title. ** Only for set operation. Notes • Some functions explained in this button repeatedly to serve as an example only. F. Turns off sound field or selects 2CH mode. Selects MULTI CH IN source. Returns to output test tone...

Operating Instructions
Page 54
... volume of the small picture. Press this section may operate differently than described. • The VIDEO 3, PHONO, AV1, AV2, 3RD, NIGHT MODE, ON SCREEN, 2ND ROOM and AUDIO SPLIT functions are not available for your digital components. POSITION* MUTING (with multi-disc changer only). MODE +/- 2CH PRESET TV TV TV TV TV TV Receiver Receiver Receiver Receiver Receiver Function Scans and selects preset stations. Press again to output test tone. Remote Button TEST TONE EQ/TONE MULTI /2CH A. DIRECT MUTING AV DISPLAY TITLE/GUIDE AV MENU...
... volume of the small picture. Press this section may operate differently than described. • The VIDEO 3, PHONO, AV1, AV2, 3RD, NIGHT MODE, ON SCREEN, 2ND ROOM and AUDIO SPLIT functions are not available for your digital components. POSITION* MUTING (with multi-disc changer only). MODE +/- 2CH PRESET TV TV TV TV TV TV Receiver Receiver Receiver Receiver Receiver Function Scans and selects preset stations. Press again to output test tone. Remote Button TEST TONE EQ/TONE MULTI /2CH A. DIRECT MUTING AV DISPLAY TITLE/GUIDE AV MENU...
Easy Hook-up Guide for HT Systems
Page 1
... your DVD player. 19. Sony is a trademark of Dolby Laboratories Licensing Corporation. First, let's make sure to use the video R L AUDIO OUT VIDEO OUT output that you used the audio output numbered 1 you need to the VIDEO OUT connection on your DVD player. 25. DOLBY DIGITAL (AC-3) COAXIAL OPTICAL DIGITAL OUT 18. DIGITAL OPTICAL DVD/LD IN TV/SAT IN ANTENNA AM DVD/LD IN COAXIAL FM 75Ω COAXIAL VIDEO IN VIDEO IN L L L L CENTER R FRONT SURROUND SUB WOOFER MULTI CH IN R IN IN AUX CD...
... your DVD player. 19. Sony is a trademark of Dolby Laboratories Licensing Corporation. First, let's make sure to use the video R L AUDIO OUT VIDEO OUT output that you used the audio output numbered 1 you need to the VIDEO OUT connection on your DVD player. 25. DOLBY DIGITAL (AC-3) COAXIAL OPTICAL DIGITAL OUT 18. DIGITAL OPTICAL DVD/LD IN TV/SAT IN ANTENNA AM DVD/LD IN COAXIAL FM 75Ω COAXIAL VIDEO IN VIDEO IN L L L L CENTER R FRONT SURROUND SUB WOOFER MULTI CH IN R IN IN AUX CD...


