Operating Guide
Page 10
... a disc or a "Memory Stick PRO Duo 30 Recording/Playback Recording and playback with ease (Easy Handycam operation) ...... 34 Recording 38 Zooming 40 Recording sound with your camcorder Enjoy using various "Media" according to your needs 13 Operation flow 14 Features of still images (Slide...category 56 Deleting images 57 Capturing a still image from a movie 59 Dubbing/copying images from one media to another media on your camcorder 5 Subject examples and solutions ... 12 Enjoying with more presence (5.1ch surround recording) ......... 40 Starting recording quickly (QUICK ON 41 ...
... a disc or a "Memory Stick PRO Duo 30 Recording/Playback Recording and playback with ease (Easy Handycam operation) ...... 34 Recording 38 Zooming 40 Recording sound with your camcorder Enjoy using various "Media" according to your needs 13 Operation flow 14 Features of still images (Slide...category 56 Deleting images 57 Capturing a still image from a movie 59 Dubbing/copying images from one media to another media on your camcorder 5 Subject examples and solutions ... 12 Enjoying with more presence (5.1ch surround recording) ......... 40 Starting recording quickly (QUICK ON 41 ...

Operating Guide
Page 18
...for operations with your camcorder (p. 84). *1 You can be used on HDR-UX20. 18 For the items available in the (SETTINGS), see page 84. *2 During Easy Handycam operation, you can set this menu item when the setting of [MOVIE MEDIA SET] is assigned to the internal memory (HDR-UX20) or the "Memory... Stick." *3 This function can also set these items during Easy Handycam operation (p. 34). Category B Categories and items of the HOME MENU (CAMERA) category Items Page MOVIE...
...for operations with your camcorder (p. 84). *1 You can be used on HDR-UX20. 18 For the items available in the (SETTINGS), see page 84. *2 During Easy Handycam operation, you can set this menu item when the setting of [MOVIE MEDIA SET] is assigned to the internal memory (HDR-UX20) or the "Memory... Stick." *3 This function can also set these items during Easy Handycam operation (p. 34). Category B Categories and items of the HOME MENU (CAMERA) category Items Page MOVIE...

Operating Guide
Page 21
... number in the parentheses indicates the number of that you have the following items supplied with your camcorder. AC Adaptor (1) (p. 22) Rechargeable battery pack NP-FH60 (1) (p. 22) Power cord (Mains lead) (1) (p. 22) CD-ROM "Handycam Application Software" (1) (p. 105) - Getting Started Step 1: Checking supplied items Make sure that item supplied. Picture Motion Browser...
... number in the parentheses indicates the number of that you have the following items supplied with your camcorder. AC Adaptor (1) (p. 22) Rechargeable battery pack NP-FH60 (1) (p. 22) Power cord (Mains lead) (1) (p. 22) CD-ROM "Handycam Application Software" (1) (p. 105) - Getting Started Step 1: Checking supplied items Make sure that item supplied. Picture Motion Browser...
Operating Guide
Page 31
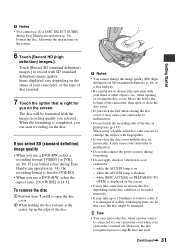
... of the disc or pickup lens (p. 133). When the formatting is right for you can remove the disc when a power source is connected to your camcorder is dirty with SD (standard definition) image quality. To remove the disc 1 Perform steps 1 and 2 to malfunction. • Do not touch the... a double-sided disc, take up the edge of the camcorder, then open the disc cover. 2 While holding the disc fastener at the center, tip up to 10 minutes to malfunction. • Do not disconnect the power sources during Easy Handycam operation (p. 34). while the ACCESS lamp is flashing - In...
... of the disc or pickup lens (p. 133). When the formatting is right for you can remove the disc when a power source is connected to your camcorder is dirty with SD (standard definition) image quality. To remove the disc 1 Perform steps 1 and 2 to malfunction. • Do not touch the... a double-sided disc, take up the edge of the camcorder, then open the disc cover. 2 While holding the disc fastener at the center, tip up to 10 minutes to malfunction. • Do not disconnect the power sources during Easy Handycam operation (p. 34). while the ACCESS lamp is flashing - In...
Operating Guide
Page 34
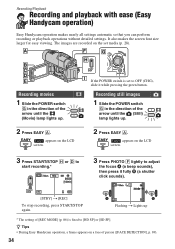
... SP] or [SD SP]. Flashing t Lights up . 2 Press EASY A. Recording/Playback Recording and playback with ease (Easy Handycam operation) Easy Handycam operation makes nearly all settings automatic so that you can perform recording or playback operations without detailed settings. Recording movies 1 Slide the...Movie) lamp lights up. 2 Press EASY A. appears on a face of [REC MODE] (p. 86) is set media (p. 28). z Tips • During Easy Handycam operation, a frame appears on the LCD screen. 3 Press START/STOP H or D to start recording.* 3 Press PHOTO F lightly to OFF (CHG), slide it ...
... SP] or [SD SP]. Flashing t Lights up . 2 Press EASY A. Recording/Playback Recording and playback with ease (Easy Handycam operation) Easy Handycam operation makes nearly all settings automatic so that you can perform recording or playback operations without detailed settings. Recording movies 1 Slide the...Movie) lamp lights up. 2 Press EASY A. appears on a face of [REC MODE] (p. 86) is set media (p. 28). z Tips • During Easy Handycam operation, a frame appears on the LCD screen. 3 Press START/STOP H or D to start recording.* 3 Press PHOTO F lightly to OFF (CHG), slide it ...
Operating Guide
Page 36
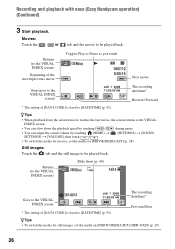
... volume by touching (HOME) t (SETTINGS) t [SOUND SETTINGS] t [VOLUME], then touch /. • To switch the media for still images, set the media on [PHOTO MEDIA SET] (HDR-UX20) (p. 29). 36 Recording and playback with ease (Easy Handycam operation) (Continued) 3 Start playback.
... volume by touching (HOME) t (SETTINGS) t [SOUND SETTINGS] t [VOLUME], then touch /. • To switch the media for still images, set the media on [PHOTO MEDIA SET] (HDR-UX20) (p. 29). 36 Recording and playback with ease (Easy Handycam operation) (Continued) 3 Start playback.

Operating Guide
Page 37
... to finalize a recorded disc to make additional recordings on other devices or computers. b Notes • Most of some buttons/functions during Easy Handycam operation You cannot use some menu items are automatically set (p. 109). For details, see page 109. • When formatting DVD-RW discs ...free space on the disc. • You cannot record additional materials on finalizing operation. See page 73 on a finalized disc during Easy Handycam operation Press (HOME) B or C to the default settings. The settings of the menu items automatically return to display the menu items ...
... to finalize a recorded disc to make additional recordings on other devices or computers. b Notes • Most of some buttons/functions during Easy Handycam operation You cannot use some menu items are automatically set (p. 109). For details, see page 109. • When formatting DVD-RW discs ...free space on the disc. • You cannot record additional materials on finalizing operation. See page 73 on a finalized disc during Easy Handycam operation Press (HOME) B or C to the default settings. The settings of the menu items automatically return to display the menu items ...

Operating Guide
Page 57
Deleting the movies The selected movie is set to the images. To delete all the movies recorded on the disc. b Notes • During Easy Handycam operation, you cannot delete movies on the same day at one time 1 In step 3, touch [ DELETE by date]/ [ DELETE by date]. 2 ... time. • You can delete an image on the LCD screen to confirm. Press and hold the movie on the playback screen using your camcorder. Cancel Easy Handycam operation. 1 Touch (HOME) t (OTHERS) t [DELETE]. 2 Touch [ DELETE]. 3 Touch [ DELETE]/ [ DELETE]/[ DELETE]. 4 Touch the movie to be deleted in advance (p. ...
Deleting the movies The selected movie is set to the images. To delete all the movies recorded on the disc. b Notes • During Easy Handycam operation, you cannot delete movies on the same day at one time 1 In step 3, touch [ DELETE by date]/ [ DELETE by date]. 2 ... time. • You can delete an image on the LCD screen to confirm. Press and hold the movie on the playback screen using your camcorder. Cancel Easy Handycam operation. 1 Touch (HOME) t (OTHERS) t [DELETE]. 2 Touch [ DELETE]. 3 Touch [ DELETE]/ [ DELETE]/[ DELETE]. 4 Touch the movie to be deleted in advance (p. ...

Operating Guide
Page 74
... a recording. Make a new recording If a disc menu has been created, a confirmation screen prompts you to confirm that you use DVD- To do so, cancel Easy Handycam operation (p. 37). To play back a disc on another device after adding a recording (p. 75) Finalize Playback on other device AVCHD-compatible device Computer Make a desired disc...
... a recording. Make a new recording If a disc menu has been created, a confirmation screen prompts you to confirm that you use DVD- To do so, cancel Easy Handycam operation (p. 37). To play back a disc on another device after adding a recording (p. 75) Finalize Playback on other device AVCHD-compatible device Computer Make a desired disc...

Operating Guide
Page 75
... create a disc menu. 3 Touch . To select a disc menu style 1 In step 4, touch (OPTION) t [DISC MENU]. 2 Select the desired style from your camcorder. 3 Insert the disc to be finalized. 4 Touch (HOME) t (MANAGE MEDIA) t [FINALIZE]. If you must finalize each side of the disc individually. • ... the disc from 4 types of pattern with HD (high definition) image quality - Discs recorded with / . Continued , 75 b Notes • During Easy Handycam operation, the disc menu is fixed to step 5. When you do not change the setting of the disc menu style, go to [STYLE1]. Select [NO...
... create a disc menu. 3 Touch . To select a disc menu style 1 In step 4, touch (OPTION) t [DISC MENU]. 2 Select the desired style from your camcorder. 3 Insert the disc to be finalized. 4 Touch (HOME) t (MANAGE MEDIA) t [FINALIZE]. If you must finalize each side of the disc individually. • ... the disc from 4 types of pattern with HD (high definition) image quality - Discs recorded with / . Continued , 75 b Notes • During Easy Handycam operation, the disc menu is fixed to step 5. When you do not change the setting of the disc menu style, go to [STYLE1]. Select [NO...

Operating Guide
Page 80
If you format DVD-RW during Easy Handycam operation (p. 34), the recording format is required on each side in the recording image quality and ... • Discs recorded with a new disc. 1 Connect the AC Adaptor to the DC IN jack on your camcorder and the wall outlet (wall socket). 2 Slide the POWER switch to turn on the (Movie) lamp. 3 Insert the finalized disc... the AC Adaptor during formatting. • When you use a double-sided disc, formatting is fixed to your camcorder. Cancel the protection with the original device, and then format it with HD (high definition) image quality can ...
If you format DVD-RW during Easy Handycam operation (p. 34), the recording format is required on each side in the recording image quality and ... • Discs recorded with a new disc. 1 Connect the AC Adaptor to the DC IN jack on your camcorder and the wall outlet (wall socket). 2 Slide the POWER switch to turn on the (Movie) lamp. 3 Insert the finalized disc... the AC Adaptor during formatting. • When you use a double-sided disc, formatting is fixed to your camcorder. Cancel the protection with the original device, and then format it with HD (high definition) image quality can ...

Operating Guide
Page 85
... 96 CALIBRATION 132 A.SHUT OFF 97 QUICK ON STBY 97 REMOTE CTRL 97 CTRL FOR HDMI 97 * You can set these items also during Easy Handycam operation (p. 34). ** [SOUND SETTINGS] during Easy Handycam operation. 85 Customizing your camcorder
... 96 CALIBRATION 132 A.SHUT OFF 97 QUICK ON STBY 97 REMOTE CTRL 97 CTRL FOR HDMI 97 * You can set these items also during Easy Handycam operation (p. 34). ** [SOUND SETTINGS] during Easy Handycam operation. 85 Customizing your camcorder

Operating Guide
Page 98
... BLT-IN ZOOM MIC MICREF LEVEL IMAGE SIZE SELF-TIMER a 86 - 104 - 104 a 90 - 104 Activating functions using your camcorder at the time. • Some items appear without a tab. • During Easy Handycam operation, you cannot use the (OPTION MENU). If you cannot find the item anywhere, the function does not work...
... BLT-IN ZOOM MIC MICREF LEVEL IMAGE SIZE SELF-TIMER a 86 - 104 - 104 a 90 - 104 Activating functions using your camcorder at the time. • Some items appear without a tab. • During Easy Handycam operation, you cannot use the (OPTION MENU). If you cannot find the item anywhere, the function does not work...
Operating Guide
Page 109
...(p. 48) - DUBBING button (HDR-UX20) (p. 61) (OPTION) does not appear on the screen. • The OPTION MENU cannot be used simultaneously p. 118 Overall operations/Easy Handycam operation/Remote Commander The power does not turn on and off your camcorder to be ready to shoot after....) • The temperature of your camcorder is not a malfunction. • Disconnect the AC Adaptor from the wall outlet (wall socket). If the problem persists, disconnect the power source and contact your Sony dealer. • Overall operations/Easy Handycam operation/Remote Commander .......p. 109 •...
...(p. 48) - DUBBING button (HDR-UX20) (p. 61) (OPTION) does not appear on the screen. • The OPTION MENU cannot be used simultaneously p. 118 Overall operations/Easy Handycam operation/Remote Commander The power does not turn on and off your camcorder to be ready to shoot after....) • The temperature of your camcorder is not a malfunction. • Disconnect the AC Adaptor from the wall outlet (wall socket). If the problem persists, disconnect the power source and contact your Sony dealer. • Overall operations/Easy Handycam operation/Remote Commander .......p. 109 •...
Operating Guide
Page 110
... ones before Easy Handycam operation. - [MOVIE MEDIA SET] - [PHOTO MEDIA SET]* - [AUDIO MODE] - [WIDE SELECT] - [X.V.COLOR] - [SUB-T DATE] - [FLASH MODE] - [ INDEX SET] - [CONVERSION LENS] - [ IMAGE SIZE] - [FILE NO.] - [ DISPLAY] - [VOLUME] - [BEEP] - [TV TYPE] - [COMPONENT] - [CLOCK SET] - [AREA SET] - [DST SET]/[SUMMERTIME] - [ LANGUAGE SET] - [DEMO MODE] - [CTRL FOR HDMI] *HDR-UX20 Your camcorder vibrates. •...
... ones before Easy Handycam operation. - [MOVIE MEDIA SET] - [PHOTO MEDIA SET]* - [AUDIO MODE] - [WIDE SELECT] - [X.V.COLOR] - [SUB-T DATE] - [FLASH MODE] - [ INDEX SET] - [CONVERSION LENS] - [ IMAGE SIZE] - [FILE NO.] - [ DISPLAY] - [VOLUME] - [BEEP] - [TV TYPE] - [COMPONENT] - [CLOCK SET] - [AREA SET] - [DST SET]/[SUMMERTIME] - [ LANGUAGE SET] - [DEMO MODE] - [CTRL FOR HDMI] *HDR-UX20 Your camcorder vibrates. •...
Operating Guide
Page 117
... of following discs, follow the required procedure to edit or record additional material on a disc recorded on your camcorder using other than the most recent movie on DVD-RW with the VIDEO mode - To the Playlist on the...movie. • There is no free space in the media. • To the Playlist on the internal memory (HDR-UX20) or the "Memory Stick PRO Duo," you can add a maximum of 999 movies. • You cannot add still...than the most recent movie on DVD+RW • During Easy Handycam operation, movies on the disc cannot be deleted. • An image protected on another device cannot be ...
... of following discs, follow the required procedure to edit or record additional material on a disc recorded on your camcorder using other than the most recent movie on DVD-RW with the VIDEO mode - To the Playlist on the...movie. • There is no free space in the media. • To the Playlist on the internal memory (HDR-UX20) or the "Memory Stick PRO Duo," you can add a maximum of 999 movies. • You cannot add still...than the most recent movie on DVD+RW • During Easy Handycam operation, movies on the disc cannot be deleted. • An image protected on another device cannot be ...

Operating Guide
Page 137
... voltage DC 7.2 V Capacity 7.2 Wh (1 000 mAh) Type Li-ion Design and specifications are subject to change without notice. • Your camcorder is a trademark of Dolby Laboratories. • HDMI, the HDMI logo and High-Definition Multimedia Interface are trademarks or registered trademarks of HDMI Licensing ... mentioned herein may be the trademarks or registered trademarks of their respective companies. On trademarks • "Handycam" and are registered trademarks of Sony Corporation. • "AVCHD" and "AVCHD" logotype are trademarks of Matsushita Electric Industrial Co., Ltd.
... voltage DC 7.2 V Capacity 7.2 Wh (1 000 mAh) Type Li-ion Design and specifications are subject to change without notice. • Your camcorder is a trademark of Dolby Laboratories. • HDMI, the HDMI logo and High-Definition Multimedia Interface are trademarks or registered trademarks of HDMI Licensing ... mentioned herein may be the trademarks or registered trademarks of their respective companies. On trademarks • "Handycam" and are registered trademarks of Sony Corporation. • "AVCHD" and "AVCHD" logotype are trademarks of Matsushita Electric Industrial Co., Ltd.
Operating Guide
Page 146
Quick Reference Index Numeric 1080i/480i 95 1440 × 1080/60i............17, 128 16:9 95 16:9 WIDE 87 1920 × 1080/60i............17,...67 Dolby Digital 5.1 Creator 40, 145 Double-sided disc 127 DST SET 96 Dual Rec 41 Dubbing to a disc on the camcorder 61 to a other devices .......... 68 DVD drive 77 DVD format 16, 145 DVD menu 75 DVD-R 16 DVD-RW 16 ...DVD+R DL 16 DVD+RW 16 D.EFFECT (Digital effect 104, 119 E Easy Handycam 34 Editing 56 EMPTY (Data empty 83 EXPOSURE 101, 119 F FACE DETECTION .... 89, 119 Face Index 47 Face INDEX SET ...
Quick Reference Index Numeric 1080i/480i 95 1440 × 1080/60i............17, 128 16:9 95 16:9 WIDE 87 1920 × 1080/60i............17,...67 Dolby Digital 5.1 Creator 40, 145 Double-sided disc 127 DST SET 96 Dual Rec 41 Dubbing to a disc on the camcorder 61 to a other devices .......... 68 DVD drive 77 DVD format 16, 145 DVD menu 75 DVD-R 16 DVD-RW 16 ...DVD+R DL 16 DVD+RW 16 D.EFFECT (Digital effect 104, 119 E Easy Handycam 34 Editing 56 EMPTY (Data empty 83 EXPOSURE 101, 119 F FACE DETECTION .... 89, 119 Face Index 47 Face INDEX SET ...


