Operating Guide
Page 8
...illustrating the operating procedures. On recording • Before starting to record, test the recording function to make sure the image and sound are not compatible with the AVCHD format Note on the countries/regions. If you cannot record/play back images recorded with the ...Other AVCHD-compatible devices which are recorded without any problems. HDR-UX10: It is recommended that you perform [ EMPTY] (p. 83) to prevent the recovery of the camcorder, storage media, etc. • TV color systems differ depending on disposal/transfer (HDR-UX20) Even if you format the internal memory (p. ...
...illustrating the operating procedures. On recording • Before starting to record, test the recording function to make sure the image and sound are not compatible with the AVCHD format Note on the countries/regions. If you cannot record/play back images recorded with the ...Other AVCHD-compatible devices which are recorded without any problems. HDR-UX10: It is recommended that you perform [ EMPTY] (p. 83) to prevent the recovery of the camcorder, storage media, etc. • TV color systems differ depending on disposal/transfer (HDR-UX20) Even if you format the internal memory (p. ...
Operating Guide
Page 10
... Inserting a disc or a "Memory Stick PRO Duo 30 Recording/Playback Recording and playback with ease (Easy Handycam operation) ...... 34 Recording 38 Zooming 40 Recording sound with your camcorder Enjoy using various "Media" according to your needs 13 Operation flow 14 Features of the media 16 " HOME... playback on and setting the date and time 25 Changing the language setting ..... 26 Step 4: Making adjustments before operating your camcorder 5 Subject examples and solutions ... 12 Enjoying with more presence (5.1ch surround recording) ......... 40 Starting recording quickly (QUICK ON...
... Inserting a disc or a "Memory Stick PRO Duo 30 Recording/Playback Recording and playback with ease (Easy Handycam operation) ...... 34 Recording 38 Zooming 40 Recording sound with your camcorder Enjoy using various "Media" according to your needs 13 Operation flow 14 Features of the media 16 " HOME... playback on and setting the date and time 25 Changing the language setting ..... 26 Step 4: Making adjustments before operating your camcorder 5 Subject examples and solutions ... 12 Enjoying with more presence (5.1ch surround recording) ......... 40 Starting recording quickly (QUICK ON...
Operating Guide
Page 11
...the right disc (DISC SELECT GUIDE 81 Repairing the image database file 82 Preventing data on the internal memory of the camcorder from being recovered (HDR-UX20) .... 83 Customizing your camcorder What you can do with the (SETTINGS) category of the HOME MENU 84 Using the HOME MENU 84 List of...Items for recording movies) PHOTO SETTINGS 90 (Items for recording still images) VIEW IMAGES SET 92 (Items to customize the display) SOUND/DISP SET 93 (Items to adjust the sound and the screen) OUTPUT SETTINGS 95 (Items for connecting other devices) CLOCK/ LANG 96 (Items to set clock and language) ...
...the right disc (DISC SELECT GUIDE 81 Repairing the image database file 82 Preventing data on the internal memory of the camcorder from being recovered (HDR-UX20) .... 83 Customizing your camcorder What you can do with the (SETTINGS) category of the HOME MENU 84 Using the HOME MENU 84 List of...Items for recording movies) PHOTO SETTINGS 90 (Items for recording still images) VIEW IMAGES SET 92 (Items to customize the display) SOUND/DISP SET 93 (Items to adjust the sound and the screen) OUTPUT SETTINGS 95 (Items for connecting other devices) CLOCK/ LANG 96 (Items to set clock and language) ...
Operating Guide
Page 27
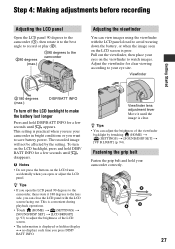
...LCD screen is convenient during playback operations. • Touch (HOME) t (SETTINGS) t [SOUND/DISP SET] t [LCD BRIGHT] (p. 93) to adjust the brightness of the viewfinder backlight by the setting. Pull out the viewfinder, then place your camcorder in bright conditions or you can close the LCD panel with the LCD panel... avoid wearing down the battery, or when the image seen on the LCD frame accidentally when you open the LCD panel 90 degrees to the camcorder, then rotate it 180 degrees to the lens side, you want to save battery power. z Tips • If you press DISP/ BATT ...
...LCD screen is convenient during playback operations. • Touch (HOME) t (SETTINGS) t [SOUND/DISP SET] t [LCD BRIGHT] (p. 93) to adjust the brightness of the viewfinder backlight by the setting. Pull out the viewfinder, then place your camcorder in bright conditions or you can close the LCD panel with the LCD panel... avoid wearing down the battery, or when the image seen on the LCD frame accidentally when you open the LCD panel 90 degrees to the camcorder, then rotate it 180 degrees to the lens side, you want to save battery power. z Tips • If you press DISP/ BATT ...
Operating Guide
Page 34
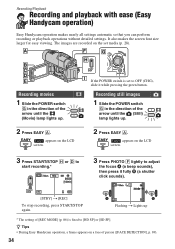
... G in the direction of the arrow until the (Movie) lamp lights up . 2 Press EASY A. z Tips • During Easy Handycam operation, a frame appears on the set to OFF (CHG), slide it fully B (a shutter click sounds). [STBY] t [REC] To stop recording, press START/STOP again. Flashing t Lights up * The setting of person ([FACE DETECTION...
... G in the direction of the arrow until the (Movie) lamp lights up . 2 Press EASY A. z Tips • During Easy Handycam operation, a frame appears on the set to OFF (CHG), slide it fully B (a shutter click sounds). [STBY] t [REC] To stop recording, press START/STOP again. Flashing t Lights up * The setting of person ([FACE DETECTION...
Operating Guide
Page 36
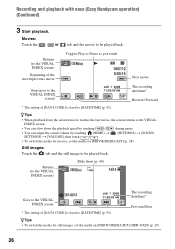
... by touching / during pause. • You can adjust the sound volume by touching (HOME) t (SETTINGS) t [SOUND SETTINGS] t [VOLUME], then touch /. • To switch the media for still images, set the media on [PHOTO MEDIA SET] (HDR-UX20) (p. 29). 36 Recording and playback with ease (Easy Handycam operation) (Continued) 3 Start playback. Still images: Touch the...
... by touching / during pause. • You can adjust the sound volume by touching (HOME) t (SETTINGS) t [SOUND SETTINGS] t [VOLUME], then touch /. • To switch the media for still images, set the media on [PHOTO MEDIA SET] (HDR-UX20) (p. 29). 36 Recording and playback with ease (Easy Handycam operation) (Continued) 3 Start playback. Still images: Touch the...

Operating Guide
Page 39
.... 2 Press START/STOP B (or C). b Notes • You cannot record still images on the number of the arrow to adjust the focus A (a beep sounds), then press it fully B (a shutter click sounds). [STBY] t [REC] To stop recording, press START/STOP again. z Tips • For details on the recordable time for desired scenes by face...
.... 2 Press START/STOP B (or C). b Notes • You cannot record still images on the number of the arrow to adjust the focus A (a beep sounds), then press it fully B (a shutter click sounds). [STBY] t [REC] To stop recording, press START/STOP again. z Tips • For details on the recordable time for desired scenes by face...
Operating Guide
Page 40
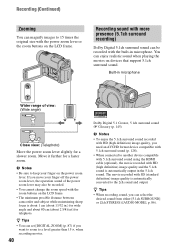
...and the 5.1ch sound is automatically output in the 5.1ch sound. Built-in microphone Wider range of the power zoom lever may also be recorded with the power zoom lever or the zoom buttons on the LCD frame. • The minimum possible distance between camcorder and subject while ...maintaining sharp focus is automatically converted to keep your finger off the power zoom lever, the operation sound of view: (Wide angle) Close view: (Telephoto) Move the power zoom lever ...
...and the 5.1ch sound is automatically output in the 5.1ch sound. Built-in microphone Wider range of the power zoom lever may also be recorded with the power zoom lever or the zoom buttons on the LCD frame. • The minimum possible distance between camcorder and subject while ...maintaining sharp focus is automatically converted to keep your finger off the power zoom lever, the operation sound of view: (Wide angle) Close view: (Telephoto) Move the power zoom lever ...

Operating Guide
Page 43
...is recorded when [RECORD SOUND] on [SMTH SLW REC] is set to [OFF], is displayed, regardless the setting of [SMTH SLW REC] is not as good as conversation on the slow motion pictures. (The default setting is [OFF].) Your camcorder records sounds for about 12 seconds ...while [Recording...] is displayed in step 2. b Notes • Sounds cannot be recorded while recording a 3 second-movie (approx.). • Image quality of [AUDIO MODE] ...
...is recorded when [RECORD SOUND] on [SMTH SLW REC] is set to [OFF], is displayed, regardless the setting of [SMTH SLW REC] is not as good as conversation on the slow motion pictures. (The default setting is [OFF].) Your camcorder records sounds for about 12 seconds ...while [Recording...] is displayed in step 2. b Notes • Sounds cannot be recorded while recording a 3 second-movie (approx.). • Image quality of [AUDIO MODE] ...

Operating Guide
Page 46
Playback (Continued) Viewing still images Touch the tab and the still image to the VISUAL INDEX screen Previous/Next (OPTION) To adjust the sound volume of movies When playing back a movie, touch (OPTION) t volume with / . Returns (to the VISUAL INDEX screen) Slide show (p. 49) Goes to be played back. tab t [VOLUME], then adjust the z Tips • You can switch the VISUAL INDEX screen by touching (VIEW IMAGES) t [VISUAL INDEX]. (HOME) D (or E) t 46
Playback (Continued) Viewing still images Touch the tab and the still image to the VISUAL INDEX screen Previous/Next (OPTION) To adjust the sound volume of movies When playing back a movie, touch (OPTION) t volume with / . Returns (to the VISUAL INDEX screen) Slide show (p. 49) Goes to be played back. tab t [VOLUME], then adjust the z Tips • You can switch the VISUAL INDEX screen by touching (VIEW IMAGES) t [VISUAL INDEX]. (HOME) D (or E) t 46

Operating Guide
Page 52
...MENU setting • Use an HDMI cable with the HDMI logo (see the cover). • Use an HDMI mini connector on one end (for the camcorder), and a connector suitable for connection to your TV on the other end. • Images are not output from the HDMI OUT jack, if copyright ... with SD (standard definition) image quality on your TV (p. 95). This may not function correctly (e.g., no sound or image) with this connection. • Do not connect the HDMI OUT jack of your camcorder and HDMI OUT jack of the external device with SD (standard definition) image quality is converted to your...
...MENU setting • Use an HDMI cable with the HDMI logo (see the cover). • Use an HDMI mini connector on one end (for the camcorder), and a connector suitable for connection to your TV on the other end. • Images are not output from the HDMI OUT jack, if copyright ... with SD (standard definition) image quality on your TV (p. 95). This may not function correctly (e.g., no sound or image) with this connection. • Do not connect the HDMI OUT jack of your camcorder and HDMI OUT jack of the external device with SD (standard definition) image quality is converted to your...

Operating Guide
Page 85
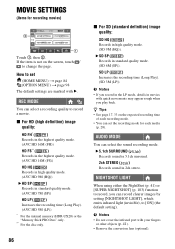
... MODE* 88 FLASH LEVEL 89 REDEYE REDUC 89 FACE DETECTION 89 CONVERSION LENS 90 VIEW IMAGES SET (p. 92) Items Page DATA CODE 92 DISPLAY 93 SOUND/DISP SET** (p. 93) Items Page VOLUME* 93 BEEP* 93 LCD BRIGHT 93 LCD BL LEVEL 94 Items Page LCD COLOR 94 VF B.LIGHT 94 OUTPUT... 96 CALIBRATION 132 A.SHUT OFF 97 QUICK ON STBY 97 REMOTE CTRL 97 CTRL FOR HDMI 97 * You can set these items also during Easy Handycam operation (p. 34). ** [SOUND SETTINGS] during Easy Handycam operation. 85 Customizing your camcorder
... MODE* 88 FLASH LEVEL 89 REDEYE REDUC 89 FACE DETECTION 89 CONVERSION LENS 90 VIEW IMAGES SET (p. 92) Items Page DATA CODE 92 DISPLAY 93 SOUND/DISP SET** (p. 93) Items Page VOLUME* 93 BEEP* 93 LCD BRIGHT 93 LCD BL LEVEL 94 Items Page LCD COLOR 94 VF B.LIGHT 94 OUTPUT... 96 CALIBRATION 132 A.SHUT OFF 97 QUICK ON STBY 97 REMOTE CTRL 97 CTRL FOR HDMI 97 * You can set these items also during Easy Handycam operation (p. 34). ** [SOUND SETTINGS] during Easy Handycam operation. 85 Customizing your camcorder
Operating Guide
Page 86
...Records in standard quality mode. (AVC HD 7M (SP)) HD LP ( ) Increases the recording time (Long Play). (AVC HD 5M (LP)) * For the internal memory (HDR-UX20) or the "Memory Stick PRO Duo" only. ** For the disc only. 86 x For SD (standard definition) image quality: SD HQ ( ) Records in standard ... t page 98 The default settings are marked with your fingers or other objects (p. 41). • Remove the conversion lens (optional). B 5.1ch SURROUND ( ) Records sound in 5.1ch surround. 2ch STEREO ( ) Records sound in movies with quick movements may appear rough when you can select the...
...Records in standard quality mode. (AVC HD 7M (SP)) HD LP ( ) Increases the recording time (Long Play). (AVC HD 5M (LP)) * For the internal memory (HDR-UX20) or the "Memory Stick PRO Duo" only. ** For the disc only. 86 x For SD (standard definition) image quality: SD HQ ( ) Records in standard ... t page 98 The default settings are marked with your fingers or other objects (p. 41). • Remove the conversion lens (optional). B 5.1ch SURROUND ( ) Records sound in 5.1ch surround. 2ch STEREO ( ) Records sound in movies with quick movements may appear rough when you can select the...

Operating Guide
Page 93
...stop recording, or operate the touch panel. VOLUME Touch / (p. 46). to adjust the sound and the screen) Touch 1, then 2. If the item is not on the VISUAL INDEX screen or the Playlist. Customizing your camcorder.* 6IMAGES Displays thumbnails of 6 images. 12IMAGES Displays thumbnails of 12 images. * You ...can select the number of thumbnails (6 or 12) with the power zoom lever on your camcorder Continued , 93 How to change the page. OFF Cancels the melody or shutter sound. DISPLAY You can also operate with the zoom buttons on the LCD frame or on the Remote Commander...
...stop recording, or operate the touch panel. VOLUME Touch / (p. 46). to adjust the sound and the screen) Touch 1, then 2. If the item is not on the VISUAL INDEX screen or the Playlist. Customizing your camcorder.* 6IMAGES Displays thumbnails of 6 images. 12IMAGES Displays thumbnails of 12 images. * You ...can select the number of thumbnails (6 or 12) with the power zoom lever on your camcorder Continued , 93 How to change the page. OFF Cancels the melody or shutter sound. DISPLAY You can also operate with the zoom buttons on the LCD frame or on the Remote Commander...

Operating Guide
Page 94
...8226; This adjustment does not affect the recorded images in any way. B NORMAL Standard brightness. b Notes • When you connect your camcorder to outside and close the LCD panel to face the screen outside power sources, [BRIGHT] is automatically selected for the setting. • When... select [BRIGHT], battery life is slightly reduced during recording. • If you select [BRIGHT], battery life is slightly reduced during recording. SOUND/DISP SET (Continued) LCD BL LEVEL You can adjust the brightness of the viewfinder. B NORMAL Standard brightness. LCD COLOR You can adjust ...
...8226; This adjustment does not affect the recorded images in any way. B NORMAL Standard brightness. b Notes • When you connect your camcorder to outside and close the LCD panel to face the screen outside power sources, [BRIGHT] is automatically selected for the setting. • When... select [BRIGHT], battery life is slightly reduced during recording. • If you select [BRIGHT], battery life is slightly reduced during recording. SOUND/DISP SET (Continued) LCD BL LEVEL You can adjust the brightness of the viewfinder. B NORMAL Standard brightness. LCD COLOR You can adjust ...

Operating Guide
Page 99
Items FLASH MODE TIMING RECORD SOUND *1 Page a 88 - 42 - 43 Viewing items on the OPTION MENU Items tab DELETE*2 DELETE by date*2 DELETE ALL*2 *1 Page a 57 a 57 a 57 tab DIVIDE ERASE*2 ... also. *2 These items also available in the HOME MENU, but with different item names. *3 [DVD MENU] for SD (standard definition) image quality 99 Customizing your camcorder
Items FLASH MODE TIMING RECORD SOUND *1 Page a 88 - 42 - 43 Viewing items on the OPTION MENU Items tab DELETE*2 DELETE by date*2 DELETE ALL*2 *1 Page a 57 a 57 a 57 tab DIVIDE ERASE*2 ... also. *2 These items also available in the HOME MENU, but with different item names. *3 [DVD MENU] for SD (standard definition) image quality 99 Customizing your camcorder

Operating Guide
Page 104
... down, then record a still image after about 10 seconds. PASTEL MICREF LEVEL (Mic reference level) You can record sound with directivity as a pale pastel drawing. Press PHOTO to an image during recording. The default setting is not suitable for recording... sound. To cancel the self-timer, select [OFF]. B NORMAL Records various surround sounds, converting them into the certain level. This setting is [OFF]. 104 To cancel [D.EFFECT], touch [OFF]. ...
... down, then record a still image after about 10 seconds. PASTEL MICREF LEVEL (Mic reference level) You can record sound with directivity as a pale pastel drawing. Press PHOTO to an image during recording. The default setting is not suitable for recording... sound. To cancel the self-timer, select [OFF]. B NORMAL Records various surround sounds, converting them into the certain level. This setting is [OFF]. 104 To cancel [D.EFFECT], touch [OFF]. ...

Operating Guide
Page 105
... details on a computer x Creating a disc in a multi-boot environment. http://guide.d-imaging.sony.co.jp/mac/ms/us/ Installing the software x System requirements for AVCHD x Importing images ...the contents to the computer - It is necessary to have DirectX installed.) Sound system: Direct Sound-compatible sound card Memory: Windows 2000, Windows XP: 512 MB or more (1 GB...volume required for installation) Continued , 105 Performing with a computer b Notes • This camcorder captures high definition footage in SD (standard definition) image quality Application: DirectX 9.0c or later...
... details on a computer x Creating a disc in a multi-boot environment. http://guide.d-imaging.sony.co.jp/mac/ms/us/ Installing the software x System requirements for AVCHD x Importing images ...the contents to the computer - It is necessary to have DirectX installed.) Sound system: Direct Sound-compatible sound card Memory: Windows 2000, Windows XP: 512 MB or more (1 GB...volume required for installation) Continued , 105 Performing with a computer b Notes • This camcorder captures high definition footage in SD (standard definition) image quality Application: DirectX 9.0c or later...
Operating Guide
Page 106
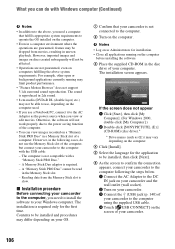
... reproduced in 2ch sound. • 8 cm media (DVD+R DL (double layer) etc.) may not be installed, then click [Next]. 6 As the screen to confirm the connection appears, connect your camcorder to the computer following cases, do with a "Memory Stick PRO Duo." - A "Memory Stick PRO Duo" cannot ...movies. What you can view images recorded on a "Memory Stick PRO Duo" in a Memory Stick slot of the computer, but connect your camcorder to your Windows computer. For example, other open or background applications currently running on the computer. 4 Click [Install]. 5 Select the language ...
... reproduced in 2ch sound. • 8 cm media (DVD+R DL (double layer) etc.) may not be installed, then click [Next]. 6 As the screen to confirm the connection appears, connect your camcorder to the computer following cases, do with a "Memory Stick PRO Duo." - A "Memory Stick PRO Duo" cannot ...movies. What you can view images recorded on a "Memory Stick PRO Duo" in a Memory Stick slot of the computer, but connect your camcorder to your Windows computer. For example, other open or background applications currently running on the computer. 4 Click [Install]. 5 Select the language ...
Operating Guide
Page 110
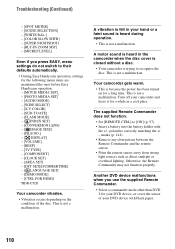
... malfunctions when you press EASY, menu settings do not switch to their defaults automatically. • During Easy Handycam operation, settings for the following menu items are maintained the ones before Easy Handycam operation. - [MOVIE MEDIA SET] - [PHOTO MEDIA SET]* - [AUDIO MODE] - [WIDE SELECT]...*HDR-UX20 Your camcorder vibrates. • Vibration occurs depending on for a while in the camcorder when the disc cover is closed without a disc. • Your camcorder is not a malfunction. Your camcorder gets warm. • This is not a malfunction. Turn off your hand or a faint sound ...
... malfunctions when you press EASY, menu settings do not switch to their defaults automatically. • During Easy Handycam operation, settings for the following menu items are maintained the ones before Easy Handycam operation. - [MOVIE MEDIA SET] - [PHOTO MEDIA SET]* - [AUDIO MODE] - [WIDE SELECT]...*HDR-UX20 Your camcorder vibrates. • Vibration occurs depending on for a while in the camcorder when the disc cover is closed without a disc. • Your camcorder is not a malfunction. Your camcorder gets warm. • This is not a malfunction. Turn off your hand or a faint sound ...


