Operating Instructions
Page 2
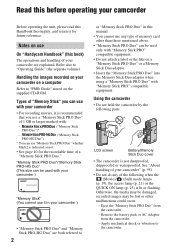
...2 as "Memory Stick PRO Duo" in your camcorder • For recording movies, it is recommended that you can use "Memory Stick PRO Duo" whether Mark2 is indicated or not. • See page 10 for future reference. Notes on use On "Handycam Handbook" (this book) The operations and handling ...of your camcorder Before operating the unit, please read this Handbook thoroughly, and retain it for the recordable time of your...
...2 as "Memory Stick PRO Duo" in your camcorder • For recording movies, it is recommended that you can use "Memory Stick PRO Duo" whether Mark2 is indicated or not. • See page 10 for future reference. Notes on use On "Handycam Handbook" (this book) The operations and handling ...of your camcorder Before operating the unit, please read this Handbook thoroughly, and retain it for the recordable time of your...
Operating Instructions
Page 3
... do not affect the recording in any problems. • Compensation for effective use. Pushing the plug forcibly into the Handycam Station or remove the camcorder from the Handycam Station holding both the Handycam Station and the DC plug. • Be sure to malfunction. Doing so might cause your... camcorder to turn off your camcorder when you insert the camcorder into the terminal will damage the terminal and may result in a ...
... do not affect the recording in any problems. • Compensation for effective use. Pushing the plug forcibly into the Handycam Station or remove the camcorder from the Handycam Station holding both the Handycam Station and the DC plug. • Be sure to malfunction. Doing so might cause your... camcorder to turn off your camcorder when you insert the camcorder into the terminal will damage the terminal and may result in a ...
Operating Instructions
Page 5
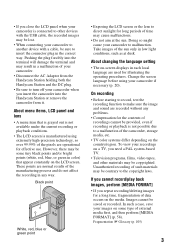
...Inserting a "Memory Stick PRO Duo 21 Recording/Playback Recording and playback with ease (Easy Handycam operation) .....22 Recording 26 Zooming 28 Recording sound with more presence (5.1ch surround recording ...images 44 Editing (OTHERS) category 45 Deleting images 46 Capturing a still image from a movie (HDR-TG1E 47 Dividing a movie 48 Creating the Playlist 49 Dubbing to other devices 52 Printing recorded images ...Deleting all images (Formatting) ...58 Repairing the image database file 59 Customizing Your Camcorder What you can do with the (SETTINGS) category of the HOME MENU 60 Using...
...Inserting a "Memory Stick PRO Duo 21 Recording/Playback Recording and playback with ease (Easy Handycam operation) .....22 Recording 26 Zooming 28 Recording sound with more presence (5.1ch surround recording ...images 44 Editing (OTHERS) category 45 Deleting images 46 Capturing a still image from a movie (HDR-TG1E 47 Dividing a movie 48 Creating the Playlist 49 Dubbing to other devices 52 Printing recorded images ...Deleting all images (Formatting) ...58 Repairing the image database file 59 Customizing Your Camcorder What you can do with the (SETTINGS) category of the HOME MENU 60 Using...
Operating Instructions
Page 11
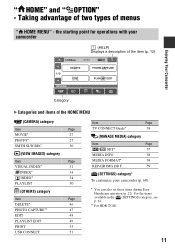
...* To customize your camcorder (HELP) Displays a description of the item (p. 12) Enjoying Your Camcorder Category B Categories and items of menus " HOME MENU" - For the items available in the (SETTINGS) category, see p. 61. ** For HDR-TG1E. 11 the starting point for operations with your camcorder (p. 60). * You can also set these items during Easy Handycam operation (p. 22).
...* To customize your camcorder (HELP) Displays a description of the item (p. 12) Enjoying Your Camcorder Category B Categories and items of menus " HOME MENU" - For the items available in the (SETTINGS) category, see p. 61. ** For HDR-TG1E. 11 the starting point for operations with your camcorder (p. 60). * You can also set these items during Easy Handycam operation (p. 22).

Operating Instructions
Page 14
... Handbook) "Operating Guide" (1) 14 Power cord (Mains lead) (1) (p. 15) Rechargeable battery pack (1) (p. 15, 93) NP-FH50 Handycam Station (1) (p. 15, 102) Component A/V cable (1) (p. 39) A/V connecting cable (1) (p. 39, 52) 21-pin adaptor (p. 42) For the model with your camcorder. PMB Guide - "Memory Stick PRO Duo" 4 GB (1) (p. 21) USB cable (long) (1)/ USB cable (short) (1) (p. 53...
... Handbook) "Operating Guide" (1) 14 Power cord (Mains lead) (1) (p. 15) Rechargeable battery pack (1) (p. 15, 93) NP-FH50 Handycam Station (1) (p. 15, 102) Component A/V cable (1) (p. 39) A/V connecting cable (1) (p. 39, 52) 21-pin adaptor (p. 42) For the model with your camcorder. PMB Guide - "Memory Stick PRO Duo" 4 GB (1) (p. 21) USB cable (long) (1)/ USB cable (short) (1) (p. 53...
Operating Instructions
Page 15
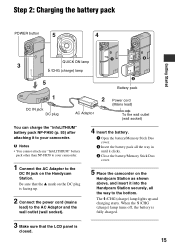
... (charge) lamp turns off, the battery is fully charged. 3 Make sure that the v mark on the Handycam Station as shown above, and insert it clicks. 3 Close the battery/Memory Stick Duo cover. 5 Place the camcorder on the DC plug is closed. 15 Be sure that the LCD panel is facing up and... outlet (wall socket). 4 Insert the battery. 1 Open the battery/Memory Stick Duo cover. 2 Insert the battery pack all the way in until it into the Handycam Station securely, all the way to the bottom. b Notes • You cannot attach any "InfoLITHIUM" battery pack other than NP-FH50 to your...
... (charge) lamp turns off, the battery is fully charged. 3 Make sure that the v mark on the Handycam Station as shown above, and insert it clicks. 3 Close the battery/Memory Stick Duo cover. 5 Place the camcorder on the DC plug is closed. 15 Be sure that the LCD panel is facing up and... outlet (wall socket). 4 Insert the battery. 1 Open the battery/Memory Stick Duo cover. 2 Insert the battery pack all the way in until it into the Handycam Station securely, all the way to the bottom. b Notes • You cannot attach any "InfoLITHIUM" battery pack other than NP-FH50 to your...
Operating Instructions
Page 16
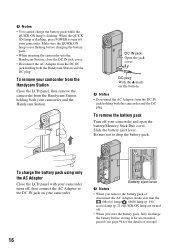
...disconnect the AC Adaptor, make sure that the (Movie) lamp/ (Still) lamp (p. 19)/ access lamp (p. 21)/QUICK ON lamp are turned off your camcorder and the Handycam Station. To remove the battery pack Turn off , then connect the AC Adaptor to the DC IN jack on the bottom b Notes • Disconnect... the AC Adaptor from the Handycam Station holding both your camcorder. To remove your camcorder. Make sure the QUICK ON lamp is flashing, press POWER to drop the battery pack. DC IN jack Open the jack ...
...disconnect the AC Adaptor, make sure that the (Movie) lamp/ (Still) lamp (p. 19)/ access lamp (p. 21)/QUICK ON lamp are turned off your camcorder and the Handycam Station. To remove the battery pack Turn off , then connect the AC Adaptor to the DC IN jack on the bottom b Notes • Disconnect... the AC Adaptor from the Handycam Station holding both your camcorder. To remove your camcorder. Make sure the QUICK ON lamp is flashing, press POWER to drop the battery pack. DC IN jack Open the jack ...
Operating Instructions
Page 17
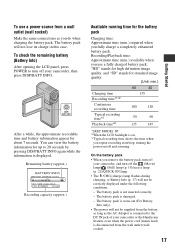
... backlight is damaged. - To check the remaining battery (Battery Info) After opening the LCD panel, press POWER to the DC IN jack of your camcorder or the Handycam Station, even when the power cord (mains lead) is worn-out (For Battery Info only). • The power will not be correctly displayed under... battery pack will not be supplied from a wall outlet (wall socket) Make the same connections as the AC Adaptor is connected to turn off your camcorder, and turn off your camcorder, then press DISP/BATT INFO.
... backlight is damaged. - To check the remaining battery (Battery Info) After opening the LCD panel, press POWER to the DC IN jack of your camcorder or the Handycam Station, even when the power cord (mains lead) is worn-out (For Battery Info only). • The power will not be correctly displayed under... battery pack will not be supplied from a wall outlet (wall socket) Make the same connections as the AC Adaptor is connected to turn off your camcorder, and turn off your camcorder, then press DISP/BATT INFO.

Operating Instructions
Page 22
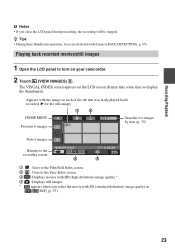
... movies 1 Open the LCD panel to start recording.* [STBY] b [REC] To stop recording, press START/STOP again. Recording/Playback Recording and playback with ease (Easy Handycam operation) Easy Handycam operation makes nearly all settings automatic so that you can perform recording or playback operation without detailed settings.
... movies 1 Open the LCD panel to start recording.* [STBY] b [REC] To stop recording, press START/STOP again. Recording/Playback Recording and playback with ease (Easy Handycam operation) Easy Handycam operation makes nearly all settings automatic so that you can perform recording or playback operation without detailed settings.
Operating Instructions
Page 23
... panel to display the thumbnails). Recording/Playback b Notes • If you select the movie with frames ([FACE DETECTION], p. 65). Appears with the image on your camcorder. 2 Touch (VIEW IMAGES) B. z Tips • During Easy Handycam operation, faces are detected with SD (standard definition) image quality in [ / SET] (p. 57). 23
... panel to display the thumbnails). Recording/Playback b Notes • If you select the movie with frames ([FACE DETECTION], p. 65). Appears with the image on your camcorder. 2 Touch (VIEW IMAGES) B. z Tips • During Easy Handycam operation, faces are detected with SD (standard definition) image quality in [ / SET] (p. 57). 23

Operating Instructions
Page 25
...details, see page 79. • You cannot use some menu items are automatically set (p. 79). disappears Menu settings during Easy Handycam operation Touch (HOME) A to images or change settings. The settings of the menu items automatically return to the default settings. Invalid functions... during Easy Handycam operation since they are fixed. b Notes • Most of some functions during Easy Handycam operation You cannot use the (OPTION) MENU. • Cancel Easy Handycam operation if you want to add effects to display the...
...details, see page 79. • You cannot use some menu items are automatically set (p. 79). disappears Menu settings during Easy Handycam operation Touch (HOME) A to images or change settings. The settings of the menu items automatically return to the default settings. Invalid functions... during Easy Handycam operation since they are fixed. b Notes • Most of some functions during Easy Handycam operation You cannot use the (OPTION) MENU. • Cancel Easy Handycam operation if you want to add effects to display the...

Operating Instructions
Page 30
...setting is displayed in smooth moving subjects and actions, which cannot be captured under the ordinary shooting conditions, can be shot in step 2. Your camcorder records sounds for about 3 seconds. b Notes • Sounds cannot be recorded while shooting a 3-second movie (approx.). • Image ... (HOME) t t [SMTH SLW REC]. (CAMERA) • [RECORD SOUND] Select [ON] ( ) to cancel the smooth slow recording. Cancel Easy Handycam operation. 2 Press START/STOP. The default setting is pressed. Recording the fast action in slow-motion (SMTH SLW REC) Fast moving slow-motion for about...
...setting is displayed in smooth moving subjects and actions, which cannot be captured under the ordinary shooting conditions, can be shot in step 2. Your camcorder records sounds for about 3 seconds. b Notes • Sounds cannot be recorded while shooting a 3-second movie (approx.). • Image ... (HOME) t t [SMTH SLW REC]. (CAMERA) • [RECORD SOUND] Select [ON] ( ) to cancel the smooth slow recording. Cancel Easy Handycam operation. 2 Press START/STOP. The default setting is pressed. Recording the fast action in slow-motion (SMTH SLW REC) Fast moving slow-motion for about...
Operating Instructions
Page 37
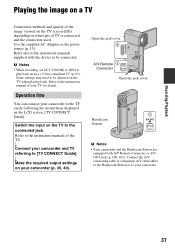
...the LCD screen, [TV CONNECT Guide]. r Make the required output settings on the TV to the connected jack. Handycam Station b Notes • Your camcorder and the Handycam Station are equipped with the device to the instruction manual of TV is connected, and the connectors used. Some ...settings may need to your camcorder. 37 A/V Remote Connector Open the jack cover. Connect the A/V connecting cable or component A/V cable either to the Handycam Station or to be connected. Recording/Playback Playing the image on a TV Connection...
...the LCD screen, [TV CONNECT Guide]. r Make the required output settings on the TV to the connected jack. Handycam Station b Notes • Your camcorder and the Handycam Station are equipped with the device to the instruction manual of TV is connected, and the connectors used. Some ...settings may need to your camcorder. 37 A/V Remote Connector Open the jack cover. Connect the A/V connecting cable or component A/V cable either to the Handycam Station or to be connected. Recording/Playback Playing the image on a TV Connection...
Operating Instructions
Page 52
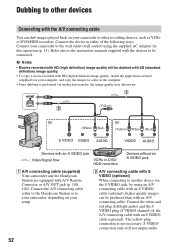
... Adaptor for this operation (p. 15). Dubbing to other recording devices, such as VCRs or DVD/HDD recorders. Connect your camcorder to your camcorder, depending on your camcorder to another device via analog data transfer, the image quality may deteriorate. (Yellow) IN IN (White) (Red) (... VIDEO jack : Video/Signal flow VCRs or DVD/ HDD recorders Devices without an S VIDEO jack A A/V connecting cable (supplied) Your camcorder and the Handycam Station are equipped with A/V Remote Connector or A/V OUT jack (p. 100, 102). Connect the A/V connecting cable either of the A/V connecting ...
... Adaptor for this operation (p. 15). Dubbing to other recording devices, such as VCRs or DVD/HDD recorders. Connect your camcorder to your camcorder, depending on your camcorder to another device via analog data transfer, the image quality may deteriorate. (Yellow) IN IN (White) (Red) (... VIDEO jack : Video/Signal flow VCRs or DVD/ HDD recorders Devices without an S VIDEO jack A A/V connecting cable (supplied) Your camcorder and the Handycam Station are equipped with A/V Remote Connector or A/V OUT jack (p. 100, 102). Connect the A/V connecting cable either of the A/V connecting ...
Operating Instructions
Page 54
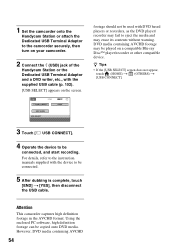
...erase its contents without warning. Using the enclosed PC software, high definition footage can be connected, and start recording. Attention This camcorder captures high definition footage in the AVCHD format. footage should not be used with the device to be played on the screen. ...However, DVD media containing AVCHD 54 1 Set the camcorder onto the Handycam Station or attach the Dedicated USB Terminal Adaptor to the camcorder securely, then turn on your camcorder. 2 Connect the (USB) jack of the Handycam Station or the Dedicated USB Terminal Adaptor and a DVD writer, etc...
...erase its contents without warning. Using the enclosed PC software, high definition footage can be connected, and start recording. Attention This camcorder captures high definition footage in the AVCHD format. footage should not be used with the device to be played on the screen. ...However, DVD media containing AVCHD 54 1 Set the camcorder onto the Handycam Station or attach the Dedicated USB Terminal Adaptor to the camcorder securely, then turn on your camcorder. 2 Connect the (USB) jack of the Handycam Station or the Dedicated USB Terminal Adaptor and a DVD writer, etc...

Operating Instructions
Page 55
...from the wall outlet (wall socket) (p. 15). If you want to print into your camcorder. 1 Set the camcorder onto the Handycam Station or attach the Dedicated USB Terminal Adaptor to the camcorder securely, then turn on the screen. Insert the "Memory Stick PRO Duo" containing the... 6. 6 Touch [EXEC] t [YES] t . Editing You can guarantee the operation of the Handycam Station or the Dedicated USB Terminal Adaptor to the printer using a PictBridge compliant printer, without connecting the camcorder to a computer. 4 Touch the still image to be printed. on the image selection b Notes ...
...from the wall outlet (wall socket) (p. 15). If you want to print into your camcorder. 1 Set the camcorder onto the Handycam Station or attach the Dedicated USB Terminal Adaptor to the camcorder securely, then turn on the screen. Insert the "Memory Stick PRO Duo" containing the... 6. 6 Touch [EXEC] t [YES] t . Editing You can guarantee the operation of the Handycam Station or the Dedicated USB Terminal Adaptor to the printer using a PictBridge compliant printer, without connecting the camcorder to a computer. 4 Touch the still image to be printed. on the image selection b Notes ...
Operating Instructions
Page 56
...• You can select only the paper sizes that the printer can print a still image on the still image playback screen from the Handycam Station or the Dedicated USB Terminal Adaptor - Press POWER - The still image recorded by a computer - Refer to your printer's instruction manual... Do not attempt the following operations when is an industry standard established by the Camera & Imaging Products Association (CIPA). Remove your camcorder, the Handycam Station, the Dedicated USB Terminal Adaptor or the printer • If the printer stops working, disconnect the USB cable, turn the...
...• You can select only the paper sizes that the printer can print a still image on the still image playback screen from the Handycam Station or the Dedicated USB Terminal Adaptor - Press POWER - The still image recorded by a computer - Refer to your printer's instruction manual... Do not attempt the following operations when is an industry standard established by the Camera & Imaging Products Association (CIPA). Remove your camcorder, the Handycam Station, the Dedicated USB Terminal Adaptor or the printer • If the printer stops working, disconnect the USB cable, turn the...

Operating Instructions
Page 58
... Stick PRO Duo" information You can check the recordable free space, etc. Cancel Easy Handycam operation (p. 22). 1 Turn the (Movie) lamp on a "Memory Stick PRO Duo," both free and used, will be formatted into your camcorder. 2 Turn on your camcorder. 3 Touch (HOME) t (MANAGE MEDIA) t [MEDIA FORMAT]. b Notes • While the access lamp is...
... Stick PRO Duo" information You can check the recordable free space, etc. Cancel Easy Handycam operation (p. 22). 1 Turn the (Movie) lamp on a "Memory Stick PRO Duo," both free and used, will be formatted into your camcorder. 2 Turn on your camcorder. 3 Touch (HOME) t (MANAGE MEDIA) t [MEDIA FORMAT]. b Notes • While the access lamp is...

Operating Instructions
Page 61
... Page DEMO MODE 71 CALIBRATION 96 A.SHUT OFF 71 QUICK ON STBY 71 CTRL FOR HDMI 71 * You can set these items also during Easy Handycam operation (p. 22). ** The menu name is changed to [SOUND SETTINGS] during Easy Handycam operation. 61 Customizing Your Camcorder
... Page DEMO MODE 71 CALIBRATION 96 A.SHUT OFF 71 QUICK ON STBY 71 CTRL FOR HDMI 71 * You can set these items also during Easy Handycam operation (p. 22). ** The menu name is changed to [SOUND SETTINGS] during Easy Handycam operation. 61 Customizing Your Camcorder

Operating Instructions
Page 72
... item anywhere, the function does not work under the current situation. 72 Activating functions using your camcorder at the time. • Some items appear without a tab. • The OPTION MENU cannot be used during Easy Handycam operation. (OPTION) Tab 2 Touch the desired item. Using the OPTION MENU 1 While using the OPTION MENU...
... item anywhere, the function does not work under the current situation. 72 Activating functions using your camcorder at the time. • Some items appear without a tab. • The OPTION MENU cannot be used during Easy Handycam operation. (OPTION) Tab 2 Touch the desired item. Using the OPTION MENU 1 While using the OPTION MENU...


