Operating Guide
Page 7
...language setting 12 Step 3: Inserting a "Memory Stick PRO Duo 13 Recording/Playback Recording 14 Playback 16 Playing the image on -screen displays in the camcorder using your camcorder may not operate correctly. IMPORTANT SAFEGUARDS..........2 Read this manual for illustrating the...in each part...18 Indicators displayed during recording/playback 20 Performing various functions - " HOME" and " OPTION" 22 Saving images 24 Deleting images 25 Enjoying with a computer Performing with a computer...........27 Installing and viewing "Handycam Handbook" (PDF 27 Installing "Picture Motion...
...language setting 12 Step 3: Inserting a "Memory Stick PRO Duo 13 Recording/Playback Recording 14 Playback 16 Playing the image on -screen displays in the camcorder using your camcorder may not operate correctly. IMPORTANT SAFEGUARDS..........2 Read this manual for illustrating the...in each part...18 Indicators displayed during recording/playback 20 Performing various functions - " HOME" and " OPTION" 22 Saving images 24 Deleting images 25 Enjoying with a computer Performing with a computer...........27 Installing and viewing "Handycam Handbook" (PDF 27 Installing "Picture Motion...
Operating Guide
Page 16
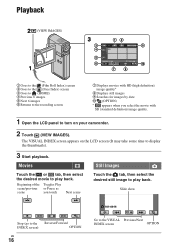
...) screen 3 Goes to (HOME) 4 Previous 6 images 5 Next 6 images 6 Returns to the recording screen 7 Displays movies with HD (high definition) image quality* 8 Displays still images 9 Searches for images by date 0 (OPTION) * appears when you touch Next scene Still Images Touch the tab, then select the desired still image... panel to turn on the LCD screen (It may take some time to the VISUAL Previous/Next INDEX screen OPTION Slide show Stop (go to the Reverse/Forward INDEX screen) OPTION US 16 Go to display the thumbnails). 3 Start playback. The VISUAL INDEX screen appears on your...
...) screen 3 Goes to (HOME) 4 Previous 6 images 5 Next 6 images 6 Returns to the recording screen 7 Displays movies with HD (high definition) image quality* 8 Displays still images 9 Searches for images by date 0 (OPTION) * appears when you touch Next scene Still Images Touch the tab, then select the desired still image... panel to turn on the LCD screen (It may take some time to the VISUAL Previous/Next INDEX screen OPTION Slide show Stop (go to the Reverse/Forward INDEX screen) OPTION US 16 Go to display the thumbnails). 3 Start playback. The VISUAL INDEX screen appears on your...
Operating Guide
Page 17
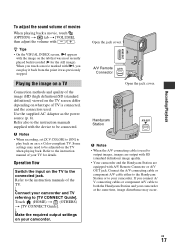
... power source (p. 8). Refer also to be adjusted on the TV when playing back. b Notes • When recording, set [X.V.COLOR] to [ON] to both the Handycam Station and your camcorder. When you connect A/ V connecting cables or component A/V cable to play it back from the point it was ...flow Switch the input on your camcorder at the same time, image disturbance may need to [TV CONNECT Guide]. Refer to the connected jack. r Make the required output settings on the TV to the instruction manuals of movies When playing back a movie, touch (OPTION) t tab t [VOLUME],...
... power source (p. 8). Refer also to be adjusted on the TV when playing back. b Notes • When recording, set [X.V.COLOR] to [ON] to both the Handycam Station and your camcorder. When you connect A/ V connecting cables or component A/V cable to play it back from the point it was ...flow Switch the input on your camcorder at the same time, image disturbance may need to [TV CONNECT Guide]. Refer to the connected jack. r Make the required output settings on the TV to the instruction manuals of movies When playing back a movie, touch (OPTION) t tab t [VOLUME],...

Operating Guide
Page 19
... details, see "PMB Guide" (p. 29). N Interface connector (Bottom surface) Connect your camcorder to the Handycam Station. R (USB) jack Connect with the USB cable. Recording/Playback G DISP/BATT INFO button You can connect the USB cable to your camcorder without using a tripod screw (optional: the length of the screw must be less than 5.5 mm (7/32 in...
... details, see "PMB Guide" (p. 29). N Interface connector (Bottom surface) Connect your camcorder to the Handycam Station. R (USB) jack Connect with the USB cable. Recording/Playback G DISP/BATT INFO button You can connect the USB cable to your camcorder without using a tripod screw (optional: the length of the screw must be less than 5.5 mm (7/32 in...

Operating Guide
Page 20
... B Remaining battery (approx.) C Recording status ([STBY] (standby) or [REC] (recording)) D Recording quality (HD/SD) and Recording mode (FH/HQ/SP/LP) E Media F Counter (hour/minute/second) G Recording remaining time H OPTION button I FACE DETECTION J VIEW IMAGES button K Face Index set L 5.1ch surround recording M Image size N Approximate number of recordable still images and media/During still image recording O Recording folder P Return button...
... B Remaining battery (approx.) C Recording status ([STBY] (standby) or [REC] (recording)) D Recording quality (HD/SD) and Recording mode (FH/HQ/SP/LP) E Media F Counter (hour/minute/second) G Recording remaining time H OPTION button I FACE DETECTION J VIEW IMAGES button K Face Index set L 5.1ch surround recording M Image size N Approximate number of recordable still images and media/During still image recording O Recording folder P Return button...

Operating Guide
Page 22
Performing various functions - " HOME" and " OPTION" You can change in the current recording/playback situation. For details of the menu items, see "Handycam Handbook" (PDF) (p. 27). (HOME) To see the explanation of (HELP) turns orange. (OPTION) Using the HOME MENU You can change the page. • To hide the HOME MENU ...item you touch an item, its explanation appears on a computer. If you right-click the mouse on the screen. Using the OPTION MENU The OPTION MENU appears just like the pop-up window that appears when you cannot find the item anywhere, the function is not on ...
Performing various functions - " HOME" and " OPTION" You can change in the current recording/playback situation. For details of the menu items, see "Handycam Handbook" (PDF) (p. 27). (HOME) To see the explanation of (HELP) turns orange. (OPTION) Using the HOME MENU You can change the page. • To hide the HOME MENU ...item you touch an item, its explanation appears on a computer. If you right-click the mouse on the screen. Using the OPTION MENU The OPTION MENU appears just like the pop-up window that appears when you cannot find the item anywhere, the function is not on ...

Operating Guide
Page 23
Recording/Playback • The (OPTION) MENU cannot be used during Easy Handycam operation. US 23 Items of the HOME MENU (CAMERA) category MOVIE* PHOTO* SMTH SLW REC (VIEW IMAGES) category VISUAL INDEX* INDEX* INDEX* PLAYLIST (OTHERS) category ... SET]/ [SUMMERTIME], [ LANGUAGE SET]* GENERAL SET [DEMO MODE], [CALIBRATION], [A.SHUT OFF], [QUICK ON STBY], [CTRL FOR HDMI] * You can set these items also during Easy Handycam operation. ** The menu name is changed to [SOUND SETTINGS] during Easy...
Recording/Playback • The (OPTION) MENU cannot be used during Easy Handycam operation. US 23 Items of the HOME MENU (CAMERA) category MOVIE* PHOTO* SMTH SLW REC (VIEW IMAGES) category VISUAL INDEX* INDEX* INDEX* PLAYLIST (OTHERS) category ... SET]/ [SUMMERTIME], [ LANGUAGE SET]* GENERAL SET [DEMO MODE], [CALIBRATION], [A.SHUT OFF], [QUICK ON STBY], [CTRL FOR HDMI] * You can set these items also during Easy Handycam operation. ** The menu name is changed to [SOUND SETTINGS] during Easy...
Operating Guide
Page 24
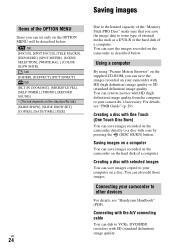
...set only on the OPTION MENU will be described below . Saving images on a computer You can dub to VCRs, DVD/HDD recorders with HD (high definition) image quality from the computer to your camcorder to the limited capacity of a computer. Connecting your camcorder, if necessary. ...Connecting with the A/V connecting cable You can save the images recorded on your computer on a disc. For details, see "Handycam Handbook" (PDF). You can save images recorded on the camcorder on the camcorder as a DVD-R or the hard disk of a computer. Using a computer By using "...
...set only on the OPTION MENU will be described below . Saving images on a computer You can dub to VCRs, DVD/HDD recorders with HD (high definition) image quality from the computer to your camcorder to the limited capacity of a computer. Connecting your camcorder, if necessary. ...Connecting with the A/V connecting cable You can save the images recorded on your computer on a disc. For details, see "Handycam Handbook" (PDF). You can save images recorded on the camcorder on the camcorder as a DVD-R or the hard disk of a computer. Using a computer By using "...
Operating Guide
Page 33
... use the LCD Cleaning Kit (optional), do not apply the cleaning liquid directly to build up inside the casing, unplug your camcorder turned off any liquid gets in these operating instructions. • Do not let your local authorized Sony service facility. - Using chemicals such as by playing back or recording images for about 3 minutes...
... use the LCD Cleaning Kit (optional), do not apply the cleaning liquid directly to build up inside the casing, unplug your camcorder turned off any liquid gets in these operating instructions. • Do not let your local authorized Sony service facility. - Using chemicals such as by playing back or recording images for about 3 minutes...


