Operating Guide
Page 5
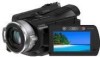
...Handycam Station Model DCRAC181 and AC Adaptor Model AC-L200/L200B. Notes on a TV, you need an NTSC system-based TV. • Television programs, films, video tapes, and other materials may be copyrighted. 5 To view your camcorder. Reorient or relocate the receiving antenna. - For the State of Conformity Trade Name: SONY Model No.: HDR-SR8... Responsible Party: Sony Electronics Inc. Notes HDR-SR5, HDR-SR7 and HDR-SR8 are designed to Subpart ...
...Handycam Station Model DCRAC181 and AC Adaptor Model AC-L200/L200B. Notes on a TV, you need an NTSC system-based TV. • Television programs, films, video tapes, and other materials may be copyrighted. 5 To view your camcorder. Reorient or relocate the receiving antenna. - For the State of Conformity Trade Name: SONY Model No.: HDR-SR8... Responsible Party: Sony Electronics Inc. Notes HDR-SR5, HDR-SR7 and HDR-SR8 are designed to Subpart ...
Operating Guide
Page 6
... necessary (p. 11). Change the screen language before using the camcorder at high altitudes • Do not turn on a disc such as DVD-R using a computer. About this manual • The images of the viewfinder (HDR-SR7/SR8) and the LCD screen used for illustration purposes are captured ...Refer also to the copyright laws. When you transfer the camcorder, it is activated by dropping, the camcorder has the drop sensor function*. If the drop sensor catches a drop repeatedly, recording/playback may be contrary to "Handycam Handbook" (PDF) and "Picture Motion Browser Guide." The...
... necessary (p. 11). Change the screen language before using the camcorder at high altitudes • Do not turn on a disc such as DVD-R using a computer. About this manual • The images of the viewfinder (HDR-SR7/SR8) and the LCD screen used for illustration purposes are captured ...Refer also to the copyright laws. When you transfer the camcorder, it is activated by dropping, the camcorder has the drop sensor function*. If the drop sensor catches a drop repeatedly, recording/playback may be contrary to "Handycam Handbook" (PDF) and "Picture Motion Browser Guide." The...
Operating Guide
Page 7
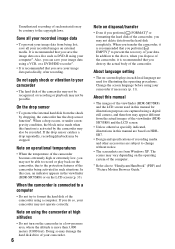
... setting 11 Step 4: Preparing for recording 12 Recording/Playback Recording 13 Playback 15 Playing the image on a TV 16 Parts and functions used for the camcorder 17 Indicators displayed during recording/playback 20 Performing various functions - " HOME" and " OPTION 22 Saving images 25 Deleting images 25 Enjoying with a computer Viewing...
... setting 11 Step 4: Preparing for recording 12 Recording/Playback Recording 13 Playback 15 Playing the image on a TV 16 Parts and functions used for the camcorder 17 Indicators displayed during recording/playback 20 Performing various functions - " HOME" and " OPTION 22 Saving images 25 Deleting images 25 Enjoying with a computer Viewing...

Operating Guide
Page 8
... the number of that you have the following items supplied with your camcorder. Picture Motion Browser Guide - AC Adaptor (1) (p. 9) Wireless Remote Commander (1) A button-type lithium battery is already installed. Handycam Handbook (PDF) "Operating Guide" (This manual) (1) 8 Insulation sheet Power cord (1) (p. 9) Handycam Station (1) (p. 9) Rechargeable battery pack NP-FH60 (1) (p. 9) Component video cable (1) (p. 16) A/V connecting cable...
... the number of that you have the following items supplied with your camcorder. Picture Motion Browser Guide - AC Adaptor (1) (p. 9) Wireless Remote Commander (1) A button-type lithium battery is already installed. Handycam Handbook (PDF) "Operating Guide" (This manual) (1) 8 Insulation sheet Power cord (1) (p. 9) Handycam Station (1) (p. 9) Rechargeable battery pack NP-FH60 (1) (p. 9) Component video cable (1) (p. 16) A/V connecting cable...
Operating Guide
Page 9
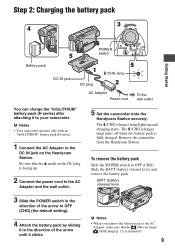
... OFF (CHG) (the default setting). 4 Attach the battery pack by sliding it in the direction of the arrow until it to your camcorder. Remove the camcorder from the Handycam Station. b Notes • When you remove the battery pack or the AC Adaptor, make sure that the v mark on the...battery pack. To remove the battery pack Slide the POWER switch to the AC Adaptor and the wall outlet. 5 Set the camcorder onto the Handycam Station securely. b Notes • Your camcorder operates only with an "InfoLITHIUM" battery pack (H series). 1 Connect the AC Adaptor to the DC IN jack on the ...
... OFF (CHG) (the default setting). 4 Attach the battery pack by sliding it in the direction of the arrow until it to your camcorder. Remove the camcorder from the Handycam Station. b Notes • When you remove the battery pack or the AC Adaptor, make sure that the v mark on the...battery pack. To remove the battery pack Slide the POWER switch to the AC Adaptor and the wall outlet. 5 Set the camcorder onto the Handycam Station securely. b Notes • Your camcorder operates only with an "InfoLITHIUM" battery pack (H series). 1 Connect the AC Adaptor to the DC IN jack on the ...
Operating Guide
Page 10
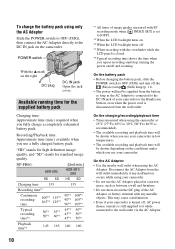
.../Playback time: Approximate time (min.) available when you use your camcorder or the Handycam Station, even when the power cord is disconnected from the battery ... SET] is set to the DC IN jack on the camcorder. Available running time for standard image quality. NP-FH60: HDR-SR5 HD SD (Unit:min.) HDR-SR7/ SR8 HD SD Charging time 135 Recording time*1 Continuous recording time ...turning the power on/off and zooming. On the charging/recording/playback time • Times measured when using the camcorder at 25°C (77°F) (10°C to 30°C (50°F to 86°F) is...
.../Playback time: Approximate time (min.) available when you use your camcorder or the Handycam Station, even when the power cord is disconnected from the battery ... SET] is set to the DC IN jack on the camcorder. Available running time for standard image quality. NP-FH60: HDR-SR5 HD SD (Unit:min.) HDR-SR7/ SR8 HD SD Charging time 135 Recording time*1 Continuous recording time ...turning the power on/off and zooming. On the charging/recording/playback time • Times measured when using the camcorder at 25°C (77°F) (10°C to 30°C (50°F to 86°F) is...
Operating Guide
Page 13
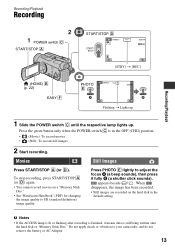
... click sounds). When disappears, the image has been recorded. • Still images are recorded on a "Memory Stick Duo." • See "Handycam Handbook" (PDF) for changing the image quality to your camcorder, and do not remove the battery or AC Adaptor. 13 Movies Still Images Press START/STOP A (or D). To stop recording, press...
... click sounds). When disappears, the image has been recorded. • Still images are recorded on a "Memory Stick Duo." • See "Handycam Handbook" (PDF) for changing the image quality to your camcorder, and do not remove the battery or AC Adaptor. 13 Movies Still Images Press START/STOP A (or D). To stop recording, press...
Operating Guide
Page 14
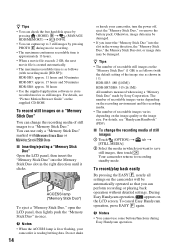
...is lit or flashing, your camcorder, turn the power off, eject the "Memory Stick Duo," or remove the battery pack. HDR-SR5: 480 ([4.0M]) HDR-SR7/SR8: 315 ([6.1M]) All numbers measured when using a "Memory Stick Duo" made by pressing PHOTO E during Easy Handycam operation. The number of ... free hard disk space by pressing (HOME) B t (MANAGE HDD/MEMORY) t [ INFO]. • You can capture up to 3 still images by Sony Corporation. You can use some buttons/functions during movie recording. • The maximum continuous recordable time is approximately 13 hours. • When a movie file...
...is lit or flashing, your camcorder, turn the power off, eject the "Memory Stick Duo," or remove the battery pack. HDR-SR5: 480 ([4.0M]) HDR-SR7/SR8: 315 ([6.1M]) All numbers measured when using a "Memory Stick Duo" made by pressing PHOTO E during Easy Handycam operation. The number of ... free hard disk space by pressing (HOME) B t (MANAGE HDD/MEMORY) t [ INFO]. • You can capture up to 3 still images by Sony Corporation. You can use some buttons/functions during movie recording. • The maximum continuous recordable time is approximately 13 hours. • When a movie file...
Operating Guide
Page 15
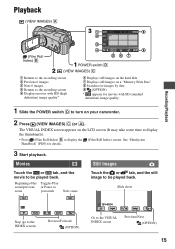
... touch Next scene Touch the or tab, and the still image to be played back. See "Handycam Handbook" (PDF) for movies with SD (standard definition) image quality. 1 Slide the POWER switch D to turn on your camcorder. 2 Press (VIEW IMAGES) C (or A). Slide show Stop (go to the INDEX screen) Reverse/Forward (OPTION) Go...
... touch Next scene Touch the or tab, and the still image to be played back. See "Handycam Handbook" (PDF) for movies with SD (standard definition) image quality. 1 Slide the POWER switch D to turn on your camcorder. 2 Press (VIEW IMAGES) C (or A). Slide show Stop (go to the INDEX screen) Reverse/Forward (OPTION) Go...
Operating Guide
Page 16
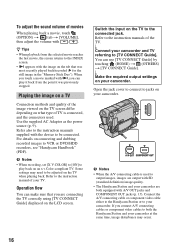
... you connect A/V connecting cables or component video cables to both equipped with SD (standard definition) image quality. • The Handycam Station and your camcorder and TV referring to [TV CONNECT Guide]. For details on an x.v.Color-compliant TV. Some settings may occur. 16 Operation ... (p. 9). Refer to jacks on the TV when playing back. r Connect your camcorder are both the Handycam Station and your camcorder. Open the jack cover to connect to the instruction manual of your camcorder. If you are connecting the TV correctly using [TV CONNECT Guide] displayed on ...
... you connect A/V connecting cables or component video cables to both equipped with SD (standard definition) image quality. • The Handycam Station and your camcorder and TV referring to [TV CONNECT Guide]. For details on an x.v.Color-compliant TV. Some settings may occur. 16 Operation ... (p. 9). Refer to jacks on the TV when playing back. r Connect your camcorder are both the Handycam Station and your camcorder. Open the jack cover to connect to the instruction manual of your camcorder. If you are connecting the TV correctly using [TV CONNECT Guide] displayed on ...
Operating Guide
Page 17
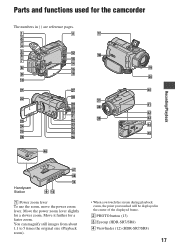
Move it further for a slower zoom. You can magnify still images from about 1.1 to 5 times the original size (Playback zoom). • When you touch the screen during playback zoom, the point you touched will be displayed in ( ) are reference pages. Parts and functions used for the camcorder The numbers in the center of the displayed frame. 2 PHOTO button (13) 3 Eyecup (HDR-SR7/SR8) 4 Viewfinder (12) (HDR-SR7/SR8) 17 Move the power zoom lever slightly for a faster zoom. Recording/Playback Handycam Station 1 Power zoom lever To use the zoom, move the power zoom lever.
Move it further for a slower zoom. You can magnify still images from about 1.1 to 5 times the original size (Playback zoom). • When you touch the screen during playback zoom, the point you touched will be displayed in ( ) are reference pages. Parts and functions used for the camcorder The numbers in the center of the displayed frame. 2 PHOTO button (13) 3 Eyecup (HDR-SR7/SR8) 4 Viewfinder (12) (HDR-SR7/SR8) 17 Move the power zoom lever slightly for a faster zoom. Recording/Playback Handycam Station 1 Power zoom lever To use the zoom, move the power zoom lever.
Operating Guide
Page 22
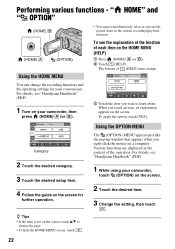
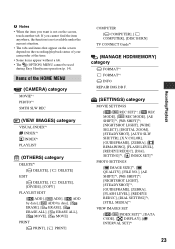
...). 1 Turn on your convenience. The bottom of each item on the screen, touch v/V to learn about. For details, see "Handycam Handbook" (PDF). 1 While using your camcorder, touch (OPTION) on the screen for your camcorder, then press (HOME) A (or B). 3 Touch the item you want to change the recording functions and the operating settings for...
...). 1 Turn on your convenience. The bottom of each item on the screen, touch v/V to learn about. For details, see "Handycam Handbook" (PDF). 1 While using your camcorder, touch (OPTION) on the screen for your camcorder, then press (HOME) A (or B). 3 Touch the item you want to change the recording functions and the operating settings for...
Operating Guide
Page 23
... items that appear on the screen depend on the screen, touch another tab. Items of your camcorder at the time. • Some items appear without a tab. • The (OPTION) MENU cannot be used during Easy Handycam operation (p. 14). b Notes • When the item you cannot find the item anywhere, the function is...
... items that appear on the screen depend on the screen, touch another tab. Items of your camcorder at the time. • Some items appear without a tab. • The (OPTION) MENU cannot be used during Easy Handycam operation (p. 14). b Notes • When the item you cannot find the item anywhere, the function is...
Operating Guide
Page 25
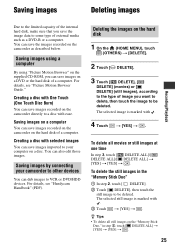
...the hard disk of a computer. To delete the still images in step 2, touch [ DELETE ALL] t [YES] t [YES] t . 25 For details, see "Handycam Handbook" (PDF). Saving images on a computer You can save images on the "Memory Stick Duo," in the "Memory Stick Duo" 1 In step 2, touch [ DELETE].... with . 4 Touch t [YES] t . The selected still image is marked with . 3 Touch t [YES] t . You can save images imported to your camcorder to other devices You can also edit those images. Saving images Deleting images Recording/Playback Due to the limited capacity of the internal hard disk...
...the hard disk of a computer. To delete the still images in step 2, touch [ DELETE ALL] t [YES] t [YES] t . 25 For details, see "Handycam Handbook" (PDF). Saving images on a computer You can save images on the "Memory Stick Duo," in the "Memory Stick Duo" 1 In step 2, touch [ DELETE].... with . 4 Touch t [YES] t . The selected still image is marked with . 3 Touch t [YES] t . You can save images imported to your camcorder to other devices You can also edit those images. Saving images Deleting images Recording/Playback Due to the limited capacity of the internal hard disk...
Operating Guide
Page 26
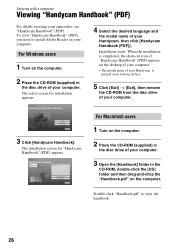
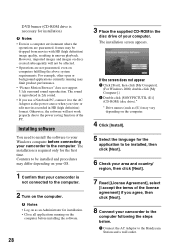
...the "Handbook.pdf" on the computer. 2 Place the CD-ROM (supplied) in the disc drive of your computer. To view "Handycam Handbook" (PDF), you need to view the handbook. 26 Installation starts. The installation screen for installation appears. 4 Select the desired ... select screen for "Handycam Handbook" (PDF) appears. When the installation is completed, the short-cut icon of "Handycam Handbook" (PDF) appears on the desktop of your computer. • The model name of your camcorder, see "Handycam Handbook" (PDF). Enjoying with a computer Viewing "Handycam Handbook" (PDF) For...
...the "Handbook.pdf" on the computer. 2 Place the CD-ROM (supplied) in the disc drive of your computer. To view "Handycam Handbook" (PDF), you need to view the handbook. 26 Installation starts. The installation screen for installation appears. 4 Select the desired ... select screen for "Handycam Handbook" (PDF) appears. When the installation is completed, the short-cut icon of "Handycam Handbook" (PDF) appears on the desktop of your computer. • The model name of your camcorder, see "Handycam Handbook" (PDF). Enjoying with a computer Viewing "Handycam Handbook" (PDF) For...
Operating Guide
Page 27
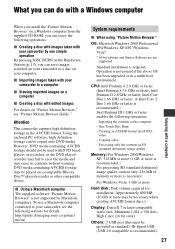
... 1.66 GHz or faster is not supported by one simple operation By pressing DISC BURN on the Handycam Station (p. 19), you can enjoy the following operations. Copying a disc - For Windows Vista:... fail to eject the media and may erase its contents without warning. http://guide.d-imaging.sony.co.jp/mac/ ms/us/ System requirements x When using "Picture Motion Browser" OS... XP SP2*/Windows Vista* * 64-bit editions and Starter (Edition) are not supported. Attention This camcorder captures high definition footage in a multi-boot environment. x Using a Macintosh computer The supplied software "...
... 1.66 GHz or faster is not supported by one simple operation By pressing DISC BURN on the Handycam Station (p. 19), you can enjoy the following operations. Copying a disc - For Windows Vista:... fail to eject the media and may erase its contents without warning. http://guide.d-imaging.sony.co.jp/mac/ ms/us/ System requirements x When using "Picture Motion Browser" OS... XP SP2*/Windows Vista* * 64-bit editions and Starter (Edition) are not supported. Attention This camcorder captures high definition footage in a multi-boot environment. x Using a Macintosh computer The supplied software "...
Operating Guide
Page 28
...reproduction. For example, other open or background applications currently running on the computer before connecting your camcorder to the computer following the steps below. 1 Connect the AC Adaptor to the Handycam Station and a wall outlet. The sound is required only for the first time. The installation ...2 Turn on the computer. b Notes • Log on as the power source when you agree, then click [Next]. 8 Connect your camcorder to the computer. Otherwise, the software will not be affected. • Operations are guaranteed, frames may differ depending on your OS. 1 Confirm that...
...reproduction. For example, other open or background applications currently running on the computer before connecting your camcorder to the computer following the steps below. 1 Connect the AC Adaptor to the Handycam Station and a wall outlet. The sound is required only for the first time. The installation ...2 Turn on the computer. b Notes • Log on as the power source when you agree, then click [Next]. 8 Connect your camcorder to the computer. Otherwise, the software will not be affected. • Operations are guaranteed, frames may differ depending on your OS. 1 Confirm that...

Operating Guide
Page 29
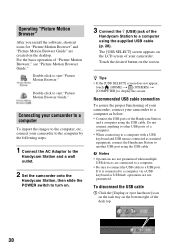
...Windows 2000 only) Software required to create an AVCHD disc - Enjoying with a computer 2 Set the camcorder onto the Handycam Station, then slide the POWER switch to turn on. 3 Connect the (USB) jack of the Handycam Station to the (USB) jack of the computer using the supplied USB cable. 4 Touch [ COMPUTER...] on the LCD screen of your camcorder. 9 Click [Next] on the connection confirmation screen of the computer. 10Follow the...
...Windows 2000 only) Software required to create an AVCHD disc - Enjoying with a computer 2 Set the camcorder onto the Handycam Station, then slide the POWER switch to turn on. 3 Connect the (USB) jack of the Handycam Station to the (USB) jack of the computer using the supplied USB cable. 4 Touch [ COMPUTER...] on the LCD screen of your camcorder. 9 Click [Next] on the connection confirmation screen of the computer. 10Follow the...
Operating Guide
Page 30
...To assure the proper functioning of your camcorder, connect your camcorder to a computer as standard equipment, connect the Handycam Station to display the screen. Connecting your camcorder to a computer To import the images to the computer, etc., connect your camcorder. b Notes • Operations are ...guaranteed. Double-click to turn on the bottom right of your camcorder to the computer by the following steps. 1 Connect the AC Adaptor to the Handycam Station and a wall outlet. 2 Set the camcorder onto the Handycam Station, then slide the POWER switch to start "Picture Motion...
...To assure the proper functioning of your camcorder, connect your camcorder to a computer as standard equipment, connect the Handycam Station to display the screen. Connecting your camcorder to a computer To import the images to the computer, etc., connect your camcorder. b Notes • Operations are ...guaranteed. Double-click to turn on the bottom right of your camcorder to the computer by the following steps. 1 Connect the AC Adaptor to the Handycam Station and a wall outlet. 2 Set the camcorder onto the Handycam Station, then slide the POWER switch to start "Picture Motion...
Operating Guide
Page 31
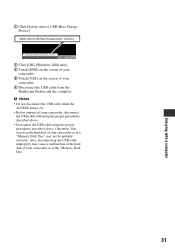
... updated correctly. b Notes • Do not disconnect the USB cable while the ACCESS lamp is lit. • Before turning off your camcorder, disconnect the USB cable following the proper procedures described above. • Disconnect the USB cable using the proper procedures described above. Enjoying with... [END] on the screen of your camcorder. 5 Touch [YES] on the hard disk of your camcorder or in a "Memory Stick Duo" may cause a malfunction of the hard disk of your camcorder or of your camcorder. 6 Disconnect the USB cable from the Handycam Station and the computer. Otherwise, files ...
... updated correctly. b Notes • Do not disconnect the USB cable while the ACCESS lamp is lit. • Before turning off your camcorder, disconnect the USB cable following the proper procedures described above. • Disconnect the USB cable using the proper procedures described above. Enjoying with... [END] on the screen of your camcorder. 5 Touch [YES] on the hard disk of your camcorder or in a "Memory Stick Duo" may cause a malfunction of the hard disk of your camcorder or of your camcorder. 6 Disconnect the USB cable from the Handycam Station and the computer. Otherwise, files ...


