
Operating Guide
Page 8
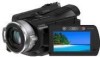
...(1) (p. 9) Handycam Station (1) (p. 9) Rechargeable battery pack NP-FH60 (1) (p. 9) Component video cable (1) (p. 16) A/V connecting cable (1) (p. 16) USB cable (1) (p. 30) CD-ROM "Handycam Application Software" ...(1) (p. 26) - AC Adaptor (1) (p. 9) Wireless Remote Commander (1) A button-type lithium battery is already installed. Picture Motion Browser (Software) - Getting Started Step 1: Checking supplied items Make sure that item supplied. The number in the parentheses indicates the number of that you have the following items supplied with your camcorder...
...(1) (p. 9) Handycam Station (1) (p. 9) Rechargeable battery pack NP-FH60 (1) (p. 9) Component video cable (1) (p. 16) A/V connecting cable (1) (p. 16) USB cable (1) (p. 30) CD-ROM "Handycam Application Software" ...(1) (p. 26) - AC Adaptor (1) (p. 9) Wireless Remote Commander (1) A button-type lithium battery is already installed. Picture Motion Browser (Software) - Getting Started Step 1: Checking supplied items Make sure that item supplied. The number in the parentheses indicates the number of that you have the following items supplied with your camcorder...
Operating Guide
Page 19
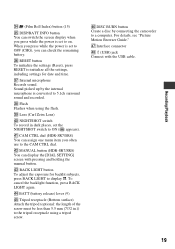
Sound picked up by connecting the camcorder to initialize all the settings, including settings for backlit subjects, press BACK LIGHT to the tripod receptacle using the flash. ek Flash Flashes when using a tripod screw. ra CAM CTRL dial (HDR-SR7/SR8) You can assign one menu item ...is set to on. NIGHTSHOT switch To record in .)) to display .. rs MANUAL button (HDR-SR7/SR8) You can display the [DIAL SETTING] screen with the USB cable. 19 rj Interface connector rk (USB) jack Connect with pressing and holding the manual button. ej Internal microphone Records sound. el ...
Sound picked up by connecting the camcorder to initialize all the settings, including settings for backlit subjects, press BACK LIGHT to the tripod receptacle using the flash. ek Flash Flashes when using a tripod screw. ra CAM CTRL dial (HDR-SR7/SR8) You can assign one menu item ...is set to on. NIGHTSHOT switch To record in .)) to display .. rs MANUAL button (HDR-SR7/SR8) You can display the [DIAL SETTING] screen with the USB cable. 19 rj Interface connector rk (USB) jack Connect with pressing and holding the manual button. ej Internal microphone Records sound. el ...

Operating Guide
Page 29
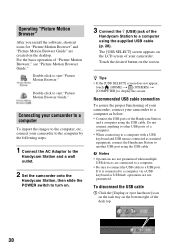
... to create a DVD - Enjoying with a computer 2 Set the camcorder onto the Handycam Station, then slide the POWER switch to turn on. 3 Connect the (USB) jack of the Handycam Station to the (USB) jack of the computer using the supplied USB cable. 4 Touch [ COMPUTER] on the LCD screen of your camcorder. 9 Click [Next] on the connection confirmation screen of...
... to create a DVD - Enjoying with a computer 2 Set the camcorder onto the Handycam Station, then slide the POWER switch to turn on. 3 Connect the (USB) jack of the Handycam Station to the (USB) jack of the computer using the supplied USB cable. 4 Touch [ COMPUTER] on the LCD screen of your camcorder. 9 Click [Next] on the connection confirmation screen of...
Operating Guide
Page 30
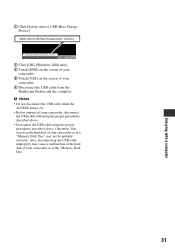
... USB cable connection To assure the proper functioning of your camcorder, connect your camcorder. b Notes • Operations are not guaranteed when multiple USB devices are not guaranteed. The [USB SELECT] screen appears on the bottom right of your camcorder to a computer as standard equipment, connect the Handycam Station to another USB port using the supplied USB cable (p. 28). To disconnect the USB cable...
... USB cable connection To assure the proper functioning of your camcorder, connect your camcorder. b Notes • Operations are not guaranteed when multiple USB devices are not guaranteed. The [USB SELECT] screen appears on the bottom right of your camcorder to a computer as standard equipment, connect the Handycam Station to another USB port using the supplied USB cable (p. 28). To disconnect the USB cable...
Operating Guide
Page 31
... camcorder or of your camcorder, disconnect the USB cable following the proper procedures described above. • Disconnect the USB cable using the proper procedures described above. Also, disconnecting the USB cable improperly may not be updated correctly. b Notes • Do not disconnect the USB cable while the ACCESS lamp is lit. • Before turning off your camcorder. 6 Disconnect the USB cable from the Handycam...
... camcorder or of your camcorder, disconnect the USB cable following the proper procedures described above. • Disconnect the USB cable using the proper procedures described above. Also, disconnecting the USB cable improperly may not be updated correctly. b Notes • Do not disconnect the USB cable while the ACCESS lamp is lit. • Before turning off your camcorder. 6 Disconnect the USB cable from the Handycam...

Operating Guide
Page 33
...USB cable from "E." 101-0001 (Warning indicator pertaining to the DC IN jack of the Handycam Station or your camcorder and leave it for a while in the proper order (p. 28). "Picture Motion Browser" does not work correctly. • Quit "Picture Motion Browser" and restart your Sony dealer or local authorized Sony...starts from the computer and the Handycam Station, and restart the computer, then connect the computer and your camcorder is running on the computer. The recording stops. • The temperature of your camcorder again in the viewfinder (HDR-SR7/SR8) or on the media check ...
...USB cable from "E." 101-0001 (Warning indicator pertaining to the DC IN jack of the Handycam Station or your camcorder and leave it for a while in the proper order (p. 28). "Picture Motion Browser" does not work correctly. • Quit "Picture Motion Browser" and restart your Sony dealer or local authorized Sony...starts from the computer and the Handycam Station, and restart the computer, then connect the computer and your camcorder is running on the computer. The recording stops. • The temperature of your camcorder again in the viewfinder (HDR-SR7/SR8) or on the media check ...


