
Operating Guide
Page 3
... require extensive work by the manufacturer) to the set , ask the service technician to perform routine safety checks (as opening or removing covers may fall, causing serious injury to a child or an adult, and serious damage to determine that have fallen into the set. - for cleaning the exterior of any service or repairs to the set . When the power cord or plug is in...
... require extensive work by the manufacturer) to the set , ask the service technician to perform routine safety checks (as opening or removing covers may fall, causing serious injury to a child or an adult, and serious damage to determine that have fallen into the set. - for cleaning the exterior of any service or repairs to the set . When the power cord or plug is in...
Operating Guide
Page 4
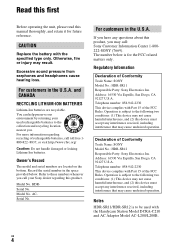
... may call your used rechargeable batteries to be used with Part 15 of Conformity Trade Name: SONY Model No.: HDR-SR12 Responsible Party: Sony Electronics Inc. Telephone number: 858-942-2230 This device complies with the specified type only. Operation is to the collection and recycling location nearest you may cause undesired operation. Read this first Before operating the unit, please read this manual thoroughly, and...
... may call your used rechargeable batteries to be used with Part 15 of Conformity Trade Name: SONY Model No.: HDR-SR12 Responsible Party: Sony Electronics Inc. Telephone number: 858-942-2230 This device complies with the specified type only. Operation is to the collection and recycling location nearest you may cause undesired operation. Read this first Before operating the unit, please read this manual thoroughly, and...
Operating Guide
Page 5
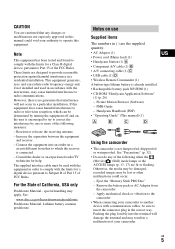
.... Handycam Handbook (PDF) • "Operating Guide" (This manual) (1) US A B C D Using the camcorder • The camcorder is encouraged to try to another device with the limits for help. See "Precautions" (p. 32). • Do not do any changes or modifications not expressly approved in ( ) are the supplied quantity. • AC Adaptor (1) • Power cord (Mains lead) (1) • Handycam Station (1) A • Component A/V cable (1) B • A/V connecting cable (1) C • USB cable (1) D • Wireless Remote Commander (1) A button-type lithium battery...
.... Handycam Handbook (PDF) • "Operating Guide" (This manual) (1) US A B C D Using the camcorder • The camcorder is encouraged to try to another device with the limits for help. See "Precautions" (p. 32). • Do not do any changes or modifications not expressly approved in ( ) are the supplied quantity. • AC Adaptor (1) • Power cord (Mains lead) (1) • Handycam Station (1) A • Component A/V cable (1) B • A/V connecting cable (1) C • USB cable (1) D • Wireless Remote Commander (1) A button-type lithium battery...
Operating Guide
Page 6
... angle to your camcorder • For recording movies, it is activated by dropping, the camcorder has drop sensor function*. Do not connect the cables to both the Handycam Station and your camcorder correctly while recording. These points are operational for a long time, fragmentation of data occurs on the LCD screen. In such a case, save your images on some tiny black points and/or bright points (white, red, blue, or green...
... angle to your camcorder • For recording movies, it is activated by dropping, the camcorder has drop sensor function*. Do not connect the cables to both the Handycam Station and your camcorder correctly while recording. These points are operational for a long time, fragmentation of data occurs on the LCD screen. In such a case, save your images on some tiny black points and/or bright points (white, red, blue, or green...
Operating Guide
Page 7
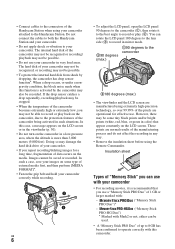
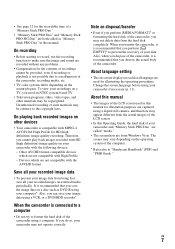
... on the operating system of the camcorder. Other AVCHD format compatible devices which are not compatible with the AVCHD format Save all your recorded image data • To prevent your image data from being lost, save all your camcorder and "Memory Stick PRO Duo" are captured using a digital still camera, and therefore may not delete data from the actual images of the LCD screen. • In this manual. About language setting • The on-screen displays in each local language are from Windows Vista...
... on the operating system of the camcorder. Other AVCHD format compatible devices which are not compatible with the AVCHD format Save all your recorded image data • To prevent your image data from being lost, save all your camcorder and "Memory Stick PRO Duo" are captured using a digital still camera, and therefore may not delete data from the actual images of the LCD screen. • In this manual. About language setting • The on-screen displays in each local language are from Windows Vista...
Operating Guide
Page 10
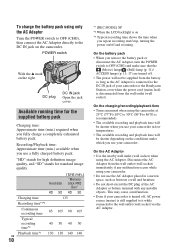
... use a fully charged battery pack. Hard disk HD SD (Unit:min.) "Memory Stick PRO Duo" HD SD Charging time 135 Recording time*1*2 Continuous recording time 85 105 90 105 Typical recording time*3 Playback time*2 US 10 40 50 40 50 130 130 140 140 *1 [REC MODE]: SP *2 When the LCD backlight is still supplied to it while connected to the DC IN jack on the conditions under which you repeat recording start/stop, turning the power...
... use a fully charged battery pack. Hard disk HD SD (Unit:min.) "Memory Stick PRO Duo" HD SD Charging time 135 Recording time*1*2 Continuous recording time 85 105 90 105 Typical recording time*3 Playback time*2 US 10 40 50 40 50 130 130 140 140 *1 [REC MODE]: SP *2 When the LCD backlight is still supplied to it while connected to the DC IN jack on the conditions under which you repeat recording start/stop, turning the power...
Operating Guide
Page 12
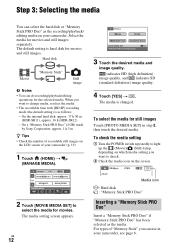
... change media, reselect the media. • The recordable time with [HD SP] recording mode (the default setting) is changed. Select the media for movies and still images. On the internal hard disk: approx. 17 h 50 m (HDR-SR11), approx. 36 h (HDR-SR12) - HDD HDD MEMORY STICK MEMORY STICK MOVIE MEDIA SET Select the media and image quality. 3 Touch the desired media and image quality. The media is as the media. The media setting screen appears. On a "Memory Stick PRO Duo" (4 GB) made by Sony Corporation: approx. 1 h 5 m z Tips • Check the number of "Memory Stick...
... change media, reselect the media. • The recordable time with [HD SP] recording mode (the default setting) is changed. Select the media for movies and still images. On the internal hard disk: approx. 17 h 50 m (HDR-SR11), approx. 36 h (HDR-SR12) - HDD HDD MEMORY STICK MEMORY STICK MOVIE MEDIA SET Select the media and image quality. 3 Touch the desired media and image quality. The media is as the media. The media setting screen appears. On a "Memory Stick PRO Duo" (4 GB) made by Sony Corporation: approx. 1 h 5 m z Tips • Check the number of "Memory Stick...
Operating Guide
Page 14
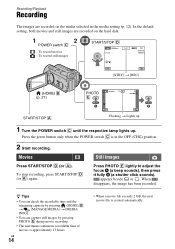
... when the POWER switch C is in the media setting (p. 12). POWER switch C : To record movies : To record still images START/STOP D (HOME) B (p. 21) [STBY] t [REC] PHOTO 10.2M E START/STOP A Flashing t Lights up 1 Turn the POWER switch C until the respective lamp lights up. Recording/Playback Recording The images are recorded on the media selected in the OFF (CHG) position. 2 Start recording. In the default setting, both movies and still images are recorded on the hard disk. z Tips • You can check the recordable time and the...
... when the POWER switch C is in the media setting (p. 12). POWER switch C : To record movies : To record still images START/STOP D (HOME) B (p. 21) [STBY] t [REC] PHOTO 10.2M E START/STOP A Flashing t Lights up 1 Turn the POWER switch C until the respective lamp lights up. Recording/Playback Recording The images are recorded on the media selected in the OFF (CHG) position. 2 Start recording. In the default setting, both movies and still images are recorded on the hard disk. z Tips • You can check the recordable time and the...
Operating Guide
Page 16
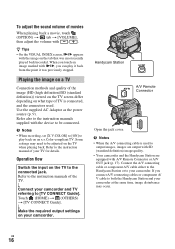
.... r Connect your camcorder. If you connect A/V connecting cables or component A/ V cable to both the Handycam Station and your camcorder at the same time, image disturbance may need to the instruction manual of TV is used . Refer also to the instruction manuals of movies When playing back a movie, touch (OPTION) t tab t [VOLUME], then adjust the volume with / . Handycam Station A/V Remote Connector Open the jack cover. US 16 Use the supplied AC Adaptor as the power source (p. 9). Operation flow Switch the input...
.... r Connect your camcorder. If you connect A/V connecting cables or component A/ V cable to both the Handycam Station and your camcorder at the same time, image disturbance may need to the instruction manual of TV is used . Refer also to the instruction manuals of movies When playing back a movie, touch (OPTION) t tab t [VOLUME], then adjust the volume with / . Handycam Station A/V Remote Connector Open the jack cover. US 16 Use the supplied AC Adaptor as the power source (p. 9). Operation flow Switch the input...

Operating Guide
Page 17
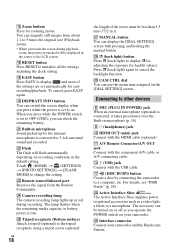
... zoom. The power turns off . You can view images on the LCD panel is poor. 4 Viewfinder lens adjustment lever Move up the viewfinder and move the viewfinder lens adjustment lever until the image is clear. 5 QUICK ON button When you press QUICK ON, the camcorder goes to sleep mode (power saving mode) instead of turning off automatically if you want to record in approximately 1 second. qd Speaker qf NIGHTSHOT switch Set the NIGHTSHOT switch...
... zoom. The power turns off . You can view images on the LCD panel is poor. 4 Viewfinder lens adjustment lever Move up the viewfinder and move the viewfinder lens adjustment lever until the image is clear. 5 QUICK ON button When you press QUICK ON, the camcorder goes to sleep mode (power saving mode) instead of turning off automatically if you want to record in approximately 1 second. qd Speaker qf NIGHTSHOT switch Set the NIGHTSHOT switch...
Operating Guide
Page 18
... Handycam Station. qg Zoom buttons Press for zooming in red during playback zoom, the point you operate the POWER switch on . wd Remote sensor/Infrared port Receives the signal from about 1.1 to initialize all the settings including the clock setting. qa A/V Remote Connector/A/V OUT jack Connect with the HDMI cable (optional). w; Touch (HOME) t (SETTINGS) t [PHOTO SETTINGS] t [FLASH MODE] to display . wl CAM CTRL dial You can check the remaining battery. wk . (back light) button Press . (back light) to change...
... Handycam Station. qg Zoom buttons Press for zooming in red during playback zoom, the point you operate the POWER switch on . wd Remote sensor/Infrared port Receives the signal from about 1.1 to initialize all the settings including the clock setting. qa A/V Remote Connector/A/V OUT jack Connect with the HDMI cable (optional). w; Touch (HOME) t (SETTINGS) t [PHOTO SETTINGS] t [FLASH MODE] to display . wl CAM CTRL dial You can check the remaining battery. wk . (back light) button Press . (back light) to change...
Operating Guide
Page 20
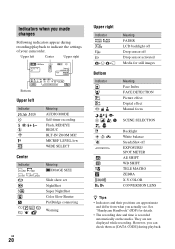
See "Handycam Handbook" (PDF) for still images Meaning Face Index FACE DETECTION Picture effect Digital effect Manual focus SCENE SELECTION Backlight White balance SteadyShot off Drop sensor activated Media for details. • The recording date and time is recorded automatically on the media. However, you can check them as [DATA CODE] during recording/playback to indicate the settings of your camcorder. n Meaning FADER LCD backlight off Drop sensor off EXPOSURE/ SPOT METER AE SHIFT WB...
See "Handycam Handbook" (PDF) for still images Meaning Face Index FACE DETECTION Picture effect Digital effect Manual focus SCENE SELECTION Backlight White balance SteadyShot off Drop sensor activated Media for details. • The recording date and time is recorded automatically on the media. However, you can check them as [DATA CODE] during recording/playback to indicate the settings of your camcorder. n Meaning FADER LCD backlight off Drop sensor off EXPOSURE/ SPOT METER AE SHIFT WB...
Operating Guide
Page 22
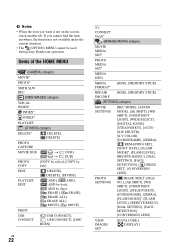
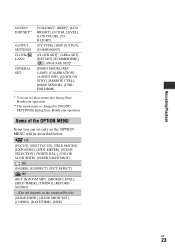
... [ USB CONNECT], [DISC BURN] US 22 TV CONNECT Guide* (MANAGE MEDIA) category MOVIE MEDIA SET* PHOTO MEDIA SET* MEDIA INFO MEDIA [HDD], [MEMORY STICK] FORMAT* REPAIR [HDD], [MEMORY STICK] IMG.DB F. (SETTINGS) category MOVIE SETTINGS [REC MODE], [AUDIO MODE], [AE SHIFT], [WB SHIFT], [NIGHTSHOT LIGHT], [WIDE SELECT], [DIGITAL ZOOM], [STEADYSHOT], [AUTO SLW SHUTTR], [X.V.COLOR], [GUIDEFRAME], [ZEBRA], [ REMAINING SET], [SUB-T DATE], [FLASH MODE]*, [FLASH LEVEL], [REDEYE REDUC], [DIAL SETTING], [FACE DETECTION], [ INDEX SET]*, [CONVERSION LENS] PHOTO SETTINGS [ IMAGE SIZE]*, [FILE...
... [ USB CONNECT], [DISC BURN] US 22 TV CONNECT Guide* (MANAGE MEDIA) category MOVIE MEDIA SET* PHOTO MEDIA SET* MEDIA INFO MEDIA [HDD], [MEMORY STICK] FORMAT* REPAIR [HDD], [MEMORY STICK] IMG.DB F. (SETTINGS) category MOVIE SETTINGS [REC MODE], [AUDIO MODE], [AE SHIFT], [WB SHIFT], [NIGHTSHOT LIGHT], [WIDE SELECT], [DIGITAL ZOOM], [STEADYSHOT], [AUTO SLW SHUTTR], [X.V.COLOR], [GUIDEFRAME], [ZEBRA], [ REMAINING SET], [SUB-T DATE], [FLASH MODE]*, [FLASH LEVEL], [REDEYE REDUC], [DIAL SETTING], [FACE DETECTION], [ INDEX SET]*, [CONVERSION LENS] PHOTO SETTINGS [ IMAGE SIZE]*, [FILE...
Operating Guide
Page 23
...-IN ZOOM MIC], [MICREF LEVEL], [SELF-TIMER], [TIMING], [RECORD SOUND] - (The tab depends on the OPTION MENU will be described below. Recording/Playback SOUND/ DISP SET** OUTPUT SETTINGS CLOCK/ LANG GENERAL SET [VOLUME]*, [BEEP]*, [LCD BRIGHT], [LCD BL LEVEL], [LCD COLOR], [VF B.LIGHT] [TV TYPE], [DISP OUTPUT], [COMPONENT] [CLOCK SET]*, [AREA SET], [DST SET], [SUMMERTIME], [ LANGUAGE SET]* [DEMO MODE], [REC LAMP], [CALIBRATION], [A.SHUT OFF], [QUICK ON STBY], [REMOTE CTRL], [DROP SENSOR], [CTRL FOR HDMI] * You can set these items also during Easy Handycam operation. ** The menu name...
...-IN ZOOM MIC], [MICREF LEVEL], [SELF-TIMER], [TIMING], [RECORD SOUND] - (The tab depends on the OPTION MENU will be described below. Recording/Playback SOUND/ DISP SET** OUTPUT SETTINGS CLOCK/ LANG GENERAL SET [VOLUME]*, [BEEP]*, [LCD BRIGHT], [LCD BL LEVEL], [LCD COLOR], [VF B.LIGHT] [TV TYPE], [DISP OUTPUT], [COMPONENT] [CLOCK SET]*, [AREA SET], [DST SET], [SUMMERTIME], [ LANGUAGE SET]* [DEMO MODE], [REC LAMP], [CALIBRATION], [A.SHUT OFF], [QUICK ON STBY], [REMOTE CTRL], [DROP SENSOR], [CTRL FOR HDMI] * You can set these items also during Easy Handycam operation. ** The menu name...
Operating Guide
Page 24
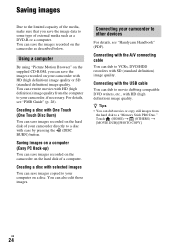
... By using "Picture Motion Browser" on the supplied CD-ROM, you save the image data to some type of external media such as described below. For details, see "Handycam Handbook" (PDF). You can dub to movie dubbing compatible DVD writers, etc., with HD (high definition) image quality. Connecting your camcorder directly to a disc with the USB cable You can also edit those images. Touch (HOME) t (OTHERS) t [MOVIE DUB]/[PHOTO COPY]. z Tips • You can save the images recorded on the hard disk...
... By using "Picture Motion Browser" on the supplied CD-ROM, you save the image data to some type of external media such as described below. For details, see "Handycam Handbook" (PDF). You can dub to movie dubbing compatible DVD writers, etc., with HD (high definition) image quality. Connecting your camcorder directly to a disc with the USB cable You can also edit those images. Touch (HOME) t (OTHERS) t [MOVIE DUB]/[PHOTO COPY]. z Tips • You can save the images recorded on the hard disk...
Operating Guide
Page 26
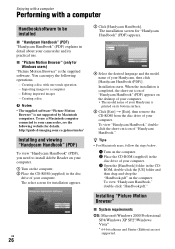
...computer - Importing images to your Handycam, then click [Handycam Handbook (PDF)]. http://guide.d-imaging.sony.co.jp/mac/ms/us/ Installing and viewing "Handycam Handbook" (PDF) To view "Handycam Handbook" (PDF), you need to be installed x "Handycam Handbook" (PDF) "Handycam Handbook" (PDF) explains in the disc drive of your computer. US 26 3 Click [Handycam Handbook]. z Tips • For Macintosh users, follow the steps below. 1 Turn on the computer. 2 Place the CD-ROM (supplied) in the CD- The installation screen for Windows users) "Picture Motion Browser" is not supported by...
...computer - Importing images to your Handycam, then click [Handycam Handbook (PDF)]. http://guide.d-imaging.sony.co.jp/mac/ms/us/ Installing and viewing "Handycam Handbook" (PDF) To view "Handycam Handbook" (PDF), you need to be installed x "Handycam Handbook" (PDF) "Handycam Handbook" (PDF) explains in the disc drive of your computer. US 26 3 Click [Handycam Handbook]. z Tips • For Macintosh users, follow the steps below. 1 Turn on the computer. 2 Place the CD-ROM (supplied) in the CD- The installation screen for Windows users) "Picture Motion Browser" is not supported by...
Operating Guide
Page 29
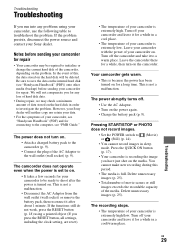
... or change the current hard disk of your camcorder is extremely high. If the functions still do not work, press the RESET button (p. 18) using your camcorder, use the following table to troubleshoot the problem. You cannot make new recording during this , the data stored on the media. Be sure to save the data on the internal hard disk (see "Handycam Handbook" (PDF)) onto other media (backup) before sending your camcorder for repair • Your camcorder may check a minimum...
... or change the current hard disk of your camcorder is extremely high. If the functions still do not work, press the RESET button (p. 18) using your camcorder, use the following table to troubleshoot the problem. You cannot make new recording during this , the data stored on the media. Be sure to save the data on the internal hard disk (see "Handycam Handbook" (PDF)) onto other media (backup) before sending your camcorder for repair • Your camcorder may check a minimum...
Operating Guide
Page 30
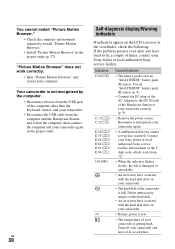
...; Remove the power source. "Picture Motion Browser" does not work correctly. • Quit "Picture Motion Browser" and restart your Sony dealer or local authorized Sony service facility. Your camcorder is not recognized by the computer. • Disconnect devices from the computer and the Handycam Station, and restart the computer, then connect the computer and your camcorder is not an "InfoLITHIUM" battery pack (H series). Delete unnecessary images on the LCD screen...
...; Remove the power source. "Picture Motion Browser" does not work correctly. • Quit "Picture Motion Browser" and restart your Sony dealer or local authorized Sony service facility. Your camcorder is not recognized by the computer. • Disconnect devices from the computer and the Handycam Station, and restart the computer, then connect the computer and your camcorder is not an "InfoLITHIUM" battery pack (H series). Delete unnecessary images on the LCD screen...
Operating Guide
Page 32
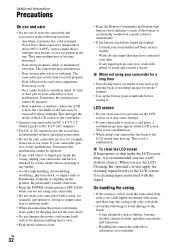
... may be able to direct sunlight. On a sandy beach or anywhere dusty. Near windows or outdoors, where the LCD screen, the viewfinder or the lens may occur. - US 32 • Keep the Remote Commander and button-type battery out of children's reach. If the battery is not a malfunction. Consult your camcorder is soiled, clean the camcorder body with a soft cloth lightly moistened with water...
... may be able to direct sunlight. On a sandy beach or anywhere dusty. Near windows or outdoors, where the LCD screen, the viewfinder or the lens may occur. - US 32 • Keep the Remote Commander and button-type battery out of children's reach. If the battery is not a malfunction. Consult your camcorder is soiled, clean the camcorder body with a soft cloth lightly moistened with water...
Operating Guide
Page 34
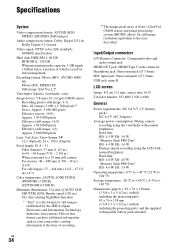
.... Input/Output connectors A/V Remote Connector: Component/video and audio output jack HDMI OUT jack: HDMI Type C mini connector Headphone jack: Stereo minijack (∅ 3.5mm) MIC input jack: Stereo minijack (∅ 3.5mm) USB jack: mini-B LCD screen Image: 8.0 cm (3.2 type, aspect ratio 16:9) Total dot number: 921 600 (1 920 × 480) General Power requirements: DC 6.8 V/7.2 V (battery pack) DC 8.4 V (AC Adaptor) Average power consumption: During camera recording using the viewfinder with normal brightness: Hard disk: HD: 4.5 W SD: 3.6 W "Memory Stick PRO...
.... Input/Output connectors A/V Remote Connector: Component/video and audio output jack HDMI OUT jack: HDMI Type C mini connector Headphone jack: Stereo minijack (∅ 3.5mm) MIC input jack: Stereo minijack (∅ 3.5mm) USB jack: mini-B LCD screen Image: 8.0 cm (3.2 type, aspect ratio 16:9) Total dot number: 921 600 (1 920 × 480) General Power requirements: DC 6.8 V/7.2 V (battery pack) DC 8.4 V (AC Adaptor) Average power consumption: During camera recording using the viewfinder with normal brightness: Hard disk: HD: 4.5 W SD: 3.6 W "Memory Stick PRO...


