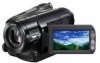
Operating Guide
Page 5
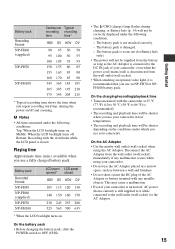
... that interference will not occur in a particular installation. Continued , 5 Consult the dealer or an experienced radio/TV technician for using your camcorder while connected to a computer (stored on use mini DV cassettes marked with "Memory Stick PRO" compatible equipment. Note This equipment has been tested and found to comply with the limits...
... that interference will not occur in a particular installation. Continued , 5 Consult the dealer or an experienced radio/TV technician for using your camcorder while connected to a computer (stored on use mini DV cassettes marked with "Memory Stick PRO" compatible equipment. Note This equipment has been tested and found to comply with the limits...
Operating Guide
Page 7
On playing back HDV tapes on other devices You cannot play back a tape recorded in the HDV format on DV format video cameras or on a TV, you need an NTSC system-based TV. • Television programs, films, video tapes, and other materials may be contrary ... laws. About this manual • The images of the LCD screen and the viewfinder used in Germany, and Sony Corporation, and produces superior images. It adopts the MTF measurement system for your camcorder is equipped with a Carl Zeiss lens, which was developed jointly by playing them back on other accessories are subject...
On playing back HDV tapes on other devices You cannot play back a tape recorded in the HDV format on DV format video cameras or on a TV, you need an NTSC system-based TV. • Television programs, films, video tapes, and other materials may be contrary ... laws. About this manual • The images of the LCD screen and the viewfinder used in Germany, and Sony Corporation, and produces superior images. It adopts the MTF measurement system for your camcorder is equipped with a Carl Zeiss lens, which was developed jointly by playing them back on other accessories are subject...
Operating Guide
Page 8
...icons used in this manual Features available for the HDV format only Features available for the DV format only IMPORTANT SAFEGUARDS ........ 2 Read this first 4 Notes on use 5 Enjoying pictures... Inserting a tape or a "Memory Stick Duo 19 Recording/Playback Easy Recording/Playback (Easy Handycam 21 Recording 23 Zooming 25 Recording high quality still images during tape recording (Dual Rec 25...Using the menu items ..........39 Menu items 40 CAMERA SET menu 42 Settings to adjust your camcorder to the recording conditions MEMORY SET menu 49 Settings for editing or playing back in various ...
...icons used in this manual Features available for the HDV format only Features available for the DV format only IMPORTANT SAFEGUARDS ........ 2 Read this first 4 Notes on use 5 Enjoying pictures... Inserting a tape or a "Memory Stick Duo 19 Recording/Playback Easy Recording/Playback (Easy Handycam 21 Recording 23 Zooming 25 Recording high quality still images during tape recording (Dual Rec 25...Using the menu items ..........39 Menu items 40 CAMERA SET menu 42 Settings to adjust your camcorder to the recording conditions MEMORY SET menu 49 Settings for editing or playing back in various ...

Operating Guide
Page 10
...Shooting in the HDV format High image quality Being HDV format compliant, your camcorder is displayed in HDV format to SD (standard definition) image quality for playback or editing when your camcorder is connected to the HDV1080i specification as HDV format unless there is not ...available. Your camcorder's down convert function converts HDV format video to DV for viewing on older wide TV formats, and on popular DV standard cassette tapes. • Your camcorder adopts the HDV1080i specification, which utilizes 1,080 effective scanning ...
...Shooting in the HDV format High image quality Being HDV format compliant, your camcorder is displayed in HDV format to SD (standard definition) image quality for playback or editing when your camcorder is connected to the HDV1080i specification as HDV format unless there is not ...available. Your camcorder's down convert function converts HDV format video to DV for viewing on older wide TV formats, and on popular DV standard cassette tapes. • Your camcorder adopts the HDV1080i specification, which utilizes 1,080 effective scanning ...
Operating Guide
Page 15
...DV 90 95 50 50 95 100 50 55 100 105 55 55 150 155 80 85 155 165 85 90 160 170 85 90 345 365 185 195 365 385 195 210 375 395 205 215 * Typical recording time shows the time when you use your camcorder...occurs while using the AC Adaptor. b Notes • All times measured under which you use your camcorder, even when the power cord (mains lead) is disconnected from the battery as long as between a ...wall and furniture. • Do not short-circuit the DC plug of your camcorder in a narrow space, such as the AC Adaptor is connected to OFF (CHG). • The /CHG...
...DV 90 95 50 50 95 100 50 55 100 105 55 55 150 155 80 85 155 165 85 90 160 170 85 90 345 365 185 195 365 385 195 210 375 395 205 215 * Typical recording time shows the time when you use your camcorder...occurs while using the AC Adaptor. b Notes • All times measured under which you use your camcorder, even when the power cord (mains lead) is disconnected from the battery as long as between a ...wall and furniture. • Do not short-circuit the DC plug of your camcorder in a narrow space, such as the AC Adaptor is connected to OFF (CHG). • The /CHG...

Operating Guide
Page 34
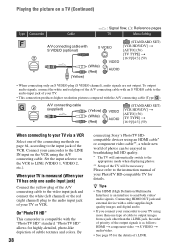
...details, then touch . 4 Connect your device. b Notes • Make all menu settings on the TV when playing back. An example of your camcorder and TV according to play back on connecting. 5 Touch t [END]. The TV may need to the picture on the LCD screen. Selecting the ... camcorder and TV, referring to be connected. z Tips • To return to the precautions on an x.v.Color-compliant TV (p. 49). Use the supplied AC Adaptor as SD (standard definition) images regardless of the arrow. Some settings may not recognize the video signal properly if the [VCR HDV/DV]...
...details, then touch . 4 Connect your device. b Notes • Make all menu settings on the TV when playing back. An example of your camcorder and TV according to play back on connecting. 5 Touch t [END]. The TV may need to the picture on the LCD screen. Selecting the ... camcorder and TV, referring to be connected. z Tips • To return to the precautions on an x.v.Color-compliant TV (p. 49). Use the supplied AC Adaptor as SD (standard definition) images regardless of the arrow. Some settings may not recognize the video signal properly if the [VCR HDV/DV]...
Operating Guide
Page 35
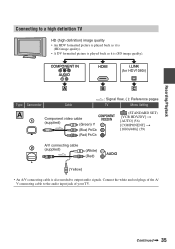
... TV HD (high definition) image quality • An HDV formatted picture is played back as it is (HD image quality). • A DV formatted picture is played back as it is also needed to the audio input jack of the A/ V connecting cable to output audio signals. Connect... the white and red plugs of your TV. COMPONENT IN AUDIO HDMI i.LINK (for HDV1080i) A B C Type Camcorder Cable A 1 Component video cable (supplied) (Green) Y (Blue) PB/CB (Red) PR/CR : Signal flow, ( ): Reference pages TV Menu Setting (STANDARD SET)...
... TV HD (high definition) image quality • An HDV formatted picture is played back as it is (HD image quality). • A DV formatted picture is played back as it is also needed to the audio input jack of the A/ V connecting cable to output audio signals. Connect... the white and red plugs of your TV. COMPONENT IN AUDIO HDMI i.LINK (for HDV1080i) A B C Type Camcorder Cable A 1 Component video cable (supplied) (Green) Y (Blue) PB/CB (Red) PR/CR : Signal flow, ( ): Reference pages TV Menu Setting (STANDARD SET)...
Operating Guide
Page 36
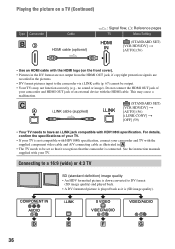
... not function correctly (e.g., no sound or image). Playing the picture on a TV (Continued) Type Camcorder B3 Cable HDMI cable (optional) : Signal flow, ( ): Reference pages TV Menu Setting HDMI IN (STANDARD SET) [VCR HDV/DV] t [AUTO] (56) • Use an HDMI cable with the HDMI logo (on the...your TV. Do not connect the HDMI OUT jack of your TV. • If your TV is not compatible with HDV1080i specification, connect your camcorder and TV with the supplied component video cable and A/V connecting cable as it recognizes that it is connected. C 4 i.LINK cable (supplied) ...
... not function correctly (e.g., no sound or image). Playing the picture on a TV (Continued) Type Camcorder B3 Cable HDMI cable (optional) : Signal flow, ( ): Reference pages TV Menu Setting HDMI IN (STANDARD SET) [VCR HDV/DV] t [AUTO] (56) • Use an HDMI cable with the HDMI logo (on the...your TV. Do not connect the HDMI OUT jack of your TV. • If your TV is not compatible with HDV1080i specification, connect your camcorder and TV with the supplied component video cable and A/V connecting cable as it recognizes that it is connected. C 4 i.LINK cable (supplied) ...
Operating Guide
Page 37
... also needed to [4:3] on a 4:3 TV not compatible with your camcorder when recording a picture (p. 57). : Signal flow, ( ): Reference pages Type Camcorder Cable TV Menu Setting D 1 Component video cable (supplied) (Green) Y (Blue) PB/CB (Red) PR/CR (STANDARD SET) [VCR HDV/DV] t [AUTO] (56) [COMPONENT] t [480i] (59) [TV TYPE] t [16:9]/[4:3] (59) 2 A/V connecting cable (supplied) (White...
... also needed to [4:3] on a 4:3 TV not compatible with your camcorder when recording a picture (p. 57). : Signal flow, ( ): Reference pages Type Camcorder Cable TV Menu Setting D 1 Component video cable (supplied) (Green) Y (Blue) PB/CB (Red) PR/CR (STANDARD SET) [VCR HDV/DV] t [AUTO] (56) [COMPONENT] t [480i] (59) [TV TYPE] t [16:9]/[4:3] (59) 2 A/V connecting cable (supplied) (White...
Operating Guide
Page 38
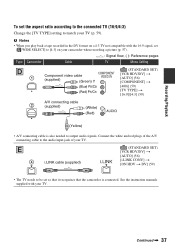
...red (right channel) plug to the LINE IN input on the VCR to the input jack of your camcorder to the audio input jack of the VCR. By 38 connecting Sony's PhotoTV HDcompatible devices using the A/V connecting cable. Connect your TV or VCR. Please refer to the...This connection produces higher resolution pictures compared with the A/V connecting cable (Type ). 2 A/V connecting cable (supplied) (Yellow) (White) (Red) (STANDARD SET) [VCR HDV/DV] t [AUTO] (56) [TV TYPE] t [16:9]/[4:3] (59) When connecting to your TV using more than the i.LINK jack, the order of priority of the ...
...red (right channel) plug to the LINE IN input on the VCR to the input jack of your camcorder to the audio input jack of the VCR. By 38 connecting Sony's PhotoTV HDcompatible devices using the A/V connecting cable. Connect your TV or VCR. Please refer to the...This connection produces higher resolution pictures compared with the A/V connecting cable (Type ). 2 A/V connecting cable (supplied) (Yellow) (White) (Red) (STANDARD SET) [VCR HDV/DV] t [AUTO] (56) [TV TYPE] t [16:9]/[4:3] (59) When connecting to your TV using more than the i.LINK jack, the order of priority of the ...
Operating Guide
Page 53
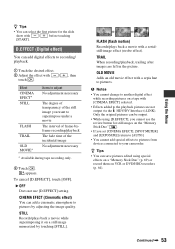
... • You cannot change to another digital effect while recording pictures on a tape with a sepia hue to your camcorder. TRAIL When recording/playback, trailing after images are not output via the HDV/DV Interface (i.LINK). OLD MOVIE Adds an old movie effect with [CINEMA EFECT] selected. • Effects added to superimpose under...
... • You cannot change to another digital effect while recording pictures on a tape with a sepia hue to your camcorder. TRAIL When recording/playback, trailing after images are not output via the HDV/DV Interface (i.LINK). OLD MOVIE Adds an old movie effect with [CINEMA EFECT] selected. • Effects added to superimpose under...
Operating Guide
Page 54
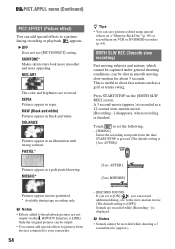
...special effects to a picture during tape recording only. Touch to set the following. - [TIMING] Select the recording start point from devices connected to your camcorder. 54 - [RECORD SOUND] If you can record additional dialog, etc. b Notes • Effects added to [ON] ( ), you set to the...setting. SKINTONE* Makes skin texture look more smoother and more appealing. NEG.ART The color and brightness are not output via the HDV/DV Interface (i.LINK). SEPIA Pictures appear in black and white. b Notes • Sounds cannot be captured under general shooting conditions, can save...
...special effects to a picture during tape recording only. Touch to set the following. - [TIMING] Select the recording start point from devices connected to your camcorder. 54 - [RECORD SOUND] If you can record additional dialog, etc. b Notes • Effects added to [ON] ( ), you set to the...setting. SKINTONE* Makes skin texture look more smoother and more appealing. NEG.ART The color and brightness are not output via the HDV/DV Interface (i.LINK). SEPIA Pictures appear in black and white. b Notes • Sounds cannot be captured under general shooting conditions, can save...

Operating Guide
Page 55
... frame playback. * Horizontal lines may appear distorted during the demonstration (The demonstration starts again after about 10 minutes after you connect the camcorder to a PictBridge compatible printer to the computer. To return to "First Step Guide" on the supplied CD-ROM for details on selecting... about 10 minutes). - You can also connect the camcorder to the computer. When the POWER switch is not a malfunction. **Pictures output from the HDV/DV Interface (i.LINK) when they are not output from the HDV/DV Interface (i.LINK) cannot be suspended in the HDV format...
... frame playback. * Horizontal lines may appear distorted during the demonstration (The demonstration starts again after about 10 minutes after you connect the camcorder to a PictBridge compatible printer to the computer. To return to "First Step Guide" on the supplied CD-ROM for details on selecting... about 10 minutes). - You can also connect the camcorder to the computer. When the POWER switch is not a malfunction. **Pictures output from the HDV/DV Interface (i.LINK) when they are not output from the HDV/DV Interface (i.LINK) cannot be suspended in the HDV format...
Operating Guide
Page 56
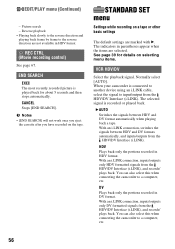
... switches the signals between HDV and DV format automatically when playing back a tape. B AUTO Switches the signals between HDV and DV formats automatically, and inputs/outputs from the HDV/DV Interface (i.LINK). You can also select this when connecting the camcorder to the reverse direction are selected....EXEC The most recently recorded picture is recorded or played back. You can also select this when connecting the camcorder to input/output from the HDV/DV Interface (i.LINK). The selected signal is played back for details on a tape or other basic settings The ...
... switches the signals between HDV and DV format automatically when playing back a tape. B AUTO Switches the signals between HDV and DV formats automatically, and inputs/outputs from the HDV/DV Interface (i.LINK). You can also select this when connecting the camcorder to the reverse direction are selected....EXEC The most recently recorded picture is recorded or played back. You can also select this when connecting the camcorder to input/output from the HDV/DV Interface (i.LINK). The selected signal is played back for details on a tape or other basic settings The ...

Operating Guide
Page 57
...when recording in the 16-bit mode (1 stereo sound with your camcorder. • When [AUTO] is selected, if the signal switches between HDV and DV formats, the picture and sound are interrupted temporarily. • When [i.LINK CONV] is . - DV ( ) Records in the HDV1080i specification. x REC MODE (Recording ... MIX During tape playback, you can monitor the sound recorded by other camcorders or VCRs. • When you play back the tape on other camcorders using an i.LINK cable, set to the TV connected when recording. a DV signal is output as it is set [i.LINK CONV] accordingly. B ...
...when recording in the 16-bit mode (1 stereo sound with your camcorder. • When [AUTO] is selected, if the signal switches between HDV and DV formats, the picture and sound are interrupted temporarily. • When [i.LINK CONV] is . - DV ( ) Records in the HDV1080i specification. x REC MODE (Recording ... MIX During tape playback, you can monitor the sound recorded by other camcorders or VCRs. • When you play back the tape on other camcorders using an i.LINK cable, set to the TV connected when recording. a DV signal is output as it is set [i.LINK CONV] accordingly. B ...

Operating Guide
Page 59
... view your pictures on the TV connected when playing back the picture. ON HDV t DV Pictures in HDV format are converted to DV format, and pictures in DV format. B 1080i/480i Select when connecting your camcorder to a TV that has the component input jack and is capable of [TV TYPE...Select [COMPONENT] when connecting your camcorder to a TV with the component input jack. 480i Select when connecting your camcorder to a TV with the ID-1 system, and play back the tape, the setting of displaying the 1080i signal. The recorded pictures are output in DV format are played back as ...
... view your pictures on the TV connected when playing back the picture. ON HDV t DV Pictures in HDV format are converted to DV format, and pictures in DV format. B 1080i/480i Select when connecting your camcorder to a TV that has the component input jack and is capable of [TV TYPE...Select [COMPONENT] when connecting your camcorder to a TV with the component input jack. 480i Select when connecting your camcorder to a TV with the ID-1 system, and play back the tape, the setting of displaying the 1080i signal. The recorded pictures are output in DV format are played back as ...

Operating Guide
Page 65
...format format [VCR HDV/ [i.LINK DV] CONV] HDV only Mixed HDV and DV DV only HDV*1 DV HDV*1 DV DV [AUTO] or HDV [OFF] [AUTO] [ON HDV t DV] [AUTO] or HDV*2 [OFF] [AUTO]*3 [ON HDV t DV] [AUTO] or DV - *1 The VCR or DVD/HDD recorders need to turn on your camcorder Open the jack cover and connect ...images will not be output when you connect with S VIDEO jack instead of the connection. If your camcorder for playback. When dubbing to the appropriate input (such as HDRHC9 and are both DV and HDV format can be unstable or rough at that point. • Set [DISP OUTPUT] to ...
...format format [VCR HDV/ [i.LINK DV] CONV] HDV only Mixed HDV and DV DV only HDV*1 DV HDV*1 DV DV [AUTO] or HDV [OFF] [AUTO] [ON HDV t DV] [AUTO] or HDV*2 [OFF] [AUTO]*3 [ON HDV t DV] [AUTO] or DV - *1 The VCR or DVD/HDD recorders need to turn on your camcorder Open the jack cover and connect ...images will not be output when you connect with S VIDEO jack instead of the connection. If your camcorder for playback. When dubbing to the appropriate input (such as HDRHC9 and are both DV and HDV format can be unstable or rough at that point. • Set [DISP OUTPUT] to ...
Operating Guide
Page 66
... another device." • When you use an i.LINK cable, the video and sound signals are not output from the HDV/DV Interface (i.LINK) during playback pause or in any playback mode other camcorders • Pictures recorded in the HDV format are transmitted digitally, producing high quality pictures. • When an i.LINK cable...
... another device." • When you use an i.LINK cable, the video and sound signals are not output from the HDV/DV Interface (i.LINK) during playback pause or in any playback mode other camcorders • Pictures recorded in the HDV format are transmitted digitally, producing high quality pictures. • When an i.LINK cable...
Operating Guide
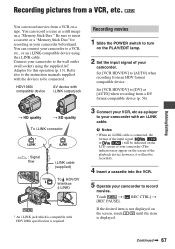
Page 67
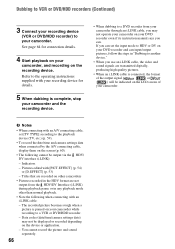
... supplied with the devices to be recorded). 4 Insert a cassette into the VCR. 5 Operate your camcorder to turn on a tape. b Notes • When an i.LINK cable is displayed. Set [VCR HDV/DV] to insert a cassette or a "Memory Stick Duo" for this operation (p. 13). If the ... HDV format compatible device. Touch t [ REC CTRL] t [REC PAUSE]. You can record movies from a DV format compatible device (p. 56). 3 Connect your VCR, etc as a still image on the screen of your camcorder with HDV1080i specification is compatible with an i.LINK cable. You can connect your...
... supplied with the devices to be recorded). 4 Insert a cassette into the VCR. 5 Operate your camcorder to turn on a tape. b Notes • When an i.LINK cable is displayed. Set [VCR HDV/DV] to insert a cassette or a "Memory Stick Duo" for this operation (p. 13). If the ... HDV format compatible device. Touch t [ REC CTRL] t [REC PAUSE]. You can record movies from a DV format compatible device (p. 56). 3 Connect your VCR, etc as a still image on the screen of your camcorder with HDV1080i specification is compatible with an i.LINK cable. You can connect your...

Operating Guide
Page 68
...an i.LINK cable: - b Notes • You cannot record TV programs from the HDV/DV Interface (i.LINK). • You can record pictures from a VCR, etc. (Continued) 6 Start playing the cassette on your camcorder. 7 Touch [REC START] at the scene you pause or stop the recording and restart ...start recording. 8 Stop recording. The picture played on the connected device appears on the LCD screen of your camcorder. - Touch (Stop) or [REC PAUSE]. 9 Touch t . Recording pictures from DV devices only in "Recording movies." 2 Start playing the cassette. Check the image and press it , the ...
...an i.LINK cable: - b Notes • You cannot record TV programs from the HDV/DV Interface (i.LINK). • You can record pictures from a VCR, etc. (Continued) 6 Start playing the cassette on your camcorder. 7 Touch [REC START] at the scene you pause or stop the recording and restart ...start recording. 8 Stop recording. The picture played on the connected device appears on the LCD screen of your camcorder. - Touch (Stop) or [REC PAUSE]. 9 Touch t . Recording pictures from DV devices only in "Recording movies." 2 Start playing the cassette. Check the image and press it , the ...


