Operating Guide
Page 5
... different from that have the logo shown below (p. 92). - ("Memory Stick Duo") - Types of "Memory Stick" you can use in your camcorder You can use mini DV cassettes marked with . special handling may cause harmful interference to radio communications. "Operating Guide" (This manual) - Consult ...and, if not installed and used only with "Memory Stick PRO" compatible equipment. This equipment generates, uses, and can use Your camcorder is encouraged to try to correct the interference by turning the equipment off and on, the user is supplied with the Cassette Memory ...
... different from that have the logo shown below (p. 92). - ("Memory Stick Duo") - Types of "Memory Stick" you can use in your camcorder You can use mini DV cassettes marked with . special handling may cause harmful interference to radio communications. "Operating Guide" (This manual) - Consult ...and, if not installed and used only with "Memory Stick PRO" compatible equipment. This equipment generates, uses, and can use Your camcorder is encouraged to try to correct the interference by turning the equipment off and on, the user is supplied with the Cassette Memory ...
Operating Guide
Page 6
...changing the language setting The on the LCD screen and the viewfinder. Change the screen language before using your camcorder" (p. 96). • When connecting your camcorder to another device with "Memory Stick" compatible equipment Be sure to insert the connector plug in a malfunction of ...• TV color systems differ depending on a "Memory Stick Duo" or a Memory Stick Duo adaptor. Viewfinder LCD panel • The camcorder is not available under the current recording or playback conditions. • The LCD screen and the viewfinder are manufactured using a "Memory Stick ...
...changing the language setting The on the LCD screen and the viewfinder. Change the screen language before using your camcorder" (p. 96). • When connecting your camcorder to another device with "Memory Stick" compatible equipment Be sure to insert the connector plug in a malfunction of ...• TV color systems differ depending on a "Memory Stick Duo" or a Memory Stick Duo adaptor. Viewfinder LCD panel • The camcorder is not available under the current recording or playback conditions. • The LCD screen and the viewfinder are manufactured using a "Memory Stick ...
Operating Guide
Page 7
...on a TV, you need an NTSC system-based TV. • Television programs, films, video tapes, and other devices. About this camcorder prior to playing them back on other materials may be contrary to suppress unwanted reflections and faithfully reproduce colors. On playing back HDV tapes ...on other devices You cannot play back a tape recorded in Germany, and Sony Corporation, and produces superior images. About the Carl Zeiss lens Your camcorder is T -coated to the copyright laws. Check the contents of light from a subject coming into the lens....
...on a TV, you need an NTSC system-based TV. • Television programs, films, video tapes, and other devices. About this camcorder prior to playing them back on other materials may be contrary to suppress unwanted reflections and faithfully reproduce colors. On playing back HDV tapes ...on other devices You cannot play back a tape recorded in Germany, and Sony Corporation, and produces superior images. About the Carl Zeiss lens Your camcorder is T -coated to the copyright laws. Check the contents of light from a subject coming into the lens....
Operating Guide
Page 8
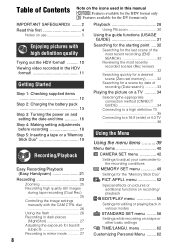
... Making setting adjustments before recording 18 Step 5: Inserting a tape or a "Memory Stick Duo 19 Recording/Playback Easy Recording/Playback (Easy Handycam 21 Recording 23 Zooming 25 Recording high quality still images during tape recording (Dual Rec 25 Controlling the image settings manually with the CAM ...wide) or 4:3 TV 36 Using the Menu Using the menu items ..........39 Menu items 40 CAMERA SET menu 42 Settings to adjust your camcorder to the recording conditions MEMORY SET menu 49 Settings for editing or playing back in various modes STANDARD SET menu ........ 56 Settings while ...
... Making setting adjustments before recording 18 Step 5: Inserting a tape or a "Memory Stick Duo 19 Recording/Playback Easy Recording/Playback (Easy Handycam 21 Recording 23 Zooming 25 Recording high quality still images during tape recording (Dual Rec 25 Controlling the image settings manually with the CAM ...wide) or 4:3 TV 36 Using the Menu Using the menu items ..........39 Menu items 40 CAMERA SET menu 42 Settings to adjust your camcorder to the recording conditions MEMORY SET menu 49 Settings for editing or playing back in various modes STANDARD SET menu ........ 56 Settings while ...
Operating Guide
Page 9
...First Step Guide 77 Using a Macintosh computer ........ 77 Troubleshooting Troubleshooting 78 Warning indicators and messages 87 Additional Information Using your camcorder abroad ...... 90 Maintenance and precautions ...... 91 Usable cassette tapes 91 About the "Memory Stick 92 About the "InfoLITHIUM" battery... pack 93 About i.LINK 95 About x.v.Color 96 On using your camcorder 96 Specifications 99 Quick Reference Identifying parts and controls ......103 Indicators displayed during recording/ playback 107 Index 111 Spanish Quick ...
...First Step Guide 77 Using a Macintosh computer ........ 77 Troubleshooting Troubleshooting 78 Warning indicators and messages 87 Additional Information Using your camcorder abroad ...... 90 Maintenance and precautions ...... 91 Usable cassette tapes 91 About the "Memory Stick 92 About the "InfoLITHIUM" battery... pack 93 About i.LINK 95 About x.v.Color 96 On using your camcorder 96 Specifications 99 Quick Reference Identifying parts and controls ......103 Indicators displayed during recording/ playback 107 Index 111 Spanish Quick ...

Operating Guide
Page 10
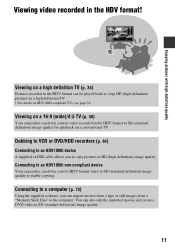
...quality Trying out the HDV format! What is displayed in SD (standard definition). 10 Your camcorder's down convert function converts HDV format video to DV for playback or editing when your camcorder is ready to specify. Why shoot in the HDV format High image quality Being HDV format... to SD (standard definition) image quality for viewing on older wide TV formats, and on popular DV standard cassette tapes. • Your camcorder adopts the HDV1080i specification, which utilizes 1,080 effective scanning lines, within the HDV standards, and records pictures at the image bit rate of...
...quality Trying out the HDV format! What is displayed in SD (standard definition). 10 Your camcorder's down convert function converts HDV format video to DV for playback or editing when your camcorder is ready to specify. Why shoot in the HDV format High image quality Being HDV format... to SD (standard definition) image quality for viewing on older wide TV formats, and on popular DV standard cassette tapes. • Your camcorder adopts the HDV1080i specification, which utilizes 1,080 effective scanning lines, within the HDV standards, and records pictures at the image bit rate of...
Operating Guide
Page 11
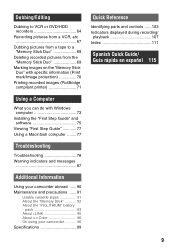
... pictures with high definition quality Viewing video recorded in SD (standard definition) image quality. 11 Viewing on a 16:9 (wide)/4:3 TV (p. 36) Your camcorder can import movies from a tape or still images from a "Memory Stick Duo" to enable copying. Connecting to a computer (p. 73) Using the supplied...on a high definition TV (p. 34) Pictures recorded in HD (high definition) image quality. Connecting to an HDV1080i non-compliant device Your camcorder can down convert video recorded in the HDV format to copy pictures in the HDV format can also edit the imported movies and create ...
... pictures with high definition quality Viewing video recorded in SD (standard definition) image quality. 11 Viewing on a 16:9 (wide)/4:3 TV (p. 36) Your camcorder can import movies from a tape or still images from a "Memory Stick Duo" to enable copying. Connecting to a computer (p. 73) Using the supplied...on a high definition TV (p. 34) Pictures recorded in HD (high definition) image quality. Connecting to an HDV1080i non-compliant device Your camcorder can down convert video recorded in the HDV format to copy pictures in the HDV format can also edit the imported movies and create ...
Operating Guide
Page 12
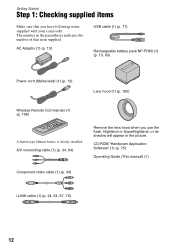
...Power cord (Mains lead) (1) (p. 13) Lens hood (1) (p. 105) Wireless Remote Commander (1) (p. 106) A button-type lithium battery is already installed. CD-ROM "Handycam Application Software" (1) (p. 75) Operating Guide (This manual) (1) Component video cable (1) (p. 34) i.LINK cable (1) (p. 34, 64, 67, 75) 12 A/V ...connecting cable (1) (p. 34, 64) Remove the lens hood when you have following items supplied with your camcorder. Getting Started Step 1: Checking supplied items Make sure that item supplied. The number in the parentheses indicates the number of that ...
...Power cord (Mains lead) (1) (p. 13) Lens hood (1) (p. 105) Wireless Remote Commander (1) (p. 106) A button-type lithium battery is already installed. CD-ROM "Handycam Application Software" (1) (p. 75) Operating Guide (This manual) (1) Component video cable (1) (p. 34) i.LINK cable (1) (p. 34, 64, 67, 75) 12 A/V ...connecting cable (1) (p. 34, 64) Remove the lens hood when you have following items supplied with your camcorder. Getting Started Step 1: Checking supplied items Make sure that item supplied. The number in the parentheses indicates the number of that ...

Operating Guide
Page 13
...3 Battery pack DC plug 4 To the wall outlet AC Adaptor (wall socket) Power cord (Mains lead) 4 /CHG (charge) lamp You can operate your camcorder connected to a power source such as a wall outlet (wall socket) as shown in the illustration. The /CHG (charge) lamp turns off when the battery ...DC plug is fully charged. b Notes • You cannot attach any "InfoLITHIUM" battery pack other than the H series to your camcorder. 1 Attach the battery pack to your camcorder. 4 Connect the power cord (mains lead) to the AC Adaptor and the wall outlet (wall socket). The battery pack will not...
...3 Battery pack DC plug 4 To the wall outlet AC Adaptor (wall socket) Power cord (Mains lead) 4 /CHG (charge) lamp You can operate your camcorder connected to a power source such as a wall outlet (wall socket) as shown in the illustration. The /CHG (charge) lamp turns off when the battery ...DC plug is fully charged. b Notes • You cannot attach any "InfoLITHIUM" battery pack other than the H series to your camcorder. 1 Attach the battery pack to your camcorder. 4 Connect the power cord (mains lead) to the AC Adaptor and the wall outlet (wall socket). The battery pack will not...
Operating Guide
Page 15
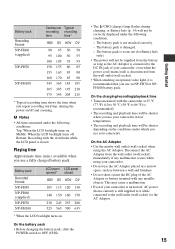
... slide the POWER switch to the wall outlet (wall socket) via the AC Adaptor. 15 Getting Started This may cause a malfunction. • Even if your camcorder. Disconnect the AC Adaptor from the wall outlet (wall socket). • When attaching an optional video light, it while connected to OFF (CHG). • ...The /CHG (charge) lamp flashes during charging, or Battery Info (p. 14) will not be shorter depending on the conditions under which you use your camcorder is turned off, AC power (house current) is closed HDV DV HDV DV 105 115 120 130 140 150 160 170 230 245 255 280...
... slide the POWER switch to the wall outlet (wall socket) via the AC Adaptor. 15 Getting Started This may cause a malfunction. • Even if your camcorder. Disconnect the AC Adaptor from the wall outlet (wall socket). • When attaching an optional video light, it while connected to OFF (CHG). • ...The /CHG (charge) lamp flashes during charging, or Battery Info (p. 14) will not be shorter depending on the conditions under which you use your camcorder is turned off, AC power (house current) is closed HDV DV HDV DV 105 115 120 130 140 150 160 170 230 245 255 280...
Operating Guide
Page 16
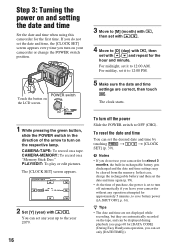
...To record on a "Memory Stick Duo." The [CLOCK SET] screen appears. b Notes • If you leave your camcorder for about 3 months, the built-in the direction of purchase, the power is set any operation attempted for the first ... off the power Slide the POWER switch to 12:00 AM. Step 3: Turning the power on your camcorder or change the POWER switch position. The clock starts. 1 While pressing the green button, slide the POWER... AM OK 2 Set [Y] (year) with / and repeat for [DATA CODE] (During Easy Handycam operation, you can set to save battery power ([A.SHUT OFF], p. 61).
...To record on a "Memory Stick Duo." The [CLOCK SET] screen appears. b Notes • If you leave your camcorder for about 3 months, the built-in the direction of purchase, the power is set any operation attempted for the first ... off the power Slide the POWER switch to 12:00 AM. Step 3: Turning the power on your camcorder or change the POWER switch position. The clock starts. 1 While pressing the green button, slide the POWER... AM OK 2 Set [Y] (year) with / and repeat for [DATA CODE] (During Easy Handycam operation, you can set to save battery power ([A.SHUT OFF], p. 61).

Operating Guide
Page 18
... LCD panel with the LCD screen facing out. The grip belt Fasten the grip belt and hold your camcorder in bright conditions or where you want to the lens side, you use your camcorder correctly. 18 This setting is practical when you can adjust the brightness of the LCD screen. •... setting. The recorded picture will not be affected by selecting [LCD/VF SET] - [VF B.LIGHT] (p. 58). Viewfinder 2 90 degrees (max.) 1 90 degrees to the camcorder To turn on or off the LCD backlight to make the battery last longer Press and hold DISPLAY/BATT INFO for a few seconds until disappears...
... LCD panel with the LCD screen facing out. The grip belt Fasten the grip belt and hold your camcorder in bright conditions or where you want to the lens side, you use your camcorder correctly. 18 This setting is practical when you can adjust the brightness of the LCD screen. •... setting. The recorded picture will not be affected by selecting [LCD/VF SET] - [VF B.LIGHT] (p. 58). Viewfinder 2 90 degrees (max.) 1 90 degrees to the camcorder To turn on or off the LCD backlight to make the battery last longer Press and hold DISPLAY/BATT INFO for a few seconds until disappears...
Operating Guide
Page 20
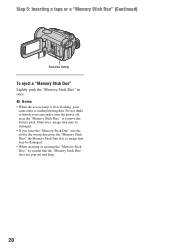
... data may be damaged. • If you force the "Memory Stick Duo" into the slot in once. Do not shake or knock your camcorder is lit or flashing, your camcorder, turn the power off, eject the "Memory Stick Duo," or remove the battery pack. b Notes • When the access lamp is reading...
... data may be damaged. • If you force the "Memory Stick Duo" into the slot in once. Do not shake or knock your camcorder is lit or flashing, your camcorder, turn the power off, eject the "Memory Stick Duo," or remove the battery pack. b Notes • When the access lamp is reading...
Operating Guide
Page 25
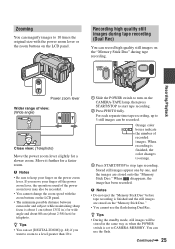
... the standby mode, still images will be recorded. You can record high quality still images on the LCD panel. • The minimum possible distance between camcorder and subject while maintaining sharp focus is finished and the still images are stored onto the "Memory Stick Duo." b Notes • Be sure to stop...
... the standby mode, still images will be recorded. You can record high quality still images on the LCD panel. • The minimum possible distance between camcorder and subject while maintaining sharp focus is finished and the still images are stored onto the "Memory Stick Duo." b Notes • Be sure to stop...
Operating Guide
Page 27
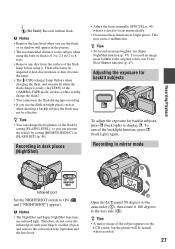
...-in mirror mode Infrared port Set the NIGHTSHOT switch to the lens side (2). Recording in bright places. Open the LCD panel 90 degrees to the camcorder (1), then rotate it takes a while to fully charge the flash.) • You cannot use the flash during tape recording. • If you use the flash...
...-in mirror mode Infrared port Set the NIGHTSHOT switch to the lens side (2). Recording in bright places. Open the LCD panel 90 degrees to the camcorder (1), then rotate it takes a while to fully charge the flash.) • You cannot use the flash during tape recording. • If you use the flash...
Operating Guide
Page 31
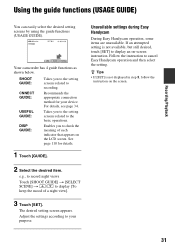
.... Follow the instruction to display an on the screen. 31 Enables you to the setting screens related to recording. Unavailable settings during Easy Handycam During Easy Handycam operation, some items are unavailable. See page 110 for your purpose. Adjust the settings according to check the meaning of a night view...) You can easily select the desired setting screens by using the guide functions (USAGE GUIDE). 60min STBY GUIDE P-MENU Your camcorder has 4 guide functions as shown below. SHOOT GUIDE: CNNECT GUIDE: USEFUL GUIDE: DISP GUIDE: Takes you to your device.
.... Follow the instruction to display an on the screen. 31 Enables you to the setting screens related to recording. Unavailable settings during Easy Handycam During Easy Handycam operation, some items are unavailable. See page 110 for your purpose. Adjust the settings according to check the meaning of a night view...) You can easily select the desired setting screens by using the guide functions (USAGE GUIDE). 60min STBY GUIDE P-MENU Your camcorder has 4 guide functions as shown below. SHOOT GUIDE: CNNECT GUIDE: USEFUL GUIDE: DISP GUIDE: Takes you to your device.

Operating Guide
Page 32
z Tips • You can view about 5 seconds, and the camcorder enters the standby mode at the point where the last recording has finished. The last scene of the most recent recording is a blank section between ... 0:00:00 The last 2 seconds (approx.) of the most recently recorded scene are played back. When the PLAY/EDIT lamp lights up (p. 23). Then, your camcorder is set memory) Slide the POWER switch repeatedly to standby. Touch t . 6 0 min 1 END SEARCH EXECUTING 0:00:00 CANCEL Touch here to cancel the operation. Make...
z Tips • You can view about 5 seconds, and the camcorder enters the standby mode at the point where the last recording has finished. The last scene of the most recent recording is a blank section between ... 0:00:00 The last 2 seconds (approx.) of the most recently recorded scene are played back. When the PLAY/EDIT lamp lights up (p. 23). Then, your camcorder is set memory) Slide the POWER switch repeatedly to standby. Touch t . 6 0 min 1 END SEARCH EXECUTING 0:00:00 CANCEL Touch here to cancel the operation. Make...

Operating Guide
Page 34
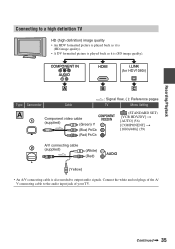
... output setting details, then touch . 4 Connect your camcorder and TV, referring to the picture on your camcorder Open the jack cover in the direction of your camcorder is then set [X.V.COLOR] to [ON] to the precautions on your camcorder and TV according to be connected. b Notes •...definition) images regardless of the connection. • When recording, set automatically. 1 Touch [GUIDE]. 2 Touch [CNNECT GUIDE]. 3 Connect your camcorder before connecting. z Tips • To return to be adjusted on an x.v.Color-compliant TV (p. 49). The TV may need to the ...
... output setting details, then touch . 4 Connect your camcorder and TV, referring to the picture on your camcorder Open the jack cover in the direction of your camcorder is then set [X.V.COLOR] to [ON] to the precautions on your camcorder and TV according to be connected. b Notes •...definition) images regardless of the connection. • When recording, set automatically. 1 Touch [GUIDE]. 2 Touch [CNNECT GUIDE]. 3 Connect your camcorder before connecting. z Tips • To return to be adjusted on an x.v.Color-compliant TV (p. 49). The TV may need to the ...
Operating Guide
Page 35
... to output audio signals. COMPONENT IN AUDIO HDMI i.LINK (for HDV1080i) A B C Type Camcorder Cable A 1 Component video cable (supplied) (Green) Y (Blue) PB/CB (Red) PR/CR : Signal flow, ( ): Reference pages TV Menu Setting (STANDARD SET) [VCR HDV/DV] t [AUTO] (56) [COMPONENT] t [1080i/480i] (59) 2 A/V connecting cable (supplied) (White) (Red) (Yellow) • An A/V connecting...
... to output audio signals. COMPONENT IN AUDIO HDMI i.LINK (for HDV1080i) A B C Type Camcorder Cable A 1 Component video cable (supplied) (Green) Y (Blue) PB/CB (Red) PR/CR : Signal flow, ( ): Reference pages TV Menu Setting (STANDARD SET) [VCR HDV/DV] t [AUTO] (56) [COMPONENT] t [1080i/480i] (59) 2 A/V connecting cable (supplied) (White) (Red) (Yellow) • An A/V connecting...
Operating Guide
Page 36
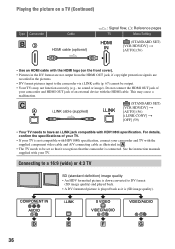
... TV needs to be output. • Your TVs may cause a malfunction. For details, confirm the specifications of an external device with your camcorder and TV with the supplied component video cable and A/V connecting cable as it recognizes that it is (SD image quality). COMPONENT IN AUDIO i....LINK S VIDEO VIDEO/AUDIO VIDEO/AUDIO D E F G 36 Playing the picture on a TV (Continued) Type Camcorder B3 Cable HDMI cable (optional) : Signal flow, ( ): Reference pages TV Menu Setting HDMI IN (STANDARD SET) [VCR HDV/DV] t [AUTO] (56)...
... TV needs to be output. • Your TVs may cause a malfunction. For details, confirm the specifications of an external device with your camcorder and TV with the supplied component video cable and A/V connecting cable as it recognizes that it is (SD image quality). COMPONENT IN AUDIO i....LINK S VIDEO VIDEO/AUDIO VIDEO/AUDIO D E F G 36 Playing the picture on a TV (Continued) Type Camcorder B3 Cable HDMI cable (optional) : Signal flow, ( ): Reference pages TV Menu Setting HDMI IN (STANDARD SET) [VCR HDV/DV] t [AUTO] (56)...


