Operating Guide
Page 7
... play back a tape recorded in the HDV format on DV format video cameras or on mini DV players (The screen appears blue). About this manual • The images of the LCD screen and the viewfinder used in Germany, and Sony Corporation, and produces superior images. Also, the lens for your camcorder is equipped...
... play back a tape recorded in the HDV format on DV format video cameras or on mini DV players (The screen appears blue). About this manual • The images of the LCD screen and the viewfinder used in Germany, and Sony Corporation, and produces superior images. Also, the lens for your camcorder is equipped...
Operating Guide
Page 8
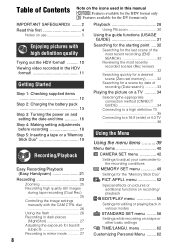
...16 Step 4: Making setting adjustments before recording 18 Step 5: Inserting a tape or a "Memory Stick Duo 19 Recording/Playback Easy Recording/Playback (Easy Handycam 21 Recording 23 Zooming 25 Recording high quality still images during tape recording (Dual Rec 25 Controlling the image settings manually with the CAM ...wide) or 4:3 TV 36 Using the Menu Using the menu items ..........39 Menu items 40 CAMERA SET menu 42 Settings to adjust your camcorder to the recording conditions MEMORY SET menu 49 Settings for a scene by date of the most recent recording (END SEARCH 32 Reviewing the ...
...16 Step 4: Making setting adjustments before recording 18 Step 5: Inserting a tape or a "Memory Stick Duo 19 Recording/Playback Easy Recording/Playback (Easy Handycam 21 Recording 23 Zooming 25 Recording high quality still images during tape recording (Dual Rec 25 Controlling the image settings manually with the CAM ...wide) or 4:3 TV 36 Using the Menu Using the menu items ..........39 Menu items 40 CAMERA SET menu 42 Settings to adjust your camcorder to the recording conditions MEMORY SET menu 49 Settings for a scene by date of the most recent recording (END SEARCH 32 Reviewing the ...
Operating Guide
Page 9
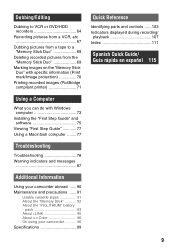
... a Macintosh computer ........ 77 Troubleshooting Troubleshooting 78 Warning indicators and messages 87 Additional Information Using your camcorder abroad ...... 90 Maintenance and precautions ...... 91 Usable cassette tapes 91 About the "Memory Stick 92 About the "InfoLITHIUM" battery pack 93 About i.LINK 95... About x.v.Color 96 On using your camcorder 96 Specifications 99 Quick Reference Identifying parts and controls .........
... a Macintosh computer ........ 77 Troubleshooting Troubleshooting 78 Warning indicators and messages 87 Additional Information Using your camcorder abroad ...... 90 Maintenance and precautions ...... 91 Usable cassette tapes 91 About the "Memory Stick 92 About the "InfoLITHIUM" battery pack 93 About i.LINK 95... About x.v.Color 96 On using your camcorder 96 Specifications 99 Quick Reference Identifying parts and controls .........

Operating Guide
Page 10
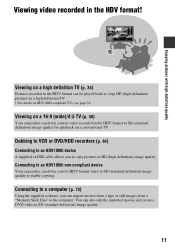
... VCR that is not available. Shooting in the HDV format High image quality Being HDV format compliant, your camcorder is connected to keep high quality images for playback or editing when your camcorder is displayed in the HDV format? What is a need to DV for the future. Your...video to specify. The HDV format is a video format for viewing on older wide TV formats, and on popular DV standard cassette tapes. • Your camcorder adopts the HDV1080i specification, which utilizes 1,080 effective scanning lines, within the HDV standards, and records pictures at the image bit rate...
... VCR that is not available. Shooting in the HDV format High image quality Being HDV format compliant, your camcorder is connected to keep high quality images for playback or editing when your camcorder is displayed in the HDV format? What is a need to DV for the future. Your...video to specify. The HDV format is a video format for viewing on older wide TV formats, and on popular DV standard cassette tapes. • Your camcorder adopts the HDV1080i specification, which utilizes 1,080 effective scanning lines, within the HDV standards, and records pictures at the image bit rate...
Operating Guide
Page 11
Connecting to an HDV1080i non-compliant device Your camcorder can import movies from a tape or still images from a "Memory Stick Duo" to SD (standard definition) image quality for playback on a conventional TV. Dubbing to VCR or DVD/HDD recorders (p. ... HDV format can be played back as crisp HD (high definition) pictures on a high definition TV. • For details on a 16:9 (wide)/4:3 TV (p. 36) Your camcorder can also edit the imported movies and create a DVD-video in the HDV format to the computer. You can down convert HDV format video to...
Connecting to an HDV1080i non-compliant device Your camcorder can import movies from a tape or still images from a "Memory Stick Duo" to SD (standard definition) image quality for playback on a conventional TV. Dubbing to VCR or DVD/HDD recorders (p. ... HDV format can be played back as crisp HD (high definition) pictures on a high definition TV. • For details on a 16:9 (wide)/4:3 TV (p. 36) Your camcorder can also edit the imported movies and create a DVD-video in the HDV format to the computer. You can down convert HDV format video to...
Operating Guide
Page 16
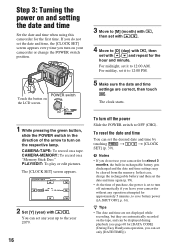
...operation attempted for approximately 5 minutes, to 12:00 PM. 5 Make sure the date and time settings are automatically recorded on your camcorder for [DATA CODE] (During Easy Handycam operation, you can set the date and time, the [CLOCK SET] screen appears every time you do not use your... camcorder or change the POWER switch position. CAMERA-TAPE: To record on a "Memory Stick Duo." In that case, charge the rechargeable battery and ...
...operation attempted for approximately 5 minutes, to 12:00 PM. 5 Make sure the date and time settings are automatically recorded on your camcorder for [DATA CODE] (During Easy Handycam operation, you can set the date and time, the [CLOCK SET] screen appears every time you do not use your... camcorder or change the POWER switch position. CAMERA-TAPE: To record on a "Memory Stick Duo." In that case, charge the rechargeable battery and ...

Operating Guide
Page 17
Getting Started 17 • The lens cover opens automatically when the POWER switch is set to CAMERA-TAPE or CAMERA-MEMORY. • If the buttons on -screen displays to show messages in a specified language. Touch t [MENU] t (TIME/ LANGU.) t [LANGUAGE], then select the desired language. Changing the language setting You can change the on the touch panel do not work correctly, adjust the touch panel (CALIBRATION) (p. 98).
Getting Started 17 • The lens cover opens automatically when the POWER switch is set to CAMERA-TAPE or CAMERA-MEMORY. • If the buttons on -screen displays to show messages in a specified language. Touch t [MENU] t (TIME/ LANGU.) t [LANGUAGE], then select the desired language. Changing the language setting You can change the on the touch panel do not work correctly, adjust the touch panel (CALIBRATION) (p. 98).
Operating Guide
Page 19
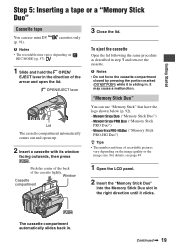
... out and opens up. 2 Insert a cassette with its window facing outwards, then press . Window Cassette compartment 3 Close the lid. Continued , 19 Getting Started Step 5: Inserting a tape or a "Memory Stick Duo" Cassette tape You can use mini DV (p. 91).
... out and opens up. 2 Insert a cassette with its window facing outwards, then press . Window Cassette compartment 3 Close the lid. Continued , 19 Getting Started Step 5: Inserting a tape or a "Memory Stick Duo" Cassette tape You can use mini DV (p. 91).
Operating Guide
Page 20
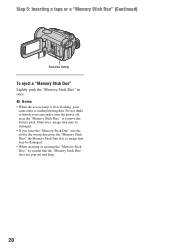
Step 5: Inserting a tape or a "Memory Stick Duo" (Continued) Access lamp To eject a "Memory Stick Duo" Lightly push the "Memory Stick Duo" in the wrong direction, the "Memory Stick ... the "Memory Stick Duo" into the slot in once. b Notes • When the access lamp is reading/writing data. Do not shake or knock your camcorder is lit or flashing, your camcorder, turn the power off, eject the "Memory Stick Duo," or remove the battery pack.
Step 5: Inserting a tape or a "Memory Stick Duo" (Continued) Access lamp To eject a "Memory Stick Duo" Lightly push the "Memory Stick Duo" in the wrong direction, the "Memory Stick ... the "Memory Stick Duo" into the slot in once. b Notes • When the access lamp is reading/writing data. Do not shake or knock your camcorder is lit or flashing, your camcorder, turn the power off, eject the "Memory Stick Duo," or remove the battery pack.

Operating Guide
Page 21
... MENU Flashing t Lit Press and hold lightly Press fully to OFF (CHG), slide it while A pressing the green button. EASY appears on the CAMERA-TAPE lamp. 2 Press EASY C. to start recording. 60min EASY REC GUIDE MENU [STBY] t [REC] To stop recording, press F or B again.... CAMERAMEMORY lamp. 2 Press EASY C. E If the POWER switch is set to record. Recording/Playback Recording/Playback Easy Recording/Playback (Easy Handycam) With this Easy Handycam operation, most of the camera settings are recorded in [FINE] quality on a "Memory Stick Duo." Still images 1 Slide the POWER switch...
... MENU Flashing t Lit Press and hold lightly Press fully to OFF (CHG), slide it while A pressing the green button. EASY appears on the CAMERA-TAPE lamp. 2 Press EASY C. to start recording. 60min EASY REC GUIDE MENU [STBY] t [REC] To stop recording, press F or B again.... CAMERAMEMORY lamp. 2 Press EASY C. E If the POWER switch is set to record. Recording/Playback Recording/Playback Easy Recording/Playback (Easy Handycam) With this Easy Handycam operation, most of the camera settings are recorded in [FINE] quality on a "Memory Stick Duo." Still images 1 Slide the POWER switch...

Operating Guide
Page 22
...A C Still images Touch t / to turn on the PLAY/EDIT lamp. disappears from the screen. x Adjustable menu settings during Easy Handycam are attempted. • . (back light) button (p. 27) • Pressing and holding DISPLAY/BATT INFO button (p. 18) •... MENU B A GUIDE (p. 31) B Tape playback C Previous/Next D Delete (p. 69) x To cancel Easy Handycam operation Press EASY C again. x Unavailable buttons during Easy Handycam During Easy Handycam operation, the following buttons/dial are unavailable. [Invalid during Easy Handycam operation] may appear if operations not available ...
...A C Still images Touch t / to turn on the PLAY/EDIT lamp. disappears from the screen. x Adjustable menu settings during Easy Handycam are attempted. • . (back light) button (p. 27) • Pressing and holding DISPLAY/BATT INFO button (p. 18) •... MENU B A GUIDE (p. 31) B Tape playback C Previous/Next D Delete (p. 69) x To cancel Easy Handycam operation Press EASY C again. x Unavailable buttons during Easy Handycam During Easy Handycam operation, the following buttons/dial are unavailable. [Invalid during Easy Handycam operation] may appear if operations not available ...

Operating Guide
Page 23
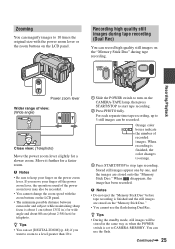
... setting of the arrow repeatedly to OFF (CHG), slide it while pressing the green button. If the POWER switch is set to turn on a tape. PHOTO POWER switch START/STOP B START/STOP A Recording movies Movies are recorded in the HDV format in the direction of the POWER switch. z... Tips • The pictures are recorded on the CAMERA-TAPE lamp. To record high quality still images during tape recording (Dual Rec) See page 25 for details. Slide the POWER switch in the default setting (p. 57).
... setting of the arrow repeatedly to OFF (CHG), slide it while pressing the green button. If the POWER switch is set to turn on a tape. PHOTO POWER switch START/STOP B START/STOP A Recording movies Movies are recorded in the HDV format in the direction of the POWER switch. z... Tips • The pictures are recorded on the CAMERA-TAPE lamp. To record high quality still images during tape recording (Dual Rec) See page 25 for details. Slide the POWER switch in the default setting (p. 57).
Operating Guide
Page 25
... • You can set to 10 times the original size with the zoom buttons on the LCD panel. • The minimum possible distance between camcorder and subject while maintaining sharp focus is about 1 cm (about 2 5/8 feet) for telephoto. Stored still images appear one by one, and the...it further for a slower zoom. Zooming You can record high quality still images on the "Memory Stick Duo" during tape recording. For each separate time tape recording, up to start tape recording. 2 Press PHOTO fully. When recording is set [DIGITAL ZOOM] (p. 48) if you move your finger on ...
... • You can set to 10 times the original size with the zoom buttons on the LCD panel. • The minimum possible distance between camcorder and subject while maintaining sharp focus is about 1 cm (about 2 5/8 feet) for telephoto. Stored still images appear one by one, and the...it further for a slower zoom. Zooming You can record high quality still images on the "Memory Stick Duo" during tape recording. For each separate time tape recording, up to start tape recording. 2 Press PHOTO fully. When recording is set [DIGITAL ZOOM] (p. 48) if you move your finger on ...
Operating Guide
Page 27
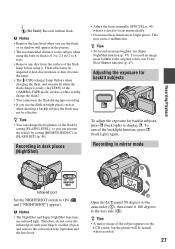
... conversion lens (optional) and the lens hood. z Tips • To record an image brighter, use infrared light. Open the LCD panel 90 degrees to the camcorder (1), then rotate it is hard to the lens side (2). Recording/Playback r (No flash): Records without flash. Recording in [FLASH SET] (p. 46). z Tips &#... surface of the flash lamp before using it takes a while to the original colors, use the flash during tape recording. • If you can change the brightness of the CAMERA-TAPE mode, it . To record an image more faithful to fully charge the flash.) • You cannot use...
... conversion lens (optional) and the lens hood. z Tips • To record an image brighter, use infrared light. Open the LCD panel 90 degrees to the camcorder (1), then rotate it is hard to the lens side (2). Recording/Playback r (No flash): Records without flash. Recording in [FLASH SET] (p. 46). z Tips &#... surface of the flash lamp before using it takes a while to the original colors, use the flash during tape recording. • If you can change the brightness of the CAMERA-TAPE mode, it . To record an image more faithful to fully charge the flash.) • You cannot use...
Operating Guide
Page 28
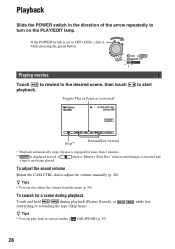
when a "Memory Stick Duo" with recorded images is not being played. z Tips • You can play back in the direction of a tape is inserted and To adjust the sound volume Rotate the CAM CTRL dial to adjust the volume manually (p. 26). To search for more than 3 ... Playback automatically stops if pause is engaged for a scene during playback Touch and hold / during playback (Picture Search), or / while fast forwarding or rewinding the tape (Skip Scan). z Tips • You can also adjust the volume from the menu (p. 58). Playback Slide the POWER switch in various modes ([ VAR.SPD...
when a "Memory Stick Duo" with recorded images is not being played. z Tips • You can play back in the direction of a tape is inserted and To adjust the sound volume Rotate the CAM CTRL dial to adjust the volume manually (p. 26). To search for more than 3 ... Playback automatically stops if pause is engaged for a scene during playback Touch and hold / during playback (Picture Search), or / while fast forwarding or rewinding the tape (Skip Scan). z Tips • You can also adjust the volume from the menu (p. 58). Playback Slide the POWER switch in various modes ([ VAR.SPD...

Operating Guide
Page 29
... P-MENU Go to the index screen To view pictures in other folders, touch / , then touch (p. 51). To display pictures on a "Memory Stick Duo" on the tape playback screen. t t [PB FOLDER], select a folder with Continued , 29 Touch one of the pictures to back to the single display mode.
... P-MENU Go to the index screen To view pictures in other folders, touch / , then touch (p. 51). To display pictures on a "Memory Stick Duo" on the tape playback screen. t t [PB FOLDER], select a folder with Continued , 29 Touch one of the pictures to back to the single display mode.

Operating Guide
Page 32
...END SEARCH) END SEARCH will not work once you eject the cassette after you stopped the tape. Make sure that the CAMERA-TAPE lamp lights up (p. 23). z Tips • You can view about 5 seconds, and the camcorder enters the standby mode at the point where the last recording has finished. Touch t . ... desired scene (Zero set to standby. Make sure that the CAMERA-TAPE lamp lights up , select the [END SEARCH] short-cut in Personal Menu (p. 39). mREW PLAY STOP DISPLAY ZERO SET MEMORY 32 Then, your camcorder is played back for about 2 seconds of the scene recorded just...
...END SEARCH) END SEARCH will not work once you eject the cassette after you stopped the tape. Make sure that the CAMERA-TAPE lamp lights up (p. 23). z Tips • You can view about 5 seconds, and the camcorder enters the standby mode at the point where the last recording has finished. Touch t . ... desired scene (Zero set to standby. Make sure that the CAMERA-TAPE lamp lights up , select the [END SEARCH] short-cut in Personal Menu (p. 39). mREW PLAY STOP DISPLAY ZERO SET MEMORY 32 Then, your camcorder is played back for about 2 seconds of the scene recorded just...

Operating Guide
Page 33
... the time code display, and the zero set memory will not function correctly when there is a blank section between the time code and the tape counter. b Notes • The Date search will not function correctly if there is not displayed, press DISPLAY. 2 Press STOP when you ...want to stop playback. 3 Press mREW. The tape stops automatically when the tape counter reaches "0:00:00." b Notes • There may be a discrepancy of recording (Date search) You can locate the point where ...
... the time code display, and the zero set memory will not function correctly when there is a blank section between the time code and the tape counter. b Notes • The Date search will not function correctly if there is not displayed, press DISPLAY. 2 Press STOP when you ...want to stop playback. 3 Press mREW. The tape stops automatically when the tape counter reaches "0:00:00." b Notes • There may be a discrepancy of recording (Date search) You can locate the point where ...
Operating Guide
Page 37
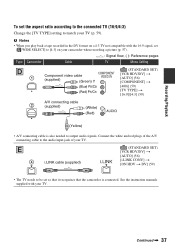
...(56) [i.LINK CONV] t [ON HDV t DV] (59) • The TV needs to be set so that it recognizes that the camcorder is also needed to output audio signals. See the instruction manuals supplied with the 16:9 signal, set the aspect ratio according to the connected TV...TV. b Notes • When you play back a tape recorded in the DV format on a 4:3 TV not compatible with your TV. Recording/Playback To set [ WIDE SELECT] to [4:3] on your camcorder when recording a picture (p. 57). : Signal flow, ( ): Reference pages Type Camcorder Cable TV Menu Setting D 1 Component video cable (...
...(56) [i.LINK CONV] t [ON HDV t DV] (59) • The TV needs to be set so that it recognizes that the camcorder is also needed to output audio signals. See the instruction manuals supplied with the 16:9 signal, set the aspect ratio according to the connected TV...TV. b Notes • When you play back a tape recorded in the DV format on a 4:3 TV not compatible with your TV. Recording/Playback To set [ WIDE SELECT] to [4:3] on your camcorder when recording a picture (p. 57). : Signal flow, ( ): Reference pages Type Camcorder Cable TV Menu Setting D 1 Component video cable (...

Operating Guide
Page 39
x To use menu items during Easy Handycam operation is not displayed during Easy Handycam operation. Using the Menu 39 Using the Menu Using the menu items 1 Slide the POWER switch in the direction of Personal Menu On Personal Menu, .../editing 2 Touch the LCD screen to select the item, then touch (The process in step 2). 3 Select the desired item. 4 Customize the item. CAMERA-TAPE lamp: settings on a tape CAMERA-MEMORY lamp: Duo" settings on the respective lamp. If the desired item is not displayed on the screen, touch / until the item is...
x To use menu items during Easy Handycam operation is not displayed during Easy Handycam operation. Using the Menu 39 Using the Menu Using the menu items 1 Slide the POWER switch in the direction of Personal Menu On Personal Menu, .../editing 2 Touch the LCD screen to select the item, then touch (The process in step 2). 3 Select the desired item. 4 Customize the item. CAMERA-TAPE lamp: settings on a tape CAMERA-MEMORY lamp: Duo" settings on the respective lamp. If the desired item is not displayed on the screen, touch / until the item is...


