Operating Guide
Page 1
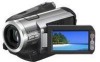
http://www.sony.net/ Printed in Japan 2-319-806-11(1) Digital HD Video Camera Recorder Operating Guide HDR-HC5/HC7 Enjoying pictures with high definition quality 11 Getting Started 13 Recording/ Playback 22 Using the Menu 40 Dubbing/Editing 65 Using a Computer 74 Troubleshooting 79 Additional Information 91 Quick Reference 105 Spanish Quick Guide/ Guía rápida en español 116 US US © 2007 Sony Corporation Additional information on this product and answers to frequently asked questions can be found at our Customer Support Website.
http://www.sony.net/ Printed in Japan 2-319-806-11(1) Digital HD Video Camera Recorder Operating Guide HDR-HC5/HC7 Enjoying pictures with high definition quality 11 Getting Started 13 Recording/ Playback 22 Using the Menu 40 Dubbing/Editing 65 Using a Computer 74 Troubleshooting 79 Additional Information 91 Quick Reference 105 Spanish Quick Guide/ Guía rápida en español 116 US US © 2007 Sony Corporation Additional information on this product and answers to frequently asked questions can be found at our Customer Support Website.
Operating Guide
Page 8
... number value indicates the amount of the LCD screen and the viewfinder used in Germany, and Sony Corporation, and produces superior images. It adopts the MTF measurement system for your camcorder. • Design and specifications of recording media and other devices You cannot play back a ...a Carl Zeiss lens. Read this first (Continued) On playing back HDV tapes on other accessories are based on the model HDR-HC7. Also, the lens for video cameras and offers a quality typical of tapes by Carl Zeiss, in this manual for illustration purposes are captured using a digital still...
... number value indicates the amount of the LCD screen and the viewfinder used in Germany, and Sony Corporation, and produces superior images. It adopts the MTF measurement system for your camcorder. • Design and specifications of recording media and other devices You cannot play back a ...a Carl Zeiss lens. Read this first (Continued) On playing back HDV tapes on other accessories are based on the model HDR-HC7. Also, the lens for video cameras and offers a quality typical of tapes by Carl Zeiss, in this manual for illustration purposes are captured using a digital still...

Operating Guide
Page 9
... mode 28 Using the menu items .......... 40 Menu items 41 CAMERA SET menu 43 Settings to adjust your camcorder to a 16:9 (wide) or 4:3 TV 37 Using the Menu Recording/Playback Easy Recording/Playback (Easy Handycam 22 Recording 24 Zooming 26 Recording high quality still images during tape...format only Features available for the DV format only IMPORTANT SAFEGUARDS .........3 Read this first 5 Enjoying pictures with the CAM CTRL dial (HDR-HC7 27 Using the flash 27 Recording in dark places (NightShot 28 Adjusting the exposure for backlit subjects 28 Recording in various modes ...
... mode 28 Using the menu items .......... 40 Menu items 41 CAMERA SET menu 43 Settings to adjust your camcorder to a 16:9 (wide) or 4:3 TV 37 Using the Menu Recording/Playback Easy Recording/Playback (Easy Handycam 22 Recording 24 Zooming 26 Recording high quality still images during tape...format only Features available for the DV format only IMPORTANT SAFEGUARDS .........3 Read this first 5 Enjoying pictures with the CAM CTRL dial (HDR-HC7 27 Using the flash 27 Recording in dark places (NightShot 28 Adjusting the exposure for backlit subjects 28 Recording in various modes ...
Operating Guide
Page 17
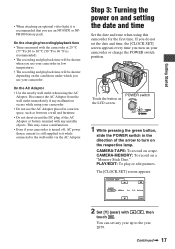
... low temperatures. • The recording and playback time will be shorter depending on the conditions under which you use your camcorder. The [CLOCK SET] screen appears. CAMERA-TAPE: To record on a "Memory Stick Duo." CLOCK SET DATE 2007Y JAN M 1D 12: 00 AM OK 2 Set [Y] (year) with touch . ...house current) is still supplied to the year 2079. On the AC Adaptor • Use the nearby wall outlet when using this camcorder for the first time. CAMERA-MEMORY: To record on a tape. Continued , 17 PLAY/EDIT: To play or edit pictures. On the charging/recording/playback time ...
... low temperatures. • The recording and playback time will be shorter depending on the conditions under which you use your camcorder. The [CLOCK SET] screen appears. CAMERA-TAPE: To record on a "Memory Stick Duo." CLOCK SET DATE 2007Y JAN M 1D 12: 00 AM OK 2 Set [Y] (year) with touch . ...house current) is still supplied to the year 2079. On the AC Adaptor • Use the nearby wall outlet when using this camcorder for the first time. CAMERA-MEMORY: To record on a tape. Continued , 17 PLAY/EDIT: To play or edit pictures. On the charging/recording/playback time ...
Operating Guide
Page 18
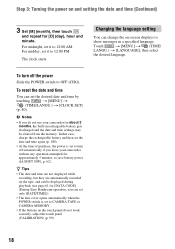
... the date and time You can set only [DATE/TIME])). • The lens cover opens automatically when the POWER switch is set to CAMERA-TAPE or CAMERA-MEMORY. • If the buttons on -screen displays to show messages in rechargeable battery gets discharged and the date and time settings may...; At the time of purchase, the power is set it to OFF (CHG). For midday, set to turn off automatically if you leave your camcorder without any operation attempted for [DATA CODE] (During Easy Handycam operation, you do not work correctly, adjust the touch panel (CALIBRATION) (p. 99). 18
... the date and time You can set only [DATE/TIME])). • The lens cover opens automatically when the POWER switch is set to CAMERA-TAPE or CAMERA-MEMORY. • If the buttons on -screen displays to show messages in rechargeable battery gets discharged and the date and time settings may...; At the time of purchase, the power is set it to OFF (CHG). For midday, set to turn off automatically if you leave your camcorder without any operation attempted for [DATA CODE] (During Easy Handycam operation, you do not work correctly, adjust the touch panel (CALIBRATION) (p. 99). 18
Operating Guide
Page 22
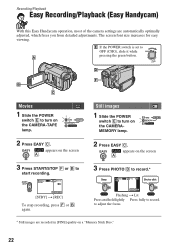
... turn on the CAMERAMEMORY lamp. 2 Press EASY C. D F B C Movies 1 Slide the POWER switch E to turn on the CAMERA-TAPE lamp. 2 Press EASY C. Recording/Playback Easy Recording/Playback (Easy Handycam) With this Easy Handycam operation, most of the camera settings are recorded in [FINE] quality on a "Memory Stick Duo." 22 E If the POWER switch is set...
... turn on the CAMERAMEMORY lamp. 2 Press EASY C. D F B C Movies 1 Slide the POWER switch E to turn on the CAMERA-TAPE lamp. 2 Press EASY C. Recording/Playback Easy Recording/Playback (Easy Handycam) With this Easy Handycam operation, most of the camera settings are recorded in [FINE] quality on a "Memory Stick Duo." 22 E If the POWER switch is set...
Operating Guide
Page 24
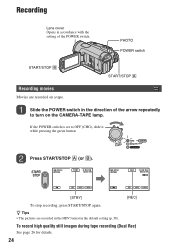
.../STOP A Recording movies Movies are recorded in the HDV format in the direction of the POWER switch. z Tips • The pictures are recorded on the CAMERA-TAPE lamp. If the POWER switch is set to turn on a tape. Press START/STOP A (or B). 60min STBY 60min 60min REC 60min GUIDE P-MENU GUIDE...
.../STOP A Recording movies Movies are recorded in the HDV format in the direction of the POWER switch. z Tips • The pictures are recorded on the CAMERA-TAPE lamp. If the POWER switch is set to turn on a tape. Press START/STOP A (or B). 60min STBY 60min 60min REC 60min GUIDE P-MENU GUIDE...
Operating Guide
Page 25
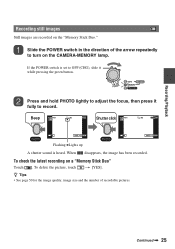
... recorded. Continued , 25 Beep min 6.1M Shutter click min 6.1M GUIDE P-MENU GUIDE P-MENU Flashing bLights up A shutter sound is set to turn on the CAMERA-MEMORY lamp. To delete the picture, touch t [YES]. If the POWER switch is heard. To check the latest recording on the "Memory Stick Duo." Recording...
... recorded. Continued , 25 Beep min 6.1M Shutter click min 6.1M GUIDE P-MENU GUIDE P-MENU Flashing bLights up A shutter sound is set to turn on the CAMERA-MEMORY lamp. To delete the picture, touch t [YES]. If the POWER switch is heard. To check the latest recording on the "Memory Stick Duo." Recording...
Operating Guide
Page 26
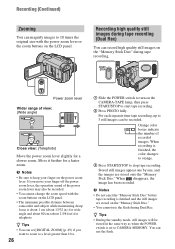
...) Zooming You can magnify images to 10 times the original size with the zoom buttons on the LCD panel. • The minimum possible distance between camcorder and subject while maintaining sharp focus is about 1 cm (about 2 5/8 feet) for telephoto. Power zoom lever Wider range of recorded images. If you ...want to zoom to a level greater than 10 ×. 26 1 Slide the POWER switch to turn on the CAMERA-TAPE lamp, then press START/STOP to start tape recording. 2 Press PHOTO fully. b Notes • Do not eject the "Memory Stick Duo" before ...
...) Zooming You can magnify images to 10 times the original size with the zoom buttons on the LCD panel. • The minimum possible distance between camcorder and subject while maintaining sharp focus is about 1 cm (about 2 5/8 feet) for telephoto. Power zoom lever Wider range of recorded images. If you ...want to zoom to a level greater than 10 ×. 26 1 Slide the POWER switch to turn on the CAMERA-TAPE lamp, then press START/STOP to start tape recording. 2 Press PHOTO fully. b Notes • Do not eject the "Memory Stick Duo" before ...

Operating Guide
Page 28
...recorded. b Notes • The NightShot and Super NightShot functions use Color Slow Shutter function (p. 48). Recording in flash is ready. (In [STBY] of the CAMERA-TAPE mode, it 180 degrees to ON ( and ["NIGHTSHOT"] appear). z Tips • A mirror-image of the flash by setting [FLASH LEVEL], or you... cover the infrared port with your fingers or other objects and remove the conversion lens (optional). 28 Open the LCD panel 90 degrees to the camcorder (1), then rotate it takes a while to fully charge the flash.) • You cannot use the flash during tape recording. • If ...
...recorded. b Notes • The NightShot and Super NightShot functions use Color Slow Shutter function (p. 48). Recording in flash is ready. (In [STBY] of the CAMERA-TAPE mode, it 180 degrees to ON ( and ["NIGHTSHOT"] appear). z Tips • A mirror-image of the flash by setting [FLASH LEVEL], or you... cover the infrared port with your fingers or other objects and remove the conversion lens (optional). 28 Open the LCD panel 90 degrees to the camcorder (1), then rotate it takes a while to fully charge the flash.) • You cannot use the flash during tape recording. • If ...
Operating Guide
Page 33
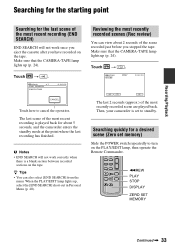
...CAMERA-TAPE lamp lights up , select the [END SEARCH] short-cut in Personal Menu (p. 40). b Notes • END SEARCH will not work correctly when there is a blank section between recorded sections on the PLAY/EDIT lamp, then operate the Remote Commander. z Tips • You can view about 5 seconds, and the camcorder...the most recent recording is set memory) Slide the POWER switch repeatedly to standby. When the PLAY/EDIT lamp lights up (p. 24). Then, your camcorder is played back for a desired scene (Zero set to turn on the tape. Touch t . 6 0 min STBY 0:00:00 The last ...
...CAMERA-TAPE lamp lights up , select the [END SEARCH] short-cut in Personal Menu (p. 40). b Notes • END SEARCH will not work correctly when there is a blank section between recorded sections on the PLAY/EDIT lamp, then operate the Remote Commander. z Tips • You can view about 5 seconds, and the camcorder...the most recent recording is set memory) Slide the POWER switch repeatedly to standby. When the PLAY/EDIT lamp lights up (p. 24). Then, your camcorder is played back for a desired scene (Zero set to turn on the tape. Touch t . 6 0 min STBY 0:00:00 The last ...
Operating Guide
Page 40
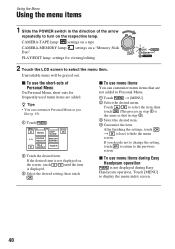
... for frequently used menu items are not added to Personal Menu. 1 Touch t [MENU]. 2 Select the desired menu. x To use menu items during Easy Handycam operation is not displayed during Easy Handycam operation. Touch [MENU] to hide the menu screen. CAMERA-TAPE lamp: settings on a tape CAMERA-MEMORY lamp: Duo" settings on the respective lamp.
... for frequently used menu items are not added to Personal Menu. 1 Touch t [MENU]. 2 Select the desired menu. x To use menu items during Easy Handycam operation is not displayed during Easy Handycam operation. Touch [MENU] to hide the menu screen. CAMERA-TAPE lamp: settings on a tape CAMERA-MEMORY lamp: Duo" settings on the respective lamp.

Operating Guide
Page 41
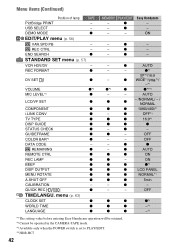
...z z z z z z z z z z z z z z z z z z z z z z z - - z - z - z - z - z - - - AUTO ON OFF - - z z -*1 - z - - During Easy Handycam operation, the setting is lit. z - - - OFF z - Menu items Available menu items (z) vary depending on which lamp is set automatically as shown in the following list.... Using the Menu Position of lamp: CAMERA SET menu (p. 43) SCENE SELECT SPOT METER EXPOSURE WHITE BAL. z z z MEMORY PLAY/EDIT Easy Handycam z - z - z*4 - AUTO - z z -*1 z z - z ...
...z z z z z z z z z z z z z z z z z z z z z z z - - z - z - z - z - z - - - AUTO ON OFF - - z z -*1 - z - - During Easy Handycam operation, the setting is lit. z - - - OFF z - Menu items Available menu items (z) vary depending on which lamp is set automatically as shown in the following list.... Using the Menu Position of lamp: CAMERA SET menu (p. 43) SCENE SELECT SPOT METER EXPOSURE WHITE BAL. z z z MEMORY PLAY/EDIT Easy Handycam z - z - z*4 - AUTO - z z -*1 z z - z ...
Operating Guide
Page 42
... - - OFF z z z*1 z z -*1 z z -*1 *1 The setting value before entering Easy Handycam operation will be retained. *2 Cannot be operated in the CAMERA-TAPE mode. *3 Available only when the POWER switch is set to PLAY/EDIT. *4 HDR-HC7 42 menu (p. 63) CLOCK SET z WORLD TIME z LANGUAGE z MEMORY - - - z - z z - ON z z z*1 z z LCD PANEL z z NORMAL*1...z*4 z z*1*3 - - z - - DEMO MODE z EDIT/PLAY menu (p. 56) VAR.SPD PB - QUICK REC z TIME/LANGU. z - - AUTO z z - /NORMAL/ - / NORMAL z z 1080i/480i*1 - z - OFF - - OFF -
... - - OFF z z z*1 z z -*1 z z -*1 *1 The setting value before entering Easy Handycam operation will be retained. *2 Cannot be operated in the CAMERA-TAPE mode. *3 Available only when the POWER switch is set to PLAY/EDIT. *4 HDR-HC7 42 menu (p. 63) CLOCK SET z WORLD TIME z LANGUAGE z MEMORY - - - z - z z - ON z z z*1 z z LCD PANEL z z NORMAL*1...z*4 z z*1*3 - - z - - DEMO MODE z EDIT/PLAY menu (p. 56) VAR.SPD PB - QUICK REC z TIME/LANGU. z - - AUTO z z - /NORMAL/ - / NORMAL z z 1080i/480i*1 - z - OFF - - OFF -

Operating Guide
Page 43
... the Menu SUNRSE SUNSET (Sunrise and sunset)* () Select to maintain the atmosphere of the distant surroundings in twilight scenes. This setting also prevents your camcorder to the recording conditions The default settings are marked with the [SCENE SELECT] function. TWILIT PORTRT (Twilight portrait) ( ) Select to shoot distant... effectively in various situations with B. SNOW** ( ) Select this when shooting in very bright, white conditions, such as sunsets and sunrises. CAMERA SET menu Settings to adjust your camcorder from focusing on glass or metal mesh in windows between the...
... the Menu SUNRSE SUNSET (Sunrise and sunset)* () Select to maintain the atmosphere of the distant surroundings in twilight scenes. This setting also prevents your camcorder to the recording conditions The default settings are marked with the [SCENE SELECT] function. TWILIT PORTRT (Twilight portrait) ( ) Select to shoot distant... effectively in various situations with B. SNOW** ( ) Select this when shooting in very bright, white conditions, such as sunsets and sunrises. CAMERA SET menu Settings to adjust your camcorder from focusing on glass or metal mesh in windows between the...
Operating Guide
Page 44
...Under video lamps in a studio, or under sodium lamps or incandescent-like color lamps ONE PUSH ( ) The white balance will shoot the subject. CAMERA SET menu (Continued) * Adjusted to focus on subjects farther away only. ** Adjusted not to focus on the screen. SPOT METER (Flexible spot ...• If you will be adjusted according to the ambient light. 1 Touch [ONE PUSH]. 2 Frame a white object such as a piece of [SHUTTR SPEED] (HDR-HC7) and [WHITE BAL.] are canceled. appears. 2 Touch [END]. b Notes • If you want to [MANUAL]. Adjust the brightness when the subject is strong ...
...Under video lamps in a studio, or under sodium lamps or incandescent-like color lamps ONE PUSH ( ) The white balance will shoot the subject. CAMERA SET menu (Continued) * Adjusted to focus on subjects farther away only. ** Adjusted not to focus on the screen. SPOT METER (Flexible spot ...• If you will be adjusted according to the ambient light. 1 Touch [ONE PUSH]. 2 Frame a white object such as a piece of [SHUTTR SPEED] (HDR-HC7) and [WHITE BAL.] are canceled. appears. 2 Touch [END]. b Notes • If you want to [MANUAL]. Adjust the brightness when the subject is strong ...
Operating Guide
Page 45
...default setting. AE SHIFT You can adjust the sharpness of the subject. Soften Sharpen SHUTTR SPEED (HDR-HC7) You can select a shutter speed between 1/4 and 1/10000 second when the POWER switch is ...white or cool white fluorescent lamps. • When you change the [SCENE SELECT] settings, or bring your camcorder outdoors after touching , set [WHITE BAL.] to adjust the shutter speed automatically. flashes quickly. Depending on the...framing white objects while is set to CAMERA-TAPE, and between 1/725 to 1/10000 second, still images cannot be set to [AUTO]. 3 Touch ...
...default setting. AE SHIFT You can adjust the sharpness of the subject. Soften Sharpen SHUTTR SPEED (HDR-HC7) You can select a shutter speed between 1/4 and 1/10000 second when the POWER switch is ...white or cool white fluorescent lamps. • When you change the [SCENE SELECT] settings, or bring your camcorder outdoors after touching , set [WHITE BAL.] to adjust the shutter speed automatically. flashes quickly. Depending on the...framing white objects while is set to CAMERA-TAPE, and between 1/725 to 1/10000 second, still images cannot be set to [AUTO]. 3 Touch ...

Operating Guide
Page 46
...appear bluish, and when set to a higher value, pictures appear reddish. • For HDR-HC7: You can also adjust the setting manually using / . To adjust the focus automatically, touch [AUTO] t in step 1. CAMERA COLOR You can adjust the focus manually. Decreases color intensity Increases color intensity WB SHIFT ... distance between camcorder and subject while maintaining sharp focus is about 1 cm (about 13/32 in the center of the screen. 1 2 46 1 Touch the subject on close range, move the power zoom lever to W (wide angle), then adjust the focus. • For HDR-HC7: You can...
...appear bluish, and when set to a higher value, pictures appear reddish. • For HDR-HC7: You can also adjust the setting manually using / . To adjust the focus automatically, touch [AUTO] t in step 1. CAMERA COLOR You can adjust the focus manually. Decreases color intensity Increases color intensity WB SHIFT ... distance between camcorder and subject while maintaining sharp focus is about 1 cm (about 13/32 in the center of the screen. 1 2 46 1 Touch the subject on close range, move the power zoom lever to W (wide angle), then adjust the focus. • For HDR-HC7: You can...
Operating Guide
Page 48
...Shutter) When you set to focus automatically. • The shutter speed of the screen where brightness is displayed. To cancel [COLOR SLOW S], touch [OFF]. CAMERA SET menu (Continued) NS LIGHT (NightShot Light) When using [NS LIGHT] is about 100 IRE or higher may slow down , touch [RESET]. b Notes... • Do not cover the infrared port with your camcorder changes depending on the screen. b Notes • Adjust the focus manually ([FOCUS], p. 46) when it is not recorded. b Notes • Portions of...
...Shutter) When you set to focus automatically. • The shutter speed of the screen where brightness is displayed. To cancel [COLOR SLOW S], touch [OFF]. CAMERA SET menu (Continued) NS LIGHT (NightShot Light) When using [NS LIGHT] is about 100 IRE or higher may slow down , touch [RESET]. b Notes... • Do not cover the infrared port with your camcorder changes depending on the screen. b Notes • Adjust the focus manually ([FOCUS], p. 46) when it is not recorded. b Notes • Portions of...
Operating Guide
Page 49
...80 × zoom is [ON]). X.V.COLOR When recording, set to [ON] when: - CONV.LENS When using the optimum compensation for camera shake for camera shake (The default setting is performed digitally. B OFF Select this function [ON] is performed optically, and after that the image quality decreases... conversion lens (optional). Recording in case you select the zooming level. A movie is performed digitally. 80 × (HDR-HC5) Up to the CAM CTRL dial. DIAL SET (HDR-HC7) You can compensate for each lens. Otherwise, set to [OFF] (the default setting). • If the movie...
...80 × zoom is [ON]). X.V.COLOR When recording, set to [ON] when: - CONV.LENS When using the optimum compensation for camera shake for camera shake (The default setting is performed digitally. B OFF Select this function [ON] is performed optically, and after that the image quality decreases... conversion lens (optional). Recording in case you select the zooming level. A movie is performed digitally. 80 × (HDR-HC5) Up to the CAM CTRL dial. DIAL SET (HDR-HC7) You can compensate for each lens. Otherwise, set to [OFF] (the default setting). • If the movie...


