Operating Guide
Page 3
... defeat the safety purpose of the set near water - Overloading Do not overload wall outlets, extension cords or convenience receptacles beyond their capacity, since this manual for cleaning the exterior of electrical power supplied to them , paying particular attention to insert the plug fully into the power outlet only one way...
... defeat the safety purpose of the set near water - Overloading Do not overload wall outlets, extension cords or convenience receptacles beyond their capacity, since this manual for cleaning the exterior of electrical power supplied to them , paying particular attention to insert the plug fully into the power outlet only one way...
Operating Guide
Page 5
... Regulatory Information Declaration of Conformity Trade Name: SONY Model No.: HDR-HC7 Responsible Party: Sony Electronics Inc. CAUTION You are cautioned that may cause undesired operation. Read this first Before operating the unit, please read this manual thoroughly, and retain it for the FCC related... you may result. Model No. Declaration of Conformity Trade Name: SONY Model No.: HDR-HC5 Responsible Party: Sony Electronics Inc. Continued , 5 The number below is subject to operate this manual could void your used rechargeable batteries to these numbers whenever you have...
... Regulatory Information Declaration of Conformity Trade Name: SONY Model No.: HDR-HC7 Responsible Party: Sony Electronics Inc. CAUTION You are cautioned that may cause undesired operation. Read this first Before operating the unit, please read this manual thoroughly, and retain it for the FCC related... you may result. Model No. Declaration of Conformity Trade Name: SONY Model No.: HDR-HC5 Responsible Party: Sony Electronics Inc. Continued , 5 The number below is subject to operate this manual could void your used rechargeable batteries to these numbers whenever you have...
Operating Guide
Page 6
... correct the interference by turning the equipment off and on, the user is no guarantee that interference will not occur in your camcorder.) • You cannot use any type of manuals - Read this equipment does cause harmful interference to radio or television reception, which the receiver is connected. - For the State of...
... correct the interference by turning the equipment off and on, the user is no guarantee that interference will not occur in your camcorder.) • You cannot use any type of manuals - Read this equipment does cause harmful interference to radio or television reception, which the receiver is connected. - For the State of...
Operating Guide
Page 8
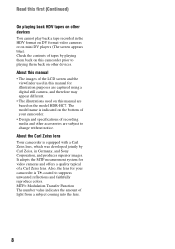
... still camera, and therefore may appear different. • The illustrations used on this manual are based on the bottom of your camcorder is T -coated to playing them back on mini DV players (The screen appears... the amount of tapes by Carl Zeiss, in Germany, and Sony Corporation, and produces superior images. It adopts the MTF measurement system for your camcorder. • Design and specifications of a Carl Zeiss lens. ... devices. About the Carl Zeiss lens Your camcorder is indicated on the model HDR-HC7. Check the contents of light from a subject coming into the lens. 8
... still camera, and therefore may appear different. • The illustrations used on this manual are based on the bottom of your camcorder is T -coated to playing them back on mini DV players (The screen appears... the amount of tapes by Carl Zeiss, in Germany, and Sony Corporation, and produces superior images. It adopts the MTF measurement system for your camcorder. • Design and specifications of a Carl Zeiss lens. ... devices. About the Carl Zeiss lens Your camcorder is indicated on the model HDR-HC7. Check the contents of light from a subject coming into the lens. 8

Operating Guide
Page 9
...11 Viewing video recorded in mirror mode 28 Using the menu items .......... 40 Menu items 41 CAMERA SET menu 43 Settings to adjust your camcorder to the recording conditions MEMORY SET menu 50 Settings for a scene by date of recording (Date search 34 Playing the picture on a... 37 Using the Menu Recording/Playback Easy Recording/Playback (Easy Handycam 22 Recording 24 Zooming 26 Recording high quality still images during tape recording (Dual Rec 26 Controlling the image settings manually with the CAM CTRL dial (HDR-HC7 27 Using the flash 27 Recording in dark places (NightShot 28...
...11 Viewing video recorded in mirror mode 28 Using the menu items .......... 40 Menu items 41 CAMERA SET menu 43 Settings to adjust your camcorder to the recording conditions MEMORY SET menu 50 Settings for a scene by date of recording (Date search 34 Playing the picture on a... 37 Using the Menu Recording/Playback Easy Recording/Playback (Easy Handycam 22 Recording 24 Zooming 26 Recording high quality still images during tape recording (Dual Rec 26 Controlling the image settings manually with the CAM CTRL dial (HDR-HC7 27 Using the flash 27 Recording in dark places (NightShot 28...
Operating Guide
Page 13
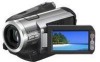
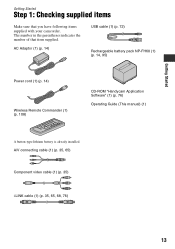
... the number of that you have following items supplied with your camcorder. AC Adaptor (1) (p. 14) USB cable (1) (p. 72) Rechargeable battery pack NP-FH60 (1) (p. 14, 95) Power cord (1) (p. 14) Wireless Remote Commander (1) (p. 108) CD-ROM "Handycam Application Software" (1) (p. 76) Operating Guide (This manual) (1) A button-type lithium battery is already installed. Getting Started Getting Started...
... the number of that you have following items supplied with your camcorder. AC Adaptor (1) (p. 14) USB cable (1) (p. 72) Rechargeable battery pack NP-FH60 (1) (p. 14, 95) Power cord (1) (p. 14) Wireless Remote Commander (1) (p. 108) CD-ROM "Handycam Application Software" (1) (p. 76) Operating Guide (This manual) (1) A button-type lithium battery is already installed. Getting Started Getting Started...
Operating Guide
Page 23
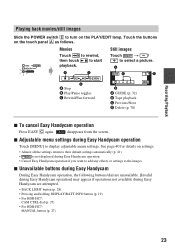
... holding DISPLAY/BATT INFO button (p. 19) • For HDR-HC7: CAM CTRL dial (p. 27) • For HDR-HC7: MANUAL button (p. 27) 23 x Unavailable buttons during Easy Handycam During Easy Handycam operation, the following buttons/dial are unavailable. [Invalid during Easy Handycam operation] may appear if operations not available during Easy Handycam operation Touch [MENU] to display adjustable menu settings...
... holding DISPLAY/BATT INFO button (p. 19) • For HDR-HC7: CAM CTRL dial (p. 27) • For HDR-HC7: MANUAL button (p. 27) 23 x Unavailable buttons during Easy Handycam During Easy Handycam operation, the following buttons/dial are unavailable. [Invalid during Easy Handycam operation] may appear if operations not available during Easy Handycam operation Touch [MENU] to display adjustable menu settings...
Operating Guide
Page 27
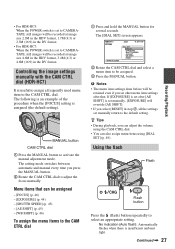
... in the HDV format, 1.7M (4:3) or 2.3M (16:9) in the DV format. • For HDR-HC7: When the POWER switch is set to CAMERATAPE, still images will be recorded at image size 4.6M in...(p. 45) - [WB SHIFT] (p. 46) To assign the menu items to the CAM CTRL dial 1 Press and hold the MANUAL button for several seconds. b Notes • The menu item settings done before will override [AE SHIFT]. • If you ... there is assigned (the default setting). Controlling the image settings manually with the CAM CTRL dial (HDR-HC7) It is set after [AE SHIFT] is useful to assign a frequently used ...
... in the HDV format, 1.7M (4:3) or 2.3M (16:9) in the DV format. • For HDR-HC7: When the POWER switch is set to CAMERATAPE, still images will be recorded at image size 4.6M in...(p. 45) - [WB SHIFT] (p. 46) To assign the menu items to the CAM CTRL dial 1 Press and hold the MANUAL button for several seconds. b Notes • The menu item settings done before will override [AE SHIFT]. • If you ... there is assigned (the default setting). Controlling the image settings manually with the CAM CTRL dial (HDR-HC7) It is set after [AE SHIFT] is useful to assign a frequently used ...

Operating Guide
Page 28
... any dust from the surface of the flash by setting [FLASH LEVEL], or you use the flash in dark places (NightShot) • Adjust the focus manually ([FOCUS], p. 46) when it takes a while to the original colors, use the flash during tape recording. • If you can prevent the redeye ... cover the infrared port with your fingers or other objects and remove the conversion lens (optional). 28 Open the LCD panel 90 degrees to the camcorder (1), then rotate it . This may be impaired if heat discoloration or dust obscures the lamp. • The /CHG (charge) lamp flickers when charging ...
... any dust from the surface of the flash by setting [FLASH LEVEL], or you use the flash in dark places (NightShot) • Adjust the focus manually ([FOCUS], p. 46) when it takes a while to the original colors, use the flash during tape recording. • If you can prevent the redeye ... cover the infrared port with your fingers or other objects and remove the conversion lens (optional). 28 Open the LCD panel 90 degrees to the camcorder (1), then rotate it . This may be impaired if heat discoloration or dust obscures the lamp. • The /CHG (charge) lamp flickers when charging ...

Operating Guide
Page 35
... connectors used. b Notes • Make all menu settings on the TV when playing back. Refer also to the instruction manuals supplied with an i.LINK cable. • Pictures recorded in the direction of your camcorder is then set [X.V.COLOR] to [ON] to play back on an x.v.Color-compliant TV (p. 49). The output setting...
... connectors used. b Notes • Make all menu settings on the TV when playing back. Refer also to the instruction manuals supplied with an i.LINK cable. • Pictures recorded in the direction of your camcorder is then set [X.V.COLOR] to [ON] to play back on an x.v.Color-compliant TV (p. 49). The output setting...
Operating Guide
Page 37
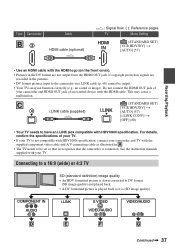
...as illustrated in the pictures. • DV format pictures input to the camcorder via i.LINK cable (p. 68) cannot be set so that it is connected. See the instruction manuals supplied with your camcorder and TV with the supplied component video cable and A/V connecting cable as... it recognizes that the camcorder is (SD image quality). Type Camcorder B3 Cable HDMI cable (optional) : Signal flow, ( ): Reference...
...as illustrated in the pictures. • DV format pictures input to the camcorder via i.LINK cable (p. 68) cannot be set so that it is connected. See the instruction manuals supplied with your camcorder and TV with the supplied component video cable and A/V connecting cable as... it recognizes that the camcorder is (SD image quality). Type Camcorder B3 Cable HDMI cable (optional) : Signal flow, ( ): Reference...
Operating Guide
Page 38
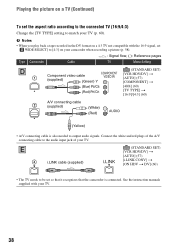
... recording a picture (p. 58). : Signal flow, ( ): Reference pages Type Camcorder Cable TV Menu Setting D 1 Component video cable (supplied) (Green) Y (Blue) PB/CB (Red) PR/CR (STANDARD SET) [VCR HDV/DV] t [AUTO] (57) [COMPONENT] t [480i] (60) [... white and red plugs of the A/V connecting cable to output audio signals. See the instruction manuals supplied with the 16:9 signal, set [ WIDE SELECT] to [4:3] on a TV (Continued) To set so that it recognizes that the camcorder is also needed to the audio input jack of your TV. 38 b Notes • When...
... recording a picture (p. 58). : Signal flow, ( ): Reference pages Type Camcorder Cable TV Menu Setting D 1 Component video cable (supplied) (Green) Y (Blue) PB/CB (Red) PR/CR (STANDARD SET) [VCR HDV/DV] t [AUTO] (57) [COMPONENT] t [480i] (60) [... white and red plugs of the A/V connecting cable to output audio signals. See the instruction manuals supplied with the 16:9 signal, set [ WIDE SELECT] to [4:3] on a TV (Continued) To set so that it recognizes that the camcorder is also needed to the audio input jack of your TV. 38 b Notes • When...
Operating Guide
Page 44
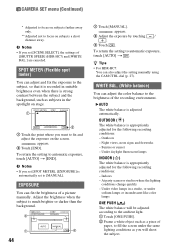
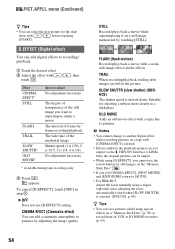
...) * Adjusted to focus on subjects farther away only. ** Adjusted not to automatic exposure, touch [AUTO] t [END]. z Tips • For HDR-HC7: You can adjust the color balance to the brightness of a picture manually. Night views, neon signs and fireworks - At party scenes or studios where the lighting conditions change quickly - To return the...
...) * Adjusted to focus on subjects farther away only. ** Adjusted not to automatic exposure, touch [AUTO] t [END]. z Tips • For HDR-HC7: You can adjust the color balance to the brightness of a picture manually. Night views, neon signs and fireworks - At party scenes or studios where the lighting conditions change quickly - To return the...
Operating Guide
Page 45
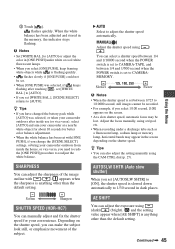
...8226; flashes slowly if [ONE PUSH] could not be lost. Soften Sharpen SHUTTR SPEED (HDR-HC7) You can adjust the sharpness of the subject. Continued , 45 Using the Menu z ...horizontal bands may be set. • When [ONE PUSH] was selected, or taken your camcorder outdoors after touching , set [WHITE BAL.], [SCENE SELECT] returns to CAMERA-TAPE, and ...second when the POWER switch is anything other than the default setting. 3 Touch [ ]. flashes quickly. MANUAL( ) Adjust the shutter speed using the CAM CTRL dial (p. 27). z Tips • You can ...
...8226; flashes slowly if [ONE PUSH] could not be lost. Soften Sharpen SHUTTR SPEED (HDR-HC7) You can adjust the sharpness of the subject. Continued , 45 Using the Menu z ...horizontal bands may be set. • When [ONE PUSH] was selected, or taken your camcorder outdoors after touching , set [WHITE BAL.], [SCENE SELECT] returns to CAMERA-TAPE, and ...second when the POWER switch is anything other than the default setting. 3 Touch [ ]. flashes quickly. MANUAL( ) Adjust the shutter speed using the CAM CTRL dial (p. 27). z Tips • You can ...

Operating Guide
Page 46
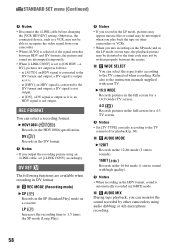
...)/ (focusing on close range, move the power zoom lever to W (wide angle), then adjust the focus. • For HDR-HC7: You can also adjust the focus manually using the CAM CTRL dial (p. 27). appears when the focus cannot be adjusted any closer, and appears when the focus cannot ... zoom for telephoto. b Notes • The minimum possible distance between camcorder and subject while maintaining sharp focus is set to a lower value, pictures appear bluish, and when set to a higher value, pictures appear reddish. • For HDR-HC7: You can adjust the white balance to focus on the screen. 9...
...)/ (focusing on close range, move the power zoom lever to W (wide angle), then adjust the focus. • For HDR-HC7: You can also adjust the focus manually using the CAM CTRL dial (p. 27). appears when the focus cannot be adjusted any closer, and appears when the focus cannot ... zoom for telephoto. b Notes • The minimum possible distance between camcorder and subject while maintaining sharp focus is set to a lower value, pictures appear bluish, and when set to a higher value, pictures appear reddish. • For HDR-HC7: You can adjust the white balance to focus on the screen. 9...
Operating Guide
Page 47
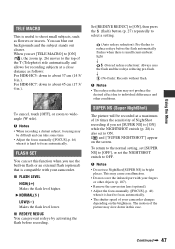
You can set [TELE MACRO] to [ON] ( ), the zoom (p. 26) moves to the top of your camcorder changes depending on the screen. x REDEYE REDUC You can take some time. • Adjust the focus manually ([FOCUS], p. 46) when it is hard to focus automatically. • The shutter speed of the T (Telephoto... ambient light. This may be recorded at a close distance as flowers or insects. The motion of NightShot recording if you set this case. For HDR-HC7: down in .). To return to the normal setting, set [SUPER NS] to [OFF], or set to OFF. FLASH SET You can blur ...
You can set [TELE MACRO] to [ON] ( ), the zoom (p. 26) moves to the top of your camcorder changes depending on the screen. x REDEYE REDUC You can take some time. • Adjust the focus manually ([FOCUS], p. 46) when it is hard to focus automatically. • The shutter speed of the T (Telephoto... ambient light. This may be recorded at a close distance as flowers or insects. The motion of NightShot recording if you set this case. For HDR-HC7: down in .). To return to the normal setting, set [SUPER NS] to [OFF], or set to OFF. FLASH SET You can blur ...
Operating Guide
Page 48
...[NS LIGHT], which emits infrared light (invisible), to [ON] (the default setting). b Notes • Do not cover the infrared port with your camcorder changes depending on the screen. COLOR SLOW S (Color Slow Shutter) When you set [COLOR SLOW S] to [ON], you change the default setting, is...The zebra pattern is useful as a guide when adjusting the brightness. To cancel the self-timer, select [OFF]. b Notes • Adjust the focus manually ([FOCUS], p. 46) when it is hard to focus automatically. • The shutter speed of the picture may appear overexposed. Press PHOTO when [SELF...
...[NS LIGHT], which emits infrared light (invisible), to [ON] (the default setting). b Notes • Do not cover the infrared port with your camcorder changes depending on the screen. COLOR SLOW S (Color Slow Shutter) When you set [COLOR SLOW S] to [ON], you change the default setting, is...The zebra pattern is useful as a guide when adjusting the brightness. To cancel the self-timer, select [OFF]. b Notes • Adjust the focus manually ([FOCUS], p. 46) when it is hard to focus automatically. • The shutter speed of the picture may appear overexposed. Press PHOTO when [SELF...
Operating Guide
Page 54
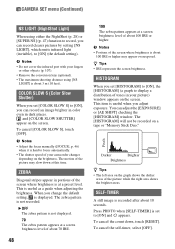
...) or record them on the "Memory Stick Duo" . • If you set [CINEMA EFECT], [SPOT METER] and [EXPOSURE] return to [AUTO]. • For HDR-HC5: Adjust the focus manually using a tripod (optional) since adjusting the focus automatically is hard when [SLOW SHUTTR] is selected. ([FOCUS], p. 46) z Tips • You can add digital...
...) or record them on the "Memory Stick Duo" . • If you set [CINEMA EFECT], [SPOT METER] and [EXPOSURE] return to [AUTO]. • For HDR-HC5: Adjust the focus manually using a tripod (optional) since adjusting the focus automatically is hard when [SLOW SHUTTR] is selected. ([FOCUS], p. 46) z Tips • You can add digital...
Operating Guide
Page 58
...SELECT You can select a recording format. x AUDIO MIX During tape playback, you can monitor the sound recorded by other camcorders using an i.LINK cable, set to the TV connected when recording. STANDARD SET menu (Continued) b Notes •...a 16:9 (wide) TV screen. 4:3 ( ) Records pictures in the 16-bit mode (1 stereo sound with your camcorder. • When [AUTO] is selected, if the signal switches between HDV and DV formats, the picture and sound are... specification. LP (LP) Increases the recording time to the instruction manuals supplied with high quality). a DV signal is ;
...SELECT You can select a recording format. x AUDIO MIX During tape playback, you can monitor the sound recorded by other camcorders using an i.LINK cable, set to the TV connected when recording. STANDARD SET menu (Continued) b Notes •...a 16:9 (wide) TV screen. 4:3 ( ) Records pictures in the 16-bit mode (1 stereo sound with your camcorder. • When [AUTO] is selected, if the signal switches between HDV and DV formats, the picture and sound are... specification. LP (LP) Increases the recording time to the instruction manuals supplied with high quality). a DV signal is ;
Operating Guide
Page 59
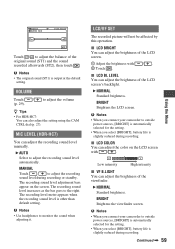
...level increases as the bar goes to adjust the volume z Tips • For HDR-HC7: You can adjust the brightness of the viewfinder. LCD/VF SET The recorded picture ...bars appear on the LCD screen with 2 Touch . /. b Notes • When you connect your camcorder to outside power sources, [BRIGHT] is automatically selected for the setting. • When you select [...than default setting. VOLUME Touch / (p. 29). B AUTO Select to monitor the sound when adjusting it. MANUAL Touch / to adjust the recording sound level during recording or standby. x LCD BL LEVEL You can adjust...
...level increases as the bar goes to adjust the volume z Tips • For HDR-HC7: You can adjust the brightness of the viewfinder. LCD/VF SET The recorded picture ...bars appear on the LCD screen with 2 Touch . /. b Notes • When you connect your camcorder to outside power sources, [BRIGHT] is automatically selected for the setting. • When you select [...than default setting. VOLUME Touch / (p. 29). B AUTO Select to monitor the sound when adjusting it. MANUAL Touch / to adjust the recording sound level during recording or standby. x LCD BL LEVEL You can adjust...


