
Operating Instructions
Page 3
... device pursuant to make sure the picture and sound are compressed in this manual could void your camcorder. Connect the equipment to an outlet on a DV format cassette. • HDV signals are recorded without any changes or modifications not expressly approved in MPEG2 format, which the receiver...with the limits for the contents of the camcorder, storage media, etc. • TV color systems differ depending on , the user is encouraged to try to radio or television reception, which utilizes 1080 effective scanning lines, within the HDV standards, and records pictures at the image ...
... device pursuant to make sure the picture and sound are compressed in this manual could void your camcorder. Connect the equipment to an outlet on a DV format cassette. • HDV signals are recorded without any changes or modifications not expressly approved in MPEG2 format, which the receiver...with the limits for the contents of the camcorder, storage media, etc. • TV color systems differ depending on , the user is encouraged to try to radio or television reception, which utilizes 1080 effective scanning lines, within the HDV standards, and records pictures at the image ...
Operating Instructions
Page 4
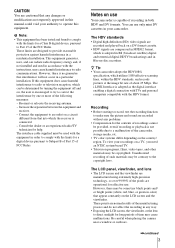
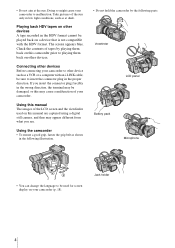
... in the proper direction. Take pictures of tapes by the following illustration. • Do not hold the camcorder by playing them back on a device that is not compatible with the HDV format. Viewfinder LCD panel Battery pack Microphone • You can change the language to be damaged, or... this camcorder prior to insert the connector plug in the following parts. Jack holder 4 Playing back HDV tapes on other devices A tape recorded in low light conditions, such as at the sun. Check...
... in the proper direction. Take pictures of tapes by the following illustration. • Do not hold the camcorder by playing them back on a device that is not compatible with the HDV format. Viewfinder LCD panel Battery pack Microphone • You can change the language to be damaged, or... this camcorder prior to insert the connector plug in the following parts. Jack holder 4 Playing back HDV tapes on other devices A tape recorded in low light conditions, such as at the sun. Check...
Operating Instructions
Page 7
...or TV 74 Connecting to a computer 77 Dubbing sound to a recorded tape 78 Connecting an analog VCR to the computer via your camcorder abroad 90 HDV format and recording/playback ..91 About the "InfoLITHIUM" battery pack 92 About i.LINK 94 Maintenance and precautions 95 Specification 98 Quick ...Reference Identifying parts and controls ...........100 Index 107 Note on the icons used in this manual : Features available for the HDV format only. : Features available for the DV format only. 7 STDYSHOT TYP/FRAME REC, etc 52 Using the (AUDIO SET) menu - ...
...or TV 74 Connecting to a computer 77 Dubbing sound to a recorded tape 78 Connecting an analog VCR to the computer via your camcorder abroad 90 HDV format and recording/playback ..91 About the "InfoLITHIUM" battery pack 92 About i.LINK 94 Maintenance and precautions 95 Specification 98 Quick ...Reference Identifying parts and controls ...........100 Index 107 Note on the icons used in this manual : Features available for the HDV format only. : Features available for the DV format only. 7 STDYSHOT TYP/FRAME REC, etc 52 Using the (AUDIO SET) menu - ...
Operating Instructions
Page 9
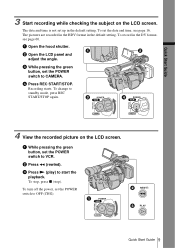
The pictures are recorded in the HDV format in the default setting. c While pressing the green button, set the POWER switch to VCR. To change to CAMERA. c Press N (play) to OFF (CHG). a ...
The pictures are recorded in the HDV format in the default setting. c While pressing the green button, set the POWER switch to VCR. To change to CAMERA. c Press N (play) to OFF (CHG). a ...
Operating Instructions
Page 13
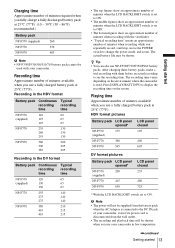
... 215 • The top figures show an approximate number of minutes when the LCD BACKLIGHT switch is set to the DC IN jack of your camcorder. b Note • The power will not be supplied from the battery pack when the AC Adaptor is connected to ON. • The middle figures show... pack at 25°C (77°F). Recording time Approximate number of minutes available when you repeatedly record, start/stop, move the POWER switch to ON. HDV format pictures Battery pack LCD panel opened* NP-F570 175 (supplied) NP-F770 360 NP-F970 545 LCD panel closed 195 400 605 DV format...
... 215 • The top figures show an approximate number of minutes when the LCD BACKLIGHT switch is set to the DC IN jack of your camcorder. b Note • The power will not be supplied from the battery pack when the AC Adaptor is connected to ON. • The middle figures show... pack at 25°C (77°F). Recording time Approximate number of minutes available when you repeatedly record, start/stop, move the POWER switch to ON. HDV format pictures Battery pack LCD panel opened* NP-F570 175 (supplied) NP-F770 360 NP-F970 545 LCD panel closed 195 400 605 DV format...
Operating Instructions
Page 20
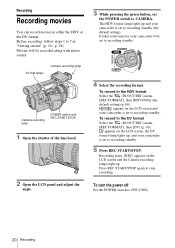
...CHG). 20 Recording It takes some time for your camcorder is set the POWER switch to be recorded along with stereo sound. To record in the DV format Select the (IN/OUT REC) menu, [REC FORMAT], then [DV] (p. 60). To record in the HDV format Select the (IN/OUT REC) menu, [...You can record movies in "Getting started" (p. 10 - Recording starts. [REC] appears on the LCD screen, the DV format lamp lights up, and your camcorder is set to recording standby. 4 Select the recording format. Movies will be set to recording standby (the default setting). appears on the LCD screen and...
...CHG). 20 Recording It takes some time for your camcorder is set the POWER switch to be recorded along with stereo sound. To record in the DV format Select the (IN/OUT REC) menu, [REC FORMAT], then [DV] (p. 60). To record in the HDV format Select the (IN/OUT REC) menu, [...You can record movies in "Getting started" (p. 10 - Recording starts. [REC] appears on the LCD screen, the DV format lamp lights up, and your camcorder is set to recording standby. 4 Select the recording format. Movies will be set to recording standby (the default setting). appears on the LCD screen and...
Operating Instructions
Page 21
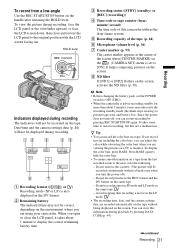
... bars, press BARS. Do not remove the cassette. (The picture will be recorded on a TV or monitor. Do not record pictures in the HDV format and the DV format on the screen. Do not record pictures in the DV format. HOLD lever Indicators displayed during recording. 6 0min HDV1080i ... and restore the LCD panel to display the correct remaining battery time. Since the power does not turn the power off , you can view this camcorder utilizes the drop-frame system. b Note • Before changing the battery pack, set to prevent tape wear and battery loss. Avoid stopping then ...
... bars, press BARS. Do not remove the cassette. (The picture will be recorded on a TV or monitor. Do not record pictures in the HDV format and the DV format on the screen. Do not record pictures in the DV format. HOLD lever Indicators displayed during recording. 6 0min HDV1080i ... and restore the LCD panel to display the correct remaining battery time. Since the power does not turn the power off , you can view this camcorder utilizes the drop-frame system. b Note • Before changing the battery pack, set to prevent tape wear and battery loss. Avoid stopping then ...
Operating Instructions
Page 22
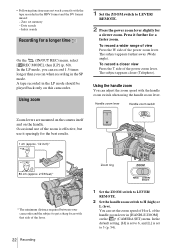
... zoom lever slightly for a longer time On the (IN/OUT REC) menu, select [ REC MODE], then [LP] (p. 60). A tape recorded in the HDV format and the DV format mixed: - Press it sparingly for a faster zoom. To record a wider range of view Press the W side of the power zoom.... Occasional use it further for the best results. 1 cm (approx. 1/2 inch)* 80 cm (approx. 2 5/8 feet)* Zoom ring * The minimum distance required between your camcorder and the subject to H (high) or L (low). In the default setting, [H] is set to 6, and [L] is effective, but use of the lever. 22 Recording...
... zoom lever slightly for a longer time On the (IN/OUT REC) menu, select [ REC MODE], then [LP] (p. 60). A tape recorded in the HDV format and the DV format mixed: - Press it sparingly for a faster zoom. To record a wider range of view Press the W side of the power zoom.... Occasional use it further for the best results. 1 cm (approx. 1/2 inch)* 80 cm (approx. 2 5/8 feet)* Zoom ring * The minimum distance required between your camcorder and the subject to H (high) or L (low). In the default setting, [H] is set to 6, and [L] is effective, but use of the lever. 22 Recording...

Operating Instructions
Page 34
...quality settings depending on the TV or monitor screen. Picture profile Recording condition number PP1 Appropriate setting to record in the HDV format PP2 Appropriate setting to record in the DV format PP3 Appropriate setting to record people PP4 Appropriate setting to record film... the picture quality by adjusting the color intensity, brightness, white balance, etc. PICTURE PROFILE You can change the above default settings at your camcorder to record in the memory. Connect your convenience. 1 In the standby mode, press PICTURE PROFILE. 2 Select a picture profile number by ...
...quality settings depending on the TV or monitor screen. Picture profile Recording condition number PP1 Appropriate setting to record in the HDV format PP2 Appropriate setting to record in the DV format PP3 Appropriate setting to record people PP4 Appropriate setting to record film... the picture quality by adjusting the color intensity, brightness, white balance, etc. PICTURE PROFILE You can change the above default settings at your camcorder to record in the memory. Connect your convenience. 1 In the standby mode, press PICTURE PROFILE. 2 Select a picture profile number by ...
Operating Instructions
Page 36
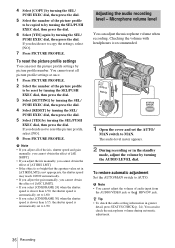
.... If you adjust all picture profile settings at once. 1 Press PICTURE PROFILE. 2 Select the number of audio input from the AUDIO/VIDEO jack or the HDV/DV jack. You cannot reset all of the iris, shutter speed and gain manually, you cannot obtain the effect of [AE SHIFT]. • If you...
.... If you adjust all picture profile settings at once. 1 Press PICTURE PROFILE. 2 Select the number of audio input from the AUDIO/VIDEO jack or the HDV/DV jack. You cannot reset all of the iris, shutter speed and gain manually, you cannot obtain the effect of [AE SHIFT]. • If you...
Operating Instructions
Page 42
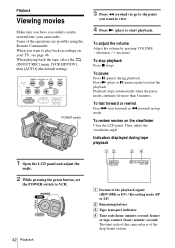
When playing back the tape, select the (IN/OUT REC) menu, [VCR HDV/DV], then [AUTO] (the default setting). To pause Press X (pause) ...Time code (hour: minute: second: frame) or tape counter (hour: minute: second) The time code of this camcorder is of the operations are possible using the Remote Commander. Some of the drop-frame system. To adjust the volume... go to the point you have a recorded cassette inserted into your TV, see page 46. To review movies on your camcorder. Press N (play) or X (pause) again to restart the playback. Then, adjust the viewfinder angle. Playback Viewing ...
When playing back the tape, select the (IN/OUT REC) menu, [VCR HDV/DV], then [AUTO] (the default setting). To pause Press X (pause) ...Time code (hour: minute: second: frame) or tape counter (hour: minute: second) The time code of this camcorder is of the operations are possible using the Remote Commander. Some of the drop-frame system. To adjust the volume... go to the point you have a recorded cassette inserted into your TV, see page 46. To review movies on your camcorder. Press N (play) or X (pause) again to restart the playback. Then, adjust the viewfinder angle. Playback Viewing ...
Operating Instructions
Page 43
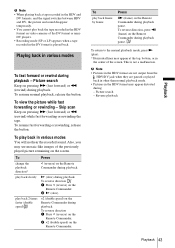
...double speed) on the Remote Commander. play back slowly y (slow) during playback. To play ). * Horizontal lines may appear at the top, bottom, or in the HDV format may see mosaic-like images of the DV format or miniDV players. • Recording mode (SP or LP) appears when a tape recorded in the..., press N (play back frame by frame Press C (frame) on the Remote Commander during playback pause. b Note • Pictures in the HDV format are not output from the HDV/DV jack when they are paused or played back in other than normal playback mode. • Pictures in the center of the...
...double speed) on the Remote Commander. play back slowly y (slow) during playback. To play ). * Horizontal lines may appear at the top, bottom, or in the HDV format may see mosaic-like images of the DV format or miniDV players. • Recording mode (SP or LP) appears when a tape recorded in the..., press N (play back frame by frame Press C (frame) on the Remote Commander during playback pause. b Note • Pictures in the HDV format are not output from the HDV/DV jack when they are paused or played back in other than normal playback mode. • Pictures in the center of the...
Operating Instructions
Page 44
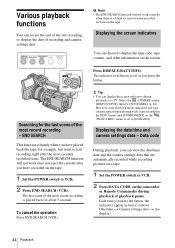
...recorded on the tape. 1 Set the POWER switch to VCR. 2 Press DATA CODE on the camcorder or Remote Commander during playback on the screen. Data code During playback, you have played back ... To cancel the operation Press END SEARCH (VCR). Displaying the screen indicators You can choose to [1080i/480i]. END SEARCH This function is a blank section between recorded sections on the (IN/OUT REC)...playing back a tape recorded in turn as you press the button, the indicators appear in the HDV format, and [COMPONENT] on the tape. Various playback functions You can locate the end of...
...recorded on the tape. 1 Set the POWER switch to VCR. 2 Press DATA CODE on the camcorder or Remote Commander during playback on the screen. Data code During playback, you have played back ... To cancel the operation Press END SEARCH (VCR). Displaying the screen indicators You can choose to [1080i/480i]. END SEARCH This function is a blank section between recorded sections on the (IN/OUT REC)...playing back a tape recorded in turn as you press the button, the indicators appear in the HDV format, and [COMPONENT] on the tape. Various playback functions You can locate the end of...
Operating Instructions
Page 45
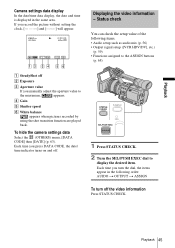
... data display, the date and time is displayed in the following items. • Audio setup such as audio mix (p. 56) • Output signal setup ([VCR HDV/DV], etc.) (p. 59) • Functions assigned to the ASSIGN buttons (p. 68) A SteadyShot off the video information Press STATUS CHECK. D Gain E Shutter speed F White balance appears...
... data display, the date and time is displayed in the following items. • Audio setup such as audio mix (p. 56) • Output signal setup ([VCR HDV/DV], etc.) (p. 59) • Functions assigned to the ASSIGN buttons (p. 68) A SteadyShot off the video information Press STATUS CHECK. D Gain E Shutter speed F White balance appears...
Operating Instructions
Page 46
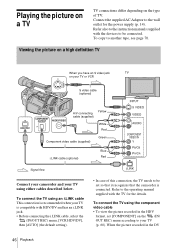
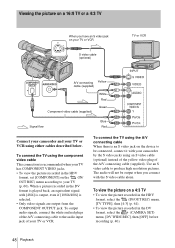
... or VCR S video cable (optional) Yellow A/V connecting cable (supplied) White Red Component video cable (supplied) Green i.LINK cable (optional) Blue Red Signal flow Connect your camcorder and your TV (p. 60). Connect the supplied AC Adaptor to another tape, see page 70. To copy to the wall outlet for the details. Refer... [COMPONENT] on the (IN/ OUT REC) menu according to your TV using an i.LINK cable This connection is recommended when your TV is compatible with HDV/DV and has an i.LINK jack. • Before connecting the i.LINK cable, select the (IN/OUT REC) menu, [VCR...
... or VCR S video cable (optional) Yellow A/V connecting cable (supplied) White Red Component video cable (supplied) Green i.LINK cable (optional) Blue Red Signal flow Connect your camcorder and your TV (p. 60). Connect the supplied AC Adaptor to another tape, see page 70. To copy to the wall outlet for the details. Refer... [COMPONENT] on the (IN/ OUT REC) menu according to your TV using an i.LINK cable This connection is recommended when your TV is compatible with HDV/DV and has an i.LINK jack. • Before connecting the i.LINK cable, select the (IN/OUT REC) menu, [VCR...
Operating Instructions
Page 47
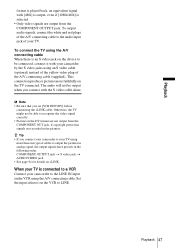
...is played back, an equivalent signal with [480i] is output, even if [1080i/480i] is connected to a VCR Connect your TV using more faithfully on the...audio signals, connect the white and red plugs of the A/V connecting cable to be output when you connect with your camcorder by the S video jacks using the A/V connecting cable When there is an S video jack on i.LINK. To ... type of cables to the LINE IN input on the TV connected. z Tip • If you set [VCR HDV/DV] before connecting the i.LINK cable. Playback 47 Playback The audio will not be connected, connect it with the...
...is played back, an equivalent signal with [480i] is output, even if [1080i/480i] is connected to a VCR Connect your TV using more faithfully on the...audio signals, connect the white and red plugs of the A/V connecting cable to be output when you connect with your camcorder by the S video jacks using the A/V connecting cable When there is an S video jack on i.LINK. To ... type of cables to the LINE IN input on the TV connected. z Tip • If you set [VCR HDV/DV] before connecting the i.LINK cable. Playback 47 Playback The audio will not be connected, connect it with the...
Operating Instructions
Page 48
... recommended when your TV has COMPONENT VIDEO jacks. • To view the picture recorded in the HDV format, set [COMPONENT] on the device to be output when you connect with [480i] is output, even if [1080i/480i] is an S video jack on the (IN/ OUT REC) menu according to your TV...then [OFF] before recording (p. 40). 48 Playback To connect the TV using an S video cable (optional) instead of the yellow video plug of your camcorder by the S video jacks using the A/V connecting cable When there is selected. • Only video signals are output from the COMPONENT OUTPUT jack. To ...
... recommended when your TV has COMPONENT VIDEO jacks. • To view the picture recorded in the HDV format, set [COMPONENT] on the device to be output when you connect with [480i] is output, even if [1080i/480i] is an S video jack on the (IN/ OUT REC) menu according to your TV...then [OFF] before recording (p. 40). 48 Playback To connect the TV using an S video cable (optional) instead of the yellow video plug of your camcorder by the S video jacks using the A/V connecting cable When there is selected. • Only video signals are output from the COMPONENT OUTPUT jack. To ...
Operating Instructions
Page 56
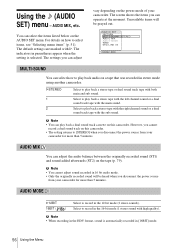
...on this camcorder. Select to [STEREO] when you cannot record a dual sound track on a tape that was recorded in the 16-bit mode (1 stereo sound with high quality). b Note • You cannot adjust sound recorded in [16BIT] mode. 56 Using the Menu b Note • When recording in the HDV format, ... the sub sound. Unavailable items will be grayed out. Using the (AUDIO SET) menu - The settings you disconnect the power source from your camcorder. b Note • You can adjust the audio balance between the originally recorded sound (ST1) and sound added afterwards (ST2) on this...
...on this camcorder. Select to [STEREO] when you cannot record a dual sound track on a tape that was recorded in the 16-bit mode (1 stereo sound with high quality). b Note • You cannot adjust sound recorded in [16BIT] mode. 56 Using the Menu b Note • When recording in the HDV format, ... the sub sound. Unavailable items will be grayed out. Using the (AUDIO SET) menu - The settings you disconnect the power source from your camcorder. b Note • You can adjust the audio balance between the originally recorded sound (ST1) and sound added afterwards (ST2) on this...

Operating Instructions
Page 59
... 77). • Select this to play back the input/ output signals in the DV format only. • For an i.LINK connection, select this camcorder. • When [AUTO] is selected and the signal switches between HDV and DV automatically. • Select this to be grayed out. Select this when connecting the...can select the items listed below on the power mode of your camcorder. an HDV signal is converted to the DV format and output; REC FORMAT/TV TYPE, etc. L I N / OUT REC RETURN VCR HDV / DV REC MODE COMPONENT i . at [HDV], an HDV signal is not output. ,continued Using the Menu 59
... 77). • Select this to play back the input/ output signals in the DV format only. • For an i.LINK connection, select this camcorder. • When [AUTO] is selected and the signal switches between HDV and DV automatically. • Select this to be grayed out. Select this when connecting the...can select the items listed below on the power mode of your camcorder. an HDV signal is converted to the DV format and output; REC FORMAT/TV TYPE, etc. L I N / OUT REC RETURN VCR HDV / DV REC MODE COMPONENT i . at [HDV], an HDV signal is not output. ,continued Using the Menu 59
Operating Instructions
Page 60
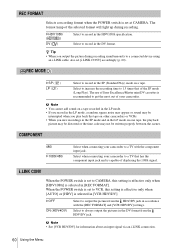
...time to a connected device using an i.LINK cable, also set at CAMERA. The use of Sony Excellence/Master mini DV cassettes is recommended to get the most out of your camcorder to a TV that of the selected format will light up during recording simultaneously to 1.5 times ...1080i signal. REC FORMAT Selects a recording format when the POWER switch is set [i.LINK CONV] accordingly (p. 60). The format lamp of the SP mode (Long Play). GHDV1080i ( ) DV ( ) Select to a TV with the [REC FORMAT] and [VCR HDV/DV] settings. COMPONENT 480i G1080i/480i Select when connecting your camcorder...
...time to a connected device using an i.LINK cable, also set at CAMERA. The use of Sony Excellence/Master mini DV cassettes is recommended to get the most out of your camcorder to a TV that of the selected format will light up during recording simultaneously to 1.5 times ...1080i signal. REC FORMAT Selects a recording format when the POWER switch is set [i.LINK CONV] accordingly (p. 60). The format lamp of the SP mode (Long Play). GHDV1080i ( ) DV ( ) Select to a TV with the [REC FORMAT] and [VCR HDV/DV] settings. COMPONENT 480i G1080i/480i Select when connecting your camcorder...

