
Operating Instructions
Page 16
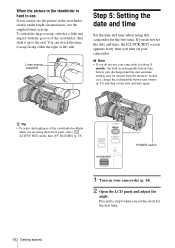
...to the end. Proceed to step 6 when you are using this camcorder for about 3 months, the built-in the viewfinder clearly under bright circumstances, use your camcorder (p. 14). 2 Open the LCD panel and adjust the angle. In that case, charge the rechargeable button-type battery (p. 97) and then set ...the date and time, the [CLOCK SET] screen appears every time you turn on your camcorder for the first time. Large eyecup (supplied) Step 5: Setting the ...
...to the end. Proceed to step 6 when you are using this camcorder for about 3 months, the built-in the viewfinder clearly under bright circumstances, use your camcorder (p. 14). 2 Open the LCD panel and adjust the angle. In that case, charge the rechargeable button-type battery (p. 97) and then set ...the date and time, the [CLOCK SET] screen appears every time you turn on your camcorder for the first time. Large eyecup (supplied) Step 5: Setting the ...
Operating Instructions
Page 26
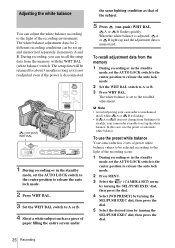
... 1 During recording or in the standby mode, set to the light of the recording environment. To recall adjustment data from flashing to lit steadily, your camcorder is set the AUTO LOCK switch to the center position to release the auto lock mode. 2 Press WHT BAL. 3 Set the WHT BAL switch to... shock while A or B is flashing. • If A or B does not change from the memory 1 During recording or in memory A and B. In this case, use the preset white balance Your camcorder has 2 sets of preset white balance values to be set the AUTO LOCK switch to the center position to release the auto...
... 1 During recording or in the standby mode, set to the light of the recording environment. To recall adjustment data from flashing to lit steadily, your camcorder is set the AUTO LOCK switch to the center position to release the auto lock mode. 2 Press WHT BAL. 3 Set the WHT BAL switch to... shock while A or B is flashing. • If A or B does not change from the memory 1 During recording or in memory A and B. In this case, use the preset white balance Your camcorder has 2 sets of preset white balance values to be set the AUTO LOCK switch to the center position to release the auto...
Operating Instructions
Page 32
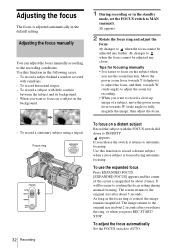
... its background. - Move the power zoom lever towards T (telephoto) to adjust the focus, and then, towards W (wide angle) to the original size in the following cases. - To record a stationary subject using automatic focusing. Use this function in about 2 seconds after about 2 times. The image returns to fully magnify the image, then...
... its background. - Move the power zoom lever towards T (telephoto) to adjust the focus, and then, towards W (wide angle) to the original size in the following cases. - To record a stationary subject using automatic focusing. Use this function in about 2 seconds after about 2 times. The image returns to fully magnify the image, then...
Operating Instructions
Page 33
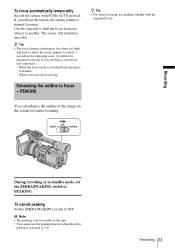
... • For easier focusing, use the peaking function when the zebra pattern is dark and hard to OFF. Recording During recording or in the following cases. (It will transition smoothly. Recording 33 The scenes will not be displayed correctly if you are using a conversion lens (optional).) - To cancel peaking Set the...
... • For easier focusing, use the peaking function when the zebra pattern is dark and hard to OFF. Recording During recording or in the following cases. (It will transition smoothly. Recording 33 The scenes will not be displayed correctly if you are using a conversion lens (optional).) - To cancel peaking Set the...
Operating Instructions
Page 35
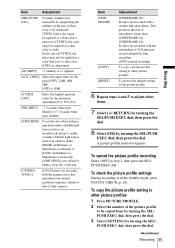
... operation under a reddish light source such as an incandescent lamp or candle, or under a blueish light source such as a skin color is wide) In the case of [TYPE3], the effect may also be copied from by turning the SEL/ PUSH EXEC dial, then press the dial. 3 Select [SETTING] by turning the...
... operation under a reddish light source such as an incandescent lamp or candle, or under a blueish light source such as a skin color is wide) In the case of [TYPE3], the effect may also be copied from by turning the SEL/ PUSH EXEC dial, then press the dial. 3 Select [SETTING] by turning the...
Operating Instructions
Page 46
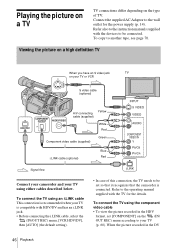
...A/V connecting cable (supplied) White Red Component video cable (supplied) Green i.LINK cable (optional) Blue Red Signal flow Connect your camcorder and your TV using an i.LINK cable This connection is recommended when your TV (p. 60). To connect the TV using the...in the DV 46 Playback When the picture recorded in the HDV format, set so that it recognizes that the camcorder is connected. Playing the picture on a TV TV connections differ depending on the (IN/ OUT REC) menu ... the (IN/OUT REC) menu, [VCR HDV/DV], then [AUTO] (the default setting). • In case of TV.
...A/V connecting cable (supplied) White Red Component video cable (supplied) Green i.LINK cable (optional) Blue Red Signal flow Connect your camcorder and your TV using an i.LINK cable This connection is recommended when your TV (p. 60). To connect the TV using the...in the DV 46 Playback When the picture recorded in the HDV format, set so that it recognizes that the camcorder is connected. Playing the picture on a TV TV connections differ depending on the (IN/ OUT REC) menu ... the (IN/OUT REC) menu, [VCR HDV/DV], then [AUTO] (the default setting). • In case of TV.
Operating Instructions
Page 74
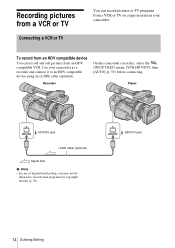
.... Player HDV/DV jack i.LINK cable (optional) Signal flow b Note • In case of digital broadcasting, you may not be allowed to an HDV compatible device using an i.LINK cable (optional). HDV/DV jack 74 Dubbing/Editing Use your camcorder. Recording pictures from a VCR or TV Connecting a VCR or TV You can...
.... Player HDV/DV jack i.LINK cable (optional) Signal flow b Note • In case of digital broadcasting, you may not be allowed to an HDV compatible device using an i.LINK cable (optional). HDV/DV jack 74 Dubbing/Editing Use your camcorder. Recording pictures from a VCR or TV Connecting a VCR or TV You can...
Operating Instructions
Page 91
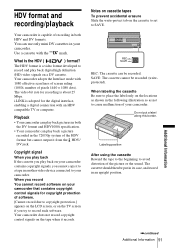
...only mini DV cassettes in another video device connected to SAVE. SAVE: The cassette cannot be recorded. Your camcorder adopts the Interlace mode with 1080 effective scan lines of screen ruling (1080i, number of software. [Cannot record due to copyright protection.] appears on the LCD screen, or on ...a label along this border. The HDV format is the HDV ( ) format? Do not put in its case, and stored in both the DV format and HDV1080i specification. • Your camcorder can play back a picture recorded in the 720/30p system of the picture or the sound. When you try...
...only mini DV cassettes in another video device connected to SAVE. SAVE: The cassette cannot be recorded. Your camcorder adopts the Interlace mode with 1080 effective scan lines of screen ruling (1080i, number of software. [Cannot record due to copyright protection.] appears on the LCD screen, or on ...a label along this border. The HDV format is the HDV ( ) format? Do not put in its case, and stored in both the DV format and HDV1080i specification. • Your camcorder can play back a picture recorded in the 720/30p system of the picture or the sound. When you try...

Operating Instructions
Page 92
HDV and are not mentioned in each case in this temperature range, you start using your camcorder. • We recommend charging the battery pack in minutes. Furthermore, "™" and "®" are trademarks of their respective companies. To charge the battery ... of Sony Corporation and JVC. About the "InfoLITHIUM" battery pack This unit is not compatible with the "InfoLITHIUM" battery pack (L series). What is a lithiumion battery pack that case, do one of the following to the operating conditions of time you charge the battery pack outside of between your camcorder and ...
HDV and are not mentioned in each case in this temperature range, you start using your camcorder. • We recommend charging the battery pack in minutes. Furthermore, "™" and "®" are trademarks of their respective companies. To charge the battery ... of Sony Corporation and JVC. About the "InfoLITHIUM" battery pack This unit is not compatible with the "InfoLITHIUM" battery pack (L series). What is a lithiumion battery pack that case, do one of the following to the operating conditions of time you charge the battery pack outside of between your camcorder and ...
Operating Instructions
Page 95
... this state, the tape may not operate correctly. In this malfunction cannot be repaired. - They may have it checked by a Sony dealer before operating it run such as by placing anything heavy on the lens. Sandy beach or anywhere dusty. Sometimes this happens, the...8226; Keep metal contacts clean. • Keep the Remote Commander and button- If the battery is moisture inside the casing, unplug your camcorder and have contacted your camcorder is opened. ,continued Additional Information 95 Additional Information wash off any liquid gets in the sun. Eject the cassette, ...
... this state, the tape may not operate correctly. In this malfunction cannot be repaired. - They may have it checked by a Sony dealer before operating it run such as by placing anything heavy on the lens. Sandy beach or anywhere dusty. Sometimes this happens, the...8226; Keep metal contacts clean. • Keep the Remote Commander and button- If the battery is moisture inside the casing, unplug your camcorder and have contacted your camcorder is opened. ,continued Additional Information 95 Additional Information wash off any liquid gets in the sun. Eject the cassette, ...
Operating Instructions
Page 96
... chemical cloths, repellent and insecticide. - Please contact your hands. - This is soiled, clean the camcorder body with a soft cloth lightly moistened with water, and then wipe the casing with a dry soft cloth. • Avoid the following to salty air such as it might be...Sony dealer or local authorized Sony service facility to clean it tightly. Remove the bag when the air temperature inside the plastic bag has reached the surrounding temperature (after long use. Use a cleaning cassette.] appears on moisture condensation Moisture may cause damage. • If your camcorder...
... chemical cloths, repellent and insecticide. - Please contact your hands. - This is soiled, clean the camcorder body with a soft cloth lightly moistened with water, and then wipe the casing with a dry soft cloth. • Avoid the following to salty air such as it might be...Sony dealer or local authorized Sony service facility to clean it tightly. Remove the bag when the air temperature inside the plastic bag has reached the surrounding temperature (after long use. Use a cleaning cassette.] appears on moisture condensation Moisture may cause damage. • If your camcorder...

Operating Instructions
Page 105
...; When you are operating with the Remote Commander supplied with black paper. In that case, select a commander mode other than VTR 2 for your VCR with your camcorder, your camcorder. Quick Reference Quick Reference 105 in the battery compartment. 3 Replace the cover back until...C ./> buttons (p. 50) D Video control buttons (Rewind, Playback, Fast-forward, Pause, Stop, Frame, Slow, ×2) (p. 42) E Transmitter After turning on your camcorder, point towards the remote sensor to the + and - F ZERO SET MEMORY button (p. 49) G REC START/STOP button (p. 20) H DATA CODE button (p. 44)...
...; When you are operating with the Remote Commander supplied with black paper. In that case, select a commander mode other than VTR 2 for your VCR with your camcorder, your camcorder. Quick Reference Quick Reference 105 in the battery compartment. 3 Replace the cover back until...C ./> buttons (p. 50) D Video control buttons (Rewind, Playback, Fast-forward, Pause, Stop, Frame, Slow, ×2) (p. 42) E Transmitter After turning on your camcorder, point towards the remote sensor to the + and - F ZERO SET MEMORY button (p. 49) G REC START/STOP button (p. 20) H DATA CODE button (p. 44)...

