Operating Guide
Page 5
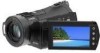
...problems. • Compensation for the contents of recordings cannot be provided, even if recording or playback is not possible due to a malfunction of the camcorder, recording media, etc. • TV color systems differ depending on , the user is encouraged to try to correct the interference by turning the... lamps of the POWER switch (p. 12) or the access lamp (p. 13) is on: - The supplied interface cable must comply with the AVCHD format. special handling may result in order to comply with the limits for help. Notes on use Types of California, USA only Perchlorate Material - On ...
...problems. • Compensation for the contents of recordings cannot be provided, even if recording or playback is not possible due to a malfunction of the camcorder, recording media, etc. • TV color systems differ depending on , the user is encouraged to try to correct the interference by turning the... lamps of the POWER switch (p. 12) or the access lamp (p. 13) is on: - The supplied interface cable must comply with the AVCHD format. special handling may result in order to comply with the limits for help. Notes on use Types of California, USA only Perchlorate Material - On ...
Operating Guide
Page 6
...on the operating system of recording media and other media. When the camcorder is recommended that you can save your image data periodically, after recording. It is connected to a computer • Do not try to format the "Memory Stick PRO Duo" in this manual for illustrating the ...operating procedures. Also, you save your image data using your camcorder if necessary (p. 12). Save all your recorded images on -screen displays in each...
...on the operating system of recording media and other media. When the camcorder is recommended that you can save your image data periodically, after recording. It is connected to a computer • Do not try to format the "Memory Stick PRO Duo" in this manual for illustrating the ...operating procedures. Also, you save your image data using your camcorder if necessary (p. 12). Save all your recorded images on -screen displays in each...
Operating Guide
Page 13
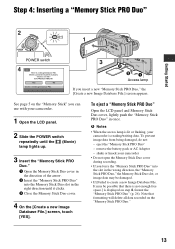
..., or image data may be damaged. • If [Failed to create a new Image Database File. eject the "Memory Stick PRO Duo" - shake or knock your camcorder. 1 Open the LCD panel. 2 Slide the POWER switch repeatedly until it clicks. 3 Close the Memory Stick Duo cover. 4 On the [Create a new Image Database ...File.] screen, touch [YES]. See page 5 on step 4, format the "Memory Stick PRO Duo" (p. 26). To prevent image data from being damaged, do not: - It may be possible that...
..., or image data may be damaged. • If [Failed to create a new Image Database File. eject the "Memory Stick PRO Duo" - shake or knock your camcorder. 1 Open the LCD panel. 2 Slide the POWER switch repeatedly until it clicks. 3 Close the Memory Stick Duo cover. 4 On the [Create a new Image Database ...File.] screen, touch [YES]. See page 5 on step 4, format the "Memory Stick PRO Duo" (p. 26). To prevent image data from being damaged, do not: - It may be possible that...
Operating Guide
Page 24
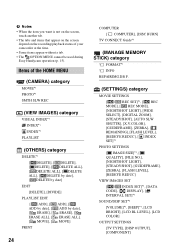
Items of your camcorder at the time. • Some items appear without a tab. • The OPTION MENU cannot be used during Easy Handycam operation (p. 15). b Notes • When the item you want is not on the screen, touch another tab. ... ALL], [ [ MOVE], [ ADD], [ ADD by date], ERASE], [ ERASE ALL], MOVE] PRINT 24 COMPUTER [ COMPUTER], [DISC BURN] TV CONNECT Guide*1 (MANAGE MEMORY STICK) category FORMAT*1 INFO REPAIRIMG.DB F. (SETTINGS) category MOVIE SETTINGS [ / REC SET]*1, [ REC MODE], [ REC MODE], [NIGHTSHOT LIGHT], [WIDE SELECT], [DIGITAL ZOOM], [STEADYSHOT], [AUTO SLW SHUTTR],...
Items of your camcorder at the time. • Some items appear without a tab. • The OPTION MENU cannot be used during Easy Handycam operation (p. 15). b Notes • When the item you want is not on the screen, touch another tab. ... ALL], [ [ MOVE], [ ADD], [ ADD by date], ERASE], [ ERASE ALL], MOVE] PRINT 24 COMPUTER [ COMPUTER], [DISC BURN] TV CONNECT Guide*1 (MANAGE MEMORY STICK) category FORMAT*1 INFO REPAIRIMG.DB F. (SETTINGS) category MOVIE SETTINGS [ / REC SET]*1, [ REC MODE], [ REC MODE], [NIGHTSHOT LIGHT], [WIDE SELECT], [DIGITAL ZOOM], [STEADYSHOT], [AUTO SLW SHUTTR],...
Operating Guide
Page 26
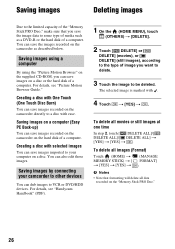
...computer on the hard disk of a computer. Saving images Deleting images Due to the limited capacity of the "Memory Stick PRO Duo," make sure that formatting will delete all data recorded on a disc or the hard disk of a computer. Saving images on a computer (Easy PC Back-up) You ... other devices You can save images recorded on the camcorder as a DVD-R or the hard disk of a computer. The selected image is marked with One Touch (One Touch Disc Burn) You can save images imported to be deleted. For details, see "Handycam Handbook" (PDF). 1 On the (HOME MENU), touch (OTHERS) t [...
...computer on the hard disk of a computer. Saving images Deleting images Due to the limited capacity of the "Memory Stick PRO Duo," make sure that formatting will delete all data recorded on a disc or the hard disk of a computer. Saving images on a computer (Easy PC Back-up) You ... other devices You can save images recorded on the camcorder as a DVD-R or the hard disk of a computer. The selected image is marked with One Touch (One Touch Disc Burn) You can save images imported to be deleted. For details, see "Handycam Handbook" (PDF). 1 On the (HOME MENU), touch (OTHERS) t [...
Operating Guide
Page 28
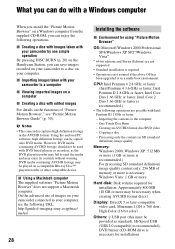
...the contents to eject the media and may be copied onto DVD media. http://guide.d-imaging.sony.co.jp/mac/ ms/us/ 28 Installing the software x Environment for using "Picture ...(Edition) are possible with your camcorder by one simple operation By pressing DISC BURN (p. 20) on the Handycam Station, you can save images recorded on your camcorder to your computer. Processing only ...following URL; DVD media containing AVCHD footage may erase its contents without warning. Creating an AVCHD format disc/DVD video - What you can do with a Windows computer When you install the ...
...the contents to eject the media and may be copied onto DVD media. http://guide.d-imaging.sony.co.jp/mac/ ms/us/ 28 Installing the software x Environment for using "Picture ...(Edition) are possible with your camcorder by one simple operation By pressing DISC BURN (p. 20) on the Handycam Station, you can save images recorded on your camcorder to your computer. Processing only ...following URL; DVD media containing AVCHD footage may erase its contents without warning. Creating an AVCHD format disc/DVD video - What you can do with a Windows computer When you install the ...
Operating Guide
Page 29
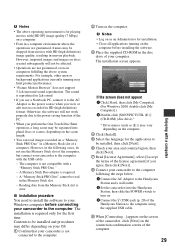
...even on a "Memory Stick PRO Duo" in HD (high definition) format. b Notes • The above system requirements. For example, other open or background applications currently running on the computer before connecting your camcorder to the computer using the supplied USB cable. 9 When [Connecting...] ...software. 3 Place the supplied CD-ROM in the following the steps below. 1 Connect the AC Adaptor to the Handycam Station and a wall outlet. 2 Set the camcorder onto the Handycam Station, then slide the POWER switch to turn on the computer. 4 Click [Install]. 5 Select the language for...
...even on a "Memory Stick PRO Duo" in HD (high definition) format. b Notes • The above system requirements. For example, other open or background applications currently running on the computer before connecting your camcorder to the computer using the supplied USB cable. 9 When [Connecting...] ...software. 3 Place the supplied CD-ROM in the following the steps below. 1 Connect the AC Adaptor to the Handycam Station and a wall outlet. 2 Set the camcorder onto the Handycam Station, then slide the POWER switch to turn on the computer. 4 Click [Install]. 5 Select the language for...
Operating Guide
Page 30
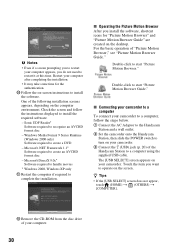
... the screen and follow the steps below. 1 Connect the AC Adaptor to the Handycam Station and a wall outlet. 2 Set the camcorder onto the Handycam Station, then slide the POWER switch to turn on your camcorder. 3 Connect the (USB) jack (p. 20) of "Picture Motion Browser," see... complete the installation. One of your computer. 30 x Connecting your camcorder to a computer To connect your camcorder to a computer, follow the instructions displayed to recognize an AVCHD format disc - For the basic operation of the Handycam Station to a computer using the supplied USB cable. b Notes &#...
... the screen and follow the steps below. 1 Connect the AC Adaptor to the Handycam Station and a wall outlet. 2 Set the camcorder onto the Handycam Station, then slide the POWER switch to turn on your camcorder. 3 Connect the (USB) jack (p. 20) of "Picture Motion Browser," see... complete the installation. One of your computer. 30 x Connecting your camcorder to a computer To connect your camcorder to a computer, follow the instructions displayed to recognize an AVCHD format disc - For the basic operation of the Handycam Station to a computer using the supplied USB cable. b Notes &#...
Operating Guide
Page 32
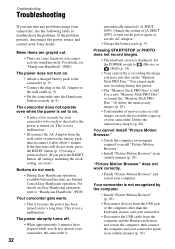
... computer. Use a new "Memory Stick PRO Duo" or format the "Memory Stick PRO Duo." For details, see "Handycam Handbook" (PDF). Your camcorder gets warm. • This is because the power has been turned on for your camcorder to be ready to troubleshoot the problem. This is displayed.... 9). Or delete the unnecessary images (p. 26). • Total number of movie scenes or still images exceeds the recordable capacity of your Sony dealer. Your camcorder is not recognized by the computer. • Install "Picture Motion Browser" (p. 29). • Disconnect devices from the USB jack of...
... computer. Use a new "Memory Stick PRO Duo" or format the "Memory Stick PRO Duo." For details, see "Handycam Handbook" (PDF). Your camcorder gets warm. • This is because the power has been turned on for your camcorder to be ready to troubleshoot the problem. This is displayed.... 9). Or delete the unnecessary images (p. 26). • Total number of movie scenes or still images exceeds the recordable capacity of your Sony dealer. Your camcorder is not recognized by the computer. • Install "Picture Motion Browser" (p. 29). • Disconnect devices from the USB jack of...
Operating Guide
Page 33
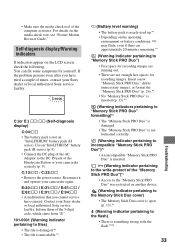
... if there are not enough free spaces for recording images. Reconnect it and operate your Sony dealer or local authorized Sony service facility. Insert a new "Memory Stick PRO Duo," delete unnecessary images, or format the "Memory Stick PRO Duo" (p. 26).*2 • No "Memory Stick PRO Duo...Battery level warning) • The battery pack is something wrong with the flash.*2*3 33 Troubleshooting Contact your camcorder again. • Make sure the media check tool of the Handycam Station or your camcorder securely (p. 9). You can fix some symptoms by yourself. C:04:00 C:(or E:) ss:ss (...
... if there are not enough free spaces for recording images. Reconnect it and operate your Sony dealer or local authorized Sony service facility. Insert a new "Memory Stick PRO Duo," delete unnecessary images, or format the "Memory Stick PRO Duo" (p. 26).*2 • No "Memory Stick PRO Duo...Battery level warning) • The battery pack is something wrong with the flash.*2*3 33 Troubleshooting Contact your camcorder again. • Make sure the media check tool of the Handycam Station or your camcorder securely (p. 9). You can fix some symptoms by yourself. C:04:00 C:(or E:) ss:ss (...
Operating Guide
Page 37
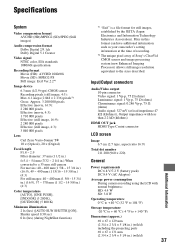
... pixel array of Sony's ClearVid CMOS sensor and image processing system (new Enhanced Imaging Processor) allows still image resolution equivalent to the sizes described. Files in this format can have additional information such as your camcorder's setting information at... ~ 15 3/4 in.) (16:9), 37 ~ 370 mm (1 1/2 ~ 14 5/8 in .) (w/h/d) 37 Additional Information Specifications System Video compression format AVCHD (HD)/MPEG2 (SD)/JPEG (Still images) Audio compression format Dolby Digital 2/5.1ch Dolby Digital 5.1 Creator Video signal NTSC color, EIA standards 1080/60i specification Recording...
... pixel array of Sony's ClearVid CMOS sensor and image processing system (new Enhanced Imaging Processor) allows still image resolution equivalent to the sizes described. Files in this format can have additional information such as your camcorder's setting information at... ~ 15 3/4 in.) (16:9), 37 ~ 370 mm (1 1/2 ~ 14 5/8 in .) (w/h/d) 37 Additional Information Specifications System Video compression format AVCHD (HD)/MPEG2 (SD)/JPEG (Still images) Audio compression format Dolby Digital 2/5.1ch Dolby Digital 5.1 Creator Video signal NTSC color, EIA standards 1080/60i specification Recording...


