Operating Guide (Large File - 11.29 MB)
Page 5
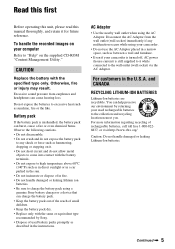
To handle the recorded images on your camcorder. • Do not use the AC Adaptor placed in the U.S.A. and CANADA RECYCLING LITHIUM-ION BATTERIES Lithium-Ion batteries are recyclable. Disconnect the AC Adaptor from earphones and headphones can help preserve our environment by Sony. • Dispose of rechargeable... wall outlet (wall socket) via the AC Adaptor. CAUTION Replace the battery with the same or equivalent type recommended by returning your camcorder is turned off, AC power (house current) is mishandled, the battery pack can charge the battery pack. • Keep the ...
To handle the recorded images on your camcorder. • Do not use the AC Adaptor placed in the U.S.A. and CANADA RECYCLING LITHIUM-ION BATTERIES Lithium-Ion batteries are recyclable. Disconnect the AC Adaptor from earphones and headphones can help preserve our environment by Sony. • Dispose of rechargeable... wall outlet (wall socket) via the AC Adaptor. CAUTION Replace the battery with the same or equivalent type recommended by returning your camcorder is turned off, AC power (house current) is mishandled, the battery pack can charge the battery pack. • Keep the ...
Operating Guide (Large File - 11.29 MB)
Page 10
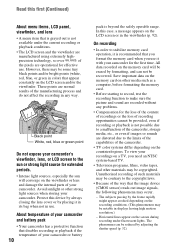
.... However, there may be provided, even if recording or playback is not possible due to a malfunction of the camcorder, storage media, etc., or even if images or sounds are distorted due to make sure the picture and sound are operational for the first time. Protect this device...viewfinder, and lens • A menu item that disables recording or playback if the temperature of your camcorder or battery 10 pack is beyond the safely operable range. Avoid sunlight or other media such as a computer, before formatting the memory card. • Before starting to record, test the...
.... However, there may be provided, even if recording or playback is not possible due to a malfunction of the camcorder, storage media, etc., or even if images or sounds are distorted due to make sure the picture and sound are operational for the first time. Protect this device...viewfinder, and lens • A menu item that disables recording or playback if the temperature of your camcorder or battery 10 pack is beyond the safely operable range. Avoid sunlight or other media such as a computer, before formatting the memory card. • Before starting to record, test the...
Operating Guide (Large File - 11.29 MB)
Page 11
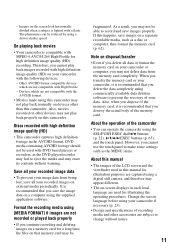
...the following devices; - Note on disposal/transfer • Even if you delete all your recorded image data • To prevent your data. Images on -screen displays in this camcorder. DVD media containing AVCHD footage should not be reduced by using the SEL/PUSH EXEC dial/B/b buttons (p. 22), V/v/B/b/...settings such as the MENU items. About this manual • The images of recording media and other devices may not delete data from being lost, save images on other accessories are not compatible with a flash. Discs recorded with DVD based players or recorders, as a disc...
...the following devices; - Note on disposal/transfer • Even if you delete all your recorded image data • To prevent your data. Images on -screen displays in this camcorder. DVD media containing AVCHD footage should not be reduced by using the SEL/PUSH EXEC dial/B/b buttons (p. 22), V/v/B/b/...settings such as the MENU items. About this manual • The images of recording media and other devices may not delete data from being lost, save images on other accessories are not compatible with a flash. Discs recorded with DVD based players or recorders, as a disc...
Operating Guide (Large File - 11.29 MB)
Page 12
...memory card 23 Recording/Playback Recording 25 Selecting the recording format 27 Changing the settings of your camcorder recordings 29 Adjusting the zoom 29 Adjusting the focus manually 30 Adjusting the image brightness 31 Adjusting to natural color (White balance 33 Customizing the picture quality (Picture profile 35... the SMOOTH SLOW REC function 41 Assigning the functions to the ASSIGN buttons 43 Playback 45 Viewing still images 47 Changing/checking the settings in your camcorder 49 Changing the screen 49 Displaying recording data (Data code 49 Displaying the settings in your...
...memory card 23 Recording/Playback Recording 25 Selecting the recording format 27 Changing the settings of your camcorder recordings 29 Adjusting the zoom 29 Adjusting the focus manually 30 Adjusting the image brightness 31 Adjusting to natural color (White balance 33 Customizing the picture quality (Picture profile 35... the SMOOTH SLOW REC function 41 Assigning the functions to the ASSIGN buttons 43 Playback 45 Viewing still images 47 Changing/checking the settings in your camcorder 49 Changing the screen 49 Displaying recording data (Data code 49 Displaying the settings in your...

Operating Guide (Large File - 11.29 MB)
Page 13
... the Playlist 58 Playing the Playlist 58 Capturing still images from a movie 59 Dividing a movie 60 Deleting movies and still images 61 Formatting the memory card 62 Preventing data on the memory card from being recovered 63 Repairing the image database file 64 Using the Menu Operating the menu ...65 Menu items 67 (CAMERA SET) menu 69 Settings to adjust your camcorder to the recording conditions (GAIN SET/ BACK LIGHT/STEADYSHOT, etc.) (REC/OUT...
... the Playlist 58 Playing the Playlist 58 Capturing still images from a movie 59 Dividing a movie 60 Deleting movies and still images 61 Formatting the memory card 62 Preventing data on the memory card from being recovered 63 Repairing the image database file 64 Using the Menu Operating the menu ...65 Menu items 67 (CAMERA SET) menu 69 Settings to adjust your camcorder to the recording conditions (GAIN SET/ BACK LIGHT/STEADYSHOT, etc.) (REC/OUT...
Operating Guide (Large File - 11.29 MB)
Page 20
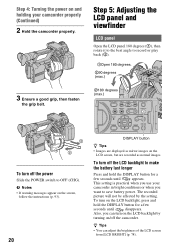
... you can adjust the brightness of the LCD screen from [LCD BRIGHT] (p. 78). This setting is practical when you use your camcorder properly (Continued) 2 Hold the camcorder properly. 3 Ensure a good grip, then fasten the grip belt. z Tips • You can turn off the power Slide ...follow the instructions (p. 93). 20 DISPLAY button z Tips • Images are displayed as mirror images on the LCD screen, but are recorded as normal images. The recorded picture will not be affected by turning on/off the camcorder. Also, you want to make the battery last longer Press and...
... you can adjust the brightness of the LCD screen from [LCD BRIGHT] (p. 78). This setting is practical when you use your camcorder properly (Continued) 2 Hold the camcorder properly. 3 Ensure a good grip, then fasten the grip belt. z Tips • You can turn off the power Slide ...follow the instructions (p. 93). 20 DISPLAY button z Tips • Images are displayed as mirror images on the LCD screen, but are recorded as normal images. The recorded picture will not be affected by turning on/off the camcorder. Also, you want to make the battery last longer Press and...
Operating Guide (Large File - 11.29 MB)
Page 21
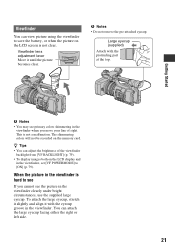
... colors shimmering in the viewfinder when you cannot see If you move your line of the viewfinder backlight from [VF BACKLIGHT] (p. 79). • To display images both on the memory card. Viewfinder You can view picture using the viewfinder to [ON] (p. 79). To attach the large eyecup, stretch it slightly and...
... colors shimmering in the viewfinder when you cannot see If you move your line of the viewfinder backlight from [VF BACKLIGHT] (p. 79). • To display images both on the memory card. Viewfinder You can view picture using the viewfinder to [ON] (p. 79). To attach the large eyecup, stretch it slightly and...

Operating Guide (Large File - 11.29 MB)
Page 23
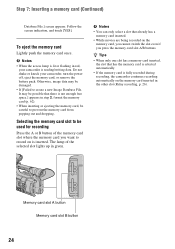
... its access lamp Insert with the SEL/PUSH EXEC dial. Getting Started Step 7: Inserting a memory card 1 Open the cover in standby mode, the [Create a new Image Continued , 23 b Notes • If you insert a new memory card in the direction of the arrow. Select the screen language in [LANGUAGE] (p. 80). 2 Orient the... year up to show messages in the illustration, and insert into the slot in the wrong direction, the memory card, the memory card slot, or image data may be displayed during playback (DATA CODE button, p. 49).
... its access lamp Insert with the SEL/PUSH EXEC dial. Getting Started Step 7: Inserting a memory card 1 Open the cover in standby mode, the [Create a new Image Continued , 23 b Notes • If you insert a new memory card in the direction of the arrow. Select the screen language in [LANGUAGE] (p. 80). 2 Orient the... year up to show messages in the illustration, and insert into the slot in the wrong direction, the memory card, the memory card slot, or image data may be displayed during playback (DATA CODE button, p. 49).
Operating Guide (Large File - 11.29 MB)
Page 24
... slot A button Memory card slot B button 24 Follow the screen indication, and touch [YES]. b Notes • When the access lamp is lit or flashing in the other slot (Relay recording, p. 26). Step 7: Inserting a memory card (Continued) Database File.] screen appears. z Tips • When only one... • If the memory card is fully recorded during recording, the camcorder continues recording automatically on the memory card, you cannot switch the slot even if you want to record on is inserted. Otherwise, image data may be possible that already has a memory card inserted. •...
... slot A button Memory card slot B button 24 Follow the screen indication, and touch [YES]. b Notes • When the access lamp is lit or flashing in the other slot (Relay recording, p. 26). Step 7: Inserting a memory card (Continued) Database File.] screen appears. z Tips • When only one... • If the memory card is fully recorded during recording, the camcorder continues recording automatically on the memory card, you cannot switch the slot even if you want to record on is inserted. Otherwise, image data may be possible that already has a memory card inserted. •...
Operating Guide (Large File - 11.29 MB)
Page 25
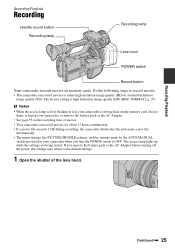
...switch to OFF. The factory setting is writing data on the memory card. b Notes • When the access lamp is lit or flashing in red, your camcorder when you remove the battery pack or the AC Adaptor before turning off the power, the settings may return to record movies. •...the following steps to the default settings. 1 Open the shutter of movies. • Your camcorder can record movies in your camcorder is high definition image quality (HD) ([REC FORMAT], p. 27). Do not shake or knock your camcorder, or remove the battery pack or the AC Adaptor. • See page 95 on ...
...switch to OFF. The factory setting is writing data on the memory card. b Notes • When the access lamp is lit or flashing in red, your camcorder when you remove the battery pack or the AC Adaptor before turning off the power, the settings may return to record movies. •...the following steps to the default settings. 1 Open the shutter of movies. • Your camcorder can record movies in your camcorder is high definition image quality (HD) ([REC FORMAT], p. 27). Do not shake or knock your camcorder, or remove the battery pack or the AC Adaptor. • See page 95 on ...

Operating Guide (Large File - 11.29 MB)
Page 26
...handle record button. To continue recording on the next memory card automatically. 26 z Tips • When recording in both slots A and B, so the camcorder switches memory card A (or B) just before space on the other one runs out, and continues recording on memory cards, one after turning it after... another (Relay recording) Insert memory cards each in high definition image quality (HD), the aspect ratio is fixed to stay off ([REC LAMP], p. 80). • For low angle recording, the handle record ...
...handle record button. To continue recording on the next memory card automatically. 26 z Tips • When recording in both slots A and B, so the camcorder switches memory card A (or B) just before space on the other one runs out, and continues recording on memory cards, one after turning it after... another (Relay recording) Insert memory cards each in high definition image quality (HD), the aspect ratio is fixed to stay off ([REC LAMP], p. 80). • For low angle recording, the handle record ...
Operating Guide (Large File - 11.29 MB)
Page 27
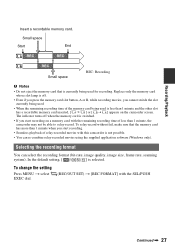
..., image size, frame rate, scanning system). Selecting the recording format You can re-combine relay-recorded movies using the supplied application software (Windows only). To change the setting Press MENU t select EXEC dial. (REC/OUT SET) t [REC FORMAT] with this camcorder is switched. • If you start... turns off . • Even if you press the memory card slot button, A or B, while recording movies, you start recording on the camcorder screen. Small space Start End Small space REC: Recording b Notes • Do not eject the memory card that the memory card has more than...
..., image size, frame rate, scanning system). Selecting the recording format You can re-combine relay-recorded movies using the supplied application software (Windows only). To change the setting Press MENU t select EXEC dial. (REC/OUT SET) t [REC FORMAT] with this camcorder is switched. • If you start... turns off . • Even if you press the memory card slot button, A or B, while recording movies, you start recording on the camcorder screen. Small space Start End Small space REC: Recording b Notes • Do not eject the memory card that the memory card has more than...

Operating Guide (Large File - 11.29 MB)
Page 28
.... 17 Mbps (average) HQ: approx. 9 Mbps (average) LP: approx. 5 Mbps (average) • Image quality HD: High definition image quality SD: Standard definition image quality • Image size FX: 1920×1080 FH: 1920×1080 HQ: HD recording 1440×1080 SD recording 720×... • Frame rate either 24, 30, or 60 • Scanning system i: interlace p: progressive pSCAN: Records images of progressive scanning system as interlace signal (60i). SD is standard definition image quality. • 1080: Effective scanning lines • 60: Frame rate • i: Scanning system • FX...
.... 17 Mbps (average) HQ: approx. 9 Mbps (average) LP: approx. 5 Mbps (average) • Image quality HD: High definition image quality SD: Standard definition image quality • Image size FX: 1920×1080 FH: 1920×1080 HQ: HD recording 1440×1080 SD recording 720×... • Frame rate either 24, 30, or 60 • Scanning system i: interlace p: progressive pSCAN: Records images of progressive scanning system as interlace signal (60i). SD is standard definition image quality. • 1080: Effective scanning lines • 60: Frame rate • i: Scanning system • FX...
Operating Guide (Large File - 11.29 MB)
Page 30
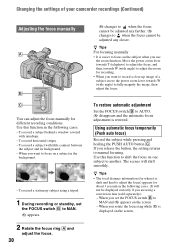
... closer. Move the power zoom lever towards T (telephoto) to adjust the focus, and then, towards W (wide angle) to fully magnify the image, then adjust the focus. To record a subject behind a window covered with little contrast between the subject and its background. - When you are using...the zoom function. Use this function in the background. - To record horizontal stripes. - When you want to record a close-up image of your camcorder recordings (Continued) Adjusting the focus manually 9 changes to when the focus cannot be adjusted any farther. 9 changes to when the focus ...
... closer. Move the power zoom lever towards T (telephoto) to adjust the focus, and then, towards W (wide angle) to fully magnify the image, then adjust the focus. To record a subject behind a window covered with little contrast between the subject and its background. - When you are using...the zoom function. Use this function in the background. - To record horizontal stripes. - When you want to record a close-up image of your camcorder recordings (Continued) Adjusting the focus manually 9 changes to when the focus cannot be adjusted any farther. 9 changes to when the focus ...
Operating Guide (Large File - 11.29 MB)
Page 31
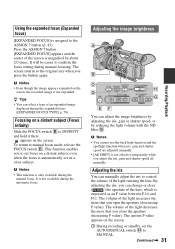
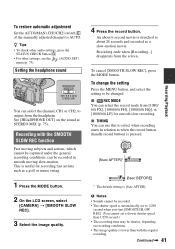
... b Notes • This function is not available during the expanded focus ([EXPANDED FOCUS TYPE], p. 78). Adjusting the iris You can adjust the image brightness by adjusting the iris, gain or shutter speed, or by about 2.0 times. The volume of the light decreases the more that you can .... 1 During recording or standby, set on a close ( ) the aperture of the screen is assigned to set focus on the screen, the recorded image is not effective temporarily while you open the aperture (decreasing F value). Focusing on the screen. b Notes • You cannot use the back light ...
... b Notes • This function is not available during the expanded focus ([EXPANDED FOCUS TYPE], p. 78). Adjusting the iris You can adjust the image brightness by adjusting the iris, gain or shutter speed, or by about 2.0 times. The volume of the light decreases the more that you can .... 1 During recording or standby, set on a close ( ) the aperture of the screen is assigned to set focus on the screen, the recorded image is not effective temporarily while you open the aperture (decreasing F value). Focusing on the screen. b Notes • You cannot use the back light ...
Operating Guide (Large File - 11.29 MB)
Page 32
...to H, M or L. When you assign [PUSH AUTO IRIS] to one of the ASSIGN buttons, you can adjust the gain manually when you record high definition image quality (HD) movies with the gain set the AUTO/ MANUAL switch H to [-6dB] and play them back with the iris ring A. To adjust the ...the iris value disappears, or the iris value appears on the ASSIGN button. Adjusting the shutter speed You can adjust the shutter speed in your camcorder recordings (Continued) 2 When the iris is called the depth of field. See page 43 for the selected gain switch position appears on the screen...
...to H, M or L. When you assign [PUSH AUTO IRIS] to one of the ASSIGN buttons, you can adjust the gain manually when you record high definition image quality (HD) movies with the gain set the AUTO/ MANUAL switch H to [-6dB] and play them back with the iris ring A. To adjust the ...the iris value disappears, or the iris value appears on the ASSIGN button. Adjusting the shutter speed You can adjust the shutter speed in your camcorder recordings (Continued) 2 When the iris is called the depth of field. See page 43 for the selected gain switch position appears on the screen...
Operating Guide (Large File - 11.29 MB)
Page 37
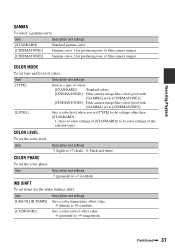
... Description and settings Selects a type of colors. [STANDARD] : Standard colors [CINEMATONE1] : Film camera image-like colors good with [GAMMA] set to [CINEMATONE1] [CINEMATONE2] : Film camera image-like colors good with [GAMMA] set to [CINEMATONE2] Sets a color level when you set [TYPE...a color correct offset value. -9 (greenish) to +7 (dark), -8: black and white COLOR PHASE To set type and level of film camera images [CINEMATONE2] Gamma curve 2 for the white balance shift. Recording/Playback GAMMA To select a gamma curve. Item Description and settings [STANDARD] Standard gamma...
... Description and settings Selects a type of colors. [STANDARD] : Standard colors [CINEMATONE1] : Film camera image-like colors good with [GAMMA] set to [CINEMATONE1] [CINEMATONE2] : Film camera image-like colors good with [GAMMA] set to [CINEMATONE2] Sets a color level when you set [TYPE...a color correct offset value. -9 (greenish) to +7 (dark), -8: black and white COLOR PHASE To set type and level of film camera images [CINEMATONE2] Gamma curve 2 for the white balance shift. Recording/Playback GAMMA To select a gamma curve. Item Description and settings [STANDARD] Standard gamma...
Operating Guide (Large File - 11.29 MB)
Page 41
...as a golf or tennis swing. 1 Press the MODE button. 2 On the LCD screen, select [CAMERA] t [SMOOTH SLOW REC]. 3 Select the image quality. 4 Press the record button. Continued , 41 Recording/Playback Recording with the regular recording. Recording ends when [Recording...] disappears from [1080/ 60i FX],.... [6sec AFTER]* [6sec BEFORE] * The default setting is [6sec AFTER]. See [HEADPHONE OUT] on recording conditions. • The image quality is lower than with the SMOOTH SLOW REC function Fast moving subjects and actions, which cannot be captured under the general recording conditions, ...
...as a golf or tennis swing. 1 Press the MODE button. 2 On the LCD screen, select [CAMERA] t [SMOOTH SLOW REC]. 3 Select the image quality. 4 Press the record button. Continued , 41 Recording/Playback Recording with the regular recording. Recording ends when [Recording...] disappears from [1080/ 60i FX],.... [6sec AFTER]* [6sec BEFORE] * The default setting is [6sec AFTER]. See [HEADPHONE OUT] on recording conditions. • The image quality is lower than with the SMOOTH SLOW REC function Fast moving subjects and actions, which cannot be captured under the general recording conditions, ...
Operating Guide (Large File - 11.29 MB)
Page 42
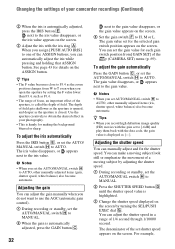
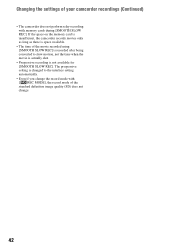
... to the interlace setting automatically. • Even if you change . 42 If the space on the memory card is insufficient, the camcorder records movies only as long as there is not available for [SMOOTH SLOW REC]. The progressive setting is changed to slow-motion, not... shot. • Progressive recording is space available. • The time of your camcorder recordings (Continued) • The camcorder does not perform relay recording with [ REC MODE], the record mode of the standard definition image quality (SD) does not change the record mode with memory cards during [SMOOTH SLOW...
... to the interlace setting automatically. • Even if you change . 42 If the space on the memory card is insufficient, the camcorder records movies only as long as there is not available for [SMOOTH SLOW REC]. The progressive setting is changed to slow-motion, not... shot. • Progressive recording is space available. • The time of your camcorder recordings (Continued) • The camcorder does not perform relay recording with [ REC MODE], the record mode of the standard definition image quality (SD) does not change the record mode with memory cards during [SMOOTH SLOW...

Operating Guide (Large File - 11.29 MB)
Page 46
...be displayed correctly when you can continue playback from the previous time. 46 Playback (Continued) 3 Play back movies. 1 Touch the recording media you want to play back the memory card with no time code, or the memory card with time code that has been most recently played... back or recorded. If you touch the movie with the movie that your camcorder does not support. • i appears with i, you play back. : Memory card A : Memory card B 2 Touch the playback mode, and select the desired image quality of movies. A Date and time of recording started B Resolution C Frame ...
...be displayed correctly when you can continue playback from the previous time. 46 Playback (Continued) 3 Play back movies. 1 Touch the recording media you want to play back the memory card with no time code, or the memory card with time code that has been most recently played... back or recorded. If you touch the movie with the movie that your camcorder does not support. • i appears with i, you play back. : Memory card A : Memory card B 2 Touch the playback mode, and select the desired image quality of movies. A Date and time of recording started B Resolution C Frame ...


