
Operating Instructions
Page 2
.... Thank you for help. CAUTION You are designed to provide reasonable protection against harmful interference in accordance with the instructions, may be connected to the grounding system of the following measures: - Consult the dealer or an experienced radio/TV technician for purchasing the Sony Compact AV System. Increase the separation between the equipment and receiver. - CAUTION The use of the FCC...
.... Thank you for help. CAUTION You are designed to provide reasonable protection against harmful interference in accordance with the instructions, may be connected to the grounding system of the following measures: - Consult the dealer or an experienced radio/TV technician for purchasing the Sony Compact AV System. Increase the separation between the equipment and receiver. - CAUTION The use of the FCC...
Operating Instructions
Page 3
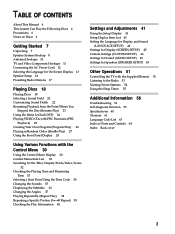
... Video Component Hookups 11 Connecting the AC Power Cord 12 Selecting the Language for On-Screen Display 13 Speaker Setup 14 Presetting Radio Stations 17 Playing Discs 18 Playing Discs 18 Selecting a Sound Field 20 Customizing Sound Fields 22 Resuming Playback from the Point Where You Stopped the Disc (Resume Play) 23 Using the Menu for Each DVD 24 Playing VIDEO CDs with PBC Functions (PBC Playback) 25 Creating Your Own Program (Program Play) 26 Playing in Random Order (Shuffle Play) 27 Using the Front Panel Display...
... Video Component Hookups 11 Connecting the AC Power Cord 12 Selecting the Language for On-Screen Display 13 Speaker Setup 14 Presetting Radio Stations 17 Playing Discs 18 Playing Discs 18 Selecting a Sound Field 20 Customizing Sound Fields 22 Resuming Playback from the Point Where You Stopped the Disc (Resume Play) 23 Using the Menu for Each DVD 24 Playing VIDEO CDs with PBC Functions (PBC Playback) 25 Creating Your Own Program (Program Play) 26 Playing in Random Order (Shuffle Play) 27 Using the Front Panel Display...

Operating Instructions
Page 4
... system. • The icons on the remote if they have the same or similar names as PAL or SECAM. Depending on this manual: Icon Z z Meaning Indicates that you try to play discs recorded in other DVD, the message "Playing this disc prohibited by area limits." Region code MODEL NO.HCD-S300 CD/DVD RECEIVER SERIAL NO . Note on playback operations of DVDs and VIDEO CDs Some playback operations...
... system. • The icons on the remote if they have the same or similar names as PAL or SECAM. Depending on this manual: Icon Z z Meaning Indicates that you try to play discs recorded in other DVD, the message "Playing this disc prohibited by area limits." Region code MODEL NO.HCD-S300 CD/DVD RECEIVER SERIAL NO . Note on playback operations of DVDs and VIDEO CDs Some playback operations...

Operating Instructions
Page 6
... AC power source (mains) as long as there can be damaged when a peak level portion is capable of holding a still video image or On screen display image on your TV for a long time, be changed, have color irregularity, turn up in direct sunlight as it on the disc. Precautions On safety • Caution - In this occur, the system may not operate properly. On adjusting volume...
... AC power source (mains) as long as there can be damaged when a peak level portion is capable of holding a still video image or On screen display image on your TV for a long time, be changed, have color irregularity, turn up in direct sunlight as it on the disc. Precautions On safety • Caution - In this occur, the system may not operate properly. On adjusting volume...
Operating Instructions
Page 11
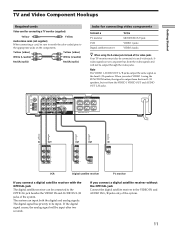
... COAXIAL AM VIDEO OUT VIDEO IN VIDEO IN VIDEO AUDIO OUT AUDIO IN AUDIO IN L L DIGITAL IN R R OPTICAL S VIDEO (DVD ONLY) FRONT R CENTER FRONT L REAR R WOOFER IMPEDANCE USE 3Ω REAR L IN OUT INPUT OUTPUT VIDEO VIDEO IN OUT AUDIO AUDIO IN OUT L R OUT OUTPUT VIDEO OUT AUDIO OUT L R OUT OUTPUT OPTICAL IN INPUT VIDEO IN VCR Digital satellite receiver TV monitor If you connect a digital satellite receiver with the OPTICAL jack The digital satellite receiver can input both the digital and analog signals. The system can be input. Note The VIDEO 1 AUDIO OUT L/R jacks...
... COAXIAL AM VIDEO OUT VIDEO IN VIDEO IN VIDEO AUDIO OUT AUDIO IN AUDIO IN L L DIGITAL IN R R OPTICAL S VIDEO (DVD ONLY) FRONT R CENTER FRONT L REAR R WOOFER IMPEDANCE USE 3Ω REAR L IN OUT INPUT OUTPUT VIDEO VIDEO IN OUT AUDIO AUDIO IN OUT L R OUT OUTPUT VIDEO OUT AUDIO OUT L R OUT OUTPUT OPTICAL IN INPUT VIDEO IN VCR Digital satellite receiver TV monitor If you connect a digital satellite receiver with the OPTICAL jack The digital satellite receiver can input both the digital and analog signals. The system can be input. Note The VIDEO 1 AUDIO OUT L/R jacks...

Operating Instructions
Page 14
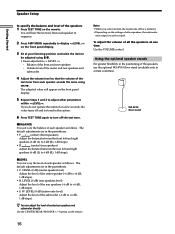
... Speaker Setup For the best possible surround sound all the speakers other than the subwoofer should be set using M/m. • Items set the balance and level. Use the test tone to adjust the speaker volumes to the side B A A 45° C C 90° Specifying the speaker parameters To obtain the best possible surround sound, first specify the distance of the rear speakers 3 Set the parameter using SPEAKER SETUP in the setup display (p. 49). Size of the operation. The front speakers can place the rear speakers...
... Speaker Setup For the best possible surround sound all the speakers other than the subwoofer should be set using M/m. • Items set the balance and level. Use the test tone to adjust the speaker volumes to the side B A A 45° C C 90° Specifying the speaker parameters To obtain the best possible surround sound, first specify the distance of the rear speakers 3 Set the parameter using SPEAKER SETUP in the setup display (p. 49). Size of the operation. The front speakers can place the rear speakers...
Operating Instructions
Page 16
Speaker Setup Getting Started To specify the balance and level of the front and rear speakers - Balance of the speakers 1 Press TEST TONE on the front panel display. 3 Sit at your listening position and select the item to display on the remote. Volume level of the center and rear speakers and subwoofer 4 Adjust the volume level so that the volume of the test tone from each speaker sounds the same using M/m. • Items adjusted in > - You will hear the test tone from each speaker in sequence. 2 Press AMP MENU repeatedly to be adjusted using
Speaker Setup Getting Started To specify the balance and level of the front and rear speakers - Balance of the speakers 1 Press TEST TONE on the front panel display. 3 Sit at your listening position and select the item to display on the remote. Volume level of the center and rear speakers and subwoofer 4 Adjust the volume level so that the volume of the test tone from each speaker sounds the same using M/m. • Items adjusted in > - You will hear the test tone from each speaker in sequence. 2 Press AMP MENU repeatedly to be adjusted using
Operating Instructions
Page 17
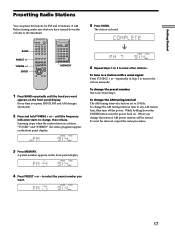
... power. Scanning stops when the system tunes in a station with a weak signal Press TUNING + or - "TUNED" and "STEREO" (for FM and 10 stations of AM. Getting Started Presetting Radio Stations You can preset 20 stations for stereo program) appear on the front panel display. Every time you change , then release. repeatedly in Step 2 to store other stations. To reset the interval, repeat the same procedure. 3 Press MEMORY. While holding down the volume to select...
... power. Scanning stops when the system tunes in a station with a weak signal Press TUNING + or - "TUNED" and "STEREO" (for FM and 10 stations of AM. Getting Started Presetting Radio Stations You can preset 20 stations for stereo program) appear on the front panel display. Every time you change , then release. repeatedly in Step 2 to store other stations. To reset the interval, repeat the same procedure. 3 Press MEMORY. While holding down the volume to select...
Operating Instructions
Page 20
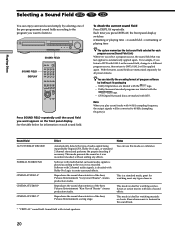
... Grant Theater" cinema production studio. Reproduces the sound characteristics of program software by selecting one of audio signal being input (Dolby Digital, DTS, Dolby Pro Logic, or standard 2 channel stereo) and performs the proper decoding if necessary. z You can use this mode as the sound field, change to a different program source, then return to the way it was recorded. Note When you listen to DVD with 96 kHz sampling frequency, the output signals will be...
... Grant Theater" cinema production studio. Reproduces the sound characteristics of program software by selecting one of audio signal being input (Dolby Digital, DTS, Dolby Pro Logic, or standard 2 channel stereo) and performs the proper decoding if necessary. z You can use this mode as the sound field, change to a different program source, then return to the way it was recorded. Note When you listen to DVD with 96 kHz sampling frequency, the output signals will be...
Operating Instructions
Page 22
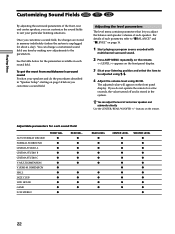
... the most from multichannel surround sound Position your speakers and do the procedures described in each parameter, refer to "xBALANCE" and "xLEVEL" on page 16. 1 Start playing a program source encoded with multichannel surround sound. 2 Press AMP MENU repeatedly on the remote. > appears on page 14 before you can change a customized sound field any time by making new adjustments to be adjusted using M/m. 4 Adjust the volume level using See the table below...
... the most from multichannel surround sound Position your speakers and do the procedures described in each parameter, refer to "xBALANCE" and "xLEVEL" on page 16. 1 Start playing a program source encoded with multichannel surround sound. 2 Press AMP MENU repeatedly on the remote. > appears on page 14 before you can change a customized sound field any time by making new adjustments to be adjusted using M/m. 4 Adjust the volume level using See the table below...

Operating Instructions
Page 27
... turn the power off - you change using M/m in Step 2 then press CLEAR, or select "- -" in the Control Menu display. MODE H 123 456 789 >10 10/0 1 In stop mode, press P. Notes • Shuffle Play is canceled when: - you open or close the disc tray - To change programming 1 In Step 2, select the program number of the programmed titles, chapters or tracks During Program Play, set "REPEAT" to do Shuffle Play depending on the front panel display...
... turn the power off - you change using M/m in Step 2 then press CLEAR, or select "- -" in the Control Menu display. MODE H 123 456 789 >10 10/0 1 In stop mode, press P. Notes • Shuffle Play is canceled when: - you open or close the disc tray - To change programming 1 In Step 2, select the program number of the programmed titles, chapters or tracks During Program Play, set "REPEAT" to do Shuffle Play depending on the front panel display...
Operating Instructions
Page 35
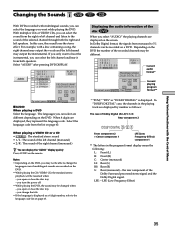
..., you change the languages even if multilingual sounds are recorded on the DVD. • While playing the CD/VIDEO CD, the standard stereo playback will be recorded on a DVD. In "DOLBY DIGITAL" case, the channels in the program format display mean the following: L: Front (L) R: Front (R) C: Center (monaural) LS: Rear (L) RS: Rear (R) S: Rear (monaural) - Notes • Depending on the screen. Displaying the audio information of Dolby Digital (AC-3) 5.1 ch: Rear component 2 DOLBY DIGITAL 3 / 2. 1 Front component 2 + Center component 1 LFE (Low Frequency Effect) component...
..., you change the languages even if multilingual sounds are recorded on the DVD. • While playing the CD/VIDEO CD, the standard stereo playback will be recorded on a DVD. In "DOLBY DIGITAL" case, the channels in the program format display mean the following: L: Front (L) R: Front (R) C: Center (monaural) LS: Rear (L) RS: Rear (R) S: Rear (monaural) - Notes • Depending on the screen. Displaying the audio information of Dolby Digital (AC-3) 5.1 ch: Rear component 2 DOLBY DIGITAL 3 / 2. 1 Front component 2 + Center component 1 LFE (Low Frequency Effect) component...
Operating Instructions
Page 43
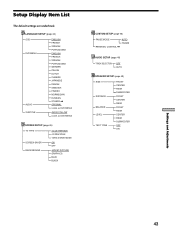
... (same as DVD MENU) AUDIO FOLLOW (same as DVD MENU) SCREEN SETUP (page 45) TV TYPE SCREEN SAVER BACKGROUND 4:3 LETTER BOX 4:3 PAN SCAN 16:9/4:3 WIDE MODE ON OFF JACKET PICTURE GRAPHICS BLUE BLACK CUSTOM SETUP (page 46) PAUSE MODE AUTO FRAME PARENTAL CONTROL / AUDIO SETUP (page 49) TRACK SELECTION OFF AUTO SPEAKER SETUP (page 49) SIZE DISTANCE BALANCE LEVEL TEST TONE FRONT CENTER REAR SUBWOOFER FRONT CENTER REAR FRONT REAR CENTER REAR SUBWOOFER OFF ON Settings and Adjustments 43 Setup Display Item List The default settings are underlined.
... (same as DVD MENU) AUDIO FOLLOW (same as DVD MENU) SCREEN SETUP (page 45) TV TYPE SCREEN SAVER BACKGROUND 4:3 LETTER BOX 4:3 PAN SCAN 16:9/4:3 WIDE MODE ON OFF JACKET PICTURE GRAPHICS BLUE BLACK CUSTOM SETUP (page 46) PAUSE MODE AUTO FRAME PARENTAL CONTROL / AUDIO SETUP (page 49) TRACK SELECTION OFF AUTO SPEAKER SETUP (page 49) SIZE DISTANCE BALANCE LEVEL TEST TONE FRONT CENTER REAR SUBWOOFER FRONT CENTER REAR FRONT REAR CENTER REAR SUBWOOFER OFF ON Settings and Adjustments 43 Setup Display Item List The default settings are underlined.
Operating Instructions
Page 49
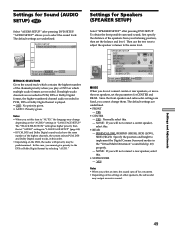
... channels, the system selects PCM, DTS and Dolby Digital sound tracks, in the "Virtual Multi Dimension" sound field (p. 20) properly. - Then use the test tone to adjust the speaker volumes to implement the Digital Cinema Surround modes in this case, you select an item, the sound cuts off for a moment. • Depending on the DVD, the audio with priority may output excessive sound. xSIZE When you cannot change depending on which multiple audio formats are fixed, you do not connect center...
... channels, the system selects PCM, DTS and Dolby Digital sound tracks, in the "Virtual Multi Dimension" sound field (p. 20) properly. - Then use the test tone to adjust the speaker volumes to implement the Digital Cinema Surround modes in this case, you select an item, the sound cuts off for a moment. • Depending on the DVD, the audio with priority may output excessive sound. xSIZE When you cannot change depending on which multiple audio formats are fixed, you do not connect center...

Operating Instructions
Page 50
... steps). • REAR (center) Adjust the balance between the rear left and right speakers (6 dB (L) to turn off for Speakers (SPEAKER SETUP) Specifying the rear speaker position and height If you set the distance, the sound cuts off the test tone. The default setting is underlined. • OFF: The test tone is not emitted from speakers. • ON: During adjustment of "BALANCE" or "LEVEL," the test tone is underlined. • BEHIND (LOW) Select this if the rear speakers are located...
... steps). • REAR (center) Adjust the balance between the rear left and right speakers (6 dB (L) to turn off for Speakers (SPEAKER SETUP) Specifying the rear speaker position and height If you set the distance, the sound cuts off the test tone. The default setting is underlined. • OFF: The test tone is not emitted from speakers. • ON: During adjustment of "BALANCE" or "LEVEL," the test tone is underlined. • BEHIND (LOW) Select this if the rear speakers are located...
Operating Instructions
Page 53
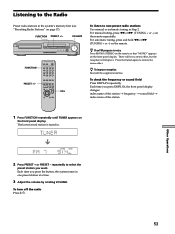
... FM program is tuned in one preset station at a time. 3 Adjust the volume by rotating VOLUME. For manual tuning, press m or M (TUNING + or -) on the front panel display. z To improve reception Reorient the supplied antennas. repeatedly to select the preset station you press DISPLAY, the front panel display changes: index name of the station t frequency t sound field t index name of the station 1 Press FUNCTION repeatedly until TUNER appears on the remote repeatedly. Each time you press the button, the system tunes in...
... FM program is tuned in one preset station at a time. 3 Adjust the volume by rotating VOLUME. For manual tuning, press m or M (TUNING + or -) on the front panel display. z To improve reception Reorient the supplied antennas. repeatedly to select the preset station you press DISPLAY, the front panel display changes: index name of the station t frequency t sound field t index name of the station 1 Press FUNCTION repeatedly until TUNER appears on the remote repeatedly. Each time you press the button, the system tunes in...
Operating Instructions
Page 57
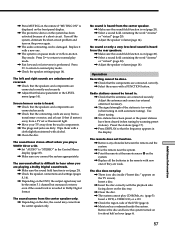
... sound comes from the center speaker only. , Depending on the disc tray. , Clean the disc. , The system cannot play mode. , Check the speaker settings (page 14). Use direct tuning. , No stations have been preset or the preset stations have been cleared (when tuning by scanning preset stations). Preset the stations (page 17). , Press DISPLAY so that the frequency appears in the Control Menu display (page 35). , Make sure you are weak. Insert a disc. , Insert the disc correctly with a FUNCTION button. Insert a DVD, a VIDEO...
... sound comes from the center speaker only. , Depending on the disc tray. , Clean the disc. , The system cannot play mode. , Check the speaker settings (page 14). Use direct tuning. , No stations have been preset or the preset stations have been cleared (when tuning by scanning preset stations). Preset the stations (page 17). , Press DISPLAY so that the frequency appears in the Control Menu display (page 35). , Make sure you are weak. Insert a disc. , Insert the disc correctly with a FUNCTION button. Insert a DVD, a VIDEO...
Operating Instructions
Page 64
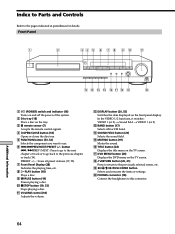
qa VOLUME control (18) Adjusts the volume. qh TITLE button (24) Displays the title menu on the tray. 3 g remote sensor (7) Accepts the remote control signals. 4 AOPEN/CLOSE button (18) Opens or closes the disc tray. 5 FUNCTION button (53, 54) Selects the component you want to the previous chapter or track (19). qa Additional Information qs qd qf qg qh qj qk ql w; 1 ?/1 (POWER) switch and indicator (18) Turns on and off...
qa VOLUME control (18) Adjusts the volume. qh TITLE button (24) Displays the title menu on the tray. 3 g remote sensor (7) Accepts the remote control signals. 4 AOPEN/CLOSE button (18) Opens or closes the disc tray. 5 FUNCTION button (53, 54) Selects the component you want to the previous chapter or track (19). qa Additional Information qs qd qf qg qh qj qk ql w; 1 ?/1 (POWER) switch and indicator (18) Turns on and off...
Operating Instructions
Page 66
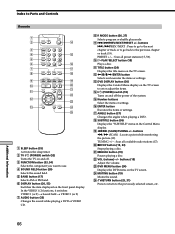
...) Selects the component you want to use. 4 SOUND FIELD button (20) Selects the sound field. 5 BAND button (17) Selects AM or FM band. 6 DISPLAY button (20, 53) Switches the item displayed on the TV screen. PRESET +/- : Scan all preset stations (17, 53). HPLAY/SELECT button (18) Plays a disc. MODE button (26, 27) Selects program or shuffle play mode. 9 ./>PREV/NEXT/PRESET +/- q; Index to the previous chapter or track (19). qa TITLE button (24) Displays the title menu on the front panel display. qs...
...) Selects the component you want to use. 4 SOUND FIELD button (20) Selects the sound field. 5 BAND button (17) Selects AM or FM band. 6 DISPLAY button (20, 53) Switches the item displayed on the TV screen. PRESET +/- : Scan all preset stations (17, 53). HPLAY/SELECT button (18) Plays a disc. MODE button (26, 27) Selects program or shuffle play mode. 9 ./>PREV/NEXT/PRESET +/- q; Index to the previous chapter or track (19). qa TITLE button (24) Displays the title menu on the front panel display. qs...

Operating Instructions
Page 67
...) Displays the playing time of FM stereo reception. DIMMER button (28) Turns the front panel display on and off . ea MONO/STEREO button (53) Switches monaural or stereo of the disc, etc., on the TV screen to store a preset station. es NAME button (54) Activates the name function. eh TEST TONE button (14) Turns test tone on or off . ej SPEAKER LEVEL +/- ek TV operation buttons (52) Control TVs. ea es ed TV SLEEP REPEAT CLEAR SLOW DVD AMP TEST TIME SETUP MENU TONE DIMMER LEVEL MONO/ STEREO CENTER REAR WOOFER...
...) Displays the playing time of FM stereo reception. DIMMER button (28) Turns the front panel display on and off . ea MONO/STEREO button (53) Switches monaural or stereo of the disc, etc., on the TV screen to store a preset station. es NAME button (54) Activates the name function. eh TEST TONE button (14) Turns test tone on or off . ej SPEAKER LEVEL +/- ek TV operation buttons (52) Control TVs. ea es ed TV SLEEP REPEAT CLEAR SLOW DVD AMP TEST TIME SETUP MENU TONE DIMMER LEVEL MONO/ STEREO CENTER REAR WOOFER...


