
Operating Instructions
Page 7
AM loop antenna Right speaker FM lead antenna Left speaker 2 3 1 4 1 Connect the speakers. Set up your system using the supplied cords and accessories. Gray (3) 3 L # Insert this portion # R 3 IMUPSEED6A-1N6CΩE Black (#) 2 Connect the FM and AM antennas. Getting Started Getting Started Hooking up the system Perform the following procedures 1 to 4 to the SPEAKER terminals as shown below. Plug type A Extend the FM lead antenna horizontally AM loop antenna continued 7GB Connect the right and left speaker cords to hook up the AM loop antenna, then connect it.
AM loop antenna Right speaker FM lead antenna Left speaker 2 3 1 4 1 Connect the speakers. Set up your system using the supplied cords and accessories. Gray (3) 3 L # Insert this portion # R 3 IMUPSEED6A-1N6CΩE Black (#) 2 Connect the FM and AM antennas. Getting Started Getting Started Hooking up the system Perform the following procedures 1 to 4 to the SPEAKER terminals as shown below. Plug type A Extend the FM lead antenna horizontally AM loop antenna continued 7GB Connect the right and left speaker cords to hook up the AM loop antenna, then connect it.

Operating Instructions
Page 24
... (stereo phone jack) of optional components Personal computer, etc. 2 Connect the transmitter to a wall outlet using the transmitter. In this case, set the NOISE FILTER to OFF. • While WIRELESS is set the NOISE FILTER to ON. Otherwise, the sound from the speaker may be intermittent or auto muting ...will be reduced and audio signal may be sure to turn off . Otherwise, you connect an optional component to the AUDIO IN A jacks of the transmitter. to DC IN 9V ...
... (stereo phone jack) of optional components Personal computer, etc. 2 Connect the transmitter to a wall outlet using the transmitter. In this case, set the NOISE FILTER to OFF. • While WIRELESS is set the NOISE FILTER to ON. Otherwise, the sound from the speaker may be intermittent or auto muting ...will be reduced and audio signal may be sure to turn off . Otherwise, you connect an optional component to the AUDIO IN A jacks of the transmitter. to DC IN 9V ...

Operating Instructions
Page 25
...; Reduce the distance between the transmitter unit and the main unit. • Select another channel using a wireless system 1 Start playing the connected component. 2 Press FUNCTION repeatedly to switch the function to audio using CHANNEL 1-3 on the transmitter, then press +/- (or TUNING +/- Notes •...) where the RF signal cannot be changed. on or near the following objects. Do not pull on the unit). Main unit, TV, speaker, fluorescent lamp, floor. - Area facing roadways. - The transmitter has a signal reception area of the transmitter with many steel file cabinets,...
...; Reduce the distance between the transmitter unit and the main unit. • Select another channel using a wireless system 1 Start playing the connected component. 2 Press FUNCTION repeatedly to switch the function to audio using CHANNEL 1-3 on the transmitter, then press +/- (or TUNING +/- Notes •...) where the RF signal cannot be changed. on or near the following objects. Do not pull on the unit). Main unit, TV, speaker, fluorescent lamp, floor. - Area facing roadways. - The transmitter has a signal reception area of the transmitter with many steel file cabinets,...
Operating Instructions
Page 26
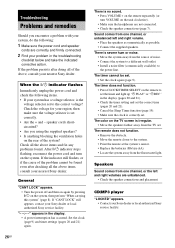
... the clock is irregular. • Move the speakers farther away from the source of the system? The timer does not function. • Press CLOCK/TIMER SELECT on the system. Check the voltage for your Sony dealer or local authorized Sony service facility. 26GB After ?/1 indicator stops flashing...the system away from one channel, or the left and right volume. • Place the speakers as symmetrically as possible. • Connect the supplied speakers. If "CANT LOCK" still appears, contact your nearest Sony dealer. Set the clock (page 9) and timer settings (pages 20 and 21) again. ...
... the clock is irregular. • Move the speakers farther away from the source of the system? The timer does not function. • Press CLOCK/TIMER SELECT on the system. Check the voltage for your Sony dealer or local authorized Sony service facility. 26GB After ?/1 indicator stops flashing...the system away from one channel, or the left and right volume. • Place the speakers as symmetrically as possible. • Connect the supplied speakers. If "CANT LOCK" still appears, contact your nearest Sony dealer. Set the clock (page 9) and timer settings (pages 20 and 21) again. ...
Operating Instructions
Page 27
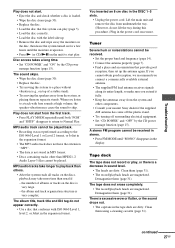
...played. continued 27GB The sound skips. • Wipe the disc clean (page 30). • Replace the disc. • Try moving the speakers away from underneath the tray. (However, do not appear correctly. • Use a disc that conforms with the label side up the antenna again... cannot be received in stereo. • Press FM MODE until "MONO" disappears in MP3 format. • Discs containing tracks other components. • Consult your nearest Sony dealer if the supplied AM antenna has come off the plastic stand. • Try turning off surrounding electrical equipment. • Set ...
...played. continued 27GB The sound skips. • Wipe the disc clean (page 30). • Replace the disc. • Try moving the speakers away from underneath the tray. (However, do not appear correctly. • Use a disc that conforms with the label side up the antenna again... cannot be received in stereo. • Press FM MODE until "MONO" disappears in MP3 format. • Discs containing tracks other components. • Consult your nearest Sony dealer if the supplied AM antenna has come off the plastic stand. • Try turning off surrounding electrical equipment. • Set ...

Operating Instructions
Page 28
... Demagnetize them (page 31). The tape does not record. • No cassette is connected to the headphones jack, turn on the connected component. • Refer to the operating instructions supplied with adhesive tape (page 31). • The tape has wound to the headphones jack. ... Noise increases or the high frequencies are erased. • The record/playback heads are connected properly. - Optional components There is no sound. • Refer to vibration. on a speaker or any place subject to General item "There is no sound. • Check the connection of the system....
... Demagnetize them (page 31). The tape does not record. • No cassette is connected to the headphones jack, turn on the connected component. • Refer to the operating instructions supplied with adhesive tape (page 31). • The tape has wound to the headphones jack. ... Noise increases or the high frequencies are erased. • The record/playback heads are connected properly. - Optional components There is no sound. • Refer to vibration. on a speaker or any place subject to General item "There is no sound. • Check the connection of the system....
Operating Instructions
Page 30
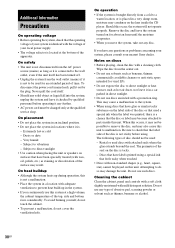
Very humid - Subject to direct sunlight • Use caution when placing the unit or speakers on surfaces that have been specially treated (with wax, oil, polish, etc.) as hot air ducts, nor leave it in a car parked in locations where ... Precautions On operating voltage • Before operating the system, check that the operating voltage of your system is identical with the voltage of your nearest Sony dealer. On safety • The unit is not disconnected from the wall outlet (mains) if it may condense on this is not to remove the...
Very humid - Subject to direct sunlight • Use caution when placing the unit or speakers on surfaces that have been specially treated (with wax, oil, polish, etc.) as hot air ducts, nor leave it in a car parked in locations where ... Precautions On operating voltage • Before operating the system, check that the operating voltage of your system is identical with the voltage of your nearest Sony dealer. On safety • The unit is not disconnected from the wall outlet (mains) if it may condense on this is not to remove the...
Operating Instructions
Page 32
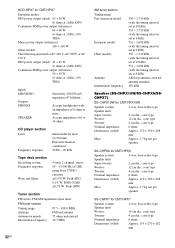
... Tape deck section Recording system Frequency response Wow and flutter 4-track 2-channel, stereo 50 - 13,000 Hz (±3 dB), using Sony TYPE I cassettes ±0.15% W. RMS (NAB) ±0.2% W. HCD-HPX7 for CMT-HPX7 European model: DIN power output (rated): 50 + 50 W (6 ohms at 1 kHz, DIN) Continuous RMS... type 4 cm dia., cone type 6 ohms Approx. 170 × 300 × 208 mm Approx. 2.7 kg net per speaker SS-CHPX9 for CMT-HPX9 Speaker system 3-way, bass-reflex type Speaker units Super tweeter: 2 cm dia., cone type Woofer: 12 cm dia., cone type Tweeter: 4 cm dia., cone type Nominal...
... Tape deck section Recording system Frequency response Wow and flutter 4-track 2-channel, stereo 50 - 13,000 Hz (±3 dB), using Sony TYPE I cassettes ±0.15% W. RMS (NAB) ±0.2% W. HCD-HPX7 for CMT-HPX7 European model: DIN power output (rated): 50 + 50 W (6 ohms at 1 kHz, DIN) Continuous RMS... type 4 cm dia., cone type 6 ohms Approx. 170 × 300 × 208 mm Approx. 2.7 kg net per speaker SS-CHPX9 for CMT-HPX9 Speaker system 3-way, bass-reflex type Speaker units Super tweeter: 2 cm dia., cone type Woofer: 12 cm dia., cone type Tweeter: 4 cm dia., cone type Nominal...
Operating Instructions
Page 33
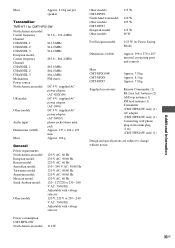
Additional Information Mass Approx. 2.2 kg net per speaker Transmitter TMR-HT1 for CMT-HPX10W North American model: Carrier frequency Channel CHANNEL 1: CHANNEL 2: CHANNEL 3: European model: Carrier frequency Channel CHANNEL 1: CHANNEL 2: ... For European model: 0.25 W (in Power Saving Mode) Dimensions (w/h/d) Approx. 196 × 270 × 407 mm incl. projecting parts and controls Mass CMT-HPX10W: CMT-HPX9: CMT-HPX7: Approx. 7.8 kg Approx. 8.1 kg Approx. 7.8 kg Supplied accessories Remote Commander (1) R6 (size AA) batteries (2) AM loop antenna (1) FM lead antenna (1) Transmitter...
Additional Information Mass Approx. 2.2 kg net per speaker Transmitter TMR-HT1 for CMT-HPX10W North American model: Carrier frequency Channel CHANNEL 1: CHANNEL 2: CHANNEL 3: European model: Carrier frequency Channel CHANNEL 1: CHANNEL 2: ... For European model: 0.25 W (in Power Saving Mode) Dimensions (w/h/d) Approx. 196 × 270 × 407 mm incl. projecting parts and controls Mass CMT-HPX10W: CMT-HPX9: CMT-HPX7: Approx. 7.8 kg Approx. 8.1 kg Approx. 7.8 kg Supplied accessories Remote Commander (1) R6 (size AA) batteries (2) AM loop antenna (1) FM lead antenna (1) Transmitter...


