
Operating Instructions
Page 4
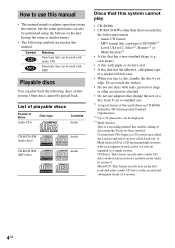
... Session CD is a recording method that can be used in this manual. How to use this manual • This manual mainly explains operations using the remote, but the same operations can also be performed using the Track-At-Once method. MP3 format that conforms to ISO9660*1 Level 1/Level 2, Joliet*2, Romeo*2 or...
... Session CD is a recording method that can be used in this manual. How to use this manual • This manual mainly explains operations using the remote, but the same operations can also be performed using the Track-At-Once method. MP3 format that conforms to ISO9660*1 Level 1/Level 2, Joliet*2, Romeo*2 or...
Operating Instructions
Page 7
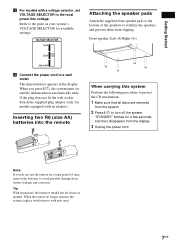
...plug adaptor (only for a few seconds, and then disappears from battery leakage and corrosion. Inserting two R6 (size AA) batteries into the remote When carrying this system Perform the following procedure to avoid possible damage from the display. 3 Unplug the power cord. Front speaker (Left (4)/Right... to stabilize the speakers and prevent them from the system. 2 Press ?/1 to the print on and the demonstration automatically ends. When the remote no longer operates the system, replace both batteries with new ones. 7GB e E E e Note If you press ?/1, the system turns on...
...plug adaptor (only for a few seconds, and then disappears from battery leakage and corrosion. Inserting two R6 (size AA) batteries into the remote When carrying this system Perform the following procedure to avoid possible damage from the display. 3 Unplug the power cord. Front speaker (Left (4)/Right... to stabilize the speakers and prevent them from the system. 2 Press ?/1 to the print on and the demonstration automatically ends. When the remote no longer operates the system, replace both batteries with new ones. 7GB e E E e Note If you press ?/1, the system turns on...
Operating Instructions
Page 8
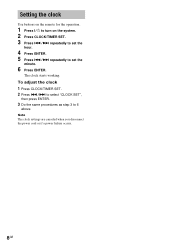
Note The clock settings are canceled when you disconnect the power cord or if a power failure occurs. 8GB To adjust the clock 1 Press CLOCK/TIMER SET. 2 Press ./> to select "CLOCK SET", then press ENTER. 3 Do the same procedures as step 3 to set the hour. 4 Press ENTER. 5 Press ./> repeatedly to 6 above. Setting the clock Use buttons on the remote for the operation. 1 Press ?/1 to turn on the system. 2 Press CLOCK/TIMER SET. 3 Press ./> repeatedly to set the minute. 6 Press ENTER. The clock starts working.
Note The clock settings are canceled when you disconnect the power cord or if a power failure occurs. 8GB To adjust the clock 1 Press CLOCK/TIMER SET. 2 Press ./> to select "CLOCK SET", then press ENTER. 3 Do the same procedures as step 3 to set the hour. 4 Press ENTER. 5 Press ./> repeatedly to 6 above. Setting the clock Use buttons on the remote for the operation. 1 Press ?/1 to turn on the system. 2 Press CLOCK/TIMER SET. 3 Press ./> repeatedly to set the minute. 6 Press ENTER. The clock starts working.
Operating Instructions
Page 9
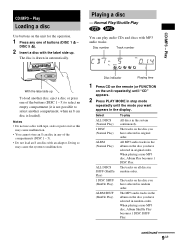
... Play) The MP3 audio tracks in the album on the disc you have selected in random order. Disc indicator Playing time 1 Press CD on the remote (or FUNCTION on the disc you want appears in random order. ALBM (Normal Play) All MP3 audio tracks in the album on the unit repeatedly...
... Play) The MP3 audio tracks in the album on the disc you have selected in random order. Disc indicator Playing time 1 Press CD on the remote (or FUNCTION on the disc you want appears in random order. ALBM (Normal Play) All MP3 audio tracks in the album on the unit repeatedly...
Operating Instructions
Page 10
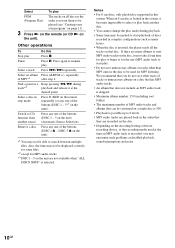
... number of MP3 audio tracks and albums that can be needed to be played (see "Creating your own program" on page 11). 3 Press N on the remote (or CD N on the unit). Notes • For 8 cm discs, only playback is inserted, the player reads all discs in the (Program Play) order you... unnecessary albums on a disc that has MP3 audio tracks. • An album that does not include an MP3 audio track is selected. SKIP on the remote repeatedly (or any one of MP3*1 after step 2. When an 8 cm disc is possible up to select or play back another source Press any one...
... number of MP3 audio tracks and albums that can be needed to be played (see "Creating your own program" on page 11). 3 Press N on the remote (or CD N on the unit). Notes • For 8 cm discs, only playback is inserted, the player reads all discs in the (Program Play) order you... unnecessary albums on a disc that has MP3 audio tracks. • An album that does not include an MP3 audio track is selected. SKIP on the remote repeatedly (or any one of MP3*1 after step 2. When an 8 cm disc is possible up to select or play back another source Press any one...
Operating Instructions
Page 11
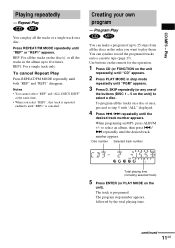
... all the tracks on the unit)) to select an album, then press ./ > repeatedly until "REP" or "REP1" appears. Play Playing repeatedly - Use buttons on the remote for the operation. 1 Press CD (or FUNCTION on the unit). When programing an MP3, press ALBUM +/- SKIP repeatedly (or any one of up to play...
... all the tracks on the unit)) to select an album, then press ./ > repeatedly until "REP" or "REP1" appears. Play Playing repeatedly - Use buttons on the remote for the operation. 1 Press CD (or FUNCTION on the unit). When programing an MP3, press ALBUM +/- SKIP repeatedly (or any one of up to play...
Operating Instructions
Page 13
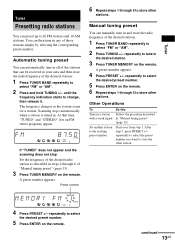
...that can automatically tune in . A preset number appears. 4 Press PRESET +/- continued 13GB repeatedly to select the desired preset number. 5 Press ENTER on the remote. Other Operations To Tune in "Manual tuning preset" (page 13). Automatic tuning preset You can be received in and store the radio frequency of the... desired stations. 1 Press TUNER BAND repeatedly to select the desired preset number. 5 Press ENTER on the remote. Scanning stops automatically when a station is tuned in all of "Manual tuning preset" (page 13). 3 Press TUNER MEMORY on the...
...that can automatically tune in . A preset number appears. 4 Press PRESET +/- continued 13GB repeatedly to select the desired preset number. 5 Press ENTER on the remote. Other Operations To Tune in "Manual tuning preset" (page 13). Automatic tuning preset You can be received in and store the radio frequency of the... desired stations. 1 Press TUNER BAND repeatedly to select the desired preset number. 5 Press ENTER on the remote. Scanning stops automatically when a station is tuned in all of "Manual tuning preset" (page 13). 3 Press TUNER MEMORY on the...
Operating Instructions
Page 14
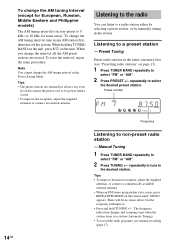
..., adjust the supplied antennas, or connect a commercially available external antenna. • When an FM stereo program has static noise, press REPEAT/FM MODE on the remote until "MONO" appears. There will be no stereo effect, but the reception will improve. • Press and hold TUNING +/-. When you disconnect the power cord...
..., adjust the supplied antennas, or connect a commercially available external antenna. • When an FM stereo program has static noise, press REPEAT/FM MODE on the remote until "MONO" appears. There will be no stereo effect, but the reception will improve. • Press and hold TUNING +/-. When you disconnect the power cord...
Operating Instructions
Page 16
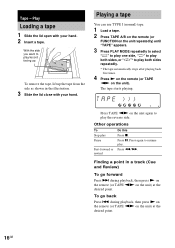
... point. 16GB With the side you want to play both sides repeatedly. * The tape automatically stops after playing back five times. 4 Press N on the remote (or TAPE nN on the unit repeatedly) until "TAPE" appears. 3 Press PLAY MODE repeatedly to select "g" to play one side, "h" to play both...the illustration. 3 Slide the lid close with your hand. Playing a tape You can use TYPE I (normal) tape. 1 Load a tape. 2 Press TAPE A/B on the remote (or FUNCTION on the unit). Other operations To Stop play the reverse side. Press X. To go forward Press > during playback, then press N on the...
... point. 16GB With the side you want to play both sides repeatedly. * The tape automatically stops after playing back five times. 4 Press N on the remote (or TAPE nN on the unit repeatedly) until "TAPE" appears. 3 Press PLAY MODE repeatedly to select "g" to play one side, "h" to play both...the illustration. 3 Slide the lid close with your hand. Playing a tape You can use TYPE I (normal) tape. 1 Load a tape. 2 Press TAPE A/B on the remote (or FUNCTION on the unit). Other operations To Stop play the reverse side. Press X. To go forward Press > during playback, then press N on the...
Operating Instructions
Page 17
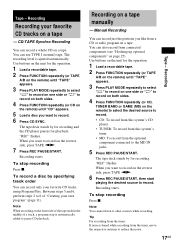
...- Tip For recording from the tuner: If noise is heard while recording from the optional component connected to record on a tape. Recording When you like from connected components (see "Hooking up optional components" on a tape. To record a disc by for the operation. 1 Load a recordable... tape. 2 Press FUNCTION repeatedly (or TAPE A/B on the remote) until "TAPE" appears. 3 Press PLAY MODE repeatedly to...
...- Tip For recording from the tuner: If noise is heard while recording from the optional component connected to record on a tape. Recording When you like from connected components (see "Hooking up optional components" on a tape. To record a disc by for the operation. 1 Load a recordable... tape. 2 Press FUNCTION repeatedly (or TAPE A/B on the remote) until "TAPE" appears. 3 Press PLAY MODE repeatedly to...
Operating Instructions
Page 19
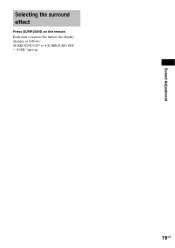
Sound Adjustment Selecting the surround effect Press SURROUND on the remote. Each time you press the button, the display changes as follows: SURROUND ON* y SURROUND OFF * "SURR" lights up. 19GB
Sound Adjustment Selecting the surround effect Press SURROUND on the remote. Each time you press the button, the display changes as follows: SURROUND ON* y SURROUND OFF * "SURR" lights up. 19GB
Operating Instructions
Page 20
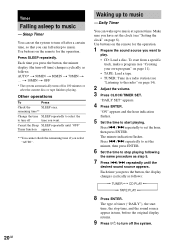
...asleep to turn off time) changes cyclically as follows: t TUNER y CD PLAY T t TAPE PLAY T 8 Press ENTER. Waking up to the radio" on the remote for the operation. 1 Prepare the sound source you press the button, the display changes cyclically as follows: AUTO* t 90MIN t 80MIN t 70MIN t ... To start...press ENTER. 6 Set the time to stop time, and the sound source appear in a radio station (see "Setting the clock" on the remote for the operation. Press ./> repeatedly to set the system to turn off the system. 20GB Sleep Timer You can fall asleep to start from...
...asleep to turn off time) changes cyclically as follows: t TUNER y CD PLAY T t TAPE PLAY T 8 Press ENTER. Waking up to the radio" on the remote for the operation. 1 Prepare the sound source you press the button, the display changes cyclically as follows: AUTO* t 90MIN t 80MIN t 70MIN t ... To start...press ENTER. 6 Set the time to stop time, and the sound source appear in a radio station (see "Setting the clock" on the remote for the operation. Press ./> repeatedly to set the system to turn off the system. 20GB Sleep Timer You can fall asleep to start from...
Operating Instructions
Page 21
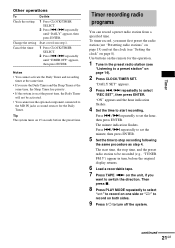
... the minute, then press ENTER. 5 Set the time to stop time, and the preset radio station to be activated. • You cannot use the optional component connected to turn , before the preset time. The minute indication flashes. Then press x. 8 Press PLAY MODE repeatedly to select "g" to record on one side or... at the preset time, the Daily Timer will not be recorded (e.g., "TUNER FM 5") appear in the preset radio station (see "Setting the clock" on the remote for the Daily Timer.
... the minute, then press ENTER. 5 Set the time to stop time, and the preset radio station to be activated. • You cannot use the optional component connected to turn , before the preset time. The minute indication flashes. Then press x. 8 Press PLAY MODE repeatedly to select "g" to record on one side or... at the preset time, the Daily Timer will not be recorded (e.g., "TUNER FM 5") appear in the preset radio station (see "Setting the clock" on the remote for the Daily Timer.
Operating Instructions
Page 25
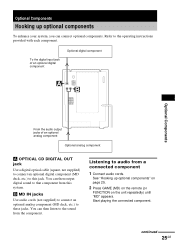
... IN jacks Use audio cords (not supplied) to connect an optional analog component (MD deck, etc.) to this system. You can then listen to that component from this jack. Optional Components Hooking up optional components" on page 25. 2 Press GAME (MD) on the remote (or FUNCTION on the unit repeatedly) until "MD" appears. You can...
... IN jacks Use audio cords (not supplied) to connect an optional analog component (MD deck, etc.) to this system. You can then listen to that component from this jack. Optional Components Hooking up optional components" on page 25. 2 Press GAME (MD) on the remote (or FUNCTION on the unit repeatedly) until "MD" appears. You can...
Operating Instructions
Page 27
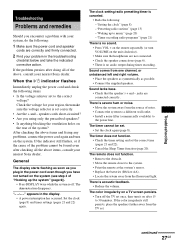
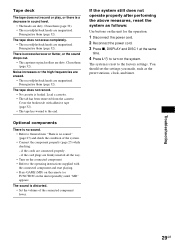
...Hooking up to music" (page 20) -"Timer recording radio programs" (page 21) There is no sound. • Press VOL + on the remote repeatedly (or turn VOLUME on the unit clockwise). • Make sure the headphones are connected correctly. General The display starts flashing as soon as ..." (page 6)). • Press DISPLAY twice while the system is acoustic feedback. • Reduce the volume. After checking the above , consult your nearest Sony dealer. The timer cannot be found even after checking all of noise. • Connect the system to a different wall outlet. • Install a noise...
...Hooking up to music" (page 20) -"Timer recording radio programs" (page 21) There is no sound. • Press VOL + on the remote repeatedly (or turn VOLUME on the unit clockwise). • Make sure the headphones are connected correctly. General The display starts flashing as soon as ..." (page 6)). • Press DISPLAY twice while the system is acoustic feedback. • Reduce the volume. After checking the above , consult your nearest Sony dealer. The timer cannot be found even after checking all of noise. • Connect the system to a different wall outlet. • Install a noise...
Operating Instructions
Page 28
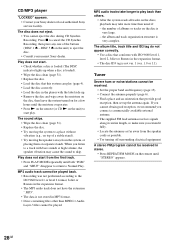
... track with bass sounds at high volume, the speaker vibration may take longer to Normal Play. CD/MP3 player "LOCKED" appears. • Contact your nearest Sony dealer. Press x to start . • Check whether a disc is loaded (The DISC indicator lights up when a disc is loaded). • Wipe ... fully. • Locate the antennas as possible. • Try turning off surrounding electrical equipment. DISC 5 Z on the remote until the moisture evaporates. • Press N on the remote (or CD N on the unit) to cancel the CD Synchro Recording, then press any one of albums or tracks on ...
... track with bass sounds at high volume, the speaker vibration may take longer to Normal Play. CD/MP3 player "LOCKED" appears. • Contact your nearest Sony dealer. Press x to start . • Check whether a disc is loaded (The DISC indicator lights up when a disc is loaded). • Wipe ... fully. • Locate the antennas as possible. • Try turning off surrounding electrical equipment. DISC 5 Z on the remote until the moisture evaporates. • Press N on the remote (or CD N on the unit) to cancel the CD Synchro Recording, then press any one of albums or tracks on ...
Operating Instructions
Page 29
...or play, or there is reset to the factory settings. Cover the broken tab with the connected component and start playing. • Press GAME (MD) on the remote (or FUNCTION on the connected component. • Refer to the operating instructions supplied with adhesive tape (page 32). • The ... them (page 32). • The record/playback heads are dirty. There is distorted. • Set the volume of the system. • Connect the component properly (page 25) while checking: - Demagnetise them (page 32). The tape does not record. • No cassette is no sound. • Refer ...
...or play, or there is reset to the factory settings. Cover the broken tab with the connected component and start playing. • Press GAME (MD) on the remote (or FUNCTION on the connected component. • Refer to the operating instructions supplied with adhesive tape (page 32). • The ... them (page 32). • The record/playback heads are dirty. There is distorted. • Set the volume of the system. • Connect the component properly (page 25) while checking: - Demagnetise them (page 32). The tape does not record. • No cassette is no sound. • Refer ...
Operating Instructions
Page 33
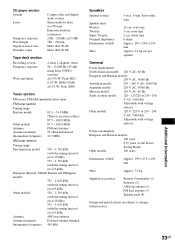
... Saving Mode) Other models: 100 watts Dimensions (w/h/d) Approx. 199 × 252 × 400 mm Mass Approx. 7.0 kg Supplied accessories: Remote Commander (1) Batteries (2) AM loop antenna (1) FM lead antenna (1) Speaker pads (8) Design and specifications are subject to -noise ratio Dynamic range ...section Recording system Frequency response Wow and flutter 4-track 2-channel, stereo 50 - 13,000 Hz (±3 dB), using Sony TYPE I cassettes ±0.15% W. CD player section System Laser Frequency response Wavelength Signal-to change without notice. Peak (IEC) 0.1%...
... Saving Mode) Other models: 100 watts Dimensions (w/h/d) Approx. 199 × 252 × 400 mm Mass Approx. 7.0 kg Supplied accessories: Remote Commander (1) Batteries (2) AM loop antenna (1) FM lead antenna (1) Speaker pads (8) Design and specifications are subject to -noise ratio Dynamic range ...section Recording system Frequency response Wow and flutter 4-track 2-channel, stereo 50 - 13,000 Hz (±3 dB), using Sony TYPE I cassettes ±0.15% W. CD player section System Laser Frequency response Wavelength Signal-to change without notice. Peak (IEC) 0.1%...
Operating Instructions
Page 34
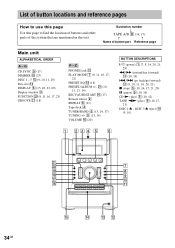
... qf DISPLAY 6 (15, 22, 23, 29) Display window 3 FUNCTION w; (9, 11, 16, 17, 25) GROOVE qj (18) P - wa (10, 11, 13, 14) REC PAUSE/START 0 (17) Remote sensor 2 REPEAT 8 (11) Tape deck 4 TUNER/BAND 5 (13, 14, 17) TUNING +/- qa (13, 14) VOLUME qh (20) BUTTON DESCRIPTIONS ?/1 (power) 1 (7, 8, 14, 20, 21, 29) m/M (rewind...
... qf DISPLAY 6 (15, 22, 23, 29) Display window 3 FUNCTION w; (9, 11, 16, 17, 25) GROOVE qj (18) P - wa (10, 11, 13, 14) REC PAUSE/START 0 (17) Remote sensor 2 REPEAT 8 (11) Tape deck 4 TUNER/BAND 5 (13, 14, 17) TUNING +/- qa (13, 14) VOLUME qh (20) BUTTON DESCRIPTIONS ?/1 (power) 1 (7, 8, 14, 20, 21, 29) m/M (rewind...
Operating Instructions
Page 35
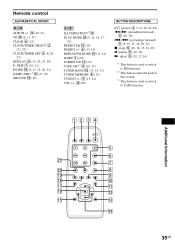
... MODE wa (11, 14) SLEEP 1 (20) SURROUND qa (19) TAPE A/B*3 9 (16, 17) TUNER BAND qk (13, 14, 17) TUNER MEMORY 8 (13) TUNING +/- 5 (13, 14) VOL +/- Remote control ALPHABETICAL ORDER A - qs (20) BUTTON DESCRIPTIONS ?/1 (power) 4 (7, 8, 20, 21, 29) m/M (rewind/fast forward) 5 (10, 16) ./> (go back/go forward) 5 (8, 10, 11, 16, 20, 21...
... MODE wa (11, 14) SLEEP 1 (20) SURROUND qa (19) TAPE A/B*3 9 (16, 17) TUNER BAND qk (13, 14, 17) TUNER MEMORY 8 (13) TUNING +/- 5 (13, 14) VOL +/- Remote control ALPHABETICAL ORDER A - qs (20) BUTTON DESCRIPTIONS ?/1 (power) 4 (7, 8, 20, 21, 29) m/M (rewind/fast forward) 5 (10, 16) ./> (go back/go forward) 5 (8, 10, 11, 16, 20, 21...


