Operating Instructions
Page 1
2-895-962-13(1) DVD Home Theatre System Operating Instructions DAV-HDX500/HDX501W ©2007 Sony Corporation
2-895-962-13(1) DVD Home Theatre System Operating Instructions DAV-HDX500/HDX501W ©2007 Sony Corporation
Operating Instructions
Page 2
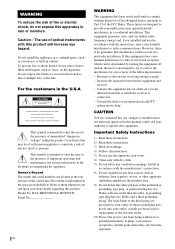
... is no guarantee that any changes or modifications not expressly approved in this manual could void your Sony dealer regarding this apparatus near any ventilation openings. Reorient or relocate the receiving antenna (aerial). - CAUTION You are designed to excessive heat such as vases, on or pinched...outlet, consult an electrician for replacement of the polarized or grounding-type plug. Record the serial number in cabinet. Model No. DAV-HDX500/DAV-HDX501W Serial No 2US WARNING This equipment has been tested and found to comply with one or more of electric shock to ...
... is no guarantee that any changes or modifications not expressly approved in this manual could void your Sony dealer regarding this apparatus near any ventilation openings. Reorient or relocate the receiving antenna (aerial). - CAUTION You are designed to excessive heat such as vases, on or pinched...outlet, consult an electrician for replacement of the polarized or grounding-type plug. Record the serial number in cabinet. Model No. DAV-HDX500/DAV-HDX501W Serial No 2US WARNING This equipment has been tested and found to comply with one or more of electric shock to ...
Operating Instructions
Page 6
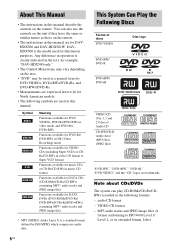
... the controls on the remote. • The instructions in this manual are used for example, "DAV-HDX500 only." • The Control Menu items may vary depending on the area. • "DVD" may be used as those on the remote. DAVHDX500 is clearly indicated in the text, for illustration...formats: - Note about CDs/DVDs The system can also use the controls on the unit if they have the same or similar names as a general term for DVD VIDEOs, DVD+RWs/DVD+Rs, and DVD-RWs/DVD-Rs. • Measurements are expressed in feet (ft) for DAVHDX500 and DAV-HDX501W. About This Manual •...
... the controls on the remote. • The instructions in this manual are used for example, "DAV-HDX500 only." • The Control Menu items may vary depending on the area. • "DVD" may be used as those on the remote. DAVHDX500 is clearly indicated in the text, for illustration...formats: - Note about CDs/DVDs The system can also use the controls on the unit if they have the same or similar names as a general term for DVD VIDEOs, DVD+RWs/DVD+Rs, and DVD-RWs/DVD-Rs. • Measurements are expressed in feet (ft) for DAVHDX500 and DAV-HDX501W. About This Manual •...
Operating Instructions
Page 11
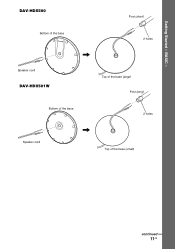
DAV-HDX500 Post (short) Bottom of the base 2 holes Speaker cord DAV-HDX501W , Top of the base (large) Post (long) Bottom of the base 2 holes Speaker cord , Top of the base (small) continued 11US Getting Started - BASIC -
DAV-HDX500 Post (short) Bottom of the base 2 holes Speaker cord DAV-HDX501W , Top of the base (large) Post (long) Bottom of the base 2 holes Speaker cord , Top of the base (small) continued 11US Getting Started - BASIC -

Operating Instructions
Page 13
... of the slot, then secure the post with washer) in criss-cross pattern. Secure 2 screws (large, with the mounting plate and screws. DAV-HDX500 Post cover Be careful the orientation of the speaker , Mounting plate continued 13US Rear of the post cover when placing the post. Mounting plate Secure... 2 screws (large, with washer) in criss-cross pattern. Rear of the speaker , DAV-HDX501W Post cover Be careful the orientation of the speaker cord. Select the speaker whose color of the jack on the rear panel of speaker...
... of the slot, then secure the post with washer) in criss-cross pattern. Secure 2 screws (large, with the mounting plate and screws. DAV-HDX500 Post cover Be careful the orientation of the speaker , Mounting plate continued 13US Rear of the post cover when placing the post. Mounting plate Secure... 2 screws (large, with washer) in criss-cross pattern. Rear of the speaker , DAV-HDX501W Post cover Be careful the orientation of the speaker cord. Select the speaker whose color of the jack on the rear panel of speaker...
Operating Instructions
Page 14
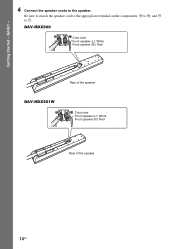
Getting Started - Be sure to match the speaker cord to the appropriate terminal on the components: 3 to 3, and # to the speaker. DAV-HDX500 Color tube Front speaker (L): White Front speaker (R): Red Rear of the speaker DAV-HDX501W Color tube Front speaker (L): White Front speaker (R): Red Rear of the speaker 14US BASIC - 4 Connect the speaker cords to #.
Getting Started - Be sure to match the speaker cord to the appropriate terminal on the components: 3 to 3, and # to the speaker. DAV-HDX500 Color tube Front speaker (L): White Front speaker (R): Red Rear of the speaker DAV-HDX501W Color tube Front speaker (L): White Front speaker (R): Red Rear of the speaker 14US BASIC - 4 Connect the speaker cords to #.

Operating Instructions
Page 15
Post Slit Projection Base DAV-HDX501W , Screws (small, silver) Post Slit Projection Base , Screws (small, silver) Note • Make sure that the slit on the post aligns with the 2 screws. continued 15US DAV-HDX500 Getting Started - 5 Attach the post to the base. BASIC - Insert the post so that the slot on the lower part of the post aligns with the projection of the base, then secure the post with the projection of the base by rotating the post slightly.
Post Slit Projection Base DAV-HDX501W , Screws (small, silver) Post Slit Projection Base , Screws (small, silver) Note • Make sure that the slit on the post aligns with the 2 screws. continued 15US DAV-HDX500 Getting Started - 5 Attach the post to the base. BASIC - Insert the post so that the slot on the lower part of the post aligns with the projection of the base, then secure the post with the projection of the base by rotating the post slightly.
Operating Instructions
Page 16
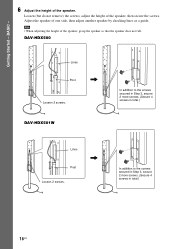
... so that the speaker does not fall. Note • When adjusting the height of one side, then adjust another speaker by checking lines as a guide. DAV-HDX501W In addition to the screws secured in Step 3, secure 2 more screws. (Secure 4 screws in total.) Lines Post Loosen 2 screws. , In addition to ... secured in Step 3, secure 2 more screws. (Secure 4 screws in total.) 16US Getting Started - BASIC - 6 Adjust the height of the speaker, then secure the screws. DAV-HDX500 Lines Post , Loosen 2 screws. Loosen (but do not remove) the screws, adjust the height of the speaker.
... so that the speaker does not fall. Note • When adjusting the height of one side, then adjust another speaker by checking lines as a guide. DAV-HDX501W In addition to the screws secured in Step 3, secure 2 more screws. (Secure 4 screws in total.) Lines Post Loosen 2 screws. , In addition to ... secured in Step 3, secure 2 more screws. (Secure 4 screws in total.) 16US Getting Started - BASIC - 6 Adjust the height of the speaker, then secure the screws. DAV-HDX500 Lines Post , Loosen 2 screws. Loosen (but do not remove) the screws, adjust the height of the speaker.

Operating Instructions
Page 17
Bottom of the base Adjust the length of the cord. continued 17US Getting Started - DAV-HDX501W Take up slack in the speaker cord by pulling from the bottom of the base and hook the speaker cord in the speaker cord by pulling from the bottom of the base. BASIC - 7 Take up slack in the cord clamp. DAV-HDX500 Take up any speaker cord slack. Cord clamp , Secure the speaker cord by running it through the slot. Adjust the length of the cord. Secure the speaker cord by running it through the slot.
Bottom of the base Adjust the length of the cord. continued 17US Getting Started - DAV-HDX501W Take up slack in the speaker cord by pulling from the bottom of the base and hook the speaker cord in the speaker cord by pulling from the bottom of the base. BASIC - 7 Take up slack in the cord clamp. DAV-HDX500 Take up any speaker cord slack. Cord clamp , Secure the speaker cord by running it through the slot. Adjust the length of the cord. Secure the speaker cord by running it through the slot.

Operating Instructions
Page 18
Fully-assembled illustration DAV-HDX500 Front speaker (L): White label Front speaker (R): Red label Getting Started - BASIC - White Red DAV-HDX501W Front speaker (L): White label Front speaker (R): Red label White Red 18US
Fully-assembled illustration DAV-HDX500 Front speaker (L): White label Front speaker (R): Red label Getting Started - BASIC - White Red DAV-HDX501W Front speaker (L): White label Front speaker (R): Red label White Red 18US
Operating Instructions
Page 19
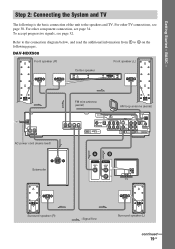
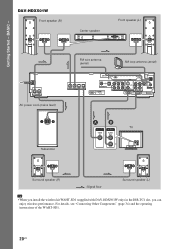
...see page 34. Refer to the connection diagram below, and read the additional information from 1 to the speakers and TV. DAV-HDX500 Front speaker (R) Front speaker (L) Center speaker CENTER WOOFER SPEAKER AC power cord (mains lead) Subwoofer FM wire antenna (aerial...DVD ONLY) Y PB/CB PR/CR COMPONENT VIDEO OUT VIDEO MONITOR OUT R AUDIO IN L TV XM DMPORT1 FM 75 COAXIAL ANTENNA DMPORT2 AB VIDEO IN AUDIO OUT L R TV Surround speaker (R) :Signal flow Surround speaker (L) continued 19US BASIC - For other component connection, see page 32. Step 2: Connecting the System...
...see page 34. Refer to the connection diagram below, and read the additional information from 1 to the speakers and TV. DAV-HDX500 Front speaker (R) Front speaker (L) Center speaker CENTER WOOFER SPEAKER AC power cord (mains lead) Subwoofer FM wire antenna (aerial...DVD ONLY) Y PB/CB PR/CR COMPONENT VIDEO OUT VIDEO MONITOR OUT R AUDIO IN L TV XM DMPORT1 FM 75 COAXIAL ANTENNA DMPORT2 AB VIDEO IN AUDIO OUT L R TV Surround speaker (R) :Signal flow Surround speaker (L) continued 19US BASIC - For other component connection, see page 32. Step 2: Connecting the System...
Operating Instructions
Page 20
Getting Started - BASIC - DAV-HDX501W Front speaker (R) Center speaker Front speaker (L) CENTER WOOFER SPEAKER AC power cord (mains lead) FM wire antenna (aerial) AM loop antenna (aerial) FRONT R FRONT L SUR R SPEAKER SUR L DIR-TC1 COAXIAL OPTICAL DIGITAL IN SAT/CABLE OUT (DVD ONLY) COMPONENT VIDEO IN Y PB/CB PR/CR AM SAT/CABLE R AUDIO...
Getting Started - BASIC - DAV-HDX501W Front speaker (R) Center speaker Front speaker (L) CENTER WOOFER SPEAKER AC power cord (mains lead) FM wire antenna (aerial) AM loop antenna (aerial) FRONT R FRONT L SUR R SPEAKER SUR L DIR-TC1 COAXIAL OPTICAL DIGITAL IN SAT/CABLE OUT (DVD ONLY) COMPONENT VIDEO IN Y PB/CB PR/CR AM SAT/CABLE R AUDIO...
Operating Instructions
Page 25
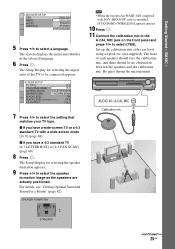
...[16:9] (page 88) x If you have a wide-screen TV or a 4:3 standard TV with DAV-HDX501W only) is installed, [STANDARD (WIRELESS)] appears instead. 10 Press . 11 Connect the calibration mic... the front panel and press X/x to select the setting that matches your TV type. The system displays the menu and subtitles in the selected language. 6 Press . Getting Started - SCREEN SETUP...YCBCR/RGB (HDMI): 16:9 SCREEN SAVER: 4:3 LETTER BOX BACKGROUND: 4:3 PAN SCAN BLACK LEVEL: ON BLACK LEVEL (COMPONENT OUT): OFF 4:3 OUTPUT: FULL 7 Press X/x to select [YES]. The Setup Display for a Room" (page...
...[16:9] (page 88) x If you have a wide-screen TV or a 4:3 standard TV with DAV-HDX501W only) is installed, [STANDARD (WIRELESS)] appears instead. 10 Press . 11 Connect the calibration mic... the front panel and press X/x to select the setting that matches your TV type. The system displays the menu and subtitles in the selected language. 6 Press . Getting Started - SCREEN SETUP...YCBCR/RGB (HDMI): 16:9 SCREEN SAVER: 4:3 LETTER BOX BACKGROUND: 4:3 PAN SCAN BLACK LEVEL: ON BLACK LEVEL (COMPONENT OUT): OFF 4:3 OUTPUT: FULL 7 Press X/x to select [YES]. The Setup Display for a Room" (page...

Operating Instructions
Page 28
... (13/32 inch) 28US Rear of speaker For the center speaker 265 mm (10 7/16 inches) 6 to 9 mm (1/4 to 3/8 inch) For the front speakers of DAV-HDX500 6 to 9 mm (1/4 to 3/8 inch) 170 mm (6 23/32 inches) For the front speakers of DAVHDX501W 6 to 9 mm (1/4 to 3/8 inch) 100 mm (3 15/16 inches) For...
... (13/32 inch) 28US Rear of speaker For the center speaker 265 mm (10 7/16 inches) 6 to 9 mm (1/4 to 3/8 inch) For the front speakers of DAV-HDX500 6 to 9 mm (1/4 to 3/8 inch) 170 mm (6 23/32 inches) For the front speakers of DAVHDX501W 6 to 9 mm (1/4 to 3/8 inch) 100 mm (3 15/16 inches) For...
Operating Instructions
Page 36
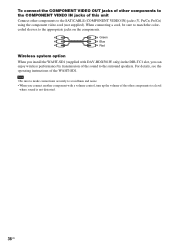
...system option When you can enjoy wireless performance by transmission of the sound to a level where sound is not distorted. 36US For details, see the operating instructions of the WAHT-SD1. Note • Be sure to make connections securely to avoid hum and noise. • When you connect another component with DAV...-HDX501W only) in the DIR-TC1 slot, you install the WAHT-SD1 (supplied with a volume control, turn up the volume of the other components to the appropriate jacks on the components. When connecting a cord, be sure to...
...system option When you can enjoy wireless performance by transmission of the sound to a level where sound is not distorted. 36US For details, see the operating instructions of the WAHT-SD1. Note • Be sure to make connections securely to avoid hum and noise. • When you connect another component with DAV...-HDX501W only) in the DIR-TC1 slot, you install the WAHT-SD1 (supplied with a volume control, turn up the volume of the other components to the appropriate jacks on the components. When connecting a cord, be sure to...

Operating Instructions
Page 83
... and surround speakers in front of the listening position. Advanced Settings and Adjustments continued 83US Note • When the wireless kit WAHT-SD1 (supplied with DAV-HDX501W only) is the same as that of the WAHT-SD1. • [NO CENTER]: when installing the front and surround speakers. • [ALL FRONT - For...
... and surround speakers in front of the listening position. Advanced Settings and Adjustments continued 83US Note • When the wireless kit WAHT-SD1 (supplied with DAV-HDX501W only) is the same as that of the WAHT-SD1. • [NO CENTER]: when installing the front and surround speakers. • [ALL FRONT - For...

Operating Instructions
Page 84
... press . 1 ( 4 4 ) 3 ( 2 8 ) T 0:03:04 SPEAKER FORMATION SPEAKER FORMATION AUTO CALIBRATION DVD VIDEO 4 Press X/x to children and neighbor. 1 Press FUNCTION repeatedly until "DVD" appears in the front panel display. 2 Press DISPLAY when the system is installed, [STANDARD (WIRED)] appears. YES NO 84US SPEAKER FORMATION Continue with DAV-HDX501W only) is in [SPEAKER SETUP], the [SPEAKER FORMATION...
... press . 1 ( 4 4 ) 3 ( 2 8 ) T 0:03:04 SPEAKER FORMATION SPEAKER FORMATION AUTO CALIBRATION DVD VIDEO 4 Press X/x to children and neighbor. 1 Press FUNCTION repeatedly until "DVD" appears in the front panel display. 2 Press DISPLAY when the system is installed, [STANDARD (WIRED)] appears. YES NO 84US SPEAKER FORMATION Continue with DAV-HDX501W only) is in [SPEAKER SETUP], the [SPEAKER FORMATION...
Operating Instructions
Page 101
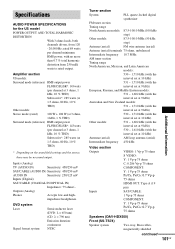
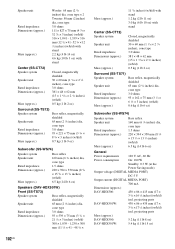
... A (19 pin) SAT/CABLE: 1 Vp-p 75 ohms COMPONENT: Y: 1 Vp-p 75 ohms PB/CB, PR/CR: 0.7 Vp-p 75 ohms Speakers (DAV-HDX500) Front (SS-TS74) Speaker system Two way, Bass reflex, magnetically shielded continued Additional Information 101US Outputs (Analog) Phones Accepts low-and high- DVD system Laser Signal format system Semiconductor laser (DVD: λ = 650 nm) (CD: λ = 790...
... A (19 pin) SAT/CABLE: 1 Vp-p 75 ohms COMPONENT: Y: 1 Vp-p 75 ohms PB/CB, PR/CR: 0.7 Vp-p 75 ohms Speakers (DAV-HDX500) Front (SS-TS74) Speaker system Two way, Bass reflex, magnetically shielded continued Additional Information 101US Outputs (Analog) Phones Accepts low-and high- DVD system Laser Signal format system Semiconductor laser (DVD: λ = 650 nm) (CD: λ = 790...
Operating Instructions
Page 102
...dia, cone type 1.5 ohms 220 × 394 × 350 mm (8 3/4 × 15 5/8 × 13 7/8 inches) (w/h/d) 6.5 kg (14 lb 6 oz) Speakers (DAV-HDX501W) Front (SS-TS73) Speaker system Bass reflex, magnetically shielded Speaker unit 65 mm (2 5/8 inches) dia, cone type Rated impedance 3.0 ohms Dimensions (approx.) 93 × 539 × 75 mm...W Standby: 0.3 W (at the Power Saving mode) Output voltage (DIGITAL MEDIA PORT) DC 5 V Output current (DIGITAL MEDIA PORT) 700 mA Dimensions (approx.) DAV-HDX500: 430 × 86 × 415 mm (17 × 3 1/2 × 16 3/8 inches) (w/h/d) incl.
...dia, cone type 1.5 ohms 220 × 394 × 350 mm (8 3/4 × 15 5/8 × 13 7/8 inches) (w/h/d) 6.5 kg (14 lb 6 oz) Speakers (DAV-HDX501W) Front (SS-TS73) Speaker system Bass reflex, magnetically shielded Speaker unit 65 mm (2 5/8 inches) dia, cone type Rated impedance 3.0 ohms Dimensions (approx.) 93 × 539 × 75 mm...W Standby: 0.3 W (at the Power Saving mode) Output voltage (DIGITAL MEDIA PORT) DC 5 V Output current (DIGITAL MEDIA PORT) 700 mA Dimensions (approx.) DAV-HDX500: 430 × 86 × 415 mm (17 × 3 1/2 × 16 3/8 inches) (w/h/d) incl.
Operating Instructions
Page 103
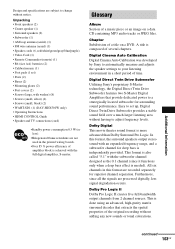
... piece or an image on a DVD. A title is more advanced than Dolby Surround Pro Logic. Dolby Digital This movie theater sound format is composed of several ... a deep bass effect is needed). Digital Direct Twin Drive Subwoofer Utilizing Sony's proprietary S-Master technology, the Digital Direct Twin Drive Subwoofer features two ...large, with washer) (8) • Screws (small, silver) (4) • Screws (small, black) (2) • WAHT-SD1 (1) (DAV-HDX501W only) • Operating Instructions • HDMI CONTROL Guide • Speaker and TV connections (card) •Standby power consumption 0.3...
... piece or an image on a DVD. A title is more advanced than Dolby Surround Pro Logic. Dolby Digital This movie theater sound format is composed of several ... a deep bass effect is needed). Digital Direct Twin Drive Subwoofer Utilizing Sony's proprietary S-Master technology, the Digital Direct Twin Drive Subwoofer features two ...large, with washer) (8) • Screws (small, silver) (4) • Screws (small, black) (2) • WAHT-SD1 (1) (DAV-HDX501W only) • Operating Instructions • HDMI CONTROL Guide • Speaker and TV connections (card) •Standby power consumption 0.3...


