Operating Instructions
Page 4
... This Manual 6 This System Can Play the Following Discs 6 Getting Started - Turning off the Demonstration 27 Installing the Speakers on a Wall.......... 28 Connecting the TV (Advanced 30 Connecting Other Components 34 Basic Operations Playing Discs 37 Enjoying the Radio or Other Components 39 Enjoying TV or VCR Sound from All Speakers 40 Selecting the Movie or Music Mode 41 Sound Adjustments Enjoying Surround Sound by Using Sound Field 42 Enjoying Multiplex Broadcast Sound ... 44 (DUAL MONO) Various Functions for Playing Discs...
... This Manual 6 This System Can Play the Following Discs 6 Getting Started - Turning off the Demonstration 27 Installing the Speakers on a Wall.......... 28 Connecting the TV (Advanced 30 Connecting Other Components 34 Basic Operations Playing Discs 37 Enjoying the Radio or Other Components 39 Enjoying TV or VCR Sound from All Speakers 40 Selecting the Movie or Music Mode 41 Sound Adjustments Enjoying Surround Sound by Using Sound Field 42 Enjoying Multiplex Broadcast Sound ... 44 (DUAL MONO) Various Functions for Playing Discs...
Operating Instructions
Page 5
... Operations Controlling the TV with the Supplied Remote 72 Using the THEATRE SYNC Function 73 Using the Sound Effect 75 Using the Sleep Timer 75 Changing the Brightness of the Front Panel Display 76 Using the DIGITAL MEDIA PORT Adapter 77 Deactivating the Buttons on the Unit.... 78 (Child Lock) Advanced Settings and Adjustments Locking Discs 79 (CUSTOM PARENTAL CONTROL, PARENTAL CONTROL) Getting Optimal Surround Sound for a Room 82 (SPEAKER FORMATION) Calibrating the Appropriate Settings Automatically 84 (AUTO CALIBRATION) Using the Setup Display 86 Setting the Display or Sound...
... Operations Controlling the TV with the Supplied Remote 72 Using the THEATRE SYNC Function 73 Using the Sound Effect 75 Using the Sleep Timer 75 Changing the Brightness of the Front Panel Display 76 Using the DIGITAL MEDIA PORT Adapter 77 Deactivating the Buttons on the Unit.... 78 (Child Lock) Advanced Settings and Adjustments Locking Discs 79 (CUSTOM PARENTAL CONTROL, PARENTAL CONTROL) Getting Optimal Surround Sound for a Room 82 (SPEAKER FORMATION) Calibrating the Appropriate Settings Automatically 84 (AUTO CALIBRATION) Using the Setup Display 86 Setting the Display or Sound...
Operating Instructions
Page 24
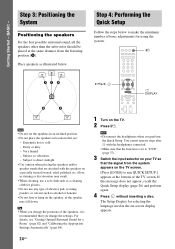
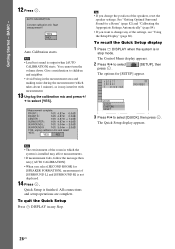
... selecting the language used in locations that are : - For details, see "Getting Optimal Surround Sound for glasses. • Do not use any type of the TV screen. Very humid - Tip • When you change the settings. Step 4: Performing the Quick Setup Follow the steps below . The Setup Display for using the system. Subject to "DVD" (page 37). 3 Switch the input selector on the TV. 2 Press [/1. You cannot operate...
... selecting the language used in locations that are : - For details, see "Getting Optimal Surround Sound for glasses. • Do not use any type of the TV screen. Very humid - Tip • When you change the settings. Step 4: Performing the Quick Setup Follow the steps below . The Setup Display for using the system. Subject to "DVD" (page 37). 3 Switch the input selector on the TV. 2 Press [/1. You cannot operate...
Operating Instructions
Page 26
...8226; If you change any of [SURROUND L] and [SURROUND R] is in any Step. 26US All connections and setup operations are complete. Note • Loud test sound is finished. Note • The environment of the speakers, reset the speaker settings. Getting Started - Give consideration to select [YES]. Quick Setup is output when [AUTO CALIBRATION] starts. AUTO CALIBRATION Connect calibration mic. YES NO Auto Calibration starts. See "Getting Optimal Surround Sound for [SETUP] appear. 1 2 ( 2 7 ) 1 8 ( 3 4 ) T 0:00:02 DVD VIDEO QUICK QUICK CUSTOM RESET BNR 3 Press X/x to...
...8226; If you change any of [SURROUND L] and [SURROUND R] is in any Step. 26US All connections and setup operations are complete. Note • Loud test sound is finished. Note • The environment of the speakers, reset the speaker settings. Getting Started - Give consideration to select [YES]. Quick Setup is output when [AUTO CALIBRATION] starts. AUTO CALIBRATION Connect calibration mic. YES NO Auto Calibration starts. See "Getting Optimal Surround Sound for [SETUP] appear. 1 2 ( 2 7 ) 1 8 ( 3 4 ) T 0:00:02 DVD VIDEO QUICK QUICK CUSTOM RESET BNR 3 Press X/x to...

Operating Instructions
Page 39
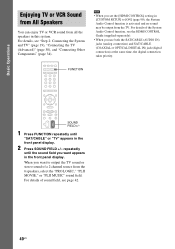
... sound of the system changes in the front panel display. Note • When you press FUNCTION, the mode of the other components connected to the operating instructions supplied with the components for further information. DVD t TUNER FM t TUNER AM t XM t SAT/CABLE t TV t DMPORT1 t DMPORT2 t AUDIO t ... The setting is changed. • "ATT OFF": normal input level. 5 Press . Refer to the SAT/CABLE or TV jacks on the component connected. Basic Operations Enjoying the Radio or Other Components FUNCTION X/x/c, SYSTEM MENU Selecting the connected component...
... sound of the system changes in the front panel display. Note • When you press FUNCTION, the mode of the other components connected to the operating instructions supplied with the components for further information. DVD t TUNER FM t TUNER AM t XM t SAT/CABLE t TV t DMPORT1 t DMPORT2 t AUDIO t ... The setting is changed. • "ATT OFF": normal input level. 5 Press . Refer to the SAT/CABLE or TV jacks on the component connected. Basic Operations Enjoying the Radio or Other Components FUNCTION X/x/c, SYSTEM MENU Selecting the connected component...
Operating Instructions
Page 40
... front panel display. For details of the System Audio Control function, see the HDMI CONTROL Guide (supplied separately). • When you want to [ON] (page 90), the System Audio Control function is activated and no sound may be output from the TV. FUNCTION SOUND FIELD+/- 1 Press FUNCTION repeatedly until the sound field you use both the SAT/CABLE (AUDIO IN) jacks (analog connection) and SAT/CABLE (COAXIAL or OPTICAL DIGITAL IN) jack (digital connection) at the same time, the digital connection takes...
... front panel display. For details of the System Audio Control function, see the HDMI CONTROL Guide (supplied separately). • When you want to [ON] (page 90), the System Audio Control function is activated and no sound may be output from the TV. FUNCTION SOUND FIELD+/- 1 Press FUNCTION repeatedly until the sound field you use both the SAT/CABLE (AUDIO IN) jacks (analog connection) and SAT/CABLE (COAXIAL or OPTICAL DIGITAL IN) jack (digital connection) at the same time, the digital connection takes...
Operating Instructions
Page 42
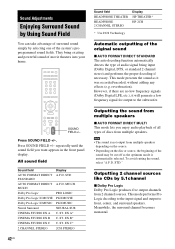
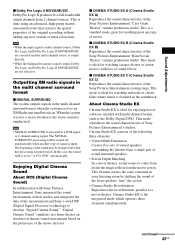
... are no low frequency signals (Dolby Digital LFE, etc.), it was recorded/encoded, without adding any effects (e.g. To avoid cutting the sound, select "A.F.D. All sound field Sound field AUTO FORMAT DIRECT STANDARD AUTO FORMAT DIRECT MULTI Dolby Pro Logic Dolby Pro Logic II MOVIE Dolby Pro Logic II MUSIC Neural Surround CINEMA STUDIO EX A CINEMA STUDIO EX B CINEMA STUDIO EX C 2 CHANNEL STEREO Display A.F.D. STD A.F.D. ST. Outputting the sound from multiple speakers x AUTO FORMAT DIRECT MULTI This mode lets you want appears in the front panel display. Outputting 2 channel sources like...
... are no low frequency signals (Dolby Digital LFE, etc.), it was recorded/encoded, without adding any effects (e.g. To avoid cutting the sound, select "A.F.D. All sound field Sound field AUTO FORMAT DIRECT STANDARD AUTO FORMAT DIRECT MULTI Dolby Pro Logic Dolby Pro Logic II MOVIE Dolby Pro Logic II MUSIC Neural Surround CINEMA STUDIO EX A CINEMA STUDIO EX B CINEMA STUDIO EX C 2 CHANNEL STEREO Display A.F.D. STD A.F.D. ST. Outputting the sound from multiple speakers x AUTO FORMAT DIRECT MULTI This mode lets you want appears in the front panel display. Outputting 2 channel sources like...
Operating Instructions
Page 43
... operates these elements simultaneously. x CINEMA STUDIO EX A (Cinema Studio EX A) Reproduces the sound characteristics of signal is ideal for watching musicals or classic films where music is turned on the movie screen. This mode is input. This element creates the same sensation in a home theater an ideal movie theater sound environment based on the preference of the sound may be turned off . Outputting XM radio signals in the multi channel surround format x NEURAL SURROUND The system outputs signals...
... operates these elements simultaneously. x CINEMA STUDIO EX A (Cinema Studio EX A) Reproduces the sound characteristics of signal is ideal for watching musicals or classic films where music is turned on the movie screen. This mode is input. This element creates the same sensation in a home theater an ideal movie theater sound environment based on the preference of the sound may be turned off . Outputting XM radio signals in the multi channel surround format x NEURAL SURROUND The system outputs signals...

Operating Instructions
Page 48
... recorded on the current disc only. 1 Press DISPLAY. Tip • To play a VIDEO CD or CD. You can program the track on a disc Total time of the disc, press x twice, then press H. PROGRAM ALL CLEAR 1. The Control Menu display appears. 2 Press X/x to 40 discs and resumes playback the next time you play from the beginning of a disc in [CUSTOM SETUP] to select [SET t], then press . [TRACK] is...
... recorded on the current disc only. 1 Press DISPLAY. Tip • To play a VIDEO CD or CD. You can program the track on a disc Total time of the disc, press x twice, then press H. PROGRAM ALL CLEAR 1. The Control Menu display appears. 2 Press X/x to 40 discs and resumes playback the next time you play from the beginning of a disc in [CUSTOM SETUP] to select [SET t], then press . [TRACK] is...

Operating Instructions
Page 57
... the input stream, this function may not be able to change the subtitle language while playing, or turn the subtitles on the TV screen, you can adjust the delay between picture and sound. 4 Press . The Control Menu display appears. 2 Press X/x to select [A/V SYNC], then press . Each time you may not be able to turn them off. The default setting is underlined. • [OFF]: does not adjust. • [ON]: adjusts the...
... the input stream, this function may not be able to change the subtitle language while playing, or turn the subtitles on the TV screen, you can adjust the delay between picture and sound. 4 Press . The Control Menu display appears. 2 Press X/x to select [A/V SYNC], then press . Each time you may not be able to turn them off. The default setting is underlined. • [OFF]: does not adjust. • [ON]: adjusts the...

Operating Instructions
Page 65
... AM stations. A preset number appears in a station. To change the interval, AM preset stations will be set to either 10 kHz or 9 kHz. To change the preset number Restart from Step 1. While holding down the volume to turn off . 65US Tuner Functions Presetting Radio Stations You can select the preset number directly by pressing "/1 on the power. To change the AM tuning interval, first tune in the front panel display. 2 Press and hold TUNING + or - Before tuning, make sure to turn down...
... AM stations. A preset number appears in a station. To change the interval, AM preset stations will be set to either 10 kHz or 9 kHz. To change the preset number Restart from Step 1. While holding down the volume to turn off . 65US Tuner Functions Presetting Radio Stations You can select the preset number directly by pressing "/1 on the power. To change the AM tuning interval, first tune in the front panel display. 2 Press and hold TUNING + or - Before tuning, make sure to turn down...
Operating Instructions
Page 68
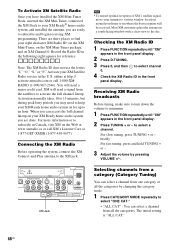
...-Tuner, connected the XM Dock to your XM Ready® home audio system, and installed the antenna, you are ready to select "ONE CAT." • "ALL CAT" : You can access the full channel lineup on your XM Ready home audio system you are three places to select a channel. Most XM customers place the antenna in the front panel display. 2 Press TUNING + or - Receiving XM Radio broadcasts Before tuning, make sure to turn down the volume...
...-Tuner, connected the XM Dock to your XM Ready® home audio system, and installed the antenna, you are ready to select "ONE CAT." • "ALL CAT" : You can access the full channel lineup on your XM Ready home audio system you are three places to select a channel. Most XM customers place the antenna in the front panel display. 2 Press TUNING + or - Receiving XM Radio broadcasts Before tuning, make sure to turn down the volume...
Operating Instructions
Page 73
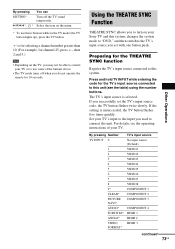
... sound temporarily. Preparing for the THEATRE SYNC function Other Operations Register the TV's input source connected to "DVD," and then switches the TV's input source you set the TV's input source code, the TV button flashes twice slowly. Press and hold TV INPUT while entering the code for the TV's input source connected to turn on the menu. * To use some of your TV or to connect the unit. If the setting is selected. By pressing Number TV's input source TV INPUT 0 No input source (Default...
... sound temporarily. Preparing for the THEATRE SYNC function Other Operations Register the TV's input source connected to "DVD," and then switches the TV's input source you set the TV's input source code, the TV button flashes twice slowly. Press and hold TV INPUT while entering the code for the TV's input source connected to turn on the menu. * To use some of your TV or to connect the unit. If the setting is selected. By pressing Number TV's input source TV INPUT 0 No input source (Default...

Operating Instructions
Page 84
... [AUTO CALIBRATION], see the operating instructions of "Calibrating the Appropriate Settings Automatically" (page 84). • [NO]: exit [SPEAKER FORMATION]. It does not indicate the speakers which output sound. • When you change the [CONNECTION] setting in stop mode. C. A. Note • Loud test sound is made. 7 Press X/x to enjoy the surround sound after you change the position of the speakers, it is in [SPEAKER SETUP], the [SPEAKER FORMATION] setting returns to select [AUTO CALIBRATION], then press . The Control Menu display appears. 3 Press X/x to select [SPEAKER...
... [AUTO CALIBRATION], see the operating instructions of "Calibrating the Appropriate Settings Automatically" (page 84). • [NO]: exit [SPEAKER FORMATION]. It does not indicate the speakers which output sound. • When you change the [CONNECTION] setting in stop mode. C. A. Note • Loud test sound is made. 7 Press X/x to enjoy the surround sound after you change the position of the speakers, it is in [SPEAKER SETUP], the [SPEAKER FORMATION] setting returns to select [AUTO CALIBRATION], then press . The Control Menu display appears. 3 Press X/x to select [SPEAKER...

Operating Instructions
Page 86
... the disc take priority over the Setup Display settings and not all the functions described may work. 1 Press FUNCTION repeatedly until "DVD" appears in the front panel display. 2 Press DISPLAY when the system is in stop mode. The Control Menu display appears. 3 Press X/x to items such as picture and sound. The Setup Display appears. Using the Setup Display By using the Setup Display, you can make various adjustments to select [SETUP], then press . The options for [SETUP] appear. 1 2 ( 2 7 ) 1 8 ( 3 4 ) T 0:00:02 DVD VIDEO QUICK QUICK CUSTOM RESET...
... the disc take priority over the Setup Display settings and not all the functions described may work. 1 Press FUNCTION repeatedly until "DVD" appears in the front panel display. 2 Press DISPLAY when the system is in stop mode. The Control Menu display appears. 3 Press X/x to items such as picture and sound. The Setup Display appears. Using the Setup Display By using the Setup Display, you can make various adjustments to select [SETUP], then press . The options for [SETUP] appear. 1 2 ( 2 7 ) 1 8 ( 3 4 ) T 0:00:02 DVD VIDEO QUICK QUICK CUSTOM RESET...

Operating Instructions
Page 90
... Setup Display. CUSTOM SETUP HDMI CONTROL: STB SYNCHRO: PAUSE MODE: TRACK SELECTION: MULTI-DISC RESUME: AUDIO DRC: AUDIO (HDMI): OFF OFF AUTO OFF ON OFF OFF x [HDMI CONTROL] Switches the HDMI CONTROL function on this function, see the HDMI CONTROL Guide (supplied separately). [OFF] [ON] Sets the HDMI CONTROL function to off. 90US For details, see the HDMI CONTROL Guide (supplied separately). [OFF] Sets the STB SYNCHRO function to off. For details on or off. For details on . The default settings are connected with the HDMI cord. Sets...
... Setup Display. CUSTOM SETUP HDMI CONTROL: STB SYNCHRO: PAUSE MODE: TRACK SELECTION: MULTI-DISC RESUME: AUDIO DRC: AUDIO (HDMI): OFF OFF AUTO OFF ON OFF OFF x [HDMI CONTROL] Switches the HDMI CONTROL function on this function, see the HDMI CONTROL Guide (supplied separately). [OFF] [ON] Sets the HDMI CONTROL function to off. 90US For details, see the HDMI CONTROL Guide (supplied separately). [OFF] Sets the STB SYNCHRO function to off. For details on or off. For details on . The default settings are connected with the HDMI cord. Sets...

Operating Instructions
Page 92
... adjust the level and the balance of the speakers and their distance from your listening position. When you perform the Quick Setup (page 24), the default settings are underlined. SPEAKER SETUP CONNECTION: DISTANCE(FRONT): DISTANCE(SURROUND): LEVEL(FRONT): LEVEL(SURROUND): TEST TONE: OFF FRONT: YES CENTER: YES SURROUND: YES SUBWOOFER: YES To return to [STANDARD]. x [CONNECTION] If you cannot change them. [FRONT] [YES] [CENTER] [YES]: Normally select this. [NONE]: Select this if no center speaker is used . [SUBWOOFER...
... adjust the level and the balance of the speakers and their distance from your listening position. When you perform the Quick Setup (page 24), the default settings are underlined. SPEAKER SETUP CONNECTION: DISTANCE(FRONT): DISTANCE(SURROUND): LEVEL(FRONT): LEVEL(SURROUND): TEST TONE: OFF FRONT: YES CENTER: YES SURROUND: YES SUBWOOFER: YES To return to [STANDARD]. x [CONNECTION] If you cannot change them. [FRONT] [YES] [CENTER] [YES]: Normally select this. [NONE]: Select this if no center speaker is used . [SUBWOOFER...
Operating Instructions
Page 98
... playing a Dolby Digital, DTS, or MPEG audio sound track. • Make sure the sound field function is too weak (when tuning in the front panel display. It does not indicate the speakers which output sound (page 42, 82). Use direct tuning. • No stations have been preset or the preset stations have the extension ".MP3." • The data is not formatted in an MP3 format that conforms to UDF (Universal Disk Format). The disc does not play...
... playing a Dolby Digital, DTS, or MPEG audio sound track. • Make sure the sound field function is too weak (when tuning in the front panel display. It does not indicate the speakers which output sound (page 42, 82). Use direct tuning. • No stations have been preset or the preset stations have the extension ".MP3." • The data is not formatted in an MP3 format that conforms to UDF (Universal Disk Format). The disc does not play...
Operating Instructions
Page 103
... signals are recorded separately for astounding sound performance. This is needed). Digital Cinema Auto Calibration Digital Cinema Auto Calibration was developed by Sony to automatically measure and adjusts the speaker settings to a strategically located subwoofer for superior channel separation. Unpacking • Front speakers (2) • Center speaker (1) • Surround speakers (2) • Subwoofer (1) • AM loop antenna (aerial) (1) • FM wire antenna (aerial) (1) • Speaker cords (6, red/white/green/gray/blue/purple) • Video Cord (1) • Remote...
... signals are recorded separately for astounding sound performance. This is needed). Digital Cinema Auto Calibration Digital Cinema Auto Calibration was developed by Sony to automatically measure and adjusts the speaker settings to a strategically located subwoofer for superior channel separation. Unpacking • Front speakers (2) • Center speaker (1) • Surround speakers (2) • Subwoofer (1) • AM loop antenna (aerial) (1) • FM wire antenna (aerial) (1) • Speaker cords (6, red/white/green/gray/blue/purple) • Video Cord (1) • Remote...
Operating Instructions
Page 116
... 7 Multi-angle function 56, 105 MULTI-DISC RESUME 91 Multilingual function 105 Multiplex broadcast sound 44 MUTING 38 N Naming preset stations 66 Neural Surround 105 O OPTICAL (Digital Out) 35 ORIGINAL 54 OSD 88 Other component connection 34 P PARENTAL CONTROL 80 Parental Control 105 PAUSE MODE 91 PBC Playback 64 PCM (Pulse Code Modulation) 105 PICTURE NAVI 47, 61 PLAY LIST 54 Playback Control (PBC) 105 Program Play 48 PROGRESSIVE 33 Progressive format 32, 105 Q Quick Setup...
... 7 Multi-angle function 56, 105 MULTI-DISC RESUME 91 Multilingual function 105 Multiplex broadcast sound 44 MUTING 38 N Naming preset stations 66 Neural Surround 105 O OPTICAL (Digital Out) 35 ORIGINAL 54 OSD 88 Other component connection 34 P PARENTAL CONTROL 80 Parental Control 105 PAUSE MODE 91 PBC Playback 64 PCM (Pulse Code Modulation) 105 PICTURE NAVI 47, 61 PLAY LIST 54 Playback Control (PBC) 105 Program Play 48 PROGRESSIVE 33 Progressive format 32, 105 Q Quick Setup...


