
Operating Instructions
Page 13
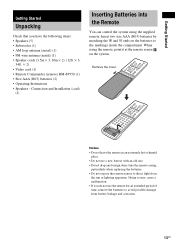
.... Insert two size AAA (R03) batteries by matching the 3 and # ends on the system. Doing so may cause a malfunction. • If you have the following items: • Speakers (5) • Subwoofer (1) • AM loop antenna (aerial) (1) • FM wire antenna (aerial) (1) • Speaker cords (3.5m × 3, 10m × 2) (12ft. × 3, 34ft. × 2) • Video cord...
.... Insert two size AAA (R03) batteries by matching the 3 and # ends on the system. Doing so may cause a malfunction. • If you have the following items: • Speakers (5) • Subwoofer (1) • AM loop antenna (aerial) (1) • FM wire antenna (aerial) (1) • Speaker cords (3.5m × 3, 10m × 2) (12ft. × 3, 34ft. × 2) • Video cord...
Operating Instructions
Page 18
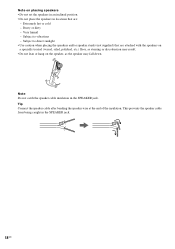
..., etc.) floor, as the speaker may fall down. Subject to direct sunlight • Use caution when placing the speakers and/or speaker stands (not supplied) that are : - Extremely hot or cold - Tip Connect the speaker cable after bending the speaker wire at the end of the insulation.... Note Do not catch the speaker cable insulation in the SPEAKER jack. 18US Subject to vibrations...
..., etc.) floor, as the speaker may fall down. Subject to direct sunlight • Use caution when placing the speakers and/or speaker stands (not supplied) that are : - Extremely hot or cold - Tip Connect the speaker cable after bending the speaker wire at the end of the insulation.... Note Do not catch the speaker cable insulation in the SPEAKER jack. 18US Subject to vibrations...
Operating Instructions
Page 19
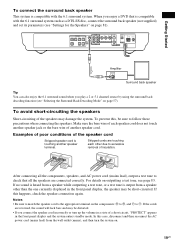
...Getting Started To connect the surround back speaker This system is output from a speaker other due to excessive removal of insulation. When you enjoy a DVD that all the components, speakers, and AC power cord (mains lead), output a test tone to #. Make sure the bare wire of each other than the one ...currently displayed in the front panel display and the system enters standby mode. For details on ...
...Getting Started To connect the surround back speaker This system is output from a speaker other due to excessive removal of insulation. When you enjoy a DVD that all the components, speakers, and AC power cord (mains lead), output a test tone to #. Make sure the bare wire of each other than the one ...currently displayed in the front panel display and the system enters standby mode. For details on ...

Operating Instructions
Page 20
... Notes • Be careful not to damage the surface you can use (desk, etc.) when attaching/detaching the speaker cords. • When using the subwoofer cord, note that the cord marked with letters are negative. (-) (-) (+)... in the front panel display and the system enters standby mode. To change the speaker cables If you want to use a different speaker cable, you use any commercially sold speaker cable of gauge cord AWG #18 ..." appears in .) of its insulation and twist the bare wires of both cords. 20US 10 mm Tips • You can detach the plug for attachment to another ...
... Notes • Be careful not to damage the surface you can use (desk, etc.) when attaching/detaching the speaker cords. • When using the subwoofer cord, note that the cord marked with letters are negative. (-) (-) (+)... in the front panel display and the system enters standby mode. To change the speaker cables If you want to use a different speaker cable, you use any commercially sold speaker cable of gauge cord AWG #18 ..." appears in .) of its insulation and twist the bare wires of both cords. 20US 10 mm Tips • You can detach the plug for attachment to another ...

Operating Instructions
Page 21
Terminals for listening to fully extend the FM wire antenna (aerial). • After connecting the FM wire antenna (aerial), keep the AM loop antenna (aerial) away from the system and other components. • Be sure to the radio. Getting Started Step 2: Antenna (aerial) Hookups Connect the ...(aerials) Connect the AM loop antenna (aerial) FM wire antenna (aerial) To the AM terminals FM 75Ω COAXIAL jack AM loop antenna (aerial) SPEAKER FRONT R CENTER FRONT L WOOFER R VIDEO AUDIO IN Y L PB/CB PR/CR S VIDEO (DVD ONLY) OPTICAL DIGITAL IN SURR R SURROUND BACK R AUDIO...
Terminals for listening to fully extend the FM wire antenna (aerial). • After connecting the FM wire antenna (aerial), keep the AM loop antenna (aerial) away from the system and other components. • Be sure to the radio. Getting Started Step 2: Antenna (aerial) Hookups Connect the ...(aerials) Connect the AM loop antenna (aerial) FM wire antenna (aerial) To the AM terminals FM 75Ω COAXIAL jack AM loop antenna (aerial) SPEAKER FRONT R CENTER FRONT L WOOFER R VIDEO AUDIO IN Y L PB/CB PR/CR S VIDEO (DVD ONLY) OPTICAL DIGITAL IN SURR R SURROUND BACK R AUDIO...


